Little Home Mini Album

Hi everyone! I’m back with a quick little little album I created a couple of months ago. I had received the Shadow Box Frames Set 2 Thinlits and if you know me I can’t just make what the dies are intended to be used for. When I created this I didn’t do any step out photos because I wasn’t even sure I could make it work. I did create another album with steps last month. If you would like to take a look at that post it can be found HERE.

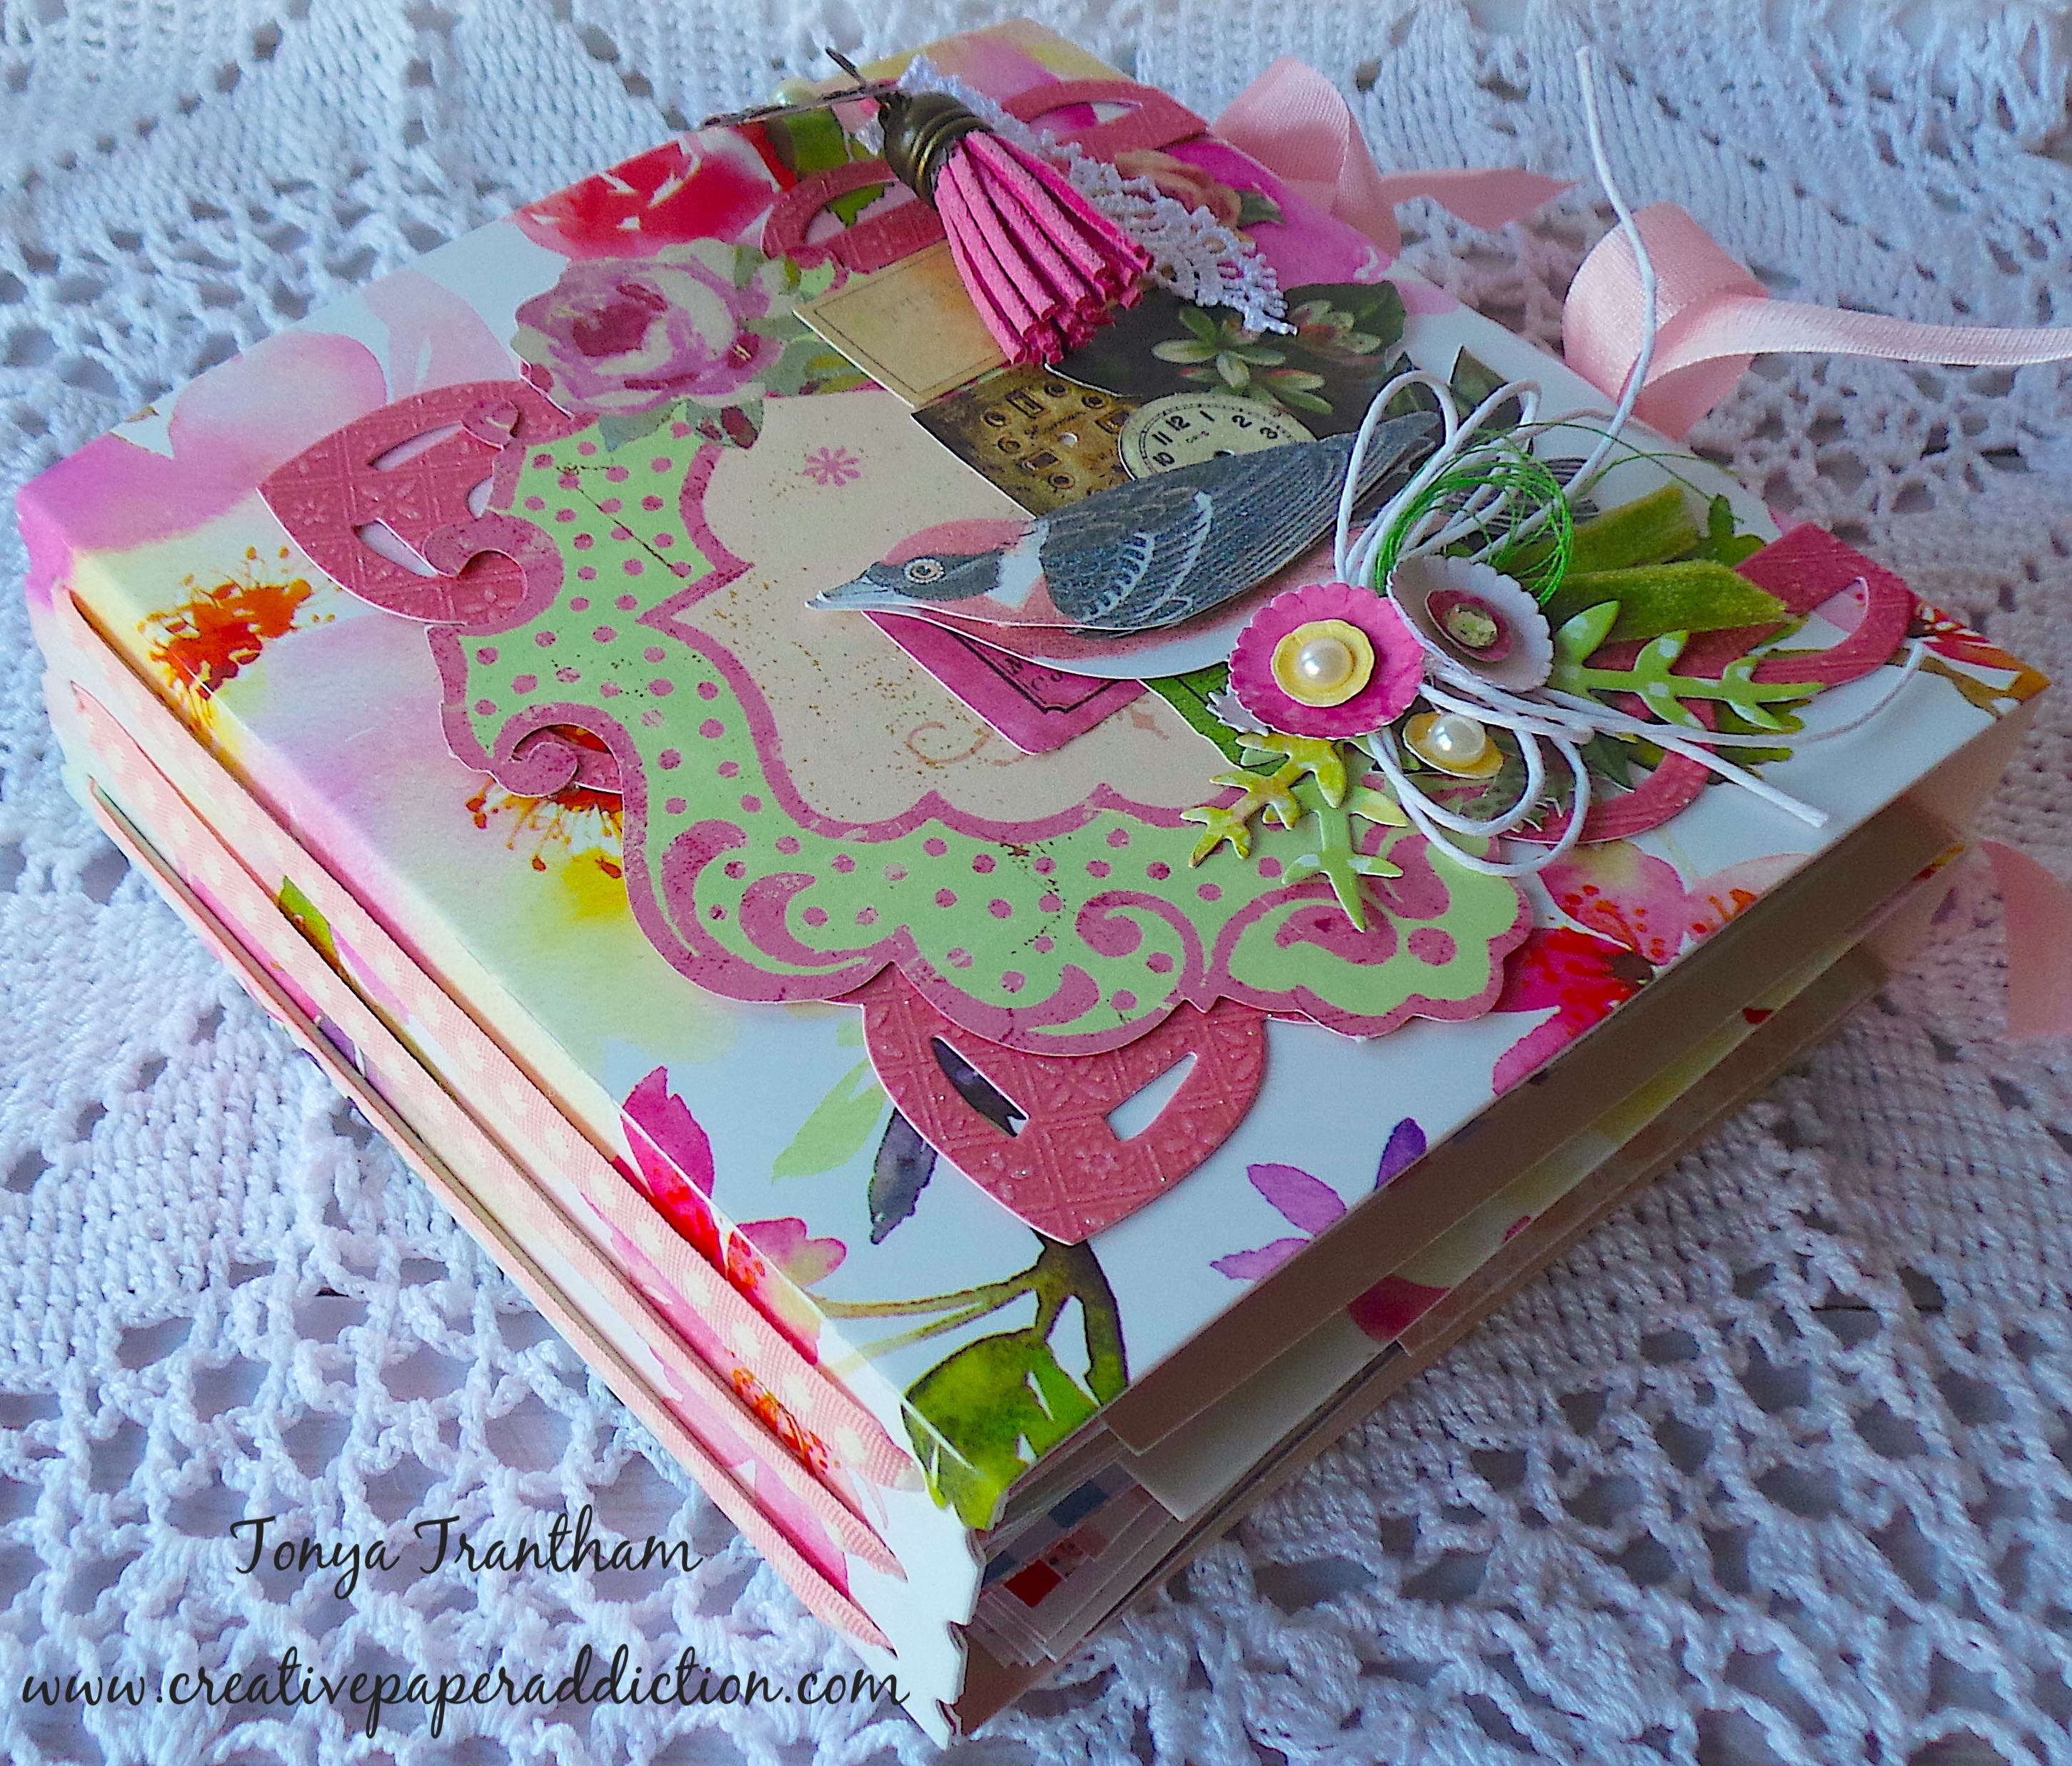
I used the Carousel 6″x8″ Paper Pad for the cover. As well as some of the scraps from this pad where used for the inside pages and embellishments.

I cut out four of the smaller “frames”, folded the flaps (to the inside) and glued both flaps together to create a pocket for the front and back of the cover. The larger flaps I glued together to create the spine for the mini album. I punched holes, added eyelets and strung elastic cording through the holes and tied off inside.

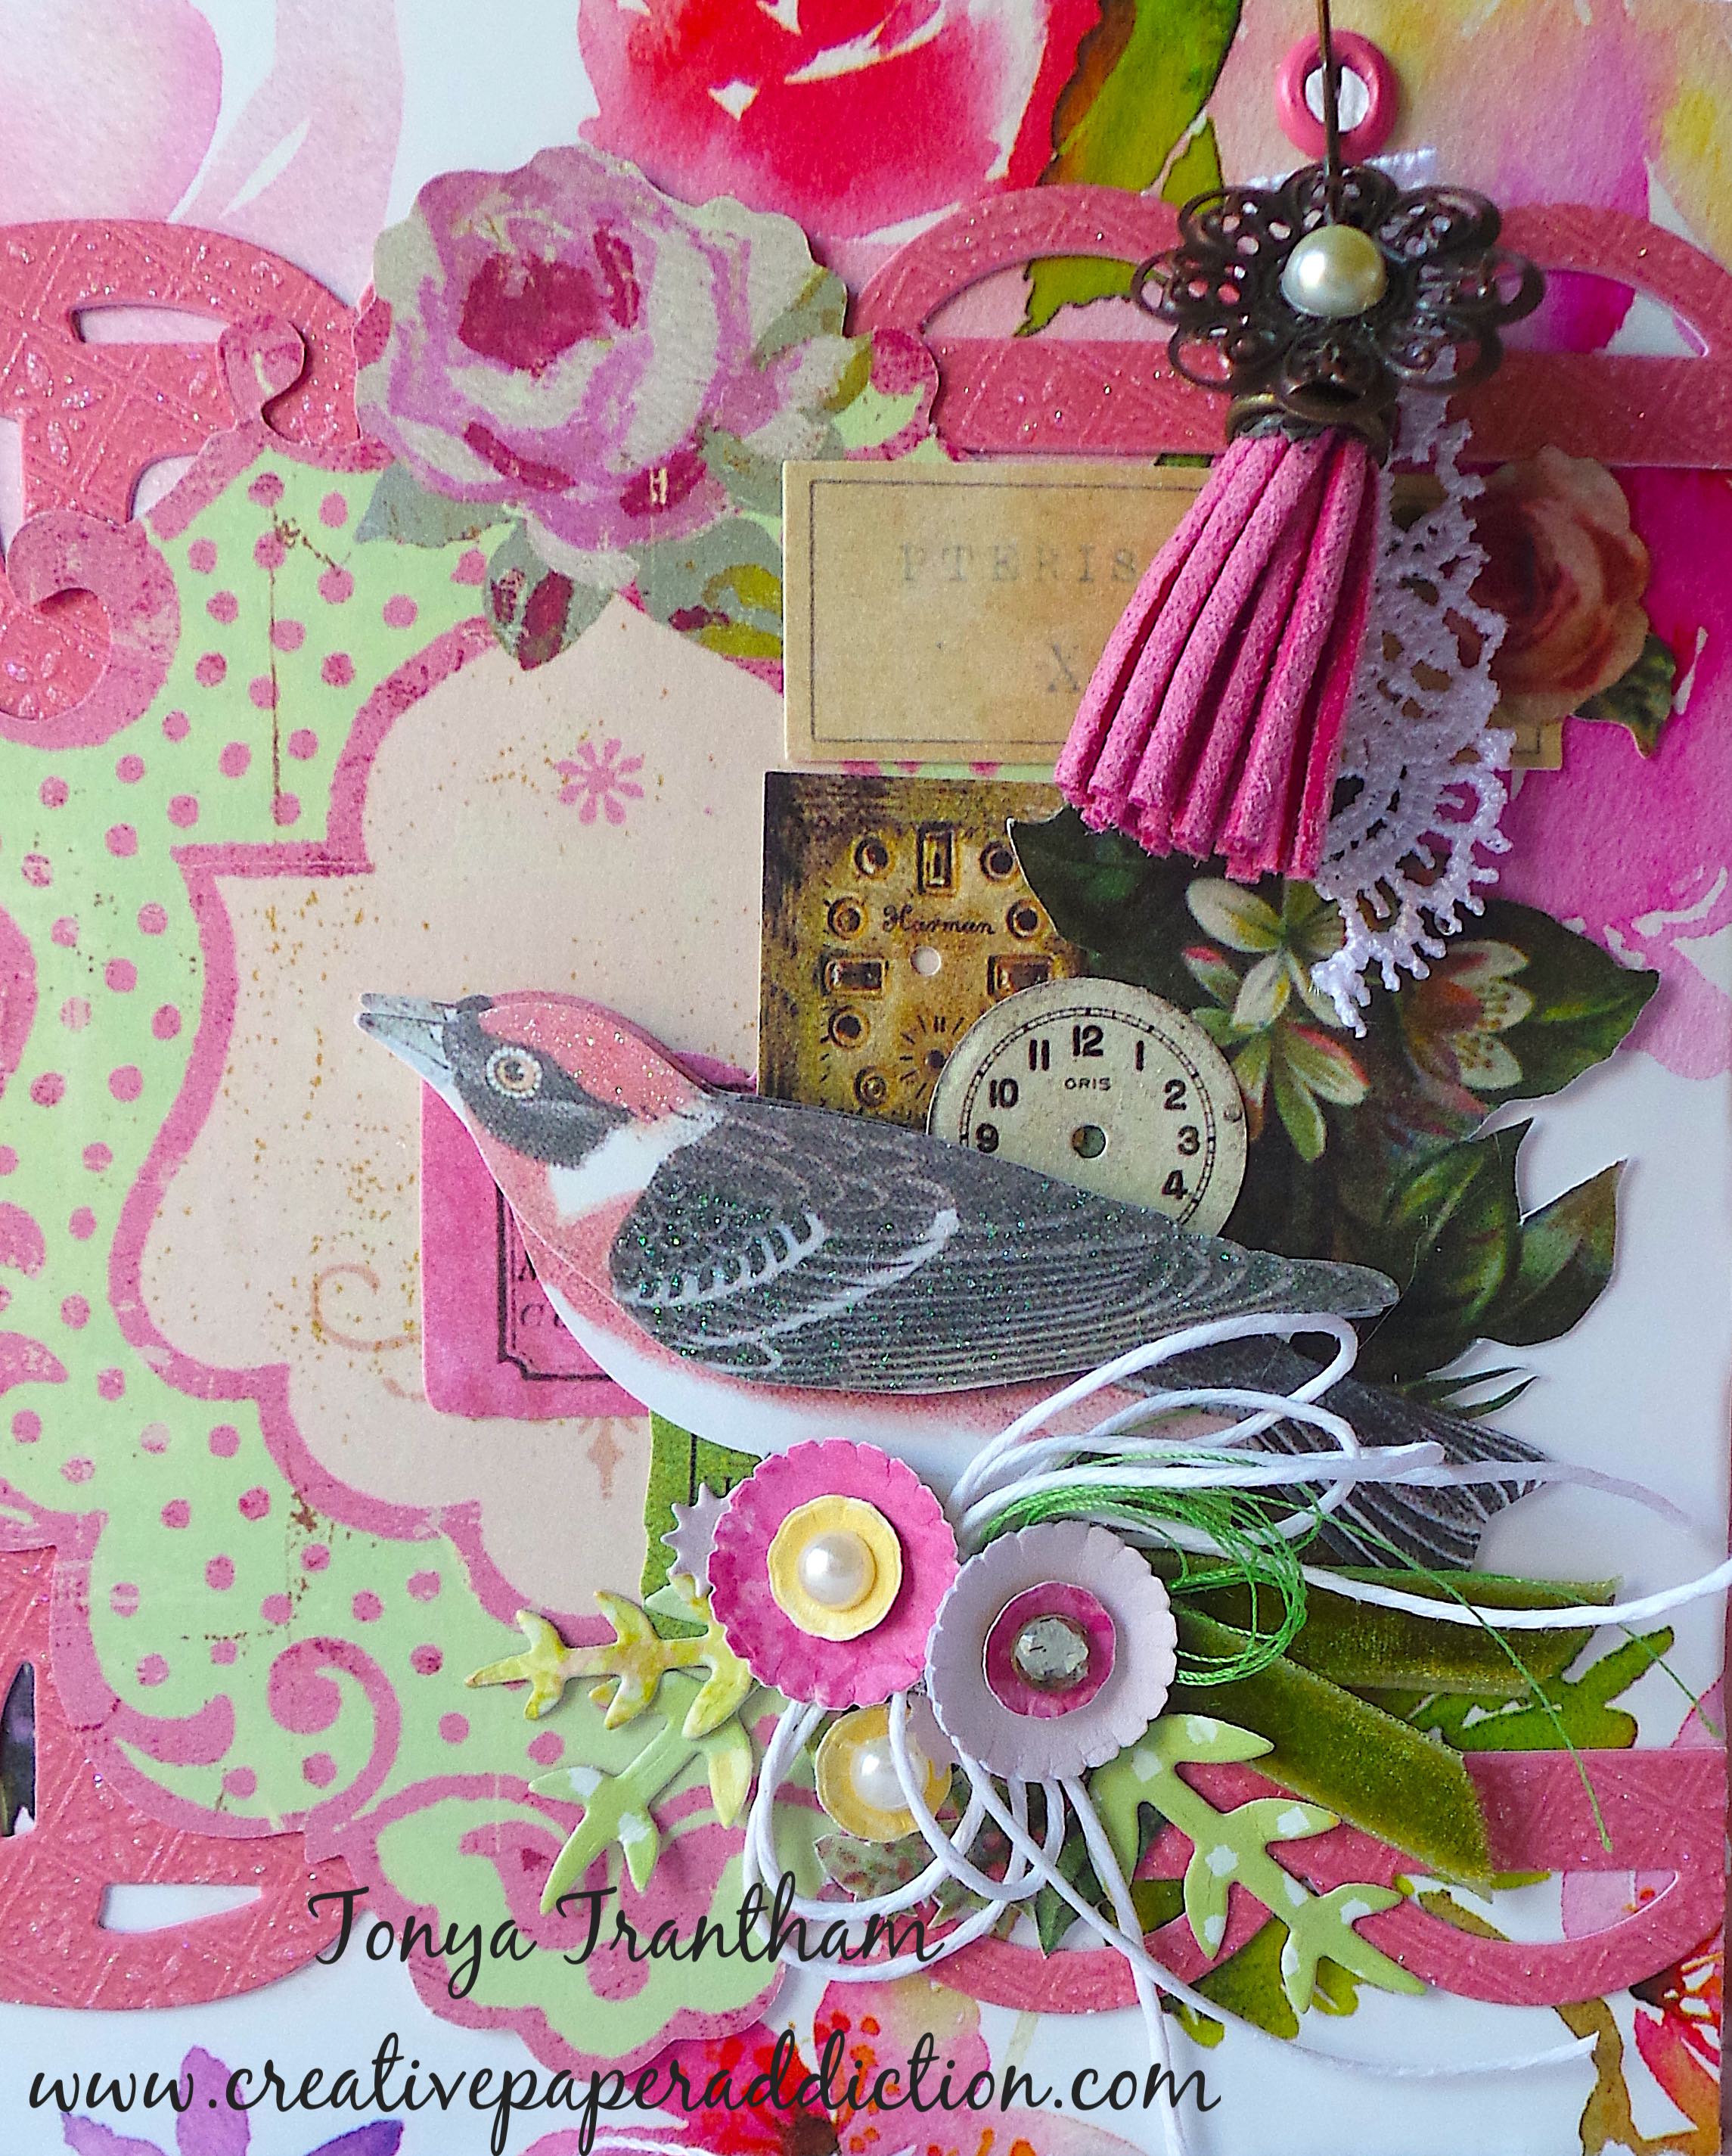
I decorated the cover with and assortment of thinlits and one diecut which included: Shadow Box Elements, Snail Mail, Folio Page, Pocket and Flowers and Scallop Border Movers and Shapers Diecut (retired). Also I used the scalloped die to create the “roof” for the cover of the album. I side note I did cut out several houses, flowers, vines and leaves from all the little bits of scraps of cardstock I had laying around. I figured if I didn’t use it all on this project I would eventually use it on something else.

I did cut out two tags for each cover pocket. I added a Tag reinforcer (Waterfall Card and Tag Thinlits) to the top each tag along with a bit of seam binding.

The inside pages I cut and placed under the elastic cording and proceeded to decorate with the extra houses, flowers, leaves, etc, thinlits that I had cut out a head of time.

I forgot to added I also cut several leaf sprigs from the Wreath and Snowflake Thinlits and used through album.

If you haven’t checked out Eileen Hull’s blog lately, the theme this month is all about using those little scraps of cardstock! You can find those posts HERE, HERE and HERE.

Supplies

Sizzix/Eileen Hull: Shadow Box Frames Set 2 Thinlits

Sizzix/Eileen Hull: Shadow Box Elements Thinlits

Sizzix/Eileen Hull: Snail Mail Thinlits

Sizzix/Eileen Hull: Folio Page, Pocket and Flowers Thinlits

Sizzix/Eileen Hull: Waterfall Card and Tag Thinlits

Sizzix/Eileen Hull: Wreath and Snowflake Thinlits

Sizzix/Eileen Hull: Scallop Border Movers and Shapers Diecut (retired)

Maggie Holmes: Carousel 6″x8″ Paper Pad

Diecut Machine

Paper Cutter

Scissors

Stylus

Eyelets

Crop-A-Dile

Scraps of Cardstock

Elastic Cording

Gems, Lace and Seaming Binding

Beacon Adhesives: Zip Dry Adhesive

(Products listed above are Affiliated Links for your convenience)

DISCLAIMERS

This blog is compensated to provide opinion on products, services, websites, and various other topics. Even though the owner(s) of this blog receives compensation for our posts or advertisements. I always give my honest opinions, findings, beliefs, or experiences on those topics or products. The views and opinions expressed on this blog are purely my own. Any product claim, statistic, quote or other representation about a product or service should be verified with each manufacturer, provider, or party in question.This blog contains affiliate links, clicking and shopping through these links helps to support and run Tonya Trantham Designs – Creative Paper Addiction at no additional cost to you. Today’s features are Sizzix. Eileen Hull and Scrapbook.com Products. 

Thanks for stopping by, hope your Thursday is awesome and enjoy creating!

Chapter 1 Eileen Hull Release Party and Sneak Peek!

Hi there and welcome to the Chapter 1 Eileen Hull/Sizzix Release Party Blog Hop! Just wait till you see all of the fun options the new ScoreBoards Folio Journal die has in store for you! You will also love the Mandala and Folio Page, Pockets and Flower Thinlits dies that coordinate. 
Please hop through the blogs and be inspired by the work of the talented Inspiration and Educator teams! Leave a comment for each designer and you could win a Folio Journal die (as soon as it arrives!) Join me and specials guests for a Facebook Live on Wednesday, Feb. 3 at noon Eastern. Comment on our Facebook Live and be eligible to win either the Mandela die or the Folio Pages, Pockets and Flowers die- two winners! Winners will be announced on the Facebook Live show on February 9 at 6:00 EST. We appreciate your love and support, friends!

I’m so excited about all of the new diecuts from this release and I can’t wait to share a sneak peek of my journal with you. For this project I used the Folio Journal Diecut and the flowers from the Folio Page Pocket and Flower Thinlits to create the cover.

I cut the journal from an extra thick file folder (love the floral design on the folder).

I cut two covers from the diecut and adhered the spine together.

I used an assortment of ephemera, craft supplies from my craft room (it’s a no spend month until my husband goes back to work) and the flowers thinlits from the Folio Page Pocket and Flower Thinlits to decorate the cover of the journal. Later this month I will share the inside of the journal so be sure to stop back by!

Be sure to stop by the other team members blogs to see what they have created and comment on each blog for a changes to win the newest Chapter One Diecuts by Eileen Hull!

Eileen Hull

Julia Aston

Madeline Arendt

Jennie Atkinson

Karen Bearse

Susie Madden Benz

Sarah Lizzie Dodd

Sue Eldred

Maggi Harding

Lisa Hoel

Jenny Marples

Elizabeth Robinson

Tonya Trantham—You Are HERE

Supplies

Sizzix/Eileen Hull: Folio Journal Diecut

Sizzix/Eileen Hull: Folio Page Pocket and Flower Thinlits

Diecut Machine

Beacon Adhesive: Zip Dry Adhesive

Scissors

Paper Cutter

File Folder

Ephemera, Ribbon, Seam Binding, Thread, Charms and Etc.

(Products listed above are Affiliated Links for your convenience)

DISCLAIMERS

This blog is compensated to provide opinion on products, services, websites, and various other topics. Even though the owner(s) of this blog receives compensation for our posts or advertisements. I always give my honest opinions, findings, beliefs, or experiences on those topics or products. The views and opinions expressed on this blog are purely my own. Any product claim, statistic, quote or other representation about a product or service should be verified with each manufacturer, provider, or party in question.This blog contains affiliate links, clicking and shopping through these links helps to support and run Tonya Trantham Designs – Creative Paper Addiction at no additional cost to you. Today’s features are (Sizzix, Eileen Hull and Scrapbook.com Products. 

Thanks for stopping by, hope your Wednesday is wonderful and enjoy creating!

From this Day Forward Wedding Tag

Hi everyone! I’m back with a tag I created in honor of my son and daughter in law’s wedding anniversary that is today. I had these photos laying around and I thought why not create something with them and this is what I came up with.
I started by placing a Size #10 Tag (upper half) in the Floral Tapestry Embossing Folder and placed  between two cutting plates and run through the Diecut Machine. I removed and place lower half of tag in the Floral Tapestry Embossing Folder and completed the same steps. I inked two Art Daubers with Leaf and Frog Blends 2 Inks and inked over the leaves and vines of the embossed areas on the tag. Next I inked three Art Daubers with TutuWildberry and Melon Blends 2 Ink and inked over the flowers of the embossed areas on the tag.


I placed the Geometrics Art Screen on top of tag, loaded two art daubers with Tutu and Melon and randomly ink areas of art screen and once I achieved the desired effect I removed the art screen. I inked the glass tray with Coconut Blends 2 Ink, added water to ink, loaded a Paint Brush with ink mixture and splattered the tag.


I cut two photos to fit the tag. I adhered the first photo slightly off the side of tag. The second photo I cut a piece of textured white cardstock slightly larger than the photo an inked an art dauber with Melon Blends 2 Ink and inked the edges of cardstock and then adhered the photo to the mat. I added Foam Pop Dots to back of photo and placed slightly off other side of tag.


I placed a scrap of white cardstock on top of the Journaling Cards, Flowers and a piece of Crinoline Fabric on top of the Leaves Diecuts and run through the diecut machine. I shaped two flowers diecuts with a Stylus and adhered together and added two sequins and a gem to center of the flower.

Next I inked an art dauber with Frog Blends 2 Ink and inked the fabric leaf. Once dry I adhered to back of flower and added to the bottom of the photo.

I looped several threads to create two messy bows and adhered one under the flower diecut and other under the smaller photo along with a few pearl sprays.

 I finished the tag by cutting two nine inch pieces of seam binding and tying into a bow at the top of tag. As always if you have questions about this project please let me know.

Supplies

ColorBox/Eileen Hull: Tutu Blends 2 Ink
ColorBox/Eileen Hull: Wildberry Blends 2 Ink
ColorBox/Eileen Hull: Melon Blends 2 Ink
ColorBox/Eileen Hull: Leaf Blends 2 Ink
ColorBox/Eileen Hull: Frog Blends 2 Ink
ColorBox/Eileen Hull: Coconut Blends 2 Ink
ColorBox: Art Daubers
Sizzix/Brenda Walton: Floral Tapestry Embossing Folder
Glass Tray 
Seam Binding
Pearl Sprays
Sequins
Gem
Thread
Beacon Adhesive: Zip Dry Adhesive
Crinoline Fabric

(Products listed above are Affiliated Links for your convenience)

Thanks for stopping by, hope your Thursday is great and enjoy creating!

Father’s Day Mustache Container

Hi everyone! I am back again today with a quick and easy Father’s Day project that I created using Blends 2 Inks, rubber stamp and a art screen! All you need is an empty container of your choice. 

I started by cleaning a container inside and out. I used an empty M and M container that I have received around Christmas. I also remove the labels on the outside and I used a little Goo Be Gone to get the sticky residue off. I placed Watercolor Paper on top of the Rectangle Border Diecut and placed in between cutting plates and run through the Diecut Machine. I cut out two diecuts to cover the front and back. I placed the lid from the container on top of watercolor paper and traced with a pencil onto the watercolor paper. Next I placed the Disco Art Screen 1 on top of rectangle diecut and loaded an Art Dauber with Beach Blends 2 Ink and applied over the art screen. I loaded another art dauber with Uniform Blends 2 Ink and apply lightly over screen. I completed the same steps for other rectangle diecut and lid and I inked around the edges of both diecuts and circle with Hydrangea Blends 2 Ink

I adhered both diecuts to container and circle to the top of lid.

I inked the Mustaches Wood Stamp with Wicked Black Archival Dye Ink and stamped onto White Cardstock  
I cut around the stamped image with a Paper Cutter  and inked an art dauber with Uniform Blends 2 Ink and ink edges of mustache tag. 

I adhered the stamped image to the corner edge of the diecut that is on the container. I made a bow from red seam binding and adhered to the diecut and mustache tag. And last but not least I filled it with yummy snack bars and candy. As always if you have questions about this project please let me know.

SUPPLIES

ColorBox/Eileen Hull: Hydrangea Blends 2 Ink
ColorBox/Eileen Hull: Beach Blends 2 Ink
ColorBox/Eileen Hull: Uniform Blends 2 Ink
ColorBox: Art Daubers
Beacon Adhesive: Zip Dry Adhesive
Red Seam Binding
Empty Container
Pencil

(Products listed above are Affiliated Links for your convenience)

Thanks for stopping by, hope your Friday is awesome and enjoy creating!

Littlest Mermaid in the Sea Tag

Hi everyone! I am back again (third time this week) with another project I created for ColorBox. I absolutely LOVE how this tag turned out! It has me in the mood for a day at the beach! So lets get started!

I started by spritzing a glass tray with Cirtus Tickle Smooch Spritz, adding water and laying the tag into the ink mixture. I removed the tag once completely covered and let dry. Next I inked the glass tray with Caribbean Dyestress Blendable Dye Ink, added water, loaded a paint with ink mixture and apply to tag. Once dry I placed the Swirl Dot Art Screen on top of tag and inked an Art Dauber with Tahiti Dyestress Blendable Dye Ink and applied the inked art dauber over the art screen. Once finished I remove the art screen. I inked and art dauber with Capri Dyestress Blendable Dye Ink and ink edges and over the surface of tag. Next I applied to the glass tray the following inks: Aster and Cabernet Dyestress Blendable Dye Ink. I loaded a paint brush with the ink mixtures and splattered the tag and let dry. Side note…set glass tray aside with ink mixture for further use. Second side note…while I tried to link all products, such as the new line of inks, I didn’t find all but will try and update as they come available.

I inked the Mimi Mermaid Rubber Stamp with Wicked Black Archival Dye Ink and stamp onto a piece of Watercolor Paper with the MISTI Stamping Tool. I placed watercolor paper onto the middle Delightful Circle Diecut. Place between two plated and run through Diecut Machine. I cut a 3 7/8″x1 3/4″ and a 2 1/2″x1″ pieces of watercolor paper and placed both in the Tides Embossing Folder. I placed between plates and run through diecut machine. Now I’m ready to  paint/watercolor everything.
I placed the Delightful Circle Diecut into the set aside Aster Dyestress Blendable Dye Ink and cover completely with ink mixture, removed and let dry. I watercolored the Sea Horse image’s body with Cabernet Dyestress Blendable Dye Ink and then cleaned the glass tray. 
I inked the glass tray with the following inks: Princess, Caribbean, Tahiti, Tomato, Bumble Bee, Capri and Mint Dyestress Blendable Dye Inks and I added a small amount of water to each ink. I placed the 3 7/8″x 1 3/4″ embossed piece of watercolor paper into the Capri Dyestress Blendable Dye Ink and once completely covered remove and let dry.

Next I placed the 2 1/2″x 1″ embossed piece of watercolor paper into the Mint Dyestress Blendable Dye Ink and once completely covered I removed and let dry. For the stamped Mermaid image I watercolored with the following inks: Face, arms and upper body…Princess Dyestress Blendable Dye Ink. Lower body/tail…a mix of Caribbean and Tahiti Dyestress Blendable Dye Inks. Seashells and fin of sea horse…Mint Dyestress Blendable Dye Ink. Hair…a mix of Bumble Bee and Tomato Dyestress Blendable Dye Inks. Starfish…Tomato Dyestress Blendable Dye Ink. 

I fussy cut the mermaid and sea horse images out and added clear glitter glue to sea horse fin, seashells, tail and starfish on mermaid. I inked two art daubers, one with Mint and the other with Capri Dyestress Blendable Dye Inks and lightly ink edges of both embossed pieces of watercolor paper and circle diecut. I added foam pop dots to the back of the 3 7/8″x 1 3/4″ embossed pieces of watercolor paper and one side of the circle diecut and placed the embossed paper on top of the tag. I added a little glue to the other side of the circle diecut before laying on top of embossed paper. Next I adhered the 2 1/2″x1″ embossed paper on top of other embossed paper and circle diecut. I adhered the mermaid image on top of all pieces.

I glued the sea horse to bottom corner of tag and added three gems next to the sea horse. Next I randomly adhere sequins to tag.

I finished the tag by cutting two 10 inch pieces of seam binding. I ran the seam binding through  the hole at the top of tag and tied a bow. As always if you have any questions about this project please let me know.

SUPPLIES USED:
ColorBox: Princess Dyestress Blendable Dye Ink
ColorBox: Art Dauber
ColorBox: Capri Dyestress Blendable Dye Ink
ColorBox: Mint Dyestress Blendable Dye Ink
ColorBox: Aster Dyestress Blendable Dye Ink
Tag
Beacon Adhesive: Zip Dry Adhesive
Glass Tray
Life Style Crafts: Tide Embossing Folders
Gems
Sequins
Seam Binding
Studio g: Clear Glitter Glue

Thanks for stopping by, hope your Friday is great and enjoy creating! 

I’ll be Home for Christmas Tag

Hi everyone! I’m back today with a quick tag I created for Christmas!


I started by inking a glass tray with Ebony and Coconut Blends and adding water to each ink. I placed the Tag into each ink mixture until the tag was completely covered with ink and once dry I inked a  Damask Cling Stamp with Pewter Ink and stamp onto the tag.


I inked a glass tray with Coconut Blends and add water and loaded a paint brush with the ink mixture, splattered the tag and let dry.


I cut the “I’ll be Home for Christmas” sentiment and fussy cut the truck with tree from the Farmhouse Christmas Stripe on Ivory Cardstock. A side note…push lid in onto the ink pads there will be ink transferred to the inside of the lid. You can paint from what is transferred onto the inside of the lid instead of loading a glass tray with ink. I painted the bed of the truck with Cattail Ink, the cab of the truck with Fruit Punch Ink, the wheel with Graphite Ink and the pine tree with a combination of Shamrock and Citronella Inks.


I inked the edges of the sentiment with Fruit Punch Ink and adhere to tag. I also cut one piece of patterned cardstock to cover the back of the tag, adhered and punch a hole in the top of the tag. Next I placed a piece of glitter cardstock on top of a Tear Drop Circle Diecut and sandwich between cutting pads and run through a diecut machine and adhered to the tag along with the truck. I added clear glitter glue to the pine tree tips in the truck. 


I tied off a 8″ piece of seam binding and 8″ piece of lace to the top of the tag and finished by adding a button on top of the lace and seam binding. As always if you have any questions about this project please let me know.


 Also I would like to submit this project for the following challenges:

Crafter’s Castle: Challenge #12
Simon Says: Wrap it Up 

Thanks for stopping by, hope your Thursday is awesome and enjoy creating!

ClearSnap: Be Fearless Tag

Hi everyone! I’m back with a very quick inspirational tag I created! 
I started by inking a glass tray with Jade Premium Ink, adding water and placing Tag  in ink mixture. Once I had the desired effect I wanted I removed and let dry. I placed the Printer’s Ornament Embossing Folder on both ends of the tag and run through the diecut machine. I inked the Be Fearless Rubber Stamp with Atmosphere Premium Ink and stamped the center of the tag.

I adhered grey lace on either side of the sentiment and add flat back pearls along the top of both pieces of lace. I punched a butterfly from patterned cardstock and adhere to the lace and added one flat back pearl to the center of the butterfly. I cut a 6 inch piece of seaming binding and tie to the top of the tag.
As always you have any questions about this project please let me know.
Thanks for stopping by, hope your Saturday is awesome and enjoy creating!

Eileen Hull: Pleather Wrapped Journal

Hi everyone! Can you believe it is already July?!?! I can’t! When I created this wrapped journal for Eileen Hull’s  booth at Creativation it was in January! If you haven’t seen my past blog posts from last month of this newest diecut from Eileen’s Book Club Chapter 2 Collection you can find those HERE, HERE and HERE.

The Wrapped Journal Diecut I used a piece of “pleather” (plastic that looks like leather) to create this journal. I cut to fit two a pieces of Kraft Paper Leather and adhered to the inside on both spines. I also cut a piece of lace to cover the spine where the booklets would be and glued with Fabri-Tac Adhesive. 

I strung elastic to hold the booklets and tied off inside of the journal. I punch a small hole on the smaller flap and added a decorative brad which I tied bright colored seam binding around the brad. On the inside I adhered lace on either side of the paper leather.

Since I used bright and cheery colors for my journal I went with a similar theme for the inside of the journal.

I used Paper Doll Diecuts through out the journal.

Since I am a hoarder of scrapbook paper, embellishments, etc. This year I have tried to incorporate more of my stash into what I am creating.

I think the little sayings and whimsical diecuts are from Crate Paper but not for sure? I had received those in a swap a few years back. But I think they are a perfect compliment to the paper dolls.

I used up a lot of scraps of cardstock by cutting out several tags from the Credit Card Sleeve and Tags  Diecuts.

I adhered only the lower part of the paper dolls to the page so I could add several tags behind them.

Be sure to stop by Eileen Hull’s blog and see what her Inspiration Team has been up to. You can find her blog HERE. As always if you have any questions about this project please let me know.

Also I would like to submit this project for the following challenges:
Mini Album Challenge: July
Cut It Up: Challenge #151

Thanks for stopping by, hope your Wednesday is wonderful and enjoy creating!

Happy Moments Tag

Hi everyone and Happy first day of March! I am here to share a quick project I created using leftover Tattered Angels Glimmer and Simply Sheer Mists from another project that will be hopefully shared soon. 😉 

This is a great way to use up mists from previous projects. All I did was place the tag onto the glass tray and let the tag soak up the leftover sprays. The following Glimmer and Simply Sheer mists I used are: Rum Punch, Peony, Soft Peach and Gold. I made sure both side were placed in the mist and then I let dry. 


I used Crate Paper’s Bloom Paper Collection on this tag and the image of the girl and chicks I purchased a few years ago but I’m not sure the name of the company or the collection?
I added the happy moments cardstock off center along with bits of lace and ribbon to dress up the little girl and chicks.
The back of the tag more cardstock from the same collection was added and of course a tag wouldn’t be complete without a doily.

Before cutting the flower arch and flower from the Floral Arch and Words Diecuts I cut a piece of Adhesive Sheet big enough to cover the pieces of cardstocks and then I ran through the diecut machine. All you have to do is peel the backing off and place on your project…easy peasy! I finished off with the other chick diecuts and a small amount of pom pom trim.

 As always if you have any questions please let me know. Also I would like to submit this project for the following challenges:
Simon Says: In My Garden
Word Art Wednesday: Challenge #324-#325

Thanks for stopping by, hope your Thursday is awesome and enjoy creating!

24-7-365 Mini Album and Album Holder Sneak Peek

Hi everyone! I am back with another peek of Eileen Hull’s newest release Sizzix Book Club Collection which should be out around November/December. The best part is these diecuts are so VERSATILE! It consists of three score board dies and three sets of thinlits and these diecuts will work well with the Journal Diecut and the Passport Diecut. Each of these new diecuts can be used many ways…books, gift boxes, cards, organizations, etc. 
Here is a little sneak peek of one of my projects using the newest diecuts. 😀


Also if you haven’t picked up your copy of the newest ebook 
Stay tuned for more sneak peeks of Sizzix Book Club Collection!

Thanks for stopping by, hope your Tuesday is awesome and enjoy creating!