Making Plans Release Party with Eileen Hull

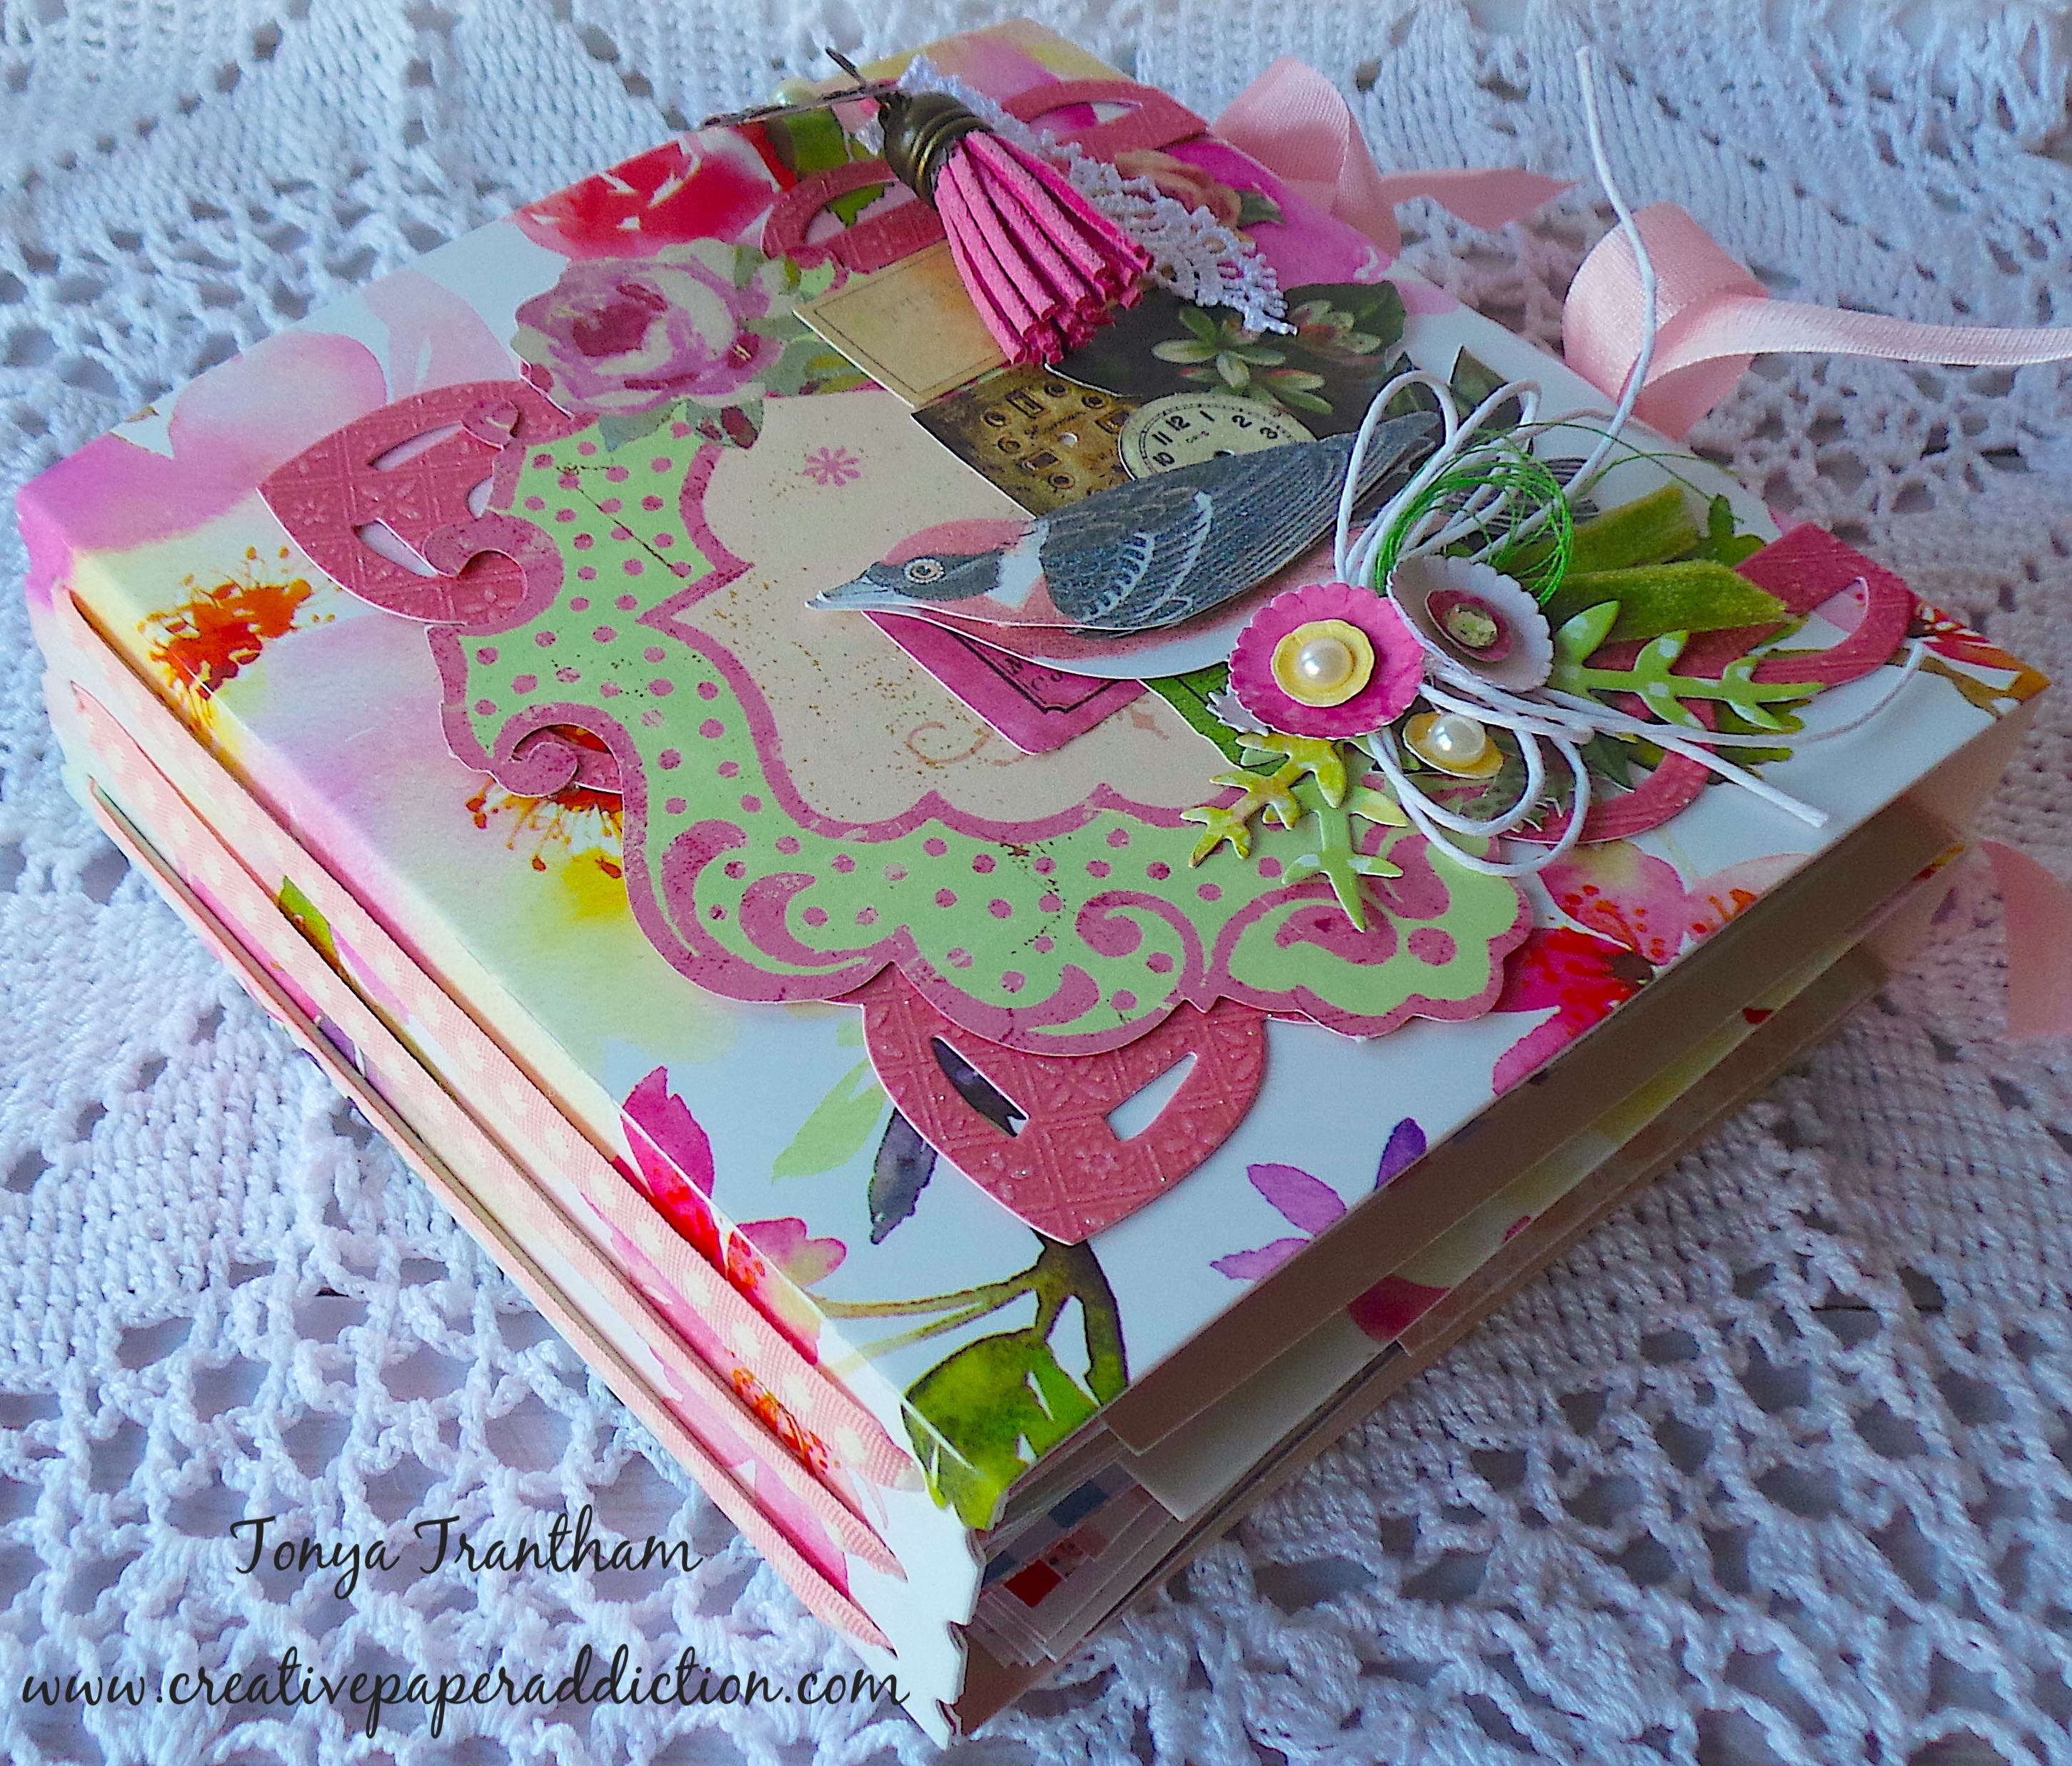
Hi everyone! I’m back with a project I created using Eileen Hull’s newest stamp set called Making Plans with Maker Forte! This set of stamps has so many possibilities! From cards, tags, journals and so much more! I used these stamps on the cover of an unfinished album from a tutorial that Eileen shared on one of her Facebook Lives. Anyways, let’s get started!

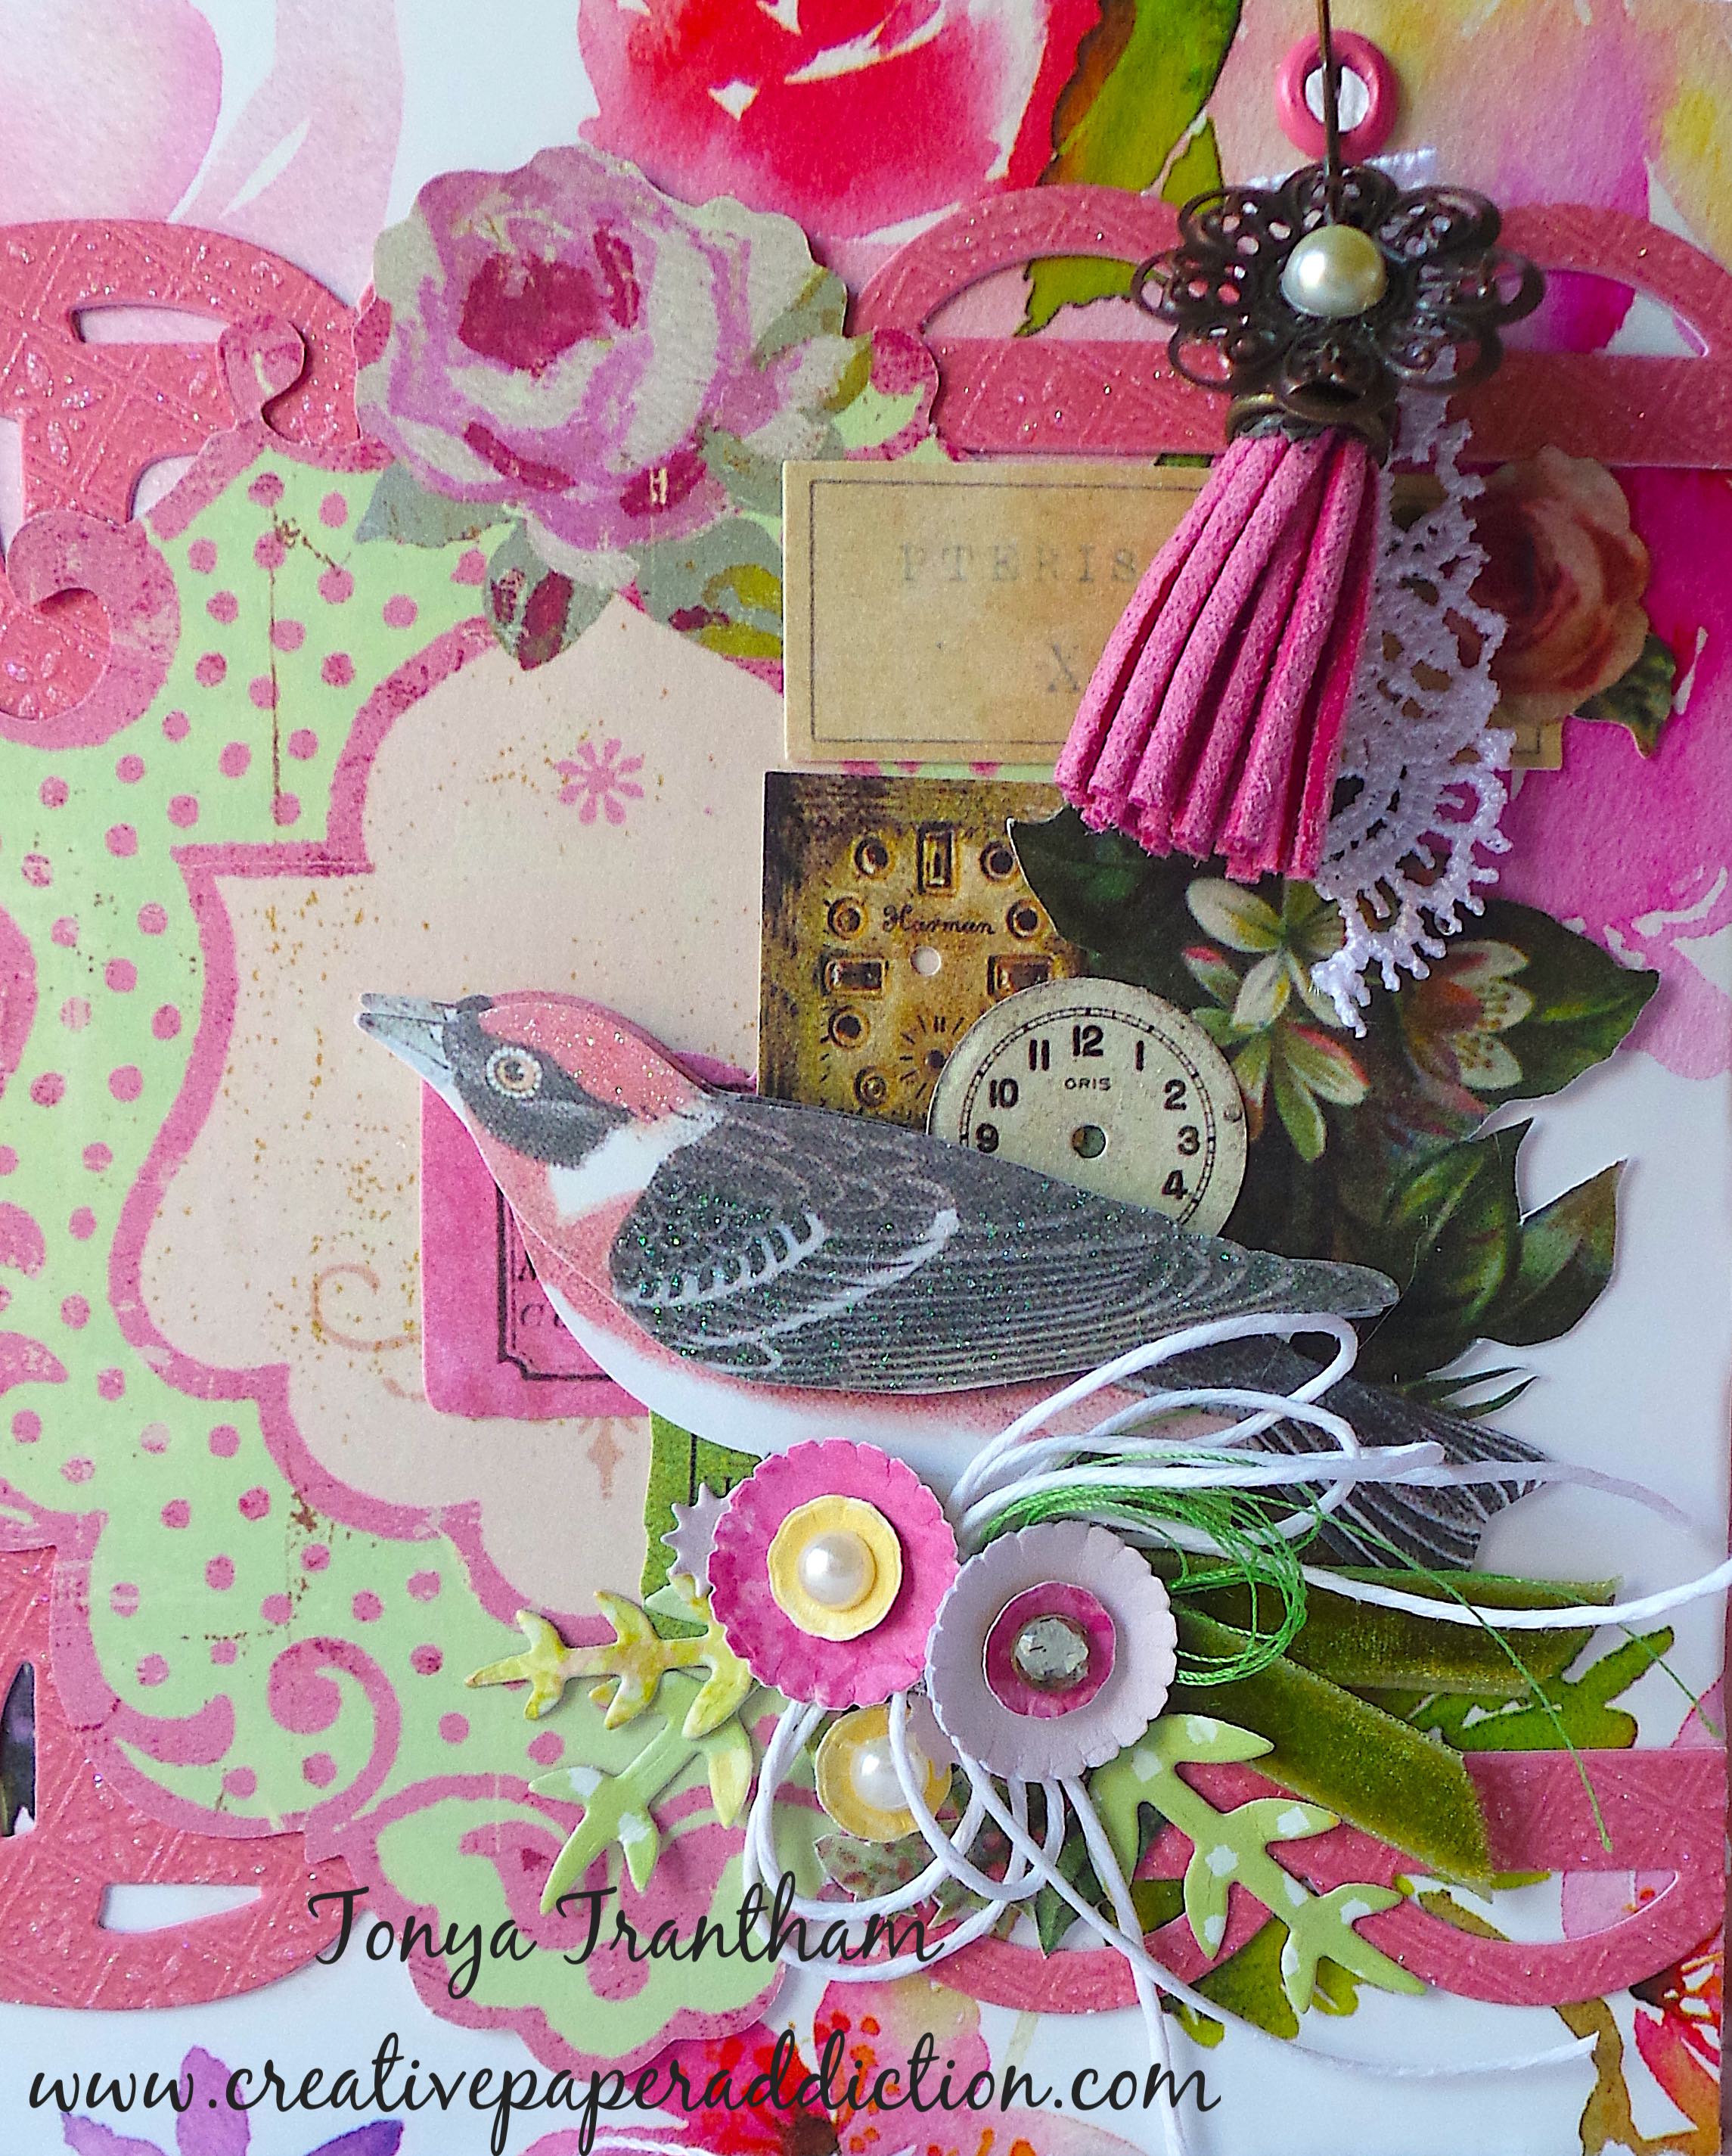
I placed an assortment of the label stamps onto the MISTI Stamping Tool, inked and stamped onto Cream Cardstock and various patterned scraps of cardstock. I also inked up the “dream a little” sentiment stamp and stamped onto one of the labels I had already stamped. I fussy cut all of the labels out and what I don’t use now will be used in finishing the inside…the plan is to do a part two blog post later…so stay tuned!

I also used an assortment of diecuts/thinlits to decorate the cover: Shadow Box Frames Set 02 Thinlits, Shadow Box Frames Set 01 Thinlits, Shadow Box Elements Thinlits, Mandala Thinlit, Folio Page Pocket and Flowers Thinlits and Full Size Journal Diecut. Can you spot the diecuts I used?

The label stamps are so fun to layer! I had a “partial” label diecut from the Extra Large Journal Diecut that I layered with a bookplate and the “dream a little” sentiment, used water splatter rub ons (49 and Market) and more label stamps along with several flowers, leaves gems and thread loops to finish the cover.

Be sure to stop by Eileen’s blog for more creativity from the Inspiration and Educator Teams and details on how you can purchase this stamp set. You can find the blog HERE.

Supplies

Maker Forte/Eileen Hull: Making Plans Stamp Set

Sizzix/Eileen Hull: Shadow Box Frames Set 02 Thinlits

Sizzix/Eileen Hull: Shadow Box Frames Set 01 Thinlits

Sizzix/Eileen Hull: Shadow Box Elements Thinlits

Sizzix/Eileen Hull: Mandala Thinlit

Sizzix/Eileen Hull: Folio Page Pocket and Flowers Thinlits

Sizzix/Eileen Hull: Full Size Journal Diecut

MISTI Stamping Tool

Brown Ink

Cream Cardstock

Various Patterned Cardstocks

Diecut Machine

Gems, Sequins, Thread

Stylus

Paper Cutter

Scissors

itKuPiLLiimaginarium: Bunny Boys Dolls Printables

Beacon Adhesives: Zip Dry Adhesive

(Products listed above are Affiliated Links for your convenience)

DISCLAIMERS

This blog is compensated to provide opinion on products, services, websites, and various other topics. Even though the owner(s) of this blog receives compensation for our posts or advertisements. I always give my honest opinions, findings, beliefs, or experiences on those topics or products. The views and opinions expressed on this blog are purely my own. Any product claim, statistic, quote or other representation about a product or service should be verified with each manufacturer, provider, or party in question.This blog contains affiliate links, clicking and shopping through these links helps to support and run Tonya Trantham Designs – Creative Paper Addiction at no additional cost to you. Today’s features are Makers Forte, Eileen Hull, Sizzix and Scrapbook.com Products. 

Thanks for stopping by, hope your Tuesday is wonderful and enjoy creating!

Making a House a Home

Hi everyone! I’m back with the full reveal of my Eileen Hull project that I shared a sneak peek of at the beginning of the month. I used an empty ribbon spool as a jumping off point too create a little home decor piece.

The first thing I did was cut two circles in patterned cardstock from the Ornament Box Diecut and adhered to the top and bottom of the spool. I cut a strip of the same patterned cardstock and adhered around the center of the spool and added flatback pearls to the bottom lip of the inside circle. Next I cut out one wreath from the Wreath and Snowflake Thinlits and added adhesive in random spots to the back of the wreath. Side note… what I will be adding to the top will anchor down the wreath.

I cut out five of the largest trees from the Vintage Truck Box Diecut, cut the trunks off, folded all, adhere the backs of the trees together and lightly ink the edges of the tree.

I cut two houses from the Shadow Box Elements Thinlits, a small section/frame of the Shadow Box Frames Set 02 Thinlit ( measure and cut at the house die roof line), fold and glue together. I backed the inside of both houses before adhering to the front and back of the “frame”. I also folded, cut and glued a strip of cardstock to create a roof.

I adhered both the tree and house to the top of the spool and proceeded to add an assortment of flowers, vines and leaves dies from the following diecuts: Wreath and Snowflakes and Shadow Box Elements Thinlits to the top of the spool.

I also added loops of thread and hand inked cheese cloth along with sequins, gems and flatback pearls to the flowers, leaves and vines.

I cut out the home sentiment and backed with a coordinating patterned cardstock, added Foam Pop Dots to the spool and placed the sentiment onto the front of the spool to finish.

If you haven’t been to Eileen Hull’s blog lately to see what her teams have been up to you can find the latest post HERE. Also on the 26th of April Eileen will have newest release of stamps with Makers Forte so be sure to come back to my blog for my latest project.

Supplies

Sizzix/Eileen Hull: Ornament Box Diecut

Sizzix/Eileen Hull: Wreath and Snowflake Thinlits

Sizzix/Eileen Hull: Vintage Truck Box Diecut

Sizzix/Eileen Hull: Shadow Box Elements Thinlits

Sizzix/Eileen Hull: Shadow Box Frames Set 02 Thinlit

Foam Pop Dots

Diecut Machine

Empty Ribbon Spool

Various Plain and Patterned Cardstocks

Flatback Pearls, Gems and Sequins

Stylus

Paper Cutter

Scissors

Cheese Cloth

Thread

Green Chalk Ink

Beacon Adhesives: Zip Dry Adhesive

(Products listed above are Affiliated Links for your convenience)

DISCLAIMERS

This blog is compensated to provide opinion on products, services, websites, and various other topics. Even though the owner(s) of this blog receives compensation for our posts or advertisements. I always give my honest opinions, findings, beliefs, or experiences on those topics or products. The views and opinions expressed on this blog are purely my own. Any product claim, statistic, quote or other representation about a product or service should be verified with each manufacturer, provider, or party in question.This blog contains affiliate links, clicking and shopping through these links helps to support and run Tonya Trantham Designs – Creative Paper Addiction at no additional cost to you. Today’s features are Sizzix, Eileen and Scrapbook.com Products. 

Thanks for stopping by, hope your Friday is wonderful and enjoy creating!

Easter Greetings Junk Journal Pages

Hi everyone! I’m back with a quick project I created for my junk journal and I wanted to share with y’all.

I used lots of leftovers from other projects to create this (the page will slide under the elastic in the journal to hold in place). The base of this page(s) was a diecut I had cut in half and used in another project. I folded in half and on the front page I added diecuts, punches and a bunny printable (image found on the internet) to create a cute Easter scene.

I used stickers, flowers and leaf sprig dies from the Folio Page Pocket and Flower Thinlits, scraps of cardstocks and Pom Pom trim to decorate the edge of one of the pages to create.

The back page I created a pocket with stickers decorating the front and added a tag with patterned cardstock and a little bunny printable. This is such a great way to use up scraps and bits and pieces you have laying around!

Supplies

Sizzix/Eileen Hull: Folio Page Pocket and Flower Thinlits

Diecut Machine

Various Plain and Patterned Cardstocks

Scissors

Paper Cutter

Easter Stickers

Easter Bunny Printables

Gems and Sequins

Pom Pom Trim

Beacon Adhesives: Zip Dry Adhesive

(Products listed above are Affiliated Links for your convenience)

DISCLAIMERS

This blog is compensated to provide opinion on products, services, websites, and various other topics. Even though the owner(s) of this blog receives compensation for our posts or advertisements. I always give my honest opinions, findings, beliefs, or experiences on those topics or products. The views and opinions expressed on this blog are purely my own. Any product claim, statistic, quote or other representation about a product or service should be verified with each manufacturer, provider, or party in question.This blog contains affiliate links, clicking and shopping through these links helps to support and run Tonya Trantham Designs – Creative Paper Addiction at no additional cost to you. Today’s features are Sizzix, Eileen Hull and Scrapbook.com Products. 

Thanks for stopping by, hope your Friday is wonderful and enjoy creating!

Vintage Inspired Button Decor Piece

Hi everyone! For the month of March Eileen Hull’s Inspiration and Educator Teams have been challenged to create something using felt, fabric and fiber and this is what I came up with!

I had fun, for the most part, altering an empty Laughing Cow container and turning it into a fun home decor piece. Originally I was going to create the container where it opened and things could be stored inside but the project went side ways. UGH! I completely abandoned that idea when I couldn’t get the inside of the container fixed the way I wanted it to look.

First off, I placed the container on top of a piece of cardstock and drew around the container (twice, one each for the top and bottom of the container) and cut both circles out. I placed the circles into the 3D Vintage Button Embossing Folder and ran through the Diecut Machine. Next, I applied Gold Luster Wax lightly over the embossed button images.

I adhered the top and bottom of the container together before adding the embossed images, lace and Pom Pom trim.

I cut two Mandala Thinlits from tissue paper and folded to create a lace like trim for the top of the container.

I placed two of the button card stamps from the Button Cards #2 Stamp Set onto the MISTI Stamping Tool, inked with Brown Ink and stamped onto a piece of Cream Cardstock. I cut both images out, roughed up and added ink around the edges.

The Mandala Thinlits I had cut out earlier I glued to the container.

The button cards I adhered the bottom of each to the container and placed Foam Pop Dots at the top of cards. I dug into my stash of old buttons (that had been cut off whatever that had been sewn onto) and glued to the smaller button card.

I once again dug into my stash and this time I used flowers and leaves that I had cut out from the Flowers and Leaves Journaling Cards Thinlits (retired). All I had to do was ink and shape before adding to the top of the container.

I finished off the piece by adding cording and thread bows, loose buttons, pearl sprays and a pearl top pin. I love the fact that I was able to up-cycle the cheese container and turn it into something to be used as decor in the home.

Be sure to stop by Eileen’s blog for more inspiration for both of her teams! You can find the latest posts HERE and HERE.

Supplies

Maker Forte/Eileen Hull: Button Cards #2 Stamp Set

Sizzix/Eileen Hull: 3D Vintage Button Embossing Folder

Sizzix/Eileen Hull: Mandala Thinlits

Sizzix/Eileen Hull: Leaves Journaling Cards Thinlits (retired)

Diecut Machine

Sizzix: Gold Luster Wax

MISTI Stamping Tool

Brown Ink

Cream Cardstock

Foam Pop Dots

Empty Cheese Container

Plain and Patterned Cardstocks

Lace, Pom Pom Trim, Cording and Thread

Crinoline

Buttons

Pearl Sprays

Pearl Top Pin

Paper Cutter

Scissors

Beacon Adhesives: Zip Dry Adhesive

(Products listed above are Affiliated Links for your convenience)

DISCLAIMERS

This blog is compensated to provide opinion on products, services, websites, and various other topics. Even though the owner(s) of this blog receives compensation for our posts or advertisements. I always give my honest opinions, findings, beliefs, or experiences on those topics or products. The views and opinions expressed on this blog are purely my own. Any product claim, statistic, quote or other representation about a product or service should be verified with each manufacturer, provider, or party in question.This blog contains affiliate links, clicking and shopping through these links helps to support and run Tonya Trantham Designs – Creative Paper Addiction at no additional cost to you. Today’s features are Sizzix, Maker Forte, Eileen Hull and Scrapbook.com Products. 

Thanks for stopping by, hope your Monday is great and enjoy creating!

Wonderland Tea Party Folio Part 3

Hi everyone! I am back with the final post of the Wonderland Tea Party Folio series. If you missed the first two posts you can find them HERE and HERE.

This page has no pockets or flaps but I used a printable as the main focus and added a leftover bit of decorative cardstock, lace and pom pom trim.

I dug into my stash of Prima flowers which I layered, added a button and used the leaf and leaf sprig thinlits from the Folio Page Pocket and Flowers Thinlits to finish off the flower.

I used the other insert that I had cut from the Photo Box Folder Diecut (retired) as an insert. All I added to it was the pointing finger sticker that I had in my stash.

I created this page with an assortment of printables, teacups, ticket stubs and a rabbit. The pocket holds a tag and cut a part and next to that is the Waterfall card that I cut from the Waterfall Card and Tags Thinlits. I glued three of the sides down to create a “pocket” to hold more tags.

This page I created a belly band to hold a little book.

The book I created from an assortment of scraps of cardstock, notebook paper and a page from an Alice in Wonderland story book.

I did take the largest tag thinlit and folded a piece of patterned cardstock in half, placed slightly below the “cut” of the thinlit to create a page to sew into this book.

The last page of the journal I kept pretty simple. I created a double pocket from a printable and dressed it up with more Prima flowers and another leaf thinlit.

I didn’t mention in the previous posts about the closure I “was” going to use on my folio. I had actually punched holes, added brads and strung elastic to hold the journal together but I didn’t go back far enough with the holes on the journal to keep the elastic in place…it kept slipping off. So I adhered a small strip of cardstock to the back of the journal and on the inside I glued a piece of cardstock on three sides to create a pocket. Not what I had originally envisioned but it works!

I hope you have enjoyed following along on the process of this journal and as always if you have questions about this project please let me know.

Supplies

SIzzix/Eileen Hull: Folio Page Pocket and Flowers Thinlits

SIzzix/Eileen Hull: Waterfall Card and Tags Thinlits

Sizzix/Eileen Hull: Folio Journal Diecut

Sizzix/Eileen Hull: Bookbinding and Label Thinlits

Sizzix/Eileen Hull: Mandala Thinlit

SIzzix/Where Women Create: Photo Box Folder Diecut (retired)

Paper Cutter

Diecut Machine

Adhesive Sheets

Beacon Adhesives: Zip Dry Adhesives

Scissors

File Folder

Patterned and Plain Cardstocks

Buttons, Prima Flowers, Ephemera, Stickers

Alice in Wonderland Printables

(Products listed above are Affiliated Links for your convenience)

DISCLAIMERS

This blog is compensated to provide opinion on products, services, websites, and various other topics. Even though the owner(s) of this blog receives compensation for our posts or advertisements. I always give my honest opinions, findings, beliefs, or experiences on those topics or products. The views and opinions expressed on this blog are purely my own. Any product claim, statistic, quote or other representation about a product or service should be verified with each manufacturer, provider, or party in question.This blog contains affiliate links, clicking and shopping through these links helps to support and run Tonya Trantham Designs – Creative Paper Addiction at no additional cost to you. Today’s features are SIzizx, Eileen Hull and Scrapbook.com Products. 

Thanks for stopping by hope your Friday is awesome and enjoy creating!

Bunny Basket

Hi everyone! I’m back with my project this month for Eileen Hull! Since Easter is a less than a month away I wanted to show you how to create an Easter basket using the Folio Page Pocket and Flower Thinlits Dies and the Teacup and Spoon Diecut. Lets get started!

From the Folio Page Pocket and Flower Thinlits I cut two of the corner pockets with flaps and from the Teacup and Spoon Die I cut the “pocket” diecut out. I folded the “pocket” in half.

While still folded in half I cut a “v” out on either side of the flap.

While still folded I punched a hole at the top and added an eyelet on either side for the handle.

I adhered the corner pocket dies to each side of the flaps on the “pocket”.

I cut out two corner dies without flaps and glued to the inside of the pocket to cover the tabs and make it look neater.

I tied a 12 inch pipe cleaner to either side of the basket.

I placed Foam Pop Dots to the back of the bunny image and placed onto the front of the basket. Next I shaped flowers and sprig dies, placed a gem in the center of each flower and added to the bunny image.

I tied bits of lace to the handle and a shaped flower and a carrot sticker. Added Easter grass and bite size candies, a little bird and fake eggs to finish this adorable basket.

If you haven’t checked out Eileen Hull’s blog to see what the Inspiration and Educator Teams have been up to lately you can find the latest posts HERE and HERE. As always if you have any questions about this projects please let me know.

Supplies

Sizzix/Eileen Hull: Folio Page Pocket and Flower Thinlits

Sizzix/Eileen Hull: Teacup and Spoon Diecut

Easter/Spring Cardstock and Stickers (I used retired line of Authentique)

Foam Pop Dots

Diecut Machine

Paper Cutter

Scissors

Pipe Cleaner

Gems, Trim and Eyelets

Crop-A-Dile

Stylus

Beacon Adhesive: Zip Dry Adhesive

(Products listed above are Affiliated Links for your convenience)

DISCLAIMERS

This blog is compensated to provide opinion on products, services, websites, and various other topics. Even though the owner(s) of this blog receives compensation for our posts or advertisements. I always give my honest opinions, findings, beliefs, or experiences on those topics or products. The views and opinions expressed on this blog are purely my own. Any product claim, statistic, quote or other representation about a product or service should be verified with each manufacturer, provider, or party in question.This blog contains affiliate links, clicking and shopping through these links helps to support and run Tonya Trantham Designs – Creative Paper Addiction at no additional cost to you. Today’s features are Sizzix, Eileen Hull and Scrapbook.com Products. 

Thanks for stopping by, hope your day is wonderful and enjoy creating!

Vintage Girls and Flower Page

Hi everyone! I wanted to hop on today and share a page I created using stickers, scraps of cardstock and scrapbook paper I have laying around along with flowers and leave diecuts from the Floral Garden Diecuts Set…those where in my stash of scraps and leftovers.

I started with a 3 3/8″x5 3/8″ patterned cardstock as the base for my page. Next I placed a circle punch that had been embossed onto the center of the base and a sticker down the side (Apologies for the dark looking photo I really thought I had taken a better photo than that.) It’s ok that the sticker is hanging off either side of the base because I will be adhering the finished project to a page in one of the journals that I have created…I’ll share more later on which journal I will be using.

The images of the vintage girls are from a piece of wrapping paper I had started fussy cutting but didn’t finish. I finished fussy cutting those out and then I went through my stash to figure out what scraps and stickers I wanted to include on the page.

I adhered bits of cardstock, banner diecuts, heart punch and diecut images to the base. I added an assortment of patterned paper to the girl images before applying Foam Pop Dots and placing on the base.

I shaped the flowers and leaves diecuts from the Floral Garden Diecuts Set and glued to the page along with thread bows, gems in the center of the flowers and a leftover gem swirl from my stash.

I can’t wait to add this to the first page in my journal! I’m still deciding if I ought to wait and do a complete reveal of what journal I chosen to work with or share again (hint this is a journal that I posted about last year). Also I’m going to add a couple more embellishments to the cover of my journal….to me it looks bland. Let me know in the comments below share now or wait for a completed journal reveal.

As always if you have any questions about this project please let me know.

Supplies

i-crafter: Floral Garden Diecuts Set

Paper Cutter

Scissors

Beacon Adhesive: Zip Dry Adhesive

Foam Pop Dots

Diecut Machine

Stylus

Various Plain and Patterned Cardstocks

Thread, Gems, Punches and Images

(Products listed above are Affiliated Links for your convenience)

DISCLAIMERS

This blog is compensated to provide opinion on products, services, websites, and various other topics. Even though the owner(s) of this blog receives compensation for our posts or advertisements. I always give my honest opinions, findings, beliefs, or experiences on those topics or products. The views and opinions expressed on this blog are purely my own. Any product claim, statistic, quote or other representation about a product or service should be verified with each manufacturer, provider, or party in question.This blog contains affiliate links, clicking and shopping through these links helps to support and run Tonya Trantham Designs – Creative Paper Addiction at no additional cost to you. Today’s features are Scrapbook.com Products. 

Thanks for stopping by, hope your Thursday is wonderful and enjoy creating!

BPM: Floral Bouquet Tag

Hi everyone! Today over on Blank Page Muse’s blog I share how I created this floral dimensional tag using Pam Bray’s Floral Spray Sunflowers Chrysanthemum Stamp. You can find the blog post HERE.

Also if you aren’t following Blank Page Muse on their social medias you can find them on:

Facebook, Instagram, Pinterest, Twitter and Blank Page Muse Website

Supplies

Blank Page Muse/Pam Bray: Floral Spray Sunflowers Chrysanthemum Stamp

Tag

Damask Embossing Folder

Pink Ink

Watercolors

Watercolor Brush

Watercolor Paper

Diecut Machine

Thread and Seam Binding

Scraps of Patterned Cardstock

Scissors

Foam Pop Dots

Gems and Flatback Pearls

Paper Cutter

Beacon Adhesive: Zip Dry Adhesive

(Products listed above are Affiliated Links for your convenience)

DISCLAIMERS

This blog is compensated to provide opinion on products, services, websites, and various other topics. Even though the owner(s) of this blog receives compensation for our posts or advertisements. I always give my honest opinions, findings, beliefs, or experiences on those topics or products. The views and opinions expressed on this blog are purely my own. Any product claim, statistic, quote or other representation about a product or service should be verified with each manufacturer, provider, or party in question.This blog contains affiliate links, clicking and shopping through these links helps to support and run Tonya Trantham Designs – Creative Paper Addiction at no additional cost to you. Today’s features are Blank Page Muse and Scrapbook.com Products. 

Thanks for stopping by hope your day is wonderful and enjoy creating!

Bird Folio Journal Reveal Part One

Hi everyone! I’m back with my project for Eileen Hull and the reveal (part one) of the inside of my journal I created using Eileen Hull’s Folio Journal Diecut and Folio Page, Pocket and Flowers Thinlits. If you missed the big Chapter 1 Release Party that Eileen hosted at the beginning of the month I have a blog post with details and more photos and instructions on how I created the cover of my folio journal. You can find that post HERE.

I placed a piece of folded patterned cardstock slightly past the cut line of the page diecut (from the Folio Page, Pocket and Flowers Thinlits), placed washi tape on the thinlit and cardstock before running through the Diecut Machine. I cut three pages/papers per signature for a total of nine pages/papers but today I’m only sharing the first set of pages.

I punched holes and added the claps with brads and then covered with a piece of patterned cardstock. This secures the clasps and brads in place. Side note…I forgot to include this step in the post where I shared how I created the cover….ooops!

I slide the pages up under the elastic cording in the spine and tied ribbon over the elastic before I started decorating the pages. The inside cover I adhered a pocket, shaped and added a flower and leaf to the pocket along with a gem to the center of the flower. The pocket is a great place to store journaling cards or photos. On the first page I added a glassine bag with washi tape. I dug into my stash and found this birdcage die which I adhered to the bag. I placed two tags inside the glassine bag and added flowers and sprigs, one to the tag and one to the corner of the birdcage.

On the inside of the glassine bag I added a bird and shaped punch and more flowers and a sprig along with a piece of trim at the bottom of the bag.

The next several pages I decorated with an assortment of tags, diecuts, stickers, thread, cheese cloth and the flowers, leaf and sprig thinlits. Most of the flowers I added gems or flat back pearls to the center, and I also shaped with a Stylus.

There you have it part one of the inside of my folio journal! If you haven’t been by Eileen’s blog to see what the Inspiration Team has been up to lately you can find this month’s blog posts HERE and HERE. As always if you have any questions about the pages or what products I used (I shopped my stash) please let me know. I’ll do my best to answer.

Supplies

Sizzix/Eileen Hull: Eileen Hull’s Folio Journal Diecut

Sizzix/Eileen Hull: Folio Page, Pocket and Flowers Thinlits

Diecut Machine

Various Patterned Cardstock

Various Diecuts, Stickers, Thread, Cheese Cloth, Ribbon, Trim, Gems and Flat Back Pearls

Stylus

Paper Cutter

Scissors

Beacon Adhesive: Zip Dry Adhesive

Crop-A-Dile

(Products listed above are Affiliated Links for your convenience)

DISCLAIMERS

This blog is compensated to provide opinion on products, services, websites, and various other topics. Even though the owner(s) of this blog receives compensation for our posts or advertisements. I always give my honest opinions, findings, beliefs, or experiences on those topics or products. The views and opinions expressed on this blog are purely my own. Any product claim, statistic, quote or other representation about a product or service should be verified with each manufacturer, provider, or party in question.This blog contains affiliate links, clicking and shopping through these links helps to support and run Tonya Trantham Designs – Creative Paper Addiction at no additional cost to you. Today’s features are Sizzix, Eileen Hull and Scrapbook.com Products. 

Thanks for stopping by, hope your Tuesday is great and enjoy creating!

Chapter 1 Eileen Hull Release Party and Sneak Peek!

Hi there and welcome to the Chapter 1 Eileen Hull/Sizzix Release Party Blog Hop! Just wait till you see all of the fun options the new ScoreBoards Folio Journal die has in store for you! You will also love the Mandala and Folio Page, Pockets and Flower Thinlits dies that coordinate. 
Please hop through the blogs and be inspired by the work of the talented Inspiration and Educator teams! Leave a comment for each designer and you could win a Folio Journal die (as soon as it arrives!) Join me and specials guests for a Facebook Live on Wednesday, Feb. 3 at noon Eastern. Comment on our Facebook Live and be eligible to win either the Mandela die or the Folio Pages, Pockets and Flowers die- two winners! Winners will be announced on the Facebook Live show on February 9 at 6:00 EST. We appreciate your love and support, friends!

I’m so excited about all of the new diecuts from this release and I can’t wait to share a sneak peek of my journal with you. For this project I used the Folio Journal Diecut and the flowers from the Folio Page Pocket and Flower Thinlits to create the cover.

I cut the journal from an extra thick file folder (love the floral design on the folder).

I cut two covers from the diecut and adhered the spine together.

I used an assortment of ephemera, craft supplies from my craft room (it’s a no spend month until my husband goes back to work) and the flowers thinlits from the Folio Page Pocket and Flower Thinlits to decorate the cover of the journal. Later this month I will share the inside of the journal so be sure to stop back by!

Be sure to stop by the other team members blogs to see what they have created and comment on each blog for a changes to win the newest Chapter One Diecuts by Eileen Hull!

Eileen Hull

Julia Aston

Madeline Arendt

Jennie Atkinson

Karen Bearse

Susie Madden Benz

Sarah Lizzie Dodd

Sue Eldred

Maggi Harding

Lisa Hoel

Jenny Marples

Elizabeth Robinson

Tonya Trantham—You Are HERE

Supplies

Sizzix/Eileen Hull: Folio Journal Diecut

Sizzix/Eileen Hull: Folio Page Pocket and Flower Thinlits

Diecut Machine

Beacon Adhesive: Zip Dry Adhesive

Scissors

Paper Cutter

File Folder

Ephemera, Ribbon, Seam Binding, Thread, Charms and Etc.

(Products listed above are Affiliated Links for your convenience)

DISCLAIMERS

This blog is compensated to provide opinion on products, services, websites, and various other topics. Even though the owner(s) of this blog receives compensation for our posts or advertisements. I always give my honest opinions, findings, beliefs, or experiences on those topics or products. The views and opinions expressed on this blog are purely my own. Any product claim, statistic, quote or other representation about a product or service should be verified with each manufacturer, provider, or party in question.This blog contains affiliate links, clicking and shopping through these links helps to support and run Tonya Trantham Designs – Creative Paper Addiction at no additional cost to you. Today’s features are (Sizzix, Eileen Hull and Scrapbook.com Products. 

Thanks for stopping by, hope your Wednesday is wonderful and enjoy creating!