Create a Unique December Daily from Gusset Bags

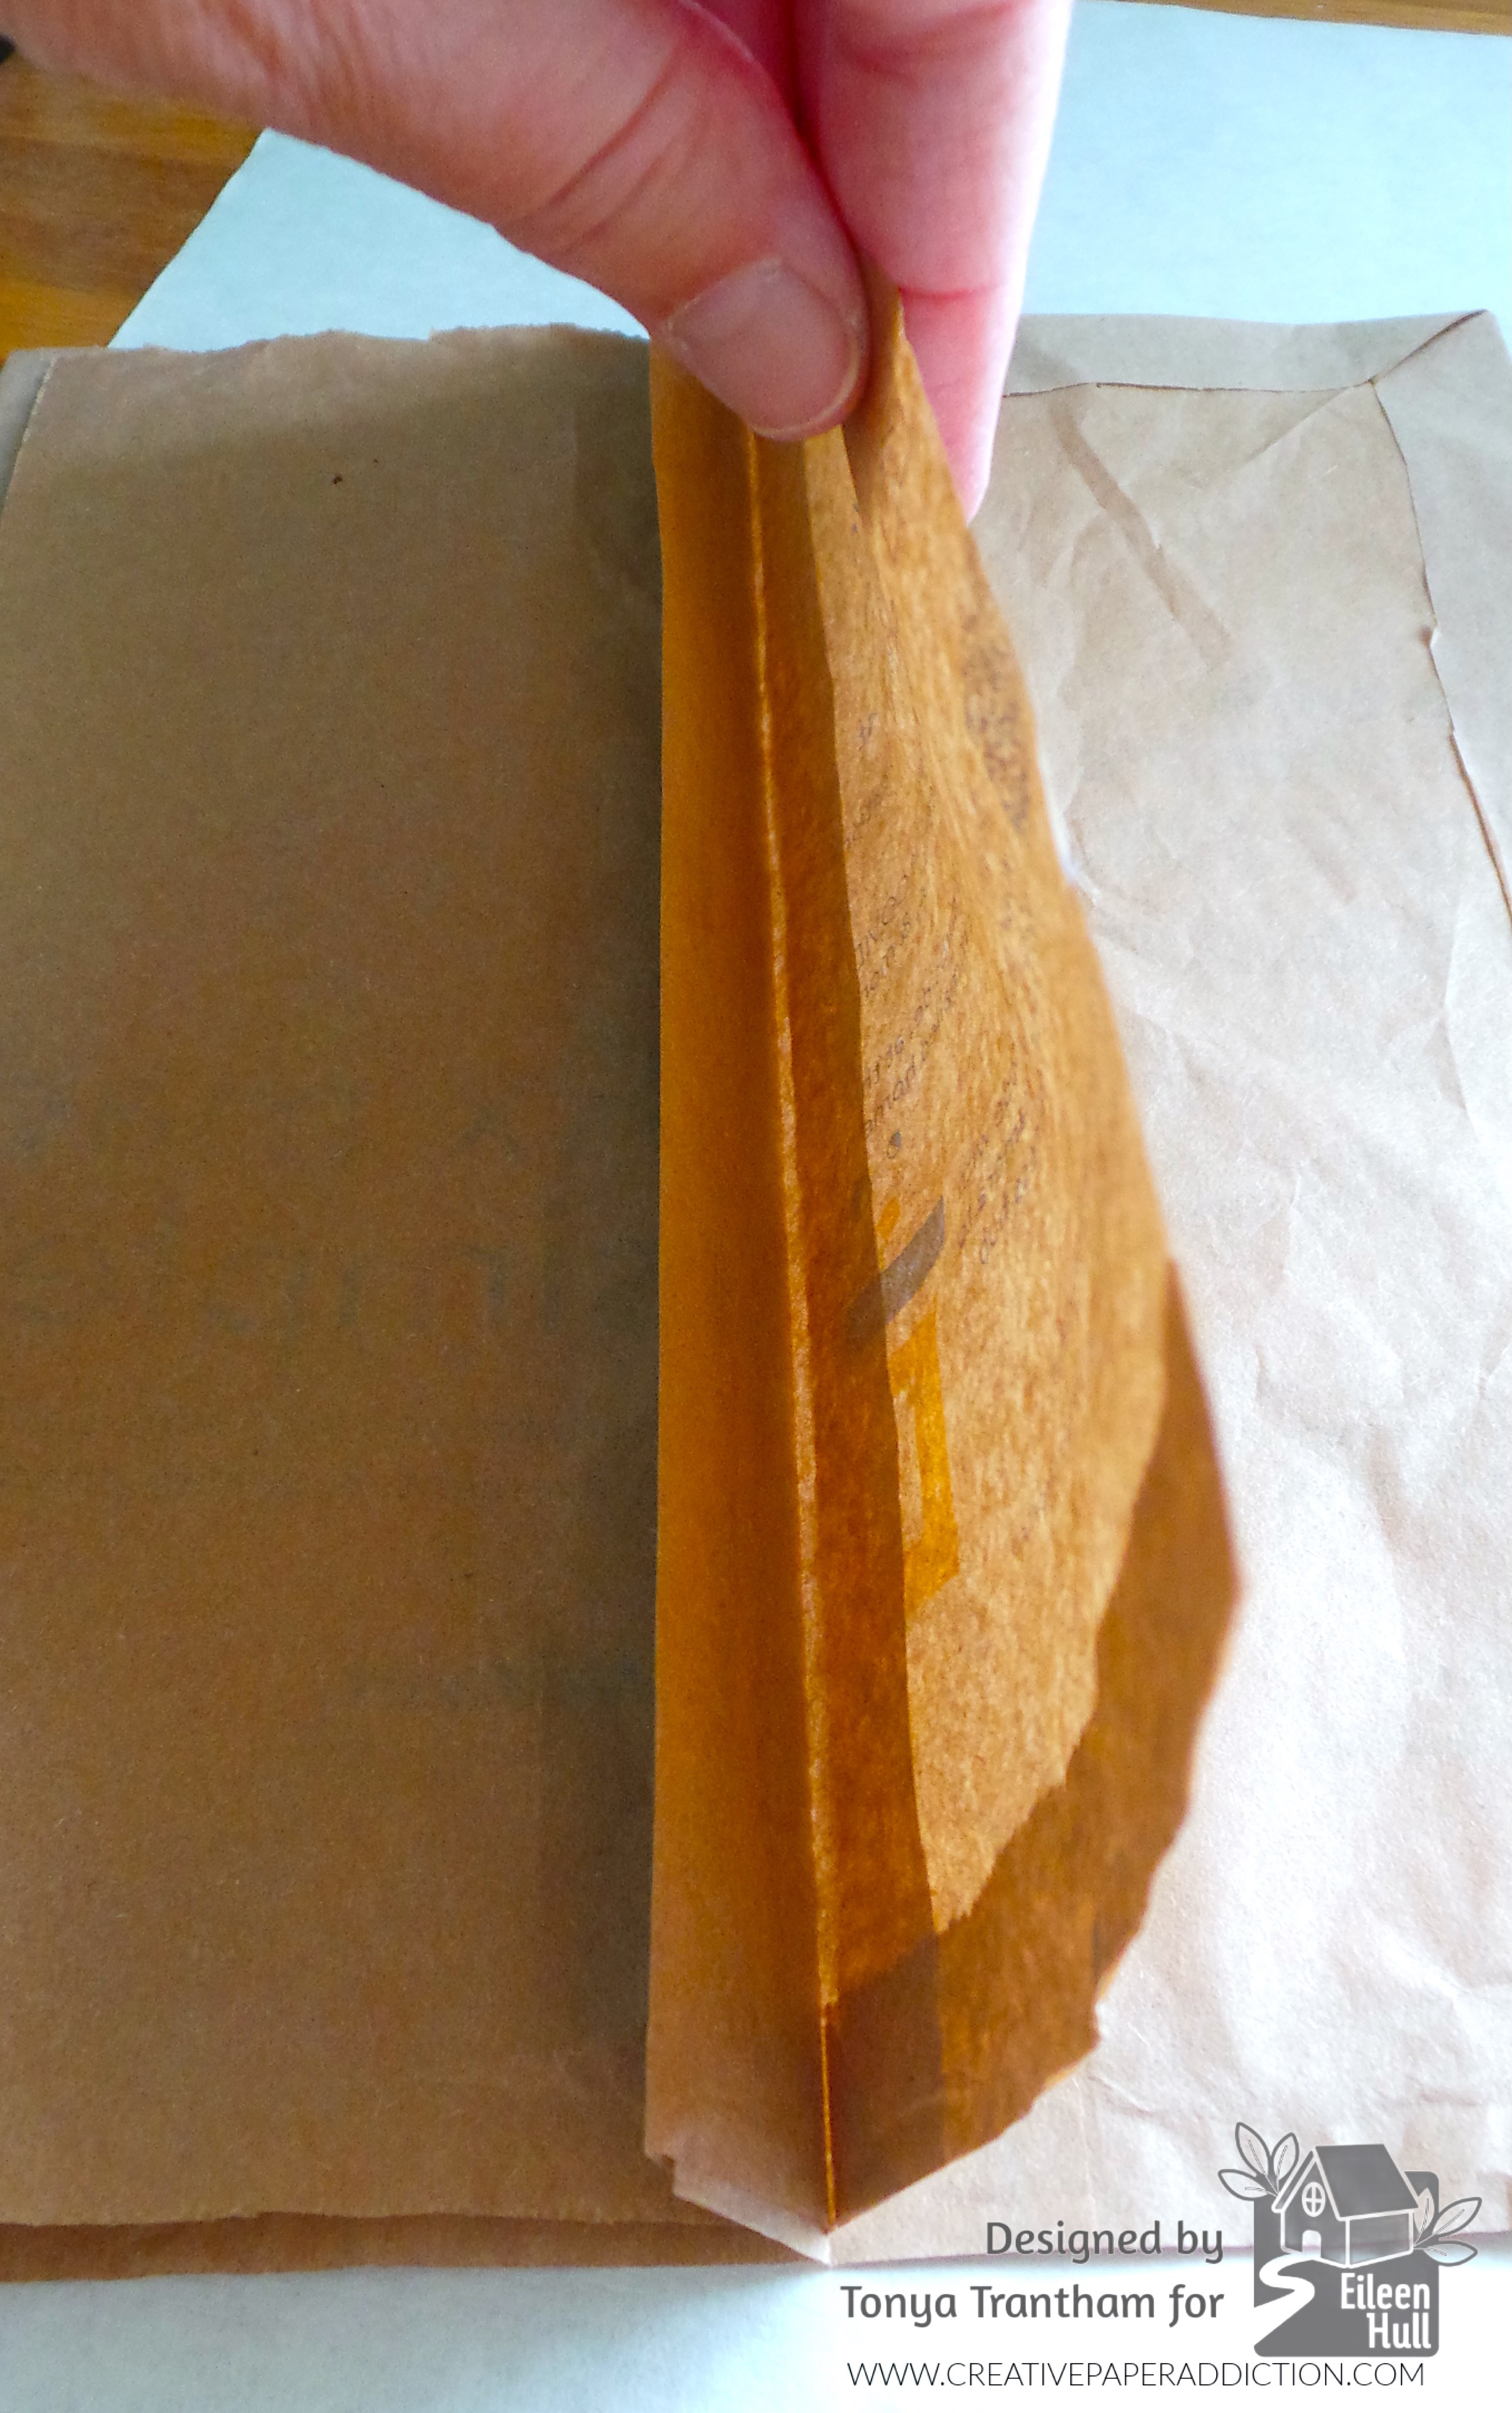
Hi everyone! I’ve been extremely busy with everything that pertains to inside the home. I’m just getting around to sharing my first project of the month for Eileen Hull. It’s hard to believe that Christmas is right around the corner. So I decided I was going to create a December Daily since I’ve been saving the gusset bags (it has a pleat on each side of the paper bag) that my husband’s medicine has come in when he picks them up at the Walmart pharmacy. Anyways, let’s get started!

A decorative journal cover featuring layered patterned cardstock, a central circular motif with a deer illustration, and the text 'It's the most wonderful time of the year.' The cover incorporates vibrant colors, textures, and embellishments like ric rac.

The first thing I did was cut off a tiny section of the bottom of each bag. Next I cut the middle of the “gusset” to create one cover and three inside pages. That’s a total of four bags cut for one journal. The top of the bags has an “extended “flap” of paper that I scored. I glued the “flap” and each of folded edges of the gusset down.

A close-up view of two brown gusset bags laid flat on a surface, with one bag opened slightly to show its pleated sides, alongside a bottle of Fabri-Tac adhesive.

The middle gusset I adhered together. I glued each side of the gusset page onto the center piece/gusset.

Close-up of a hand holding a folded gusset bag, showcasing its pleated edges and texture.

I did that for each of the three pages.

Open gusset bag from Walmart pharmacy with text 'Rx made simple' printed in blue on the front.

Now for the fun stuff! Decorating the cover! First, I cut patterned cardstock, inked the edges with a green chalk ink and glued to the front and back covers. I added two strips of cardstock to the cover. I cut two of the largest tunnel die from the Tunnel Arches Thinlits and adhered both, ends facing each other, to the cover along with a strip of patterned cardstock.

A colorful journal cover decorated with patterned cardstock, including vibrant green and pink designs, layered strips, and a unique arch shape.

I cut the largest circle die from the Rainbow Wheels Thinlits and inked the edges with a brown chalk ink.

A decorated circular tag featuring a deer silhouette surrounded by a green wreath. The tag includes the phrases 'It's the most' and 'WONDERFUL time of the year' in colorful letters, with embellishments like holly leaves and pearl accents.

I glued another strip of patterned cardstock to the cover before adding the circle die. I cut two of the wreaths from the Wreath and Snowflake Thinlits (retired), placed on top of each other and adhered to the circle. I cut a deer die from the Home Sweet Home Thinlits, inked with a brown chalk ink and placed in the center of the wreath.

Decorative cover of a handmade journal featuring a deer silhouette, wreath, festive colors, and a chipboard sentiment saying 'It's the most wonderful time of the year.'

I placed the “it’s the most wonderful time of the year” Chipboard Christmas Sentiment underneath the deer. I cut two holly dies from the Funky Festive Thinlits (retired), inked and shaped with a Stylus. I placed those onto the chipboard sentiment. I added White Gems to the wreath and the holly. I also glued two pieces of deep pink ric rac to cover to finish.

A decorated journal cover featuring a deer, layered patterned cardstock, and festive embellishments including a sentiment that reads 'It's the most wonderful time of the year'.

The only thing left to do is to decorate the inside pages. I think this journal will be an abbreviated version of a December Daily. Even though the holiday season is busy I don’t do a lot of exciting things to document.

Anyways, if you have any questions or comments please leave them below.

Colorful December Daily journal cover featuring patterned cardstock, a deer embellishment, and a sentiment that reads 'It's the most wonderful time of the year'.

Supplies

Sizzix/Eileen Hull: Tunnel Arches Thinlits

Sizzix/Eileen Hull: Rainbow Wheels Thinlits

Sizzix/Eileen Hull: Wreath and Snowflake Thinlits (retired)

Sizzix/Eileen Hull: Home Sweet Home Thinlits

Sizzix/Tim Holtz: Funky Festive Thinlits (retired)

Diecut Machine

Paper Cutter

Scissors

Gusset Bags (4)

Plain and Patterned Cardstocks

White Gems

Ric Rac

Green and Brown Chalk Inks

Chipboard Christmas Sentiment

Stylus

Beacon Adhesives: Fabri-Tac Adhesive

DISCLAIMERS

This blog is compensated to provide opinion on products, services, websites, and various other topics. Even though the owner(s) of this blog receives compensation for our posts or advertisements. I always give my honest opinions, findings, beliefs, or experiences on those topics or products. The views and opinions expressed on this blog are purely my own. Any product claim, statistic, or quote should be checked with each manufacturer. Verify other representations about a product or service with the provider or party in question.This blog contains affiliate linksClicking these links helps to support Tonya Trantham Designs – Creative Paper Addiction. It’s at no additional cost to you. Today’s features are Sizzix, Eileen Hull and Scrapbook.com Products. 

A decorated journal cover featuring a deer surrounded by greenery, with the phrase 'It's the most wonderful time of the year' prominently displayed, against a colorful patterned background with various paper strips.

Thanks for stopping by, I hope your Tuesday is wonderful and enjoy creating!

A decorative digital graphic featuring a bird among colorful flowers with the name 'Tonya' artistically displayed.

Create a Stunning Swatch Book with Eileen Hull’s Diecuts

Hi everyone! I am back with the complete reveal of my swatch book. I created it using the Hardbound Journal Diecut, Swatch Cards Stamps and a few other dies, all by Eileen Hull. This was a fun journal to create. It was a great way to showcase lace, ribbon, and trim that I have in my stash. Anyways, let’s get started!

Close-up of a handcrafted journal cover featuring floral fabric, lace, and decorative elements such as bookplates, flowers, and embellishments.

I didn’t take any step out photos of how I layered the covers and spine. So I did bullet points to break down the process. A side note… when creating the cover cut two covers and a spine with the diecut.

  • I cut a piece of cardstock to fit the Hardbound Journal Diecut.
  • I cut from the Adhesive Roll strips of adhesive and applied to both sides of the cardstock.
  • I cut two pieces of felt the same size as the cardstock. I place the felt on either side of the cardstock.
  • I did the same steps as above and applied strips of adhesive to both sides of the felt and burnished.
  • I cut fabric and placed over the applied adhesive strips that’s covering the felt. I burnished well before placing onto the Hardbound Journal Diecut and running through the Diecut Machine.
A collection of colorful and patterned die-cut pieces and covers for a journal, featuring floral designs and polka dots.

I glued the end flaps to each straight side of the journal cover.

An assembled journal featuring a floral cover with shades of pink and green, and a gray spine with polka dots and pierced details.

I cut a total of six papers for the journal. I folded in half and made holes in the fold before sewing two papers in per signature. A side note…I had actually sewn in more pages but had to remove them. The extra pages would have “bulked” up the journal too much.

Open journal featuring grid pattern pages with a decorative spine.

I used the MISTI Stamping Tool to stamp the “swatch card” stamp from the Swatch Cards Stamps onto White Cardstock. I hand cut each of the swatches with Scissors.

An assortment of stamped swatch cards on a workspace with an archival ink pad and a ruler.

I went through my lace, ribbon and trim and glued to the swatches. I also used the Journal Hardware Diecut to create labels for the larger lace and trim in my stash.

An array of swatch cards featuring various lace, ribbon, and trim in different colors and patterns, displaying the crafting supplies organized for easy access.

I adhered cardstock to each page before adding a swatch card.

A swatch book page featuring various ribbons and trims displayed in a creative layout with colorful embellishments, including a flower and the phrase 'I PICK YOU'.

This is a great way to use those bits and pieces of random embellishments.

An open swatch book page featuring vintage black and white photos of four men sitting around a table, with decorative lace and ribbon swatches displayed alongside. One side includes a swatch card labeled 'swatch card' with various trims, while the opposite side features colorful painted background with additional lace designs.

Even though it’s fun seeing all the lace, ribbon and trim I included in this journal. It’s kind of alarming that I didn’t even make a dent in what I still have in my collection.

An open journal page featuring decorative swatch cards with lace, ribbon, and a bird illustration. The left side displays swatch cards labeled with various embellishments, while the right side shows fabric swatches accompanied by a floral embellishment.

The cover I added a piece of lace and three bookplates in different sizes. The first bookplate, I adhered onto the lace. The second bookplate, I glued a piece of light blue lace inside the plate. I also added Foam Pop Dots to the back edge. I added a scrap of fabric to the third bookplate. Then I stacked all three on top of each other and glued them to the cover.

A handcrafted journal with a floral cover, featuring lace, ribbons, and decorative bookplates. The journal showcases a combination of various textures and colors, emphasizing creativity in design.

I added Gray Flatback Pearls to the ends of each bookplates. I also glued a flower with a leaf and a bit of pink seam binding to the bookplate. The finishing touch was adding mini pom pom trim to the edge of the spine and cover of the book.

A beautifully crafted swatch book featuring multiple layers of colorful fabric and cardstock. The cover is adorned with decorative lace, ribbons, and a decorative metal label holder, showcasing an intricate design and variety of textures.

I can’t wait to make more of these types of journals. Maybe the next journal will be swatches of all the Washi tape that I own?

A handcrafted swatch book featuring a floral fabric cover, decorative lace, and various embellishments like bookplates and trim.

Anyways, if you haven’t been by Eileen Hull’s blog lately you can find the latest post HERE. Also if you have any questions about this journal or comments in general leave them below.

A side view of a colorful handmade journal with various patterned pages and embellishments, showcasing the creative layout and design.

Supplies

Sizzix/Eileen Hull: Hardbound Journal Diecut

Sizzix/Eileen Hull: Swatch Cards Stamps

Sizzix/Eileen Hull: Journal Hardware Diecut

Sizzix/Eileen Hull: Rainbow Wheels Thinlits

Diecut Machine

Paper Cutter

MISTI Stamping Tool

Black Ink

Scissors

White Cardstock

Gray Flatback Pearls

Grid Paper

Various Plain and Patterned Cardstock

Fabric, Felt and Thread

Various Lace, Ribbon and Trim

Various Diecuts and Embellishments

Foam Pop Dots

Adhesive Roll

Beacon Adhesives: Zip Dry Adhesive

(Products listed above are Affiliated Links for your convenience)

DISCLAIMERS

This blog is compensated to provide opinion on products, services, websites, and various other topics. Even though the owner(s) of this blog receives compensation for our posts or advertisements. I always give my honest opinions, findings, beliefs, or experiences on those topics or products. The views and opinions expressed on this blog are purely my own. Any product claim, statistic, or quote should be checked with each manufacturer. Verify other representations about a product or service with the provider or party in question.This blog contains affiliate linksClicking these links helps to support Tonya Trantham Designs – Creative Paper Addiction. It runs at no additional cost to you. Today’s features are Sizzix, Eileen Hull and Scrapbook.com Products. 

A colorful handmade journal cover featuring floral fabric, lace, and layered embellishments, including frames and a flower accent.

Thanks for stopping by, I hope your Wednesday is great and enjoy creating!

A decorative image featuring a bird among colorful flowers with the name 'Tonya' artistically displayed.

March Release Party with Eileen Hull!

Hi everyone! It’s that time again for another wonderful release from Eileen Hull! I’m so excited to introduce this brand new collection by Eileen from Sizzix! As always, these designs may be used together but also stand alone. There are four pieces in this set. Also I will be sharing a sneak peek of each project I created and will do a complete blog post of each later.

The Storage Box is an XL ScoreBoard die measuring 4” square, the largest square box yet!

This box is constructed with a removable top and may be used in many ways, such as organizing desk and office supplies, as a gift box, storing craft supplies and packaging for baked treats.

The Mini Book is a great way to create a book in just one an evening, and using up all those scraps you have lying around in the process.

This book measures 3 3/4” x 2 1/4” and comes with a strap/handle and tiny label for the book cover. It also makes a great bag topper if you fold it in the middle and also will hold a business card. Die cut it from felt and stitch up a tiny wallet!

There is a new Thinlits called Faux Postage– the full panel is designed to fit on a 5” x 7” card and creates a fun postage stamp effect. You can also cut (or tear) each stamp apart and use the individual pieces as a miniature work of art! These dies coordinate with similar dies: Snail Mail (A-2 card size) and Mini Slimline (6” x 3”).

The Lace 3D Embossing Folder is so amazing! It’s a new LARGE size measuring 8 1/2” x 5 3/4”. It works great on bigger journal covers, card backgrounds and on home decor pieces. This is created from vintage lace that Eileen has collected. I used the embossing folder and faux postage thinlit together to create this!

Check out this collection and see lots of ideas from Eileen’s fantastic team! The Release Party will be held on Friday, March 1 at noon Eastern on Eileen’s YouTube, Facebook and Instagram channels.

There’s a giveaway too- join us on the live and hear how you can win…

You can find these dies in your local scrapbook stores- if they don’t carry them, ask them to order. Eileen also carry them in her Etsy Shop and would love your support!

Supplies

Sizzix/Eileen Hull: Storage Box Diecut

Sizzix/Eileen Hull: Mini Box Diecut

Sizzix/Eileen Hull: Faux Postage Thinlits

Sizzix/Eileen Hull: Lace 3D Embossing Folder

Diecut Machine

(Products listed above are Affiliated Links for your convenience)

DISCLAIMERS

This blog is compensated to provide opinion on products, services, websites, and various other topics. Even though the owner(s) of this blog receives compensation for our posts or advertisements. I always give my honest opinions, findings, beliefs, or experiences on those topics or products. The views and opinions expressed on this blog are purely my own. Any product claim, statistic, quote or other representation about a product or service should be verified with each manufacturer, provider, or party in question.This blog contains affiliate links, clicking and shopping through these links helps to support and run Tonya Trantham Designs – Creative Paper Addiction at no additional cost to you. Today’s features are Sizzix, Eileen Hull and Scrapbook.com Products. 

Thanks for stopping by, hope your Friday is wonderful and enjoy creating!

Floral Fabric Needle Book

Hi everyone! I hope all is well with you and everyone is staying warm. In my neck of the woods we are slowing digging out from under 7 inches of snow and ice and hopefully by the end of the week the temperatures with be in the low 60’s. I function so much better in warmer temps. Anyways, I’m back with a quick project that I created using Eileen Hull’s Needle Book Diecut. So let’s get started!

First, I ironed and cut a piece of piece floral fabric and a piece of Rouge Foundations 04 Cardstock to fit the Needle Book Diecut. I applied an Adhesive Sheet to the cardstock and placed the fabric onto that before placing onto the Needle Book Diecut and running through the Diecut Machine. This diecut has fold lines but since I cut this with thinner materials I folded book in half since you can barely see the “spine” lines to fold. Side note, I was in the moment making this project and didn’t do step out photos…sorry about that.

Second, I cut a file folder out of felt from the Envelope, Folder and Flowers Thinlits. Instead of punching holes into the cover and the file folder I marked where I wanted to stitch on the spine of the needle book, threaded the needle with thread and sewed the file folder into of the book. I tied off on the inside of the book. I also glued the closure to the back of the book.

Third, I adhered pom pom trim to the closure and a crochet flower.

Fourth, I added needles and pearl top needles to the felt page.

Fifth, I finished by adding a bit of sheer ribbon and a button with thread to the closure. I cut several of the pom poms off the end of the trim before wrapping around the book and tucking under the closure. Those pom poms I cut off will be making an appearance in a later project a few months from now so stay tuned.

This little needle book is so easy to make and I have a few more ideas besides the obvious that I hope to try out soon.

Also if you haven’t been by Eileen Hull’s blog lately to see what her teams have been up to you can find the latest posts HERE and HERE.

Supplies

Sizzix/Eileen Hull: Needle Book Diecut

Sizzix/Eileen Hull: Envelope, Folder and Flowers Thinlits

49 & Market: Rouge Foundations 04 Cardstock

Floral Fabric

Adhesive Sheet

Diecut Machine

Button, Thread, Ribbon, Pom Pom Trim, Needle, Crochet Flower

Scissors

Paper Cutter

Beacon Adhesives: Fabri-Tac Adhesive

(Products listed above are Affiliated Links for your convenience)

DISCLAIMERS

This blog is compensated to provide opinion on products, services, websites, and various other topics. Even though the owner(s) of this blog receives compensation for our posts or advertisements. I always give my honest opinions, findings, beliefs, or experiences on those topics or products. The views and opinions expressed on this blog are purely my own. Any product claim, statistic, quote or other representation about a product or service should be verified with each manufacturer, provider, or party in question.This blog contains affiliate links, clicking and shopping through these links helps to support and run Tonya Trantham Designs – Creative Paper Addiction at no additional cost to you. Today’s features are Sizzix, Eileen Hull, Scrapbook.com and A Cherry on Top Store Products

Thanks for stopping by, hope your Wednesday is great and enjoy creating!

Rouge Floral Sewing Box

Hi everyone! Earlier this month I shared sneak peeks of the latest “It’s all about the Stitching Classic Dies” re-release by Eileen Hull. If you missed that post that I shared you can find that HERE. But today I’m sharing the complete project using the Cantilever Sewing Box Diecut along with a few other dies by Eileen. So let’s get started!

First, I gathered all the scraps of Mat Board I had been saving because the hinges, feet, lids and boxes are small and this is a great way to use up scraps. Side note, there will be a lot of cuts for this project.

Next, I covered mat board for the feet, hinges and lids with Adhesive Sheets and placed patterned cardstock from the 6″x8″ Rouge Paper Collection onto the mat board. These are the cuts you will need to make for each of the following parts for the sewing box:

Two Hole Hinges: Eight Cuts

Triple Hole Hinges: Four Cuts

Feet: Two Cuts

Lids: Two Cuts

Boxes: Six Cuts

Second, I didn’t cover the mat board for the boxes since I planned on cutting cardstock from the 12″x12″ Rouge Paper Collection to fit the boxes, this was for the inside and outside of each box. I know that’s a lot of work but is so worth the extra effort for a clean and neat look.

I covered the outside of four of the boxes and two of the boxes I adhered together before covering.

Third, I punched out the holes on the outside before adding the hinges and Brads to each of the boxes. I then cut to fit cardstock for the inside of each box. I also glued the lids to the top boxes.

Fourth, I cut out two leaves, four centers and eight of the smaller flowers from the Envelope, Folder and Flowers Thinlits, three leaf sprigs from the Wreath and Snowflake Thinlits and two flowers from the Folio Page, Pockets and Flowers Thinlits.

I took all of the flowers that are from the Envelope, Folder and Flowers Thinlits and inked the edges with a red chalk ink before shaping each with a Stylus. I layered and glued four of those flowers on top of each other along with a shaped center and a leaf. I did the same for the other of flower, center and leaves but set those aside.

Next I shaped with a stylus the other two flowers from the Folio Page, Pockets and Flowers Thinlits, another center and the all the leaf sprigs. I adhered one layered flower, sprigs and the other two flowers to the corner of the lid. I did added a flat back pearl to the smallest flower and loops of thread to finish that side of the lid.

Fifth, for the other lid I fussy cut two flowers from one of the sheets of 12″x12″ Rouge Paper Collection, shaped with a stylus and glued on top of each other. I added a leaf and center to the flower before gluing to the lid. I also added more leaf sprigs, the other layered flower, a fussy cut ticket, pearl top pins, lace and loops of thread.

Sixth, I used two sewing bobbins as knobs to open the lids. I adhered to each lid and punched a small circle from cardstock and glue to each spool. I also glued the feet to the bottom of the sewing box.

This sewing box is perfect to store sewing supplies in but would be great to hold craft supplies, candy or add trinkets and give as a gift. What would you do if you created one? Let me know in the comments below.

Also if you haven’t been by Eileen Hull’s blog lately to see what her teams have been up to you can find the latest post HERE.

Supplies

Sizzix/Eileen Hull: Cantilever Sewing Box Diecut

Sizzix/Eileen Hull: Envelope, Folder and Flowers Thinlits

Sizzix/Eileen Hull: Wreath and Snowflake Thinlits

Sizzix/Eileen Hull: Folio Page, Pockets and Flowers Thinlits

Mat Board

Adhesive Sheets

49 & Market: 6″x8″ Rouge Paper Collection

49 & Market: 12″x12″ Rouge Paper Collection

Stylus

Brads

Sewing Machine Bobbins

Thread, Lace, Pearl Top Pins,, Flat Back Pearl

Scissors

Paper Cutter

Beacon Adhesives: Fabri-Tac Adhesive

(Products listed above are Affiliated Links for your convenience)

DISCLAIMERS

This blog is compensated to provide opinion on products, services, websites, and various other topics. Even though the owner(s) of this blog receives compensation for our posts or advertisements. I always give my honest opinions, findings, beliefs, or experiences on those topics or products. The views and opinions expressed on this blog are purely my own. Any product claim, statistic, quote or other representation about a product or service should be verified with each manufacturer, provider, or party in question.This blog contains affiliate links, clicking and shopping through these links helps to support and run Tonya Trantham Designs – Creative Paper Addiction at no additional cost to you. Today’s features are Sizzix, Eileen Hull, Scrapbook.com and A Cherry on Top Store Products. 

Thanks for stopping by, hope your Tuesday is wonderful and enjoy creating!

How to Create a Festive Floral Christmas Gift Bag

Hi everyone! Can you believe that Christmas is right around the corner? I can’t but I can say I’m a little ahead of the game and have a few holiday projects created ahead of time. This first project I want to share is for the 3rd Annual Comfort and Joy Event hosted by Eileen Hull. I up-cycled a cloth bag that a set of pillow cases came in and turned it into a gift bag for Christmas. I used the Sunflower Diecut to create my version of a poinsettia. Let’s get started!

First, I cut out the flowers and leaf out of paper from the Sunflower Die.

I used two of the smaller flowers and the leaf as a patterned to cut the felt slightly larger than the pattern.

I cut two of each of the flowers, total of four, and two leaves. I layered and adhered the flowers on top of each other. I did cut a set in a cream and peach color that I plan on using in another project (stay tuned).

The leaf I added a little glue to the center and pinched together.

Next I cut and tied in the center yellow embroidery thread and unwound. I adhered to the back of a flat back pearl, glued to the center of the flower and the leaf to the back of the flower. I also cut out a couple of hollies from green felt from the Funky Festive Thinlits and added.

I used an assortment of metallic threads, green thread, gold ribbons, gold vines, pom pom trim and red berry sprays to “bling” out the flower.

I have managed to acquire a collection of these fabric bags but never really knew what to do with them but now I do.

Once everything dried I adhered the flower below the elastic on the bag and let that dry well.

I added a body wash to the bag and now my first Christmas present is wrapped! YAY!

But sure to stop by Eileen Hull’s blog and see what her team has been up to! You can find the latest posts HERE and HERE. If you aren’t a part of Eileen Hull’s Fun Club be sure to join (this is the only way to see the teams Comfort and Joy projects) you can find that link HERE (be sure to answer the questions when joining).

Supplies

Sizzix/Eileen Hull: Sunflower Diecut

Sizzix/Tim Holtz: Funky Festive Thinlits

Diecut Machine

Felt: Light Pink, Hot Pink, Green, Moss

Beacon Adhesives: Fabri-Tac Adhesive

Beacon Adhesives: Zip Dry Adhesive

Scissors

Flat Back Pearl, Thread, Metallic Thread, Gold Ribbon, Gold Vines, Pom Pom Trim Red Berry Sprays

Cloth Bag

(Products listed above are Affiliated Links for your convenience)

DISCLAIMERS

This blog is compensated to provide opinion on products, services, websites, and various other topics. Even though the owner(s) of this blog receives compensation for our posts or advertisements. I always give my honest opinions, findings, beliefs, or experiences on those topics or products. The views and opinions expressed on this blog are purely my own. Any product claim, statistic, quote or other representation about a product or service should be verified with each manufacturer, provider, or party in question.This blog contains affiliate links, clicking and shopping through these links helps to support and run Tonya Trantham Designs – Creative Paper Addiction at no additional cost to you. Today’s features are Sizzix, Eileen Hull, A Cherry on Top Crafts and Scrapbook.com Products. 

Thanks for stopping by, hope your Monday is great and enjoy creating!

Eileen Hull: Peaches and Cream Felt Planner Journal

Hi everyone! I’m back again with another project using Eileen Hull’s Wrapped Journal Diecut but this time I made a planner out of it!
Before placing felt over the Wrapped Journal Diecut I placed the Movers and Shapers Floral Cutout Die inside the opening of the wrapped journal diecut  and cut out the journal. Then I used the Magnetic Platform and placed the Movers and Shapers Scallop Border Diecut and place the end of the wrapped journal over the scalloped die and cut.

Next I cut Tan Paper Leather to fit the inside of the journal and adhered with Fabri-Tac adhesive. This will make the journal sturdier. 

Next I cut a piece of pleather to fit over the paper leather and adhered to the inside.

I forgot to add that before adhering the paper leather and pleather to the inside I adhered tulle behind the floral design. The buttons I threads and tied off on the backside and adhered to the center of each floral cutout.

I adhered Pom Pom trim and lace to the outer inside edge of the journal.

I strung the spine with elastic cording and the closure I threaded elastic cording through the button and then sewed to the middle of the spine. I also added bits of lace, trim and ribbon to the spine.

I purchased a pack of three mini composition notebooks from the Dollar Tree and covered the front and back with cardstock.

I used an assortment of chipboard embellishments from my stash to decorate the covers. 

I cut a file folder down and created a place to hold stitchy notes and washi tape samples.

I cut from white cardstock the Credit Card Sleeve Diecut, embossed with the Daisy Wreath Embossing Folder and lightly inked over the embossed images. I adhered the sleeve to the folder, cut a tag to fit the slot and wrapped washi tape around the tape in case I wanted to decorate the planner on the go.

I created a pen loop to hold an ink pen inside the planner. I cut flowers and a leaf from felt with the Stitchy Flowers and Leaf Diecuts and adhered together and added a gem to the center of the flower.

I wrapped a small piece of elastic around the pen I am going to use in my planner and cut. Next I adhered each side of the elastic on either side of the binder clip, adhere the felt flower to the side of the binder clip and clip to the folder or notebook and add the pen.

I used motivational saying on the covers of the notebooks.

As always if you have any questions about this planner please let me know. Also if you haven’t had a chance to see what Eileen’s Inspiration Team has been up to you can find those posts HERE, HERE and HERE.

I would also like to submit this project for the following challenge:
Mini Album Makers Challenge: June Challenge

Thanks for stopping by, hope your Friday is wonderful and enjoy creating!

Micro Paisley and Pink Planner and Goodies

Hi everyone! I am back with a quick post about a micro planner I created for a swap I was in. I used Eileen Hull’s Passport Diecut to create this micro planner for my swap partner Nancy. The swap was a color crush swap and we had to put together a collection of items in our swap partner’s favorite colors and Nancy’s favorite colors are soft pink and sage green…I had problems finding sage green items. 😞

I created the micro planner from fabric and fusible webbing. If you missed my how to post on how I made the Fabric Travel journal with the Journal Diecut you can find that post HERE.

I added pockets to the inside covers using lace and I added two micro notebooks, a micro scrapbook that I created from 4″x6″ journaling cards and a place to hold sticky notes. This gave Nancy plenty of goodies to have a hand when she is on the go. 😀

I found this fun pen and butterfly charm on clearance at Hobby Lobby. It sure added the right touches to finish off the micro planner.

I also put together an assortment of goodies to use with the planner or use in other craft projects.

I had a few canvas make up bags that I bought from Target with the intent of decorating and giving as gifts at Christmas time…which didn’t happen. So I decorated one of those to give Nancy more storage for her craft supplies.
I cut fabric flowers from the Stitchy Flowers & Leaf Dieuts, frayed the edges of the flowers and added a button along with cording and lace and adhered to the corner of the bag. 

Here are some of the goodies I included inside of the bag. If you have any questions about this project please let me know.

I would also like to submit this project for the following challenge:
Word Art Wednesday: Challenge #292-#293

Thanks for stopping by, hope your Monday is awesome and enjoy creating!

Shabby Chic Planner and Beach Floral Giveaway Winner Announcement

Hi everyone! I am back to share another journal I created with Eileen Hull’s Journal Diecut. This journal I actually created before my travel journal but with this one I made mistakes (which I won’t point out 😉)and I didn’t take how to photos as I was working on it. 😕 So if you missed the how to of my travel journal you can find the post HERE.

This journal is basically the same other than I used Pom Pom trim, a different type of lace and ribbon was used on the spine.

The inside I used a combination of traveler’s notebooks from Michael’s, Target and Webster’s Pages.

I added lace pockets on the inside covers to diecuts and journaling cards.

And there you have it! If you have any questions about this journal please let me know. Also if you want to see the what the Inspiration Team has been up to hop on over to Eileen’s BLOG.


Linda Israel is the winner of this little matchbox with goodies! Also I decided to giveaway a second small grab bag of goodies and the winner of that is Beth Byrd! Congratulations ladies and please contact me with your mailing info. 😊
Thanks for stopping by, hope your Friday is wonderful and enjoy creating!

Fabric Travel Journal

Hi everyone! I am back with a step by step tutorial of Eileen Hull’s Journal DiecutGenerally I get caught up in the process and forget to do photos along the way as I create. 😐 

The fun part of this journal is there is no sewing whatsoever. 😀 First I started by cutting four pieces of fabric (two for the cover and two for the inside cover) and two pieces of fusible webbing  all pieces slightly larger that the journal diecut.

I placed the piece of fabric on top of the fusible webbing and the other fabric on the bottom and ironed firmly on both sides and let cool. The fusible webbing has directions on how to use it when you get it cut. 

I had to take care as to how I ran the fabric through the diecut machine since I didn’t want the map on the cover to be upside down.

I used Fabri-Tac adhesive to glue all of the journal together. It “grabs” the fabric quickly so no need to hold and wait for it to dry.

Next I adhered trim around the outside to cover the raw edge of the journal.

Trim finished around the cover of the journal.

I adhered lace to either side of the center holes and where I couldn’t see the holes I used an awl to poke holes through the lace.

The inside cover I cut two pieces of stretchy lace and while gluing to the inside I pulled the lace taunt as I went.

I then finished the outer edges with trim.

I used a couple of my 8″x8″ stacks of cardstock and some graph paper to create the traveler’s notebooks for my journal. The 8″x8″ is a perfect size! No measuring or cutting down and all you have to do is fold and punch holes in the spine and sew together. The notebooks have ten papers per signature and I trimmed the excess cardstock that protruded from the notebooks to give  them a more finished look.

I finished the journal by adhering lace to the center and added an elastic band with a charm for the outside closure and strung the inside and added my traveler’s notebook and waa-laaa finished!

Be sure to hop on over to Eileen Hull’s blog for more inspiration from the design team and as always if you have any questions about this project please let me know.

Thanks for stopping by, hope your Wednesday is awesome and enjoy creating!