Hi everyone! Can you believe this year is almost over? I’ve been busy creating behind the scenes working on craft and home projects. Also I’ve been spending quality time with family. But I want to share my three favorite projects that I created for Eileen Hull this year.
The first project is a prayer journal I created this for a friend using the Skinny Mini Book Box Diecut. You can find that blog post HERE.
The second project I created a swatch book using the Hardbound Journal Diecut along with a few other dies and stamp set. I loved being able to add bits of ribbon, lace and trim to this book. You can find that blog post HERE.
If you have any questions or comments please leave them below. Also if you haven’t been by Eileen Hull’s blog lately to see what is happening with her and the team you can find the latest post HERE.
(Products listed above are Affiliated Links for your convenience)
DISCLAIMERS
This blog is compensated to provide opinion on products, services, websites, and various other topics. Even though the owner(s) of this blog receives compensation for our posts or advertisements. I always give my honest opinions, findings, beliefs, or experiences on those topics or products. The views and opinions expressed on this blog are purely my own. Any product claim, statistic, or quote should be checked with each manufacturer. Verify other representations about a product or service with the provider or party in question.This blog contains affiliate links. Clicking these links helps to support Tonya Trantham Designs – Creative Paper Addiction. It’s at no additional cost to you.Today’s features are Sizzix and Eileen Hull Products.
Thanks for stopping by, I hope your Tuesday is wonderful and enjoy creating!
Hi everyone! I’ve been extremely busy with everything that pertains to inside the home. I’m just getting around to sharing my first project of the month for Eileen Hull. It’s hard to believe that Christmas is right around the corner. So I decided I was going to create a December Daily since I’ve been saving the gusset bags (it has a pleat on each side of the paper bag) that my husband’s medicine has come in when he picks them up at the Walmart pharmacy. Anyways, let’s get started!
The first thing I did was cut off a tiny section of the bottom of each bag. Next I cut the middle of the “gusset” to create one cover and three inside pages. That’s a total of four bags cut for one journal. The top of the bags has an “extended “flap” of paper that I scored. I glued the “flap” and each of folded edges of the gusset down.
The middle gusset I adhered together. I glued each side of the gusset page onto the center piece/gusset.
I did that for each of the three pages.
Now for the fun stuff! Decorating the cover! First, I cut patterned cardstock, inked the edges with a green chalk ink and glued to the front and back covers. I added two strips of cardstock to the cover. I cut two of the largest tunnel die from the Tunnel Arches Thinlits and adhered both, ends facing each other, to the cover along with a strip of patterned cardstock.
I cut the largest circle die from the Rainbow Wheels Thinlits and inked the edges with a brown chalk ink.
I glued another strip of patterned cardstock to the cover before adding the circle die. I cut two of the wreaths from the Wreath and Snowflake Thinlits (retired), placed on top of each other and adhered to the circle. I cut a deer die from the Home Sweet Home Thinlits, inked with a brown chalk ink and placed in the center of the wreath.
I placed the “it’s the most wonderful time of the year” Chipboard Christmas Sentiment underneath the deer. I cut two holly dies from the Funky Festive Thinlits (retired), inked and shaped with a Stylus. I placed those onto the chipboard sentiment. I added White Gemsto the wreath and the holly. I also glued two pieces of deep pink ric rac to cover to finish.
The only thing left to do is to decorate the inside pages. I think this journal will be an abbreviated version of a December Daily. Even though the holiday season is busy I don’t do a lot of exciting things to document.
Anyways, if you have any questions or comments please leave them below.
This blog is compensated to provide opinion on products, services, websites, and various other topics. Even though the owner(s) of this blog receives compensation for our posts or advertisements. I always give my honest opinions, findings, beliefs, or experiences on those topics or products. The views and opinions expressed on this blog are purely my own. Any product claim, statistic, or quote should be checked with each manufacturer. Verify other representations about a product or service with the provider or party in question.This blog contains affiliate links. Clicking these links helps to support Tonya Trantham Designs – Creative Paper Addiction. It’s at no additional cost to you.Today’s features are Sizzix, Eileen Hull and Scrapbook.com Products.
Thanks for stopping by, I hope your Tuesday is wonderful and enjoy creating!
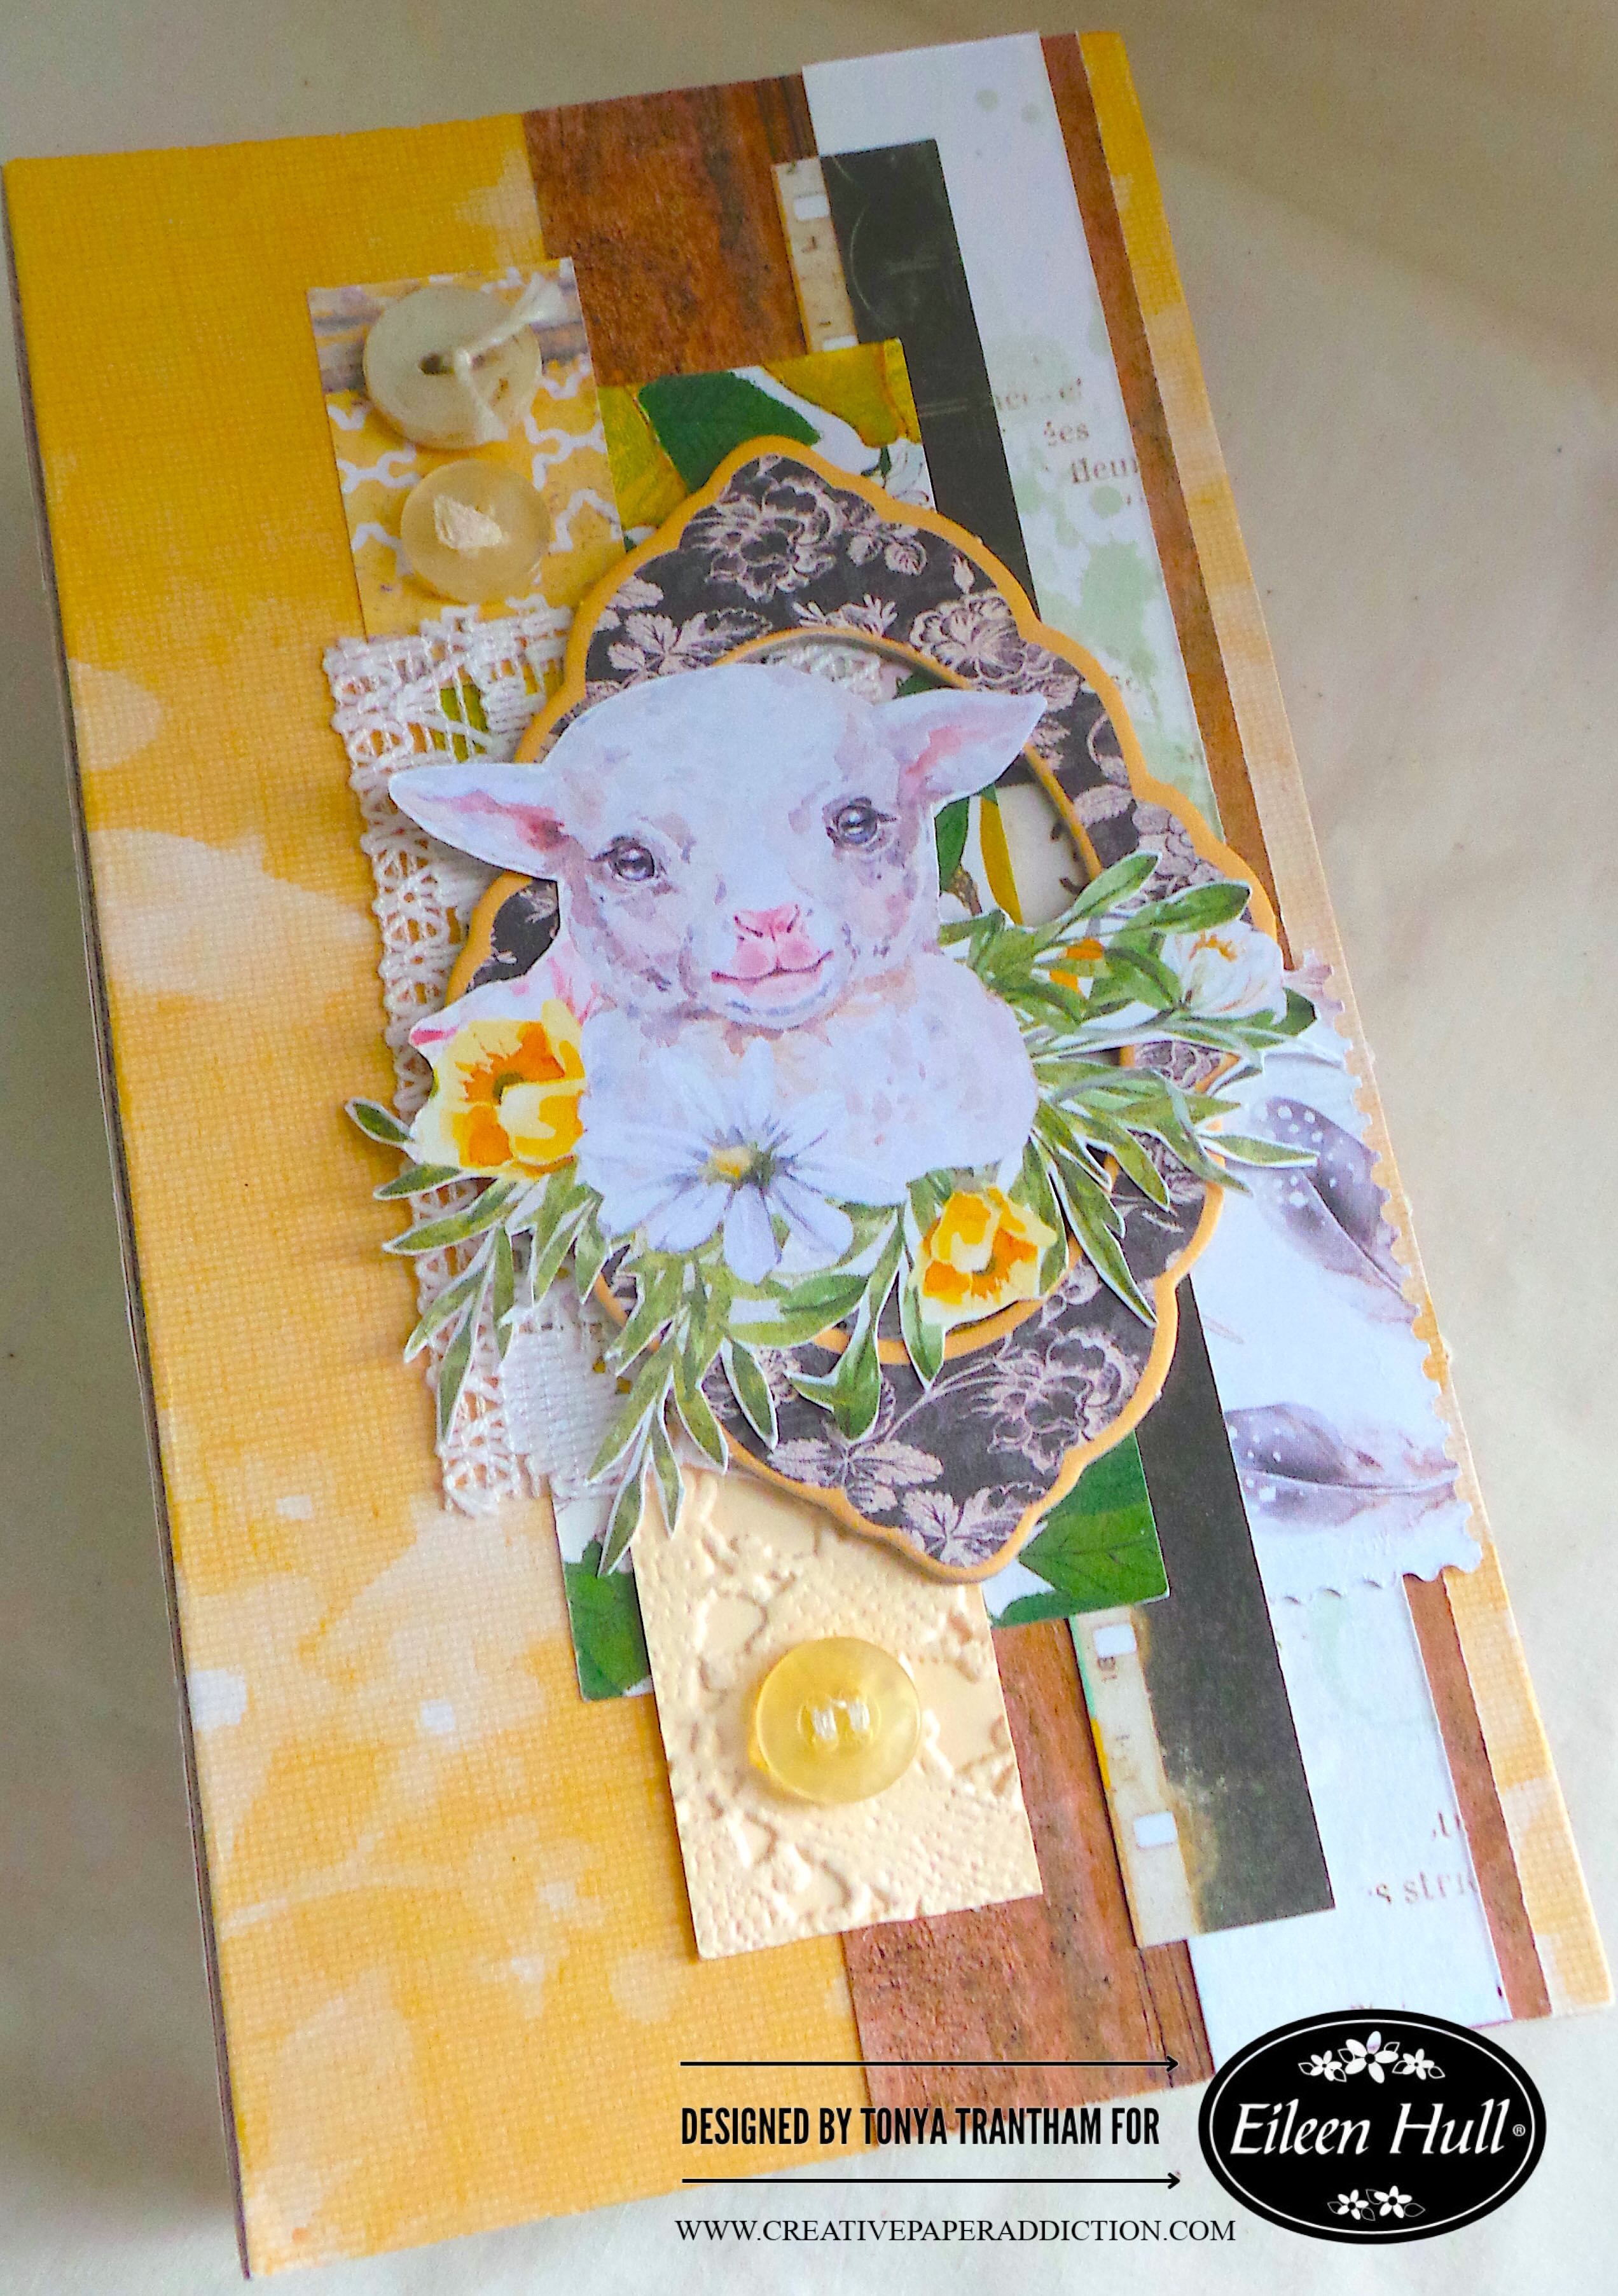
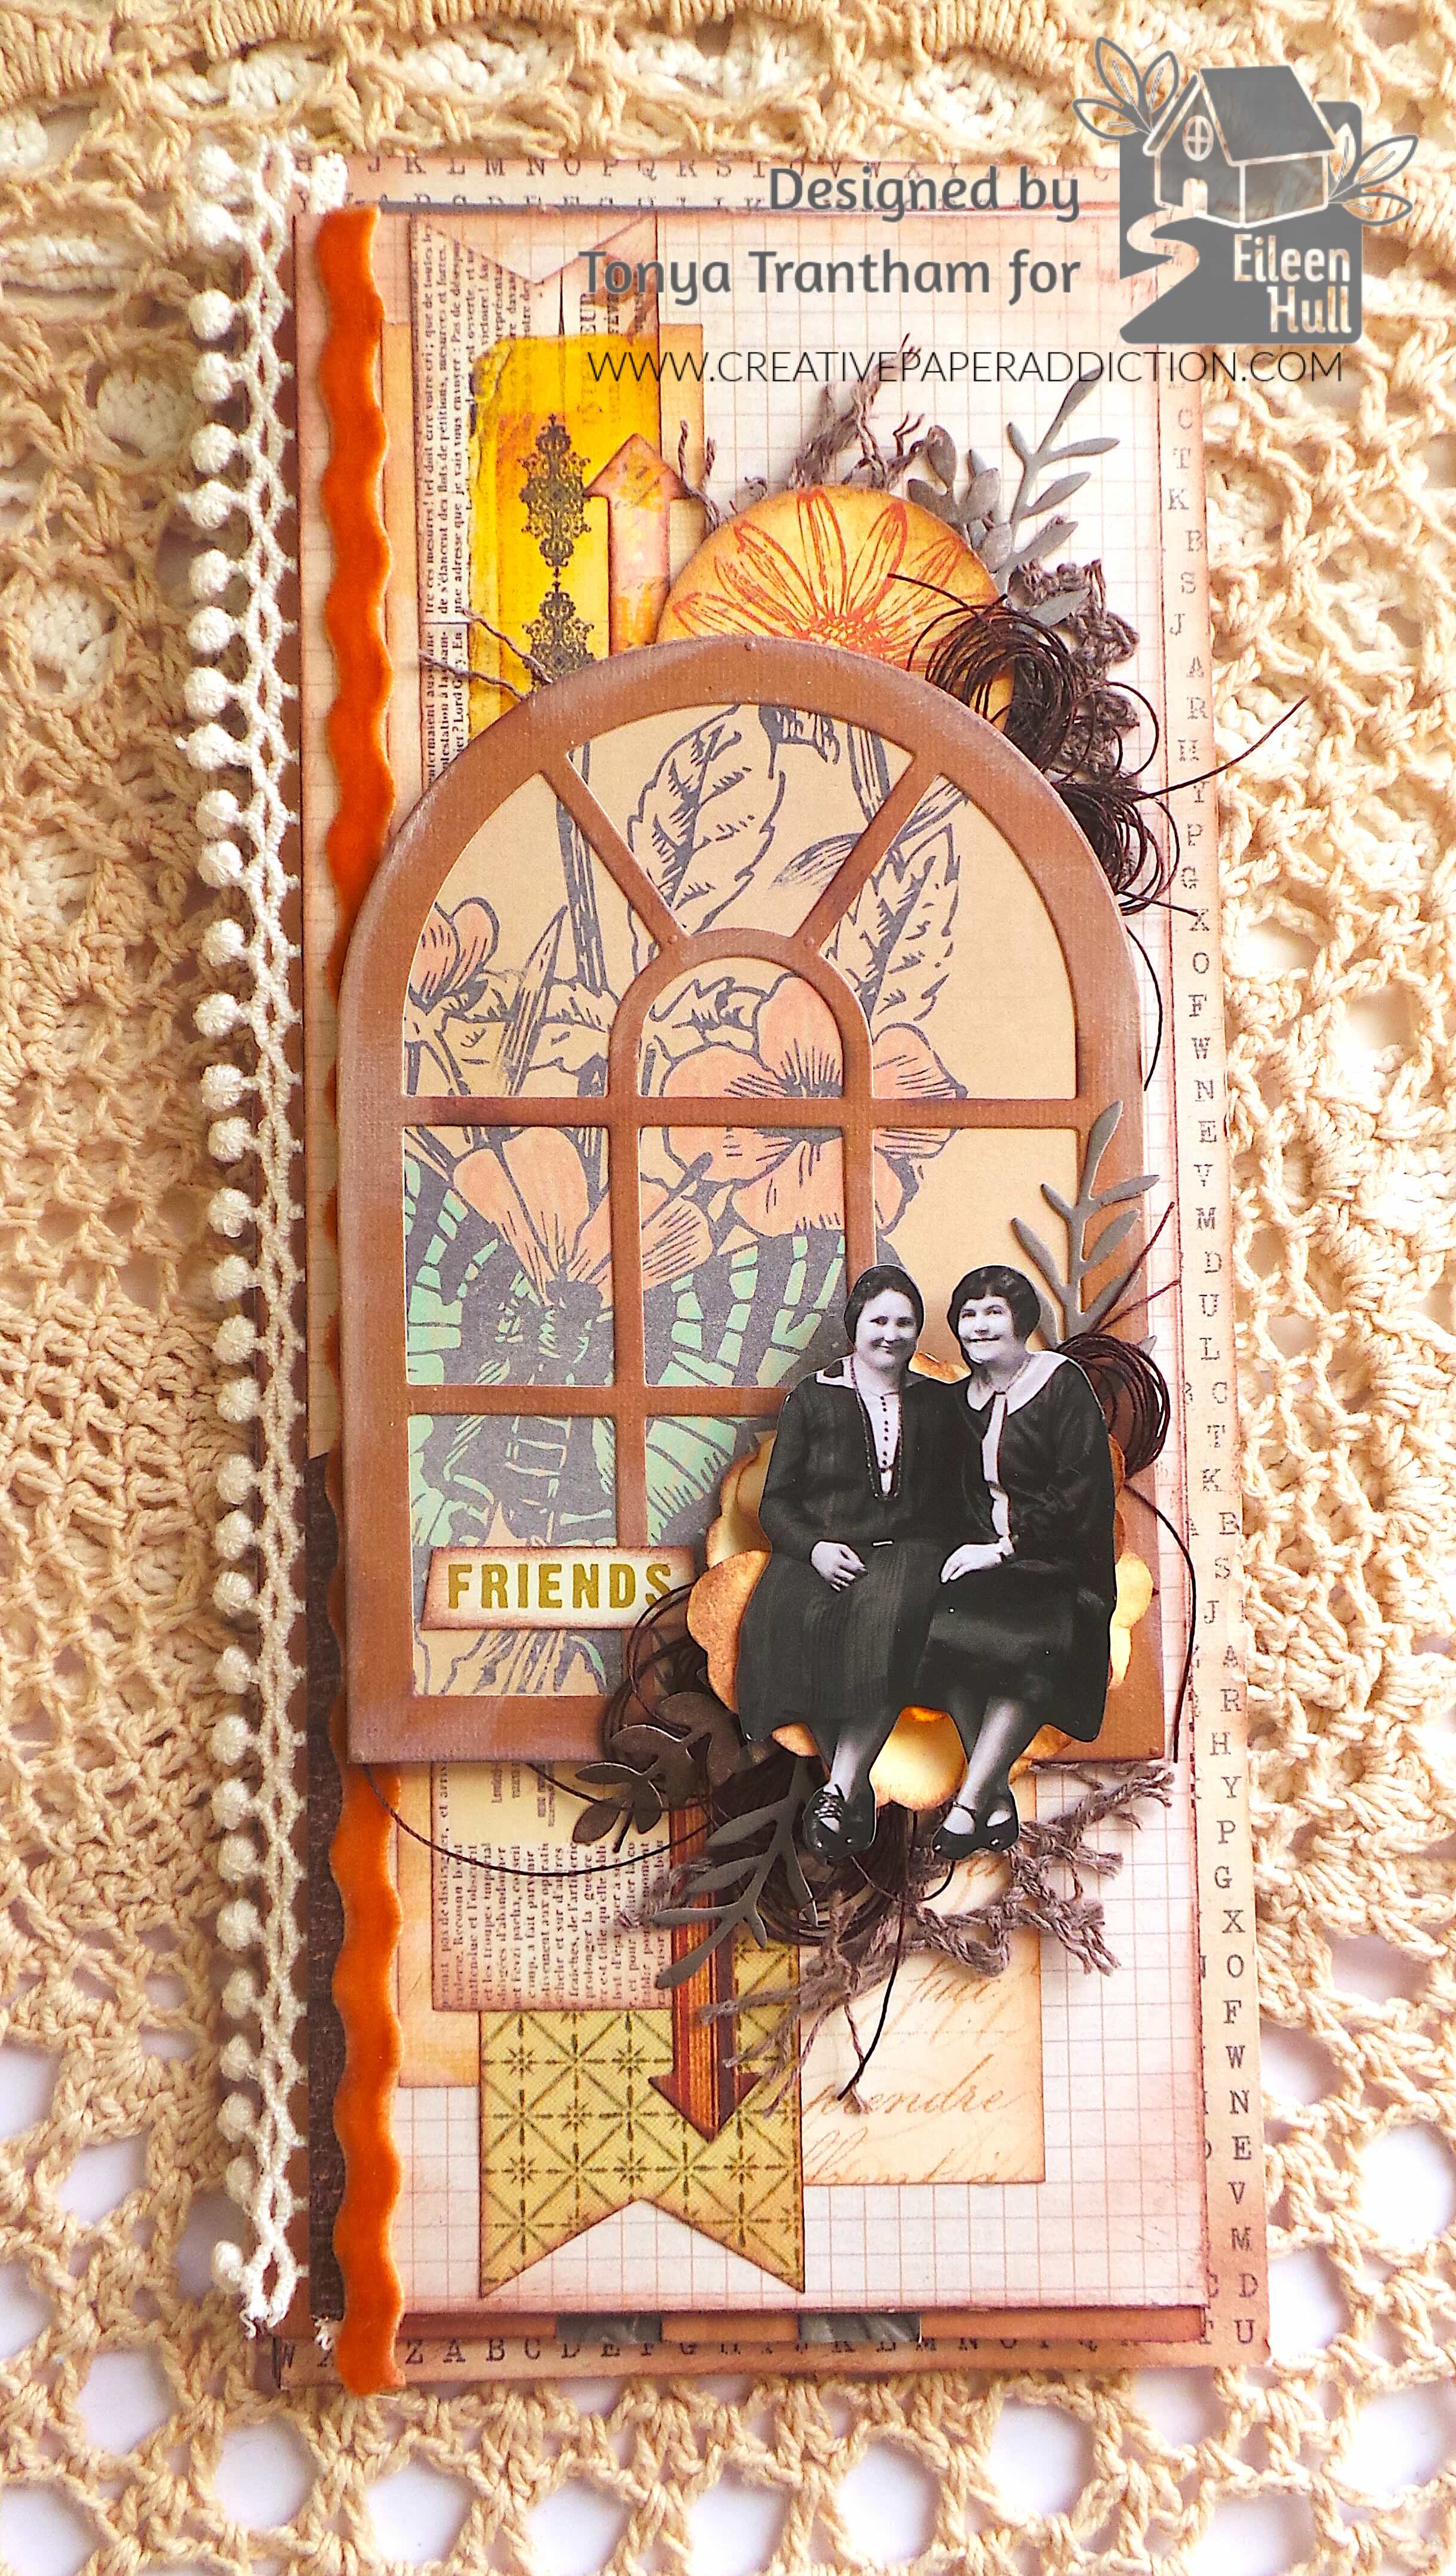
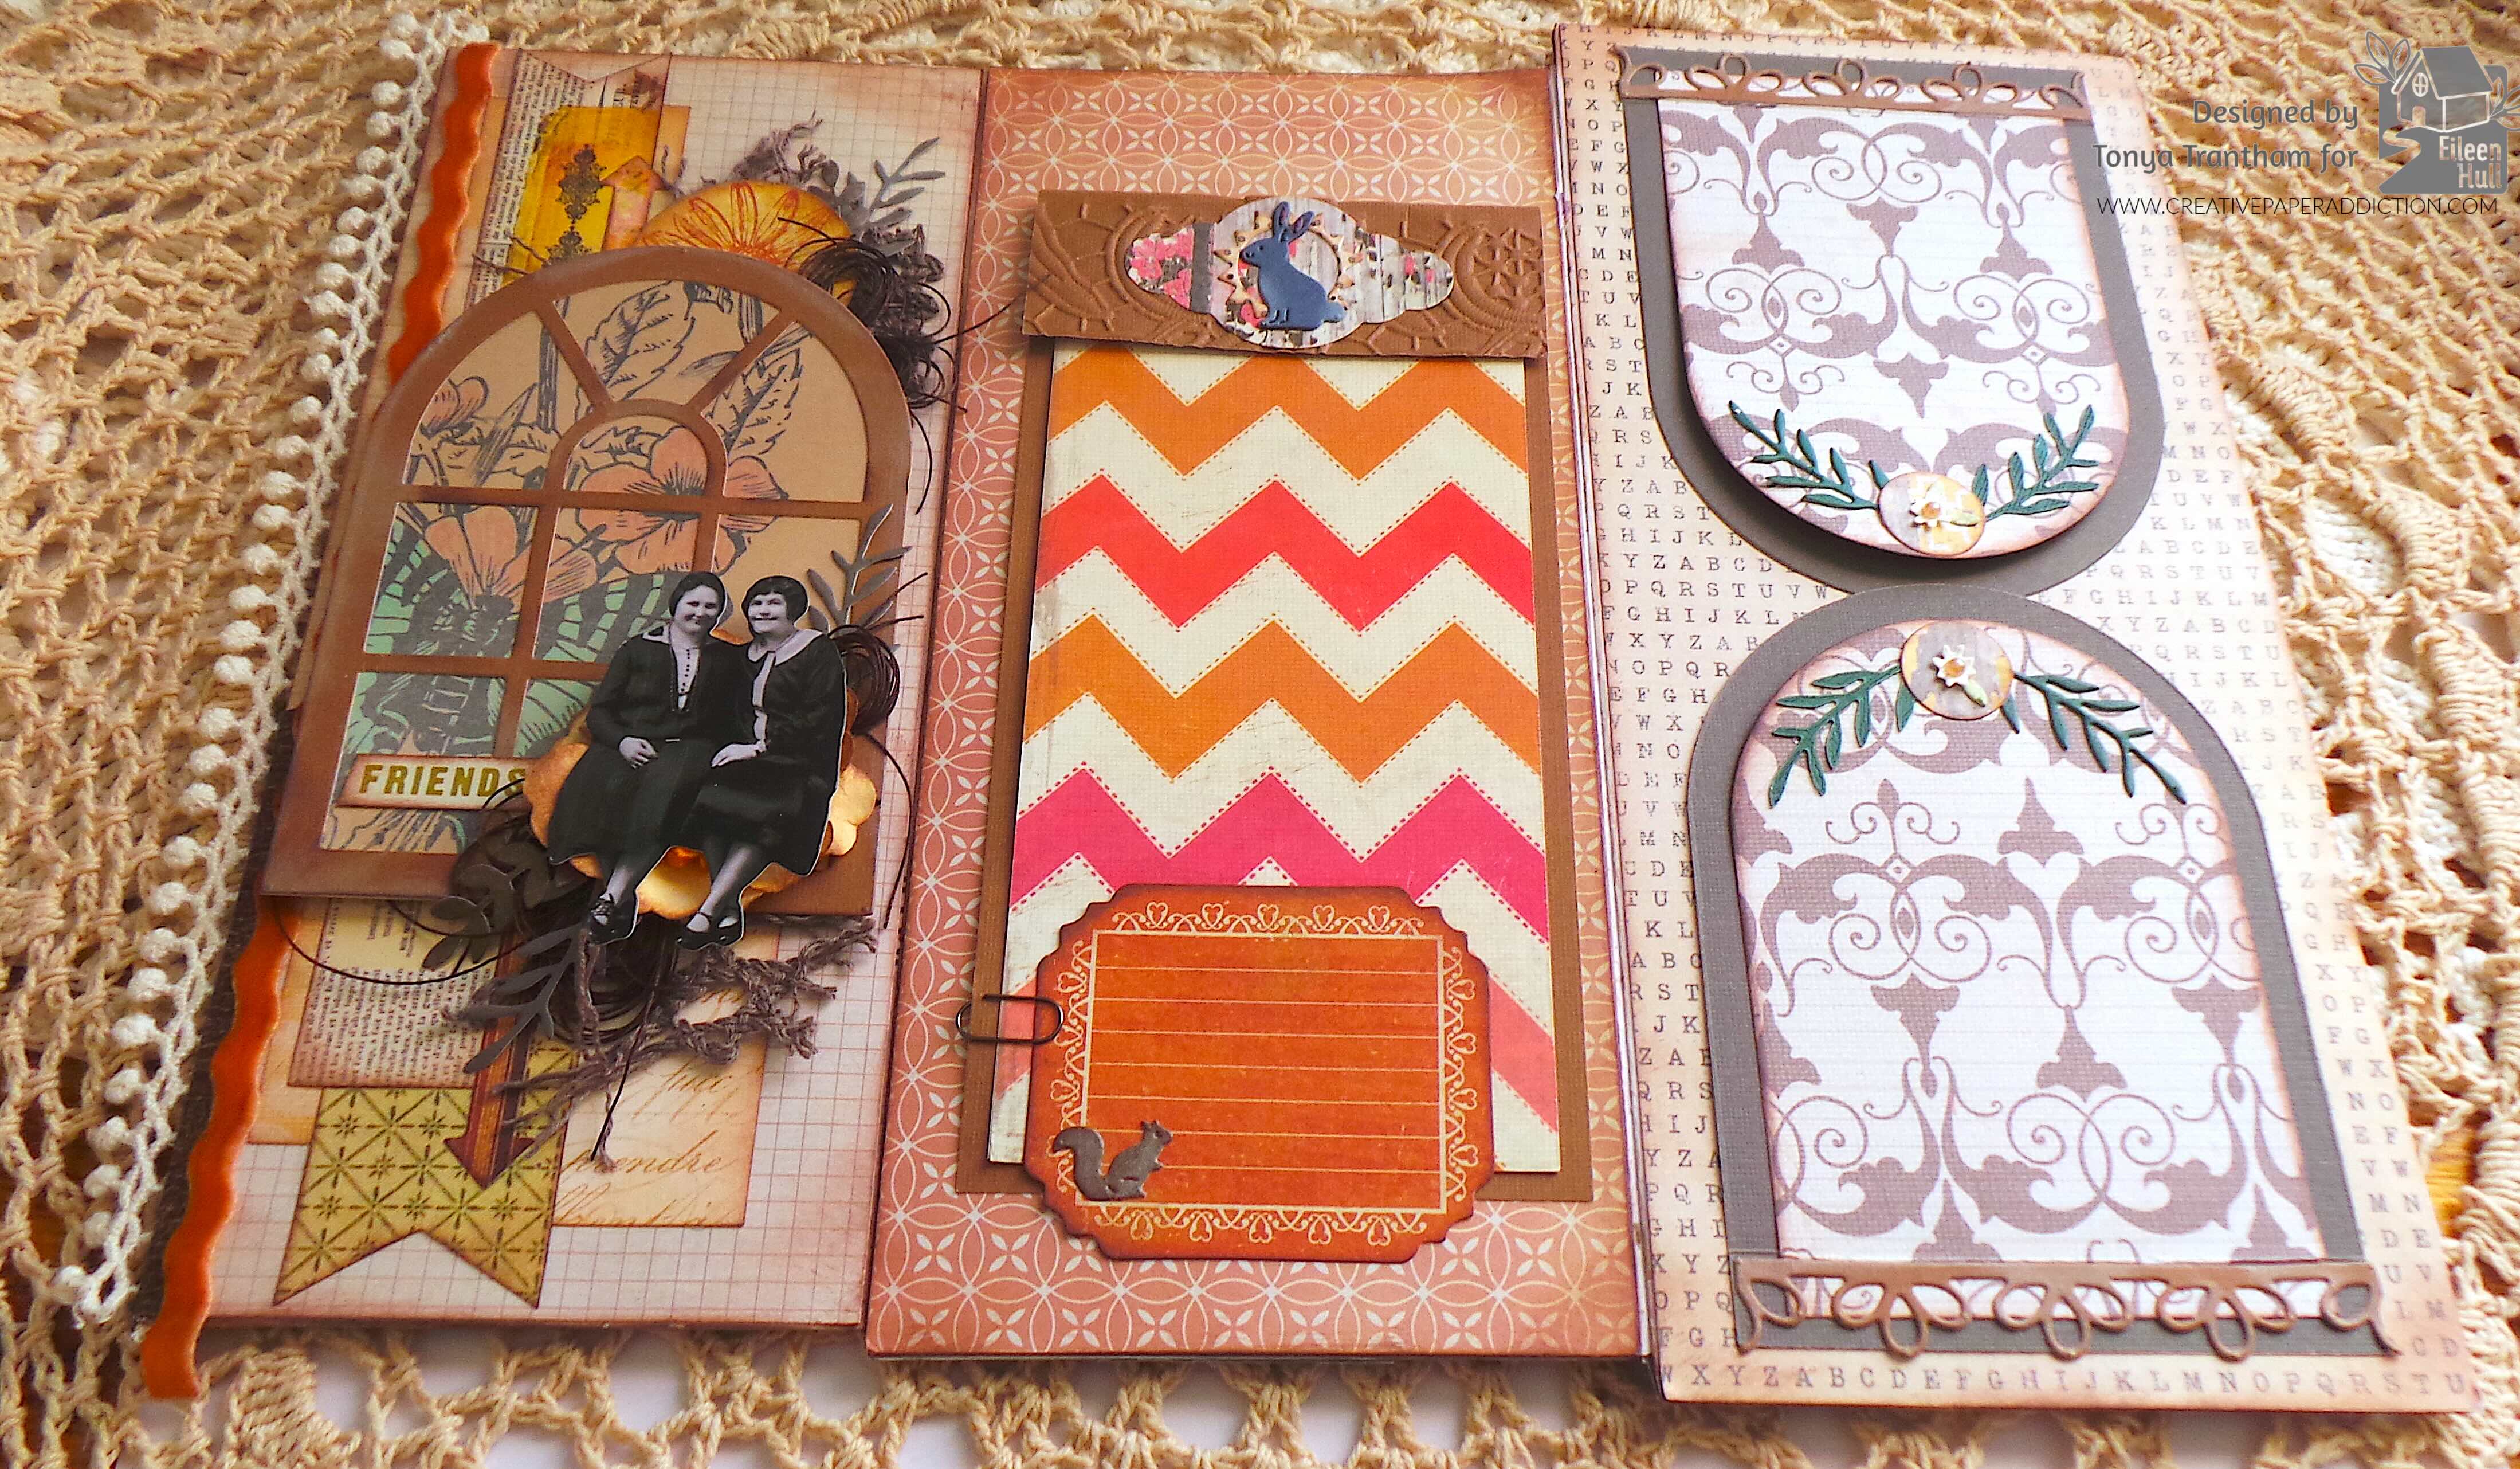
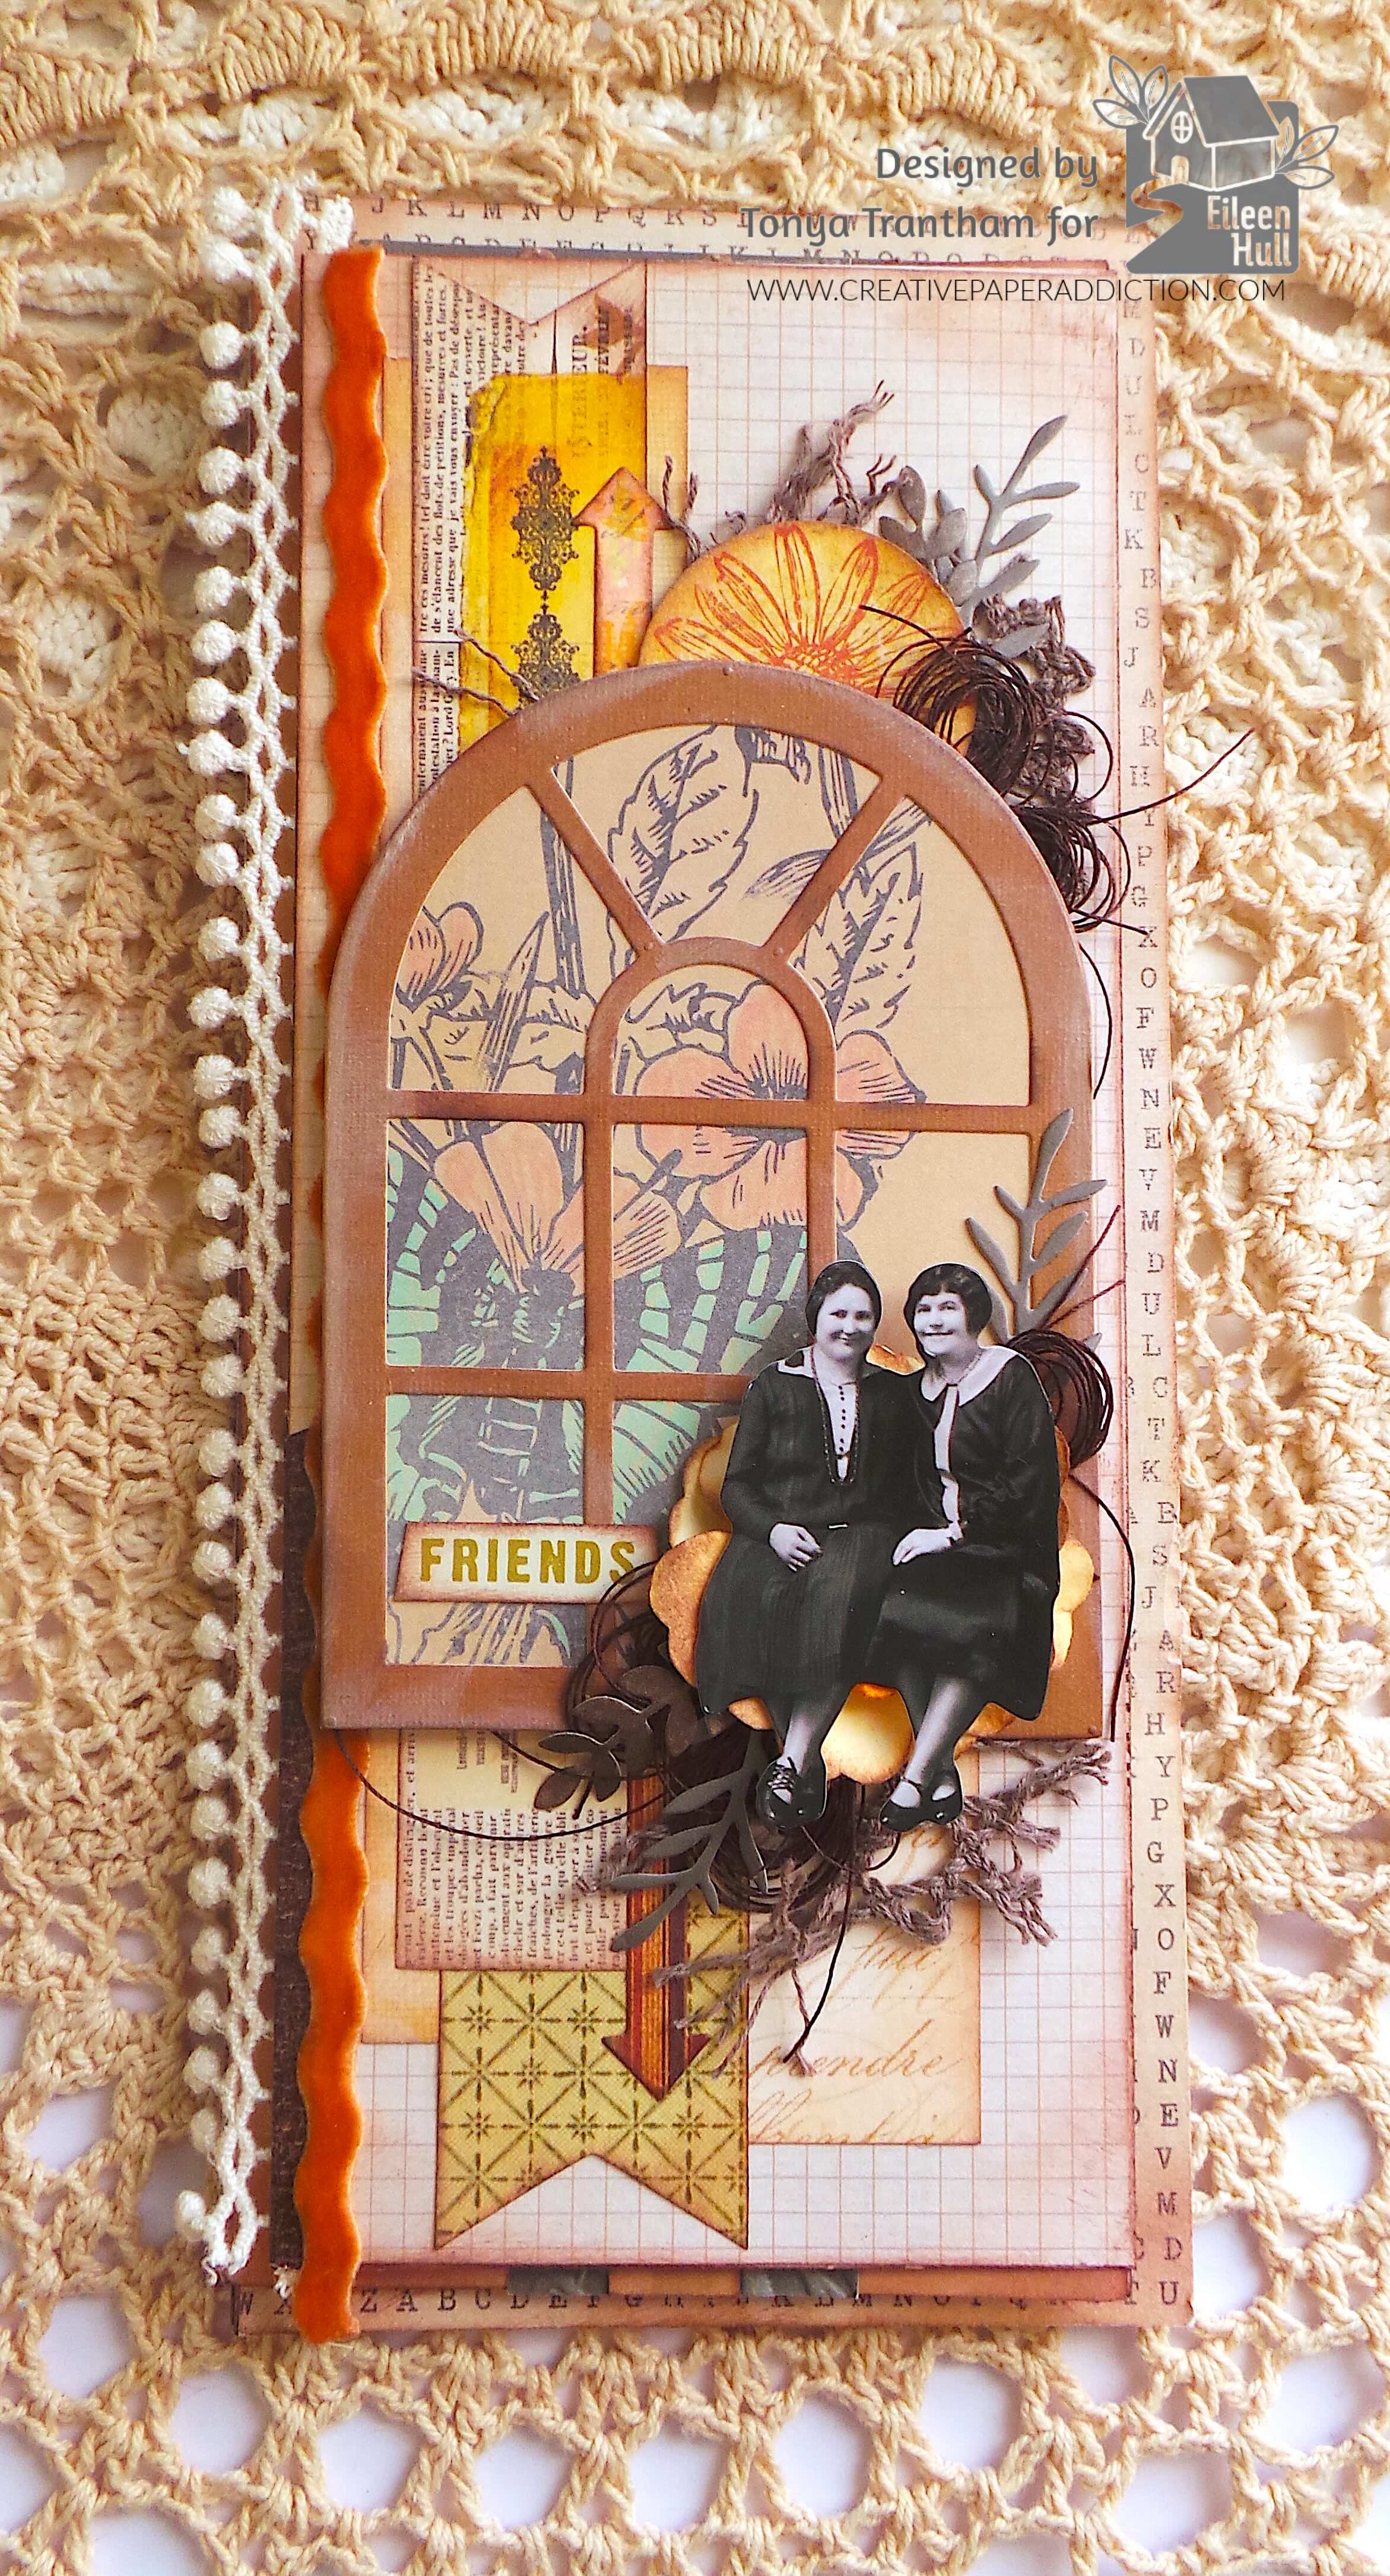
Hi everyone! I’m back with my first post of the month. I want to share how I altered three envelopes and turned them into a journal. I used a wide assortment of diecuts from Eileen Hull’s newest collection to create this fun project. Anyways let’s get started!
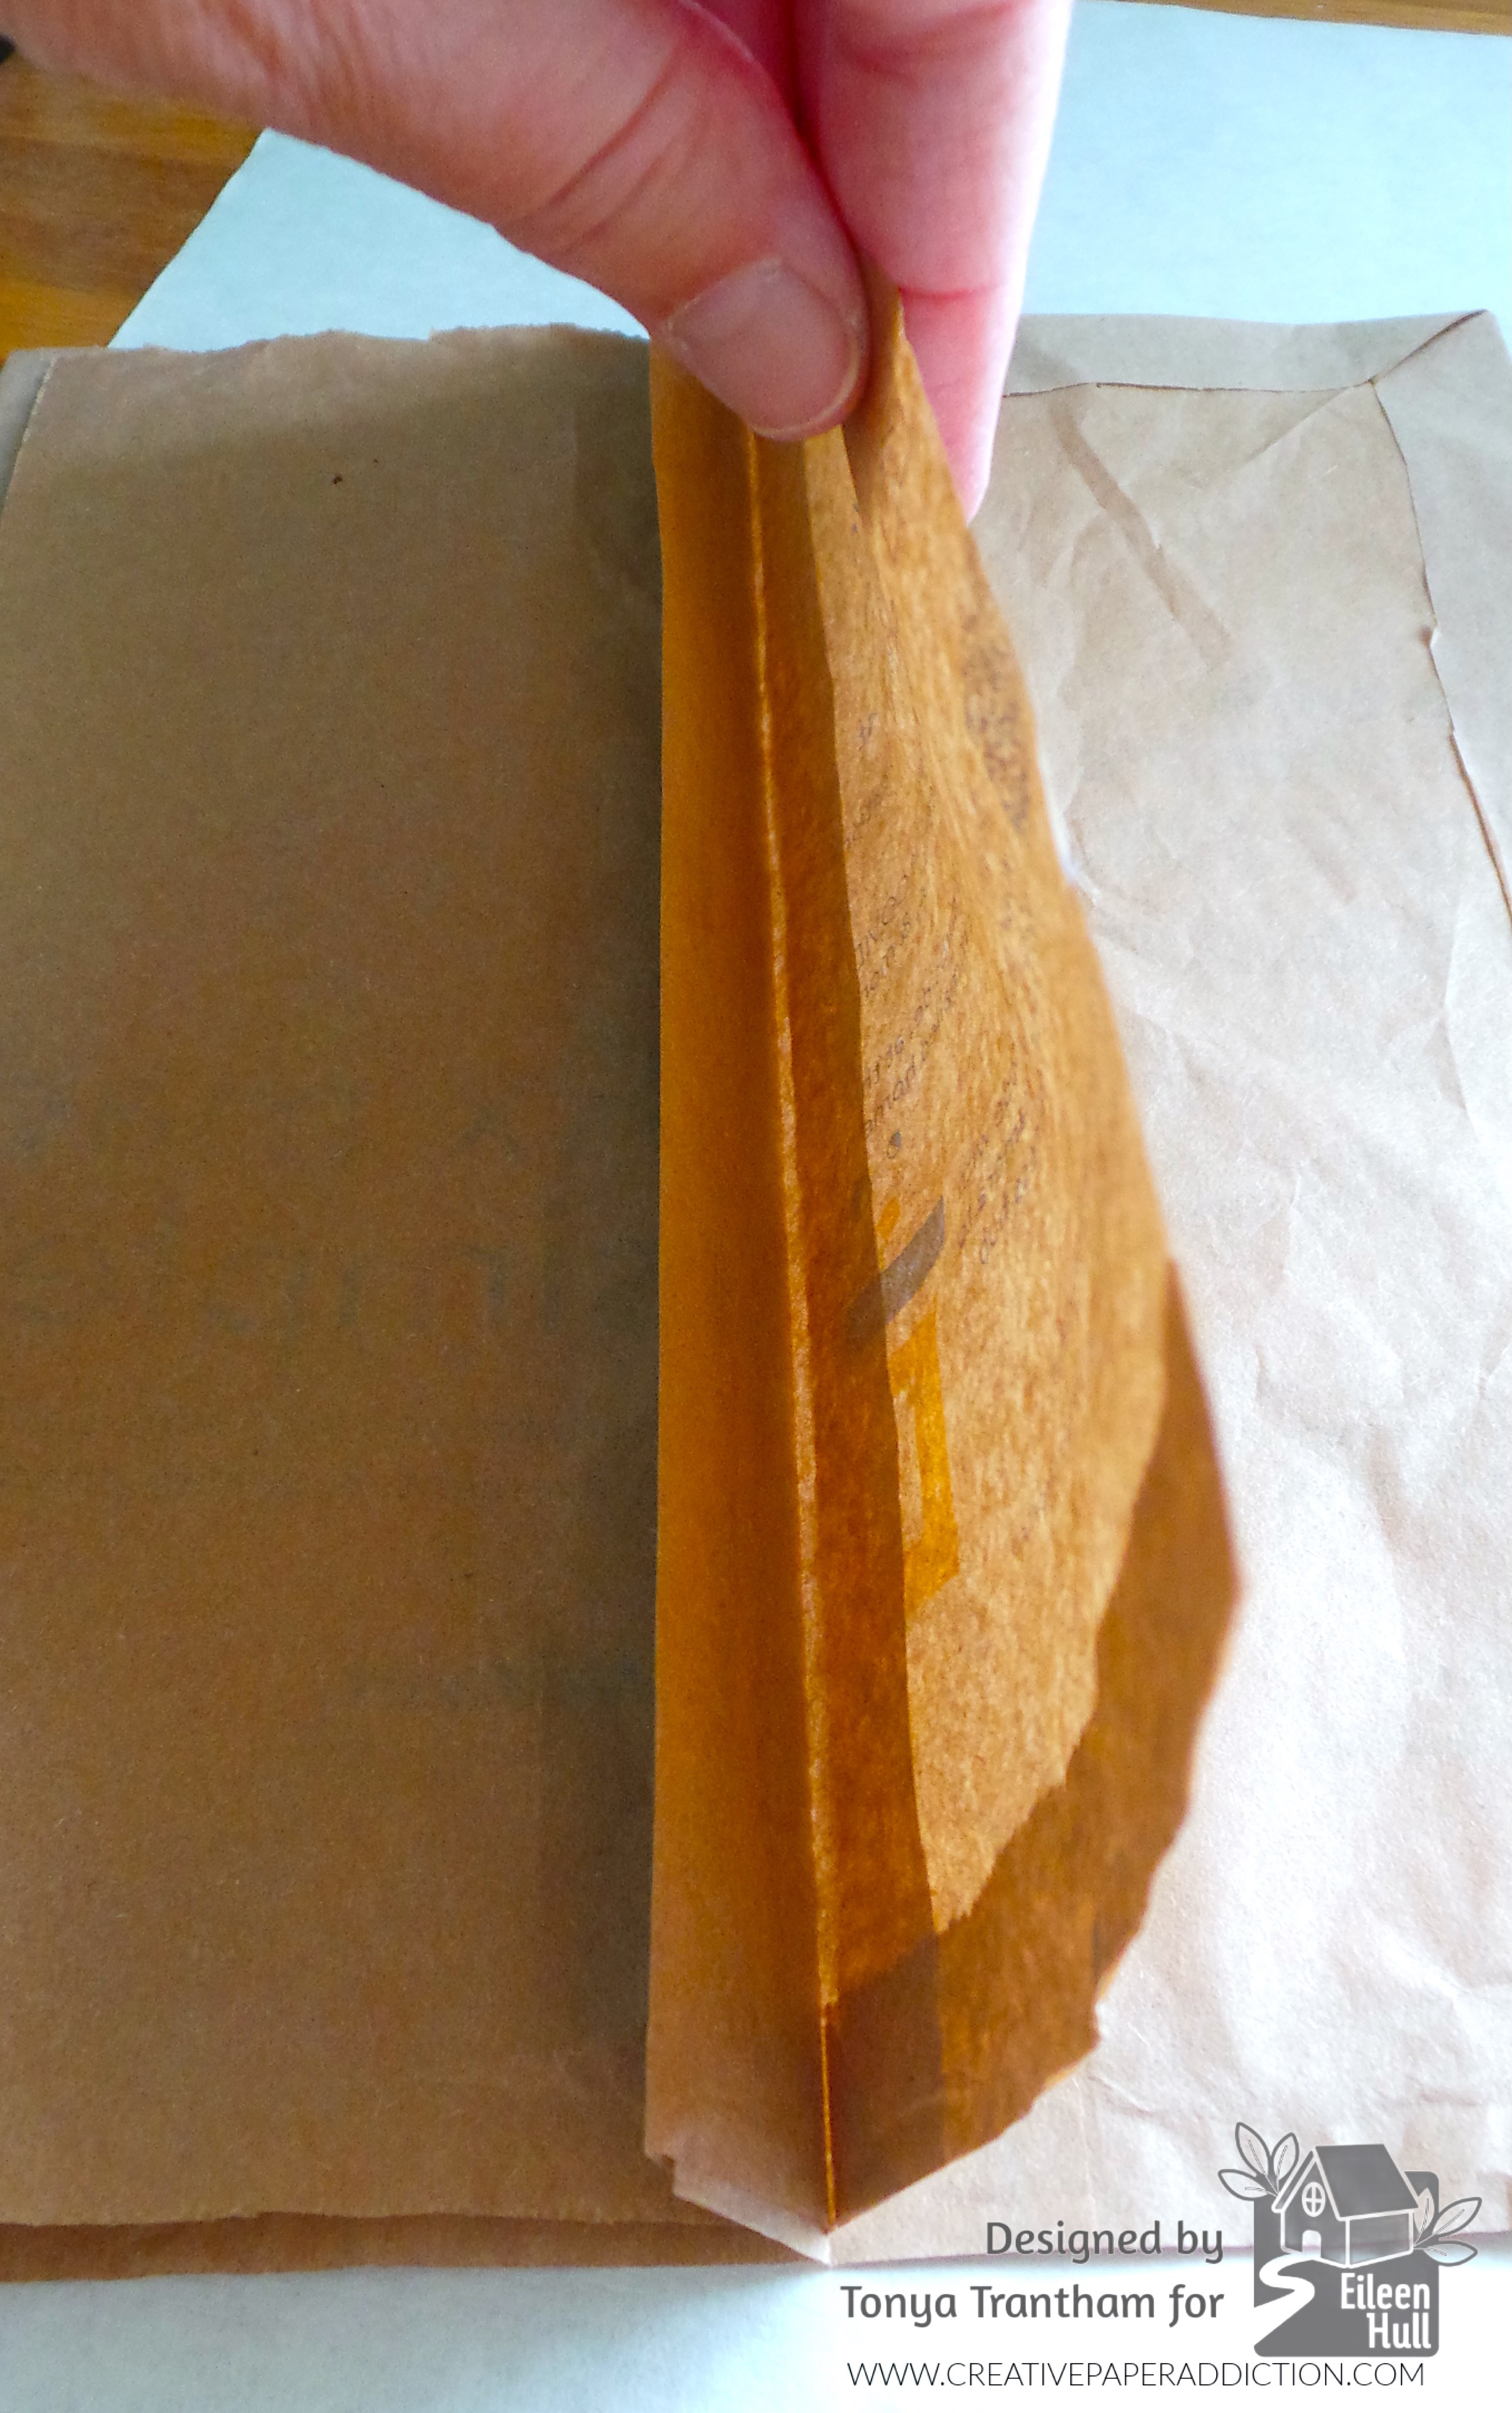
I have no step out photos of how I put together the envelopes. But I glued the top envelope flap to the middle envelope. The bottom envelope I adhered to the middle envelope to create a trip fold journal.
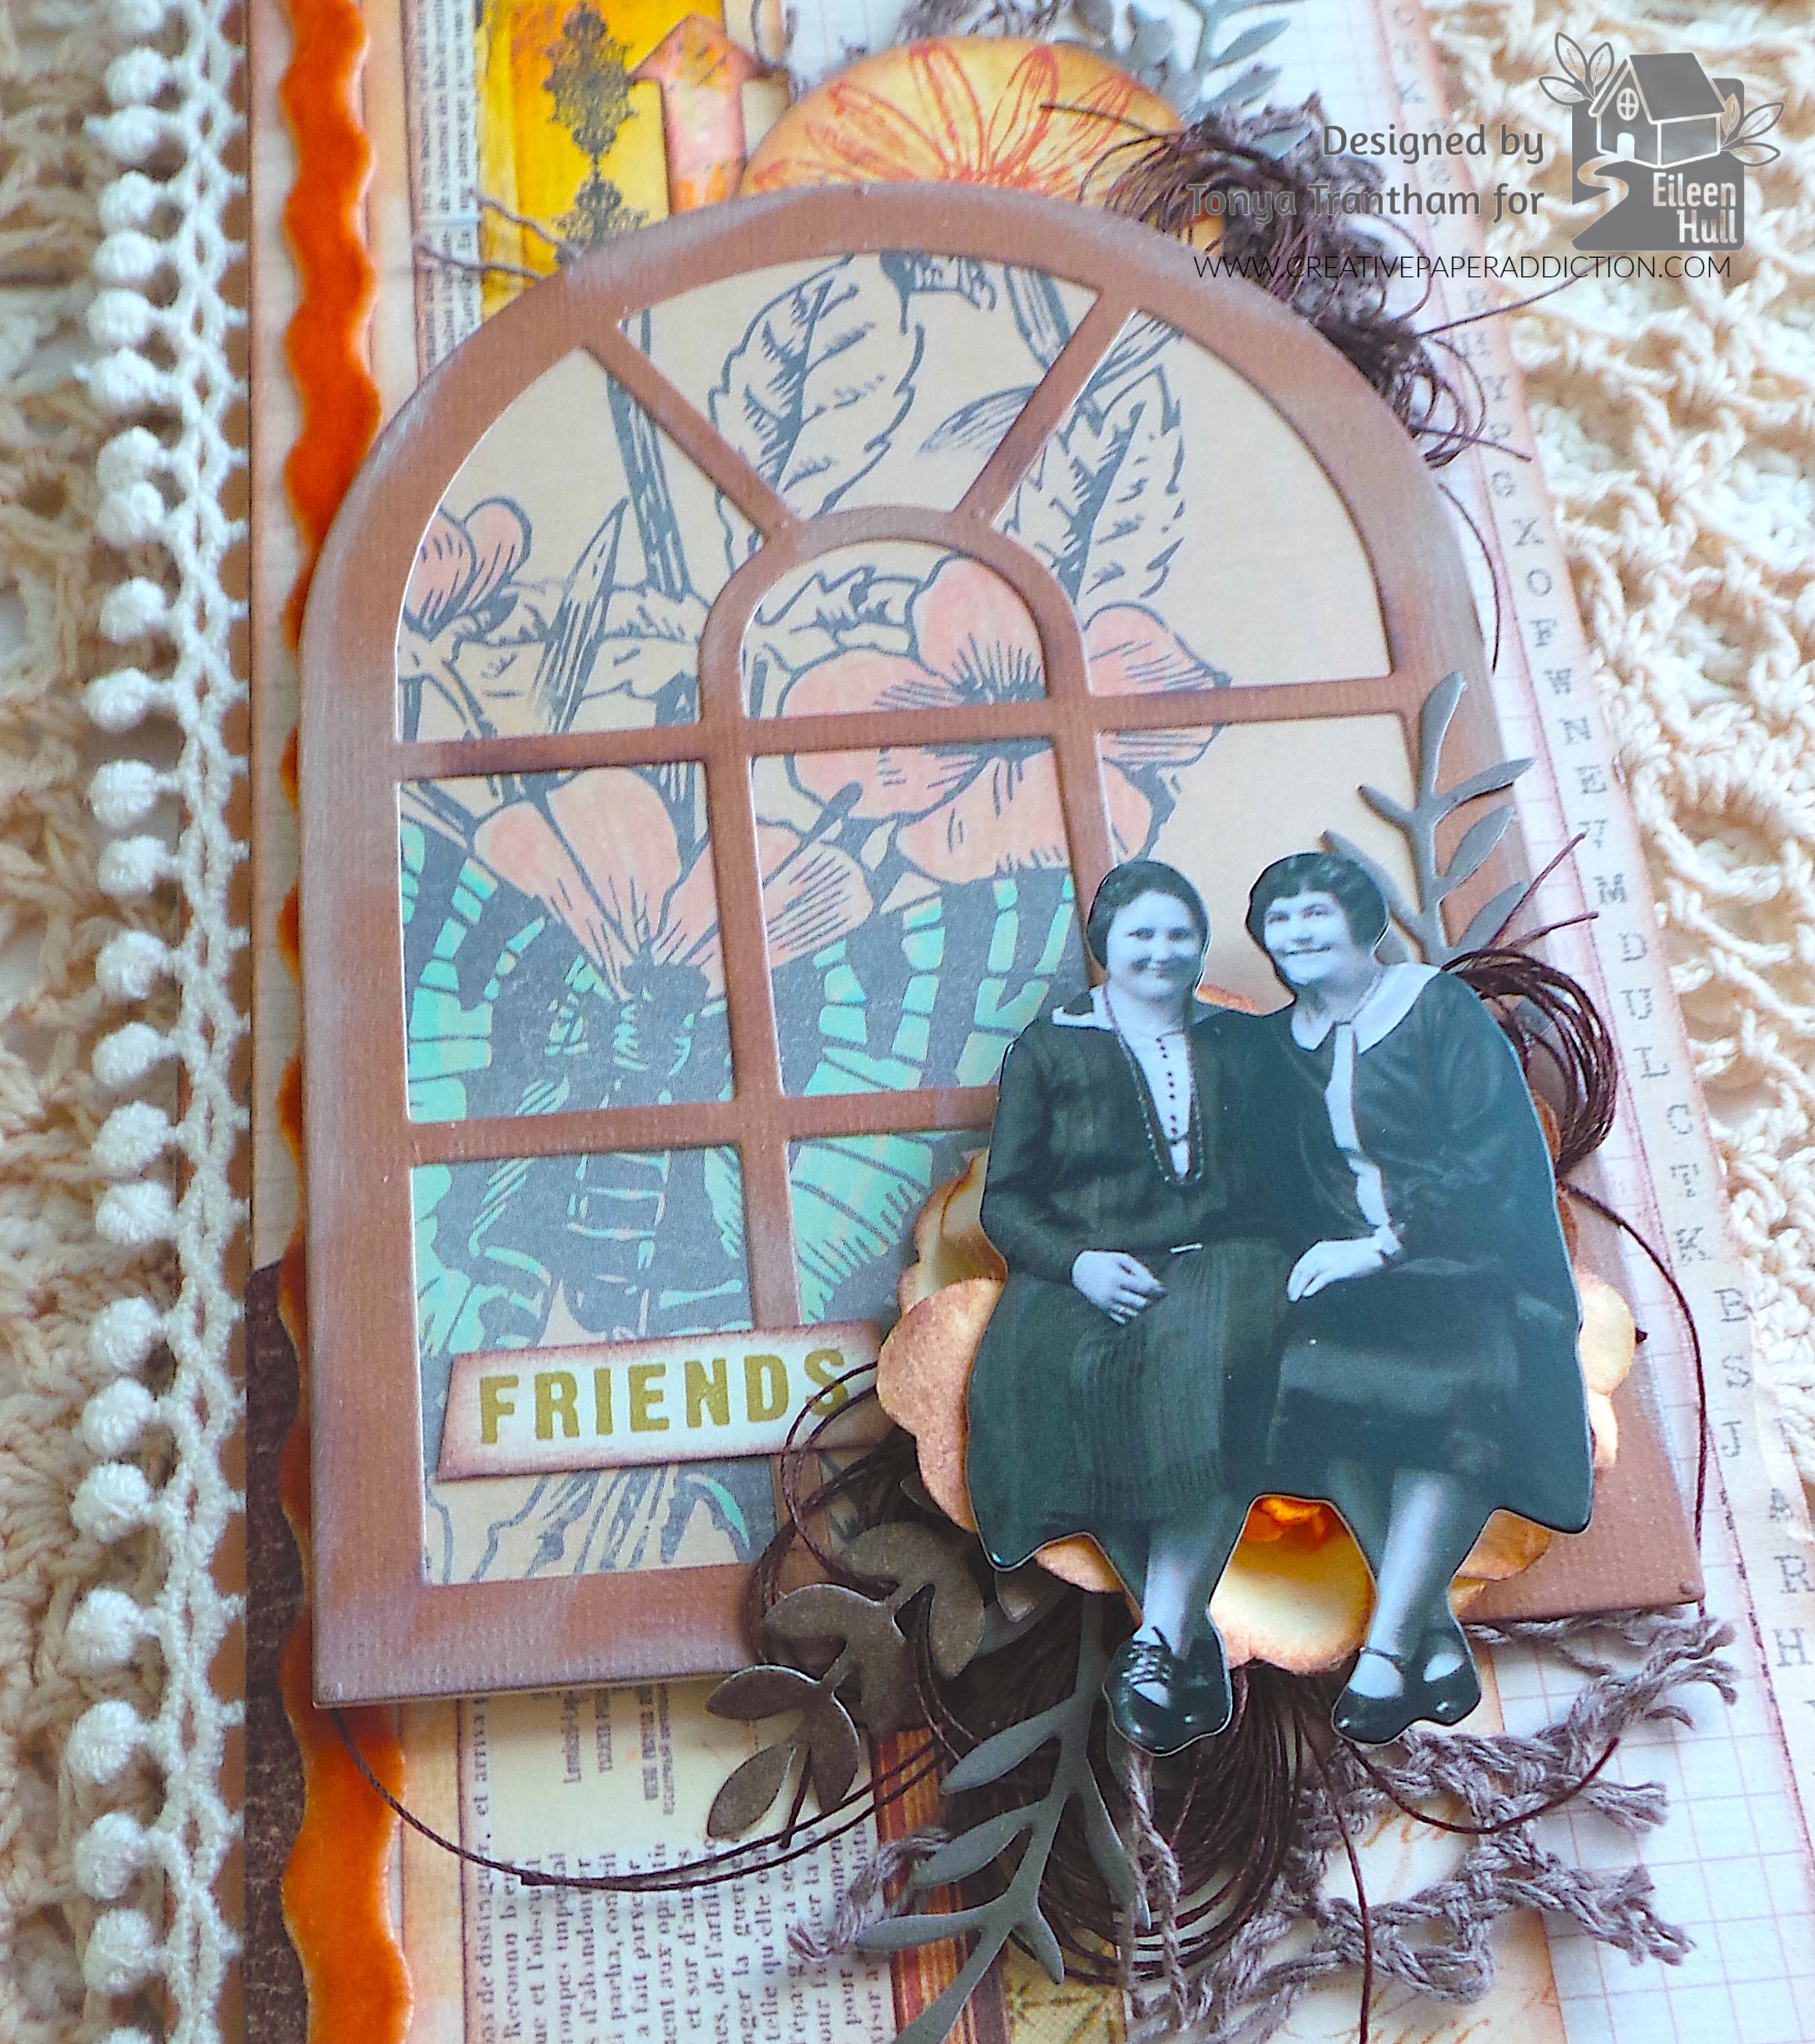
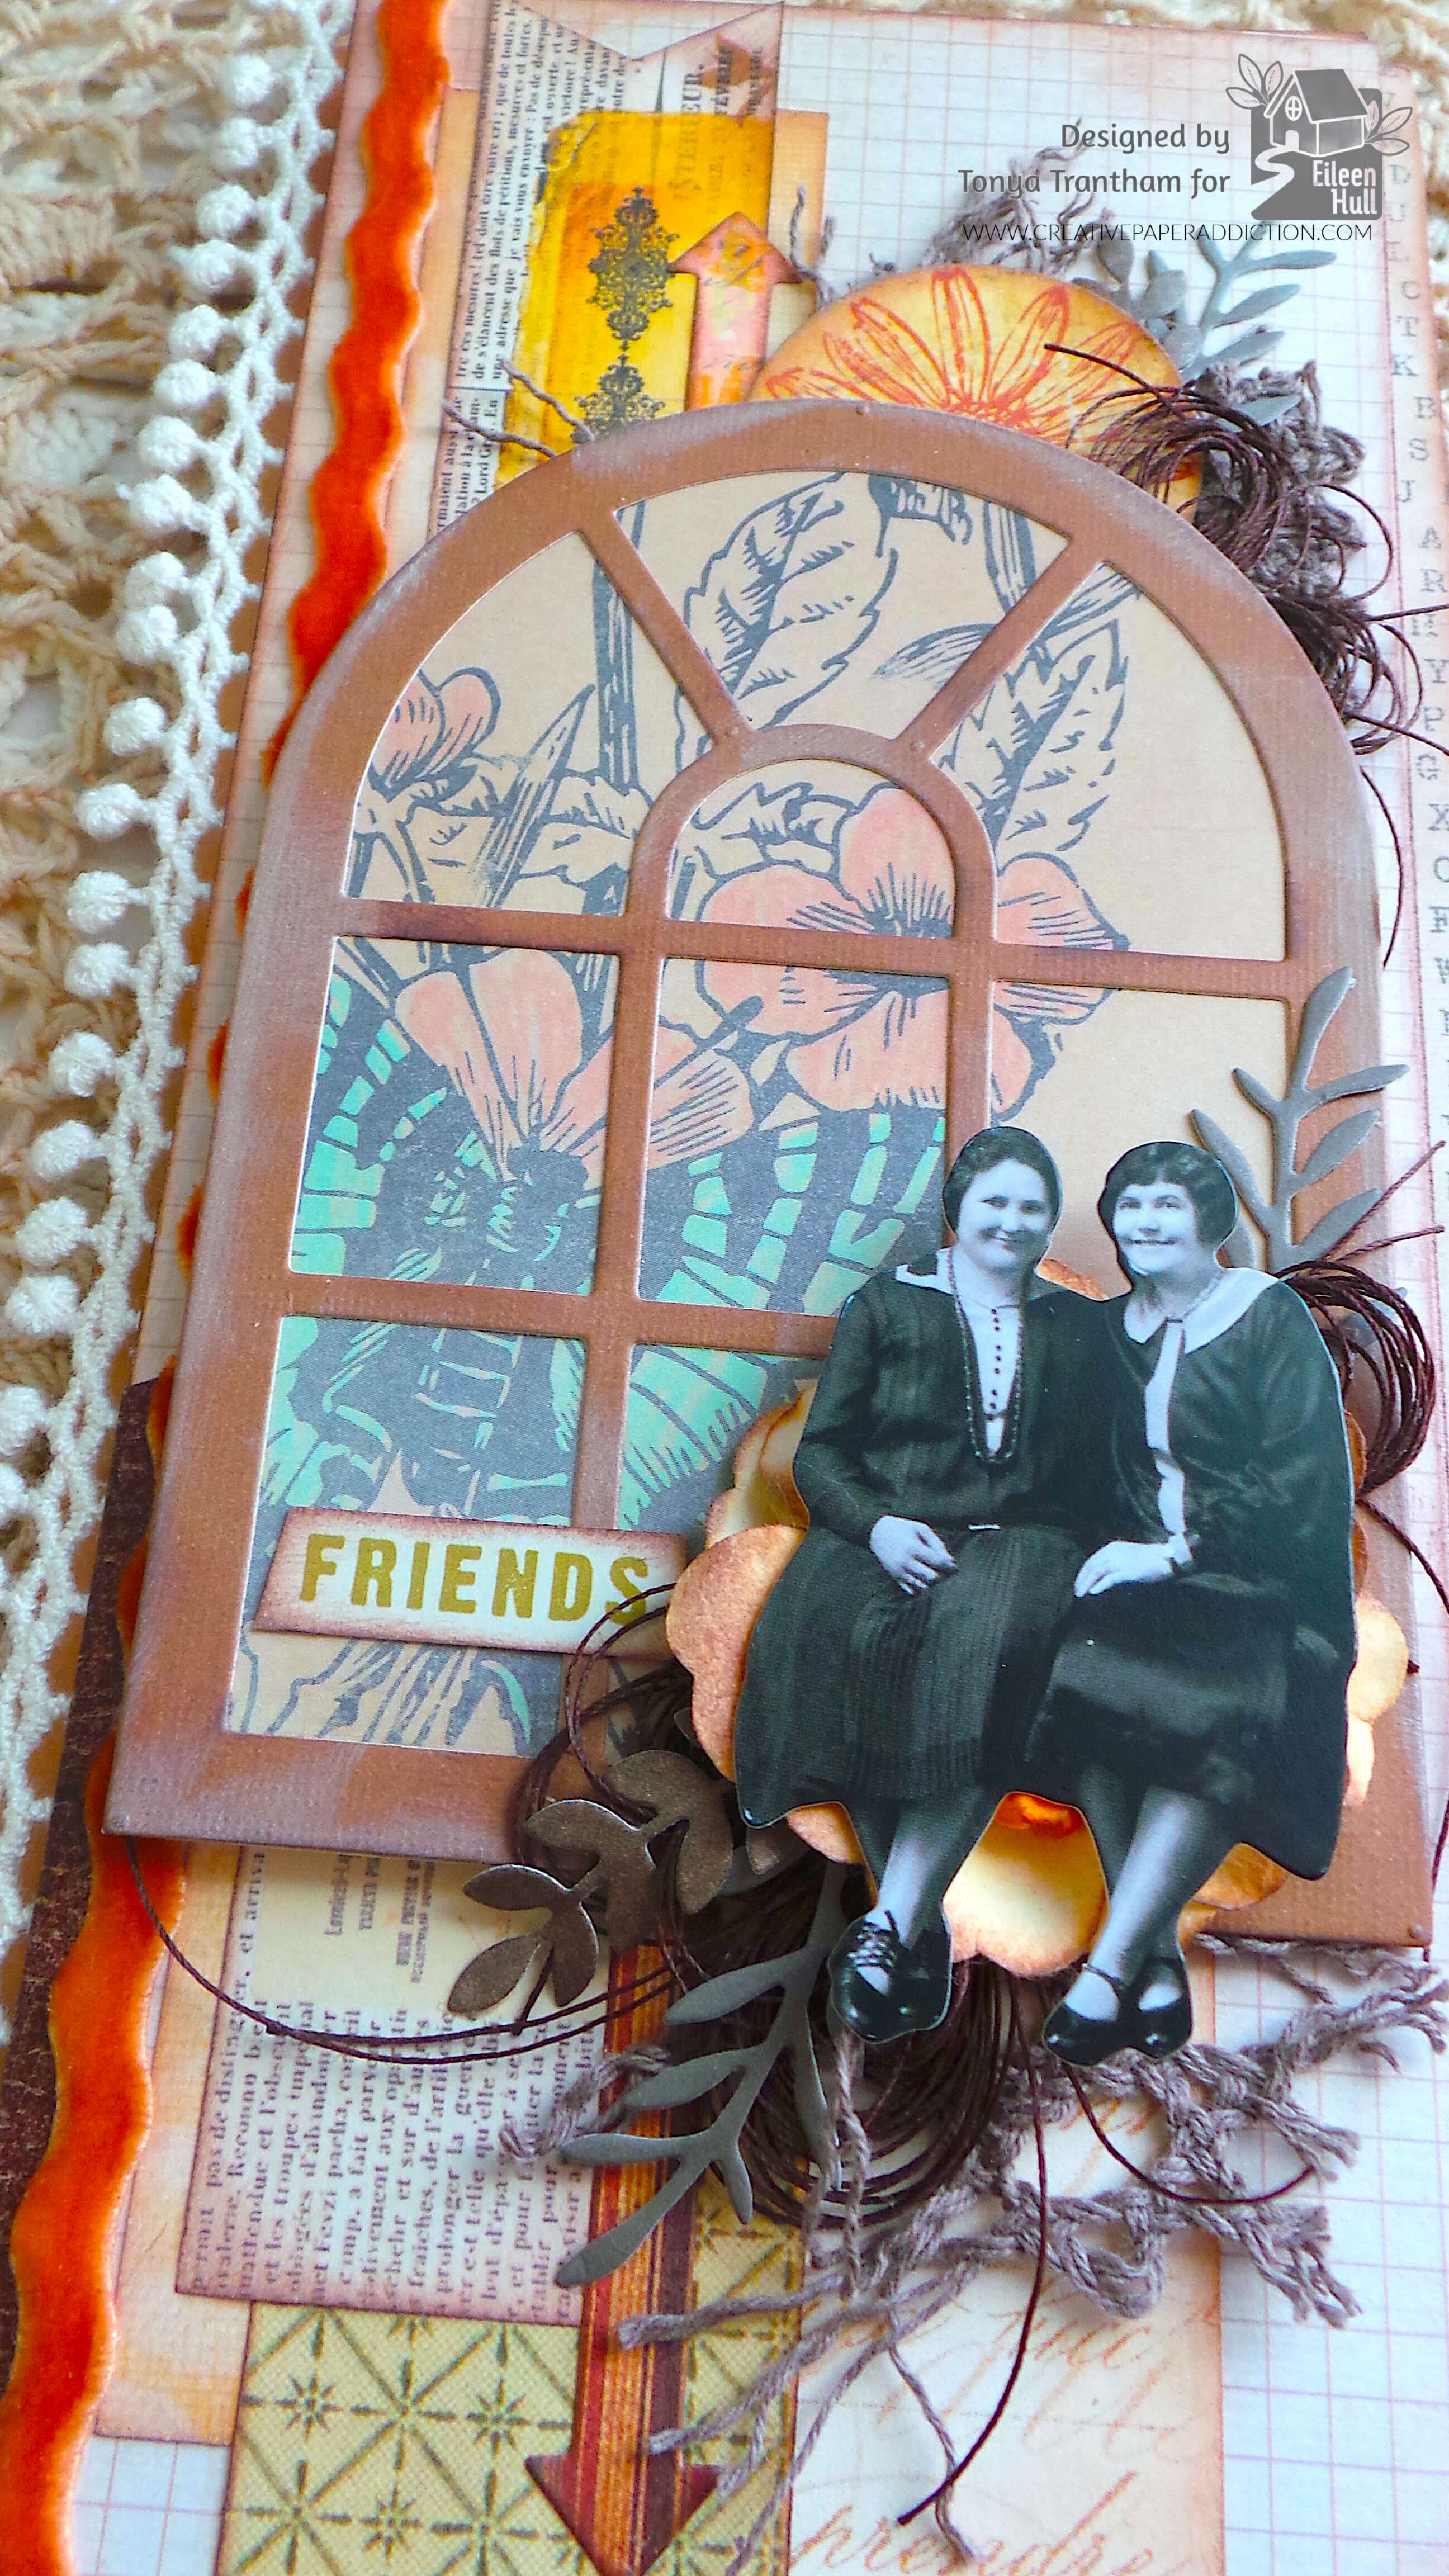
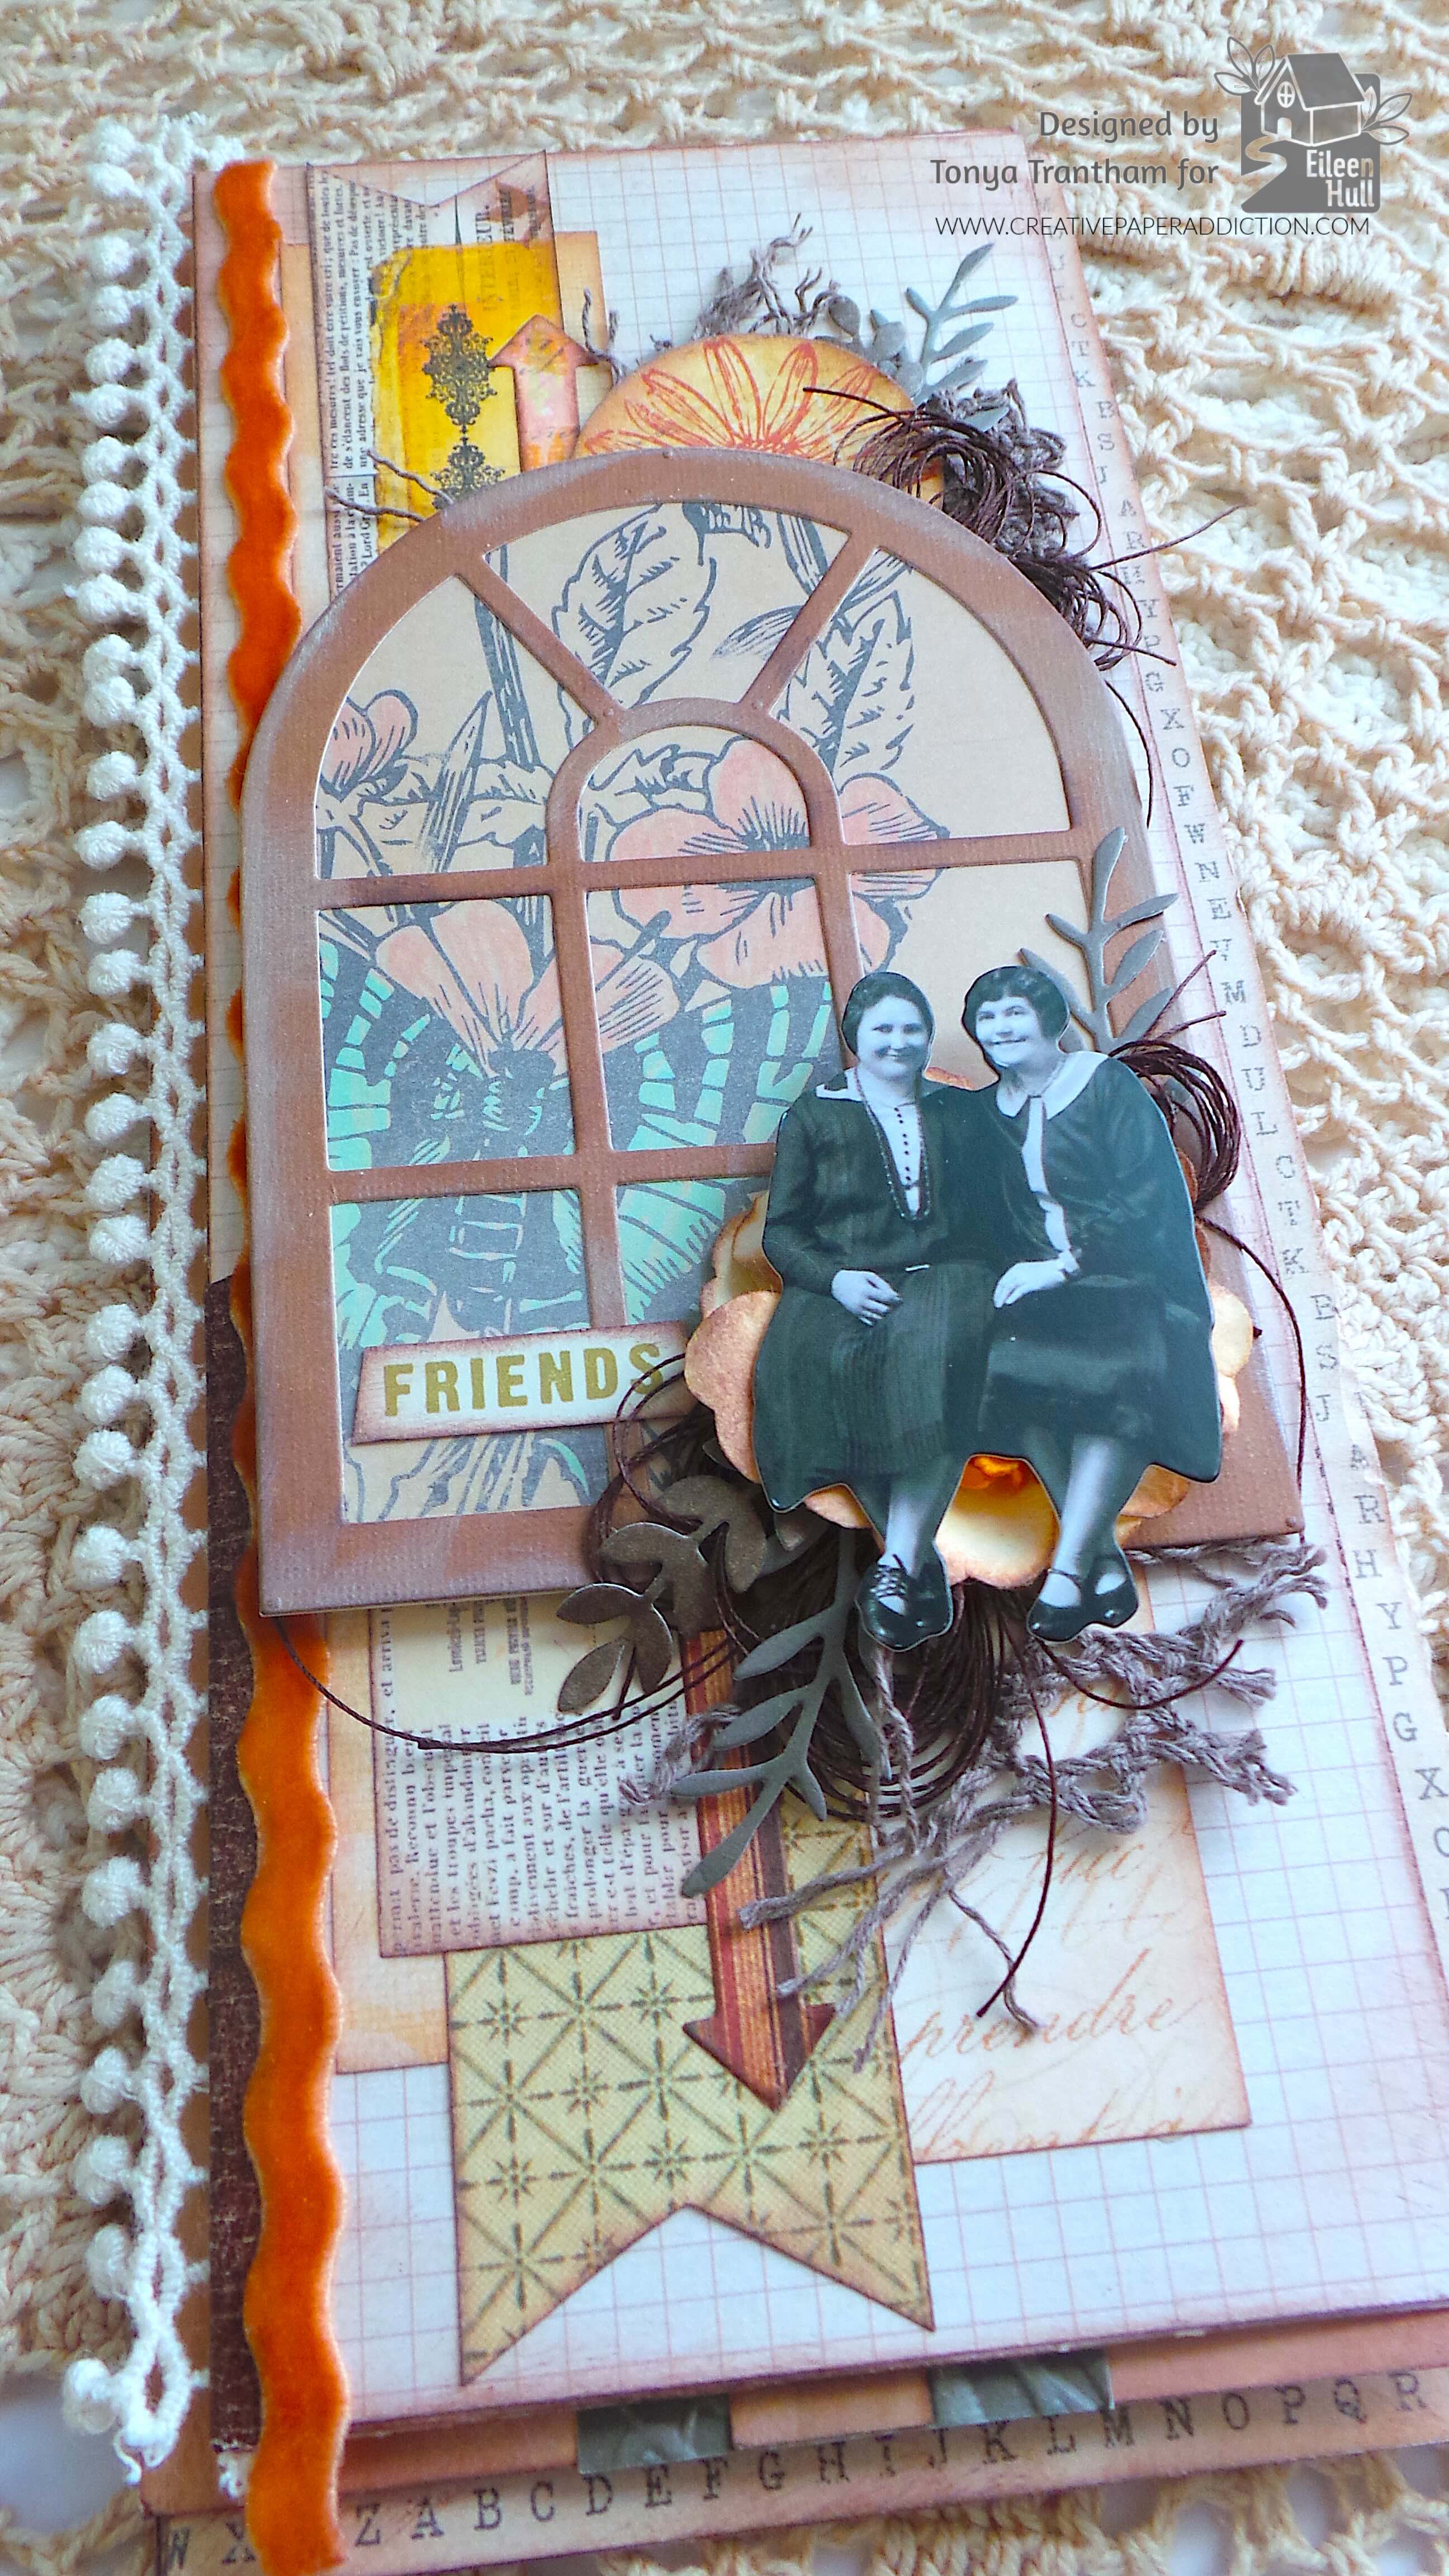
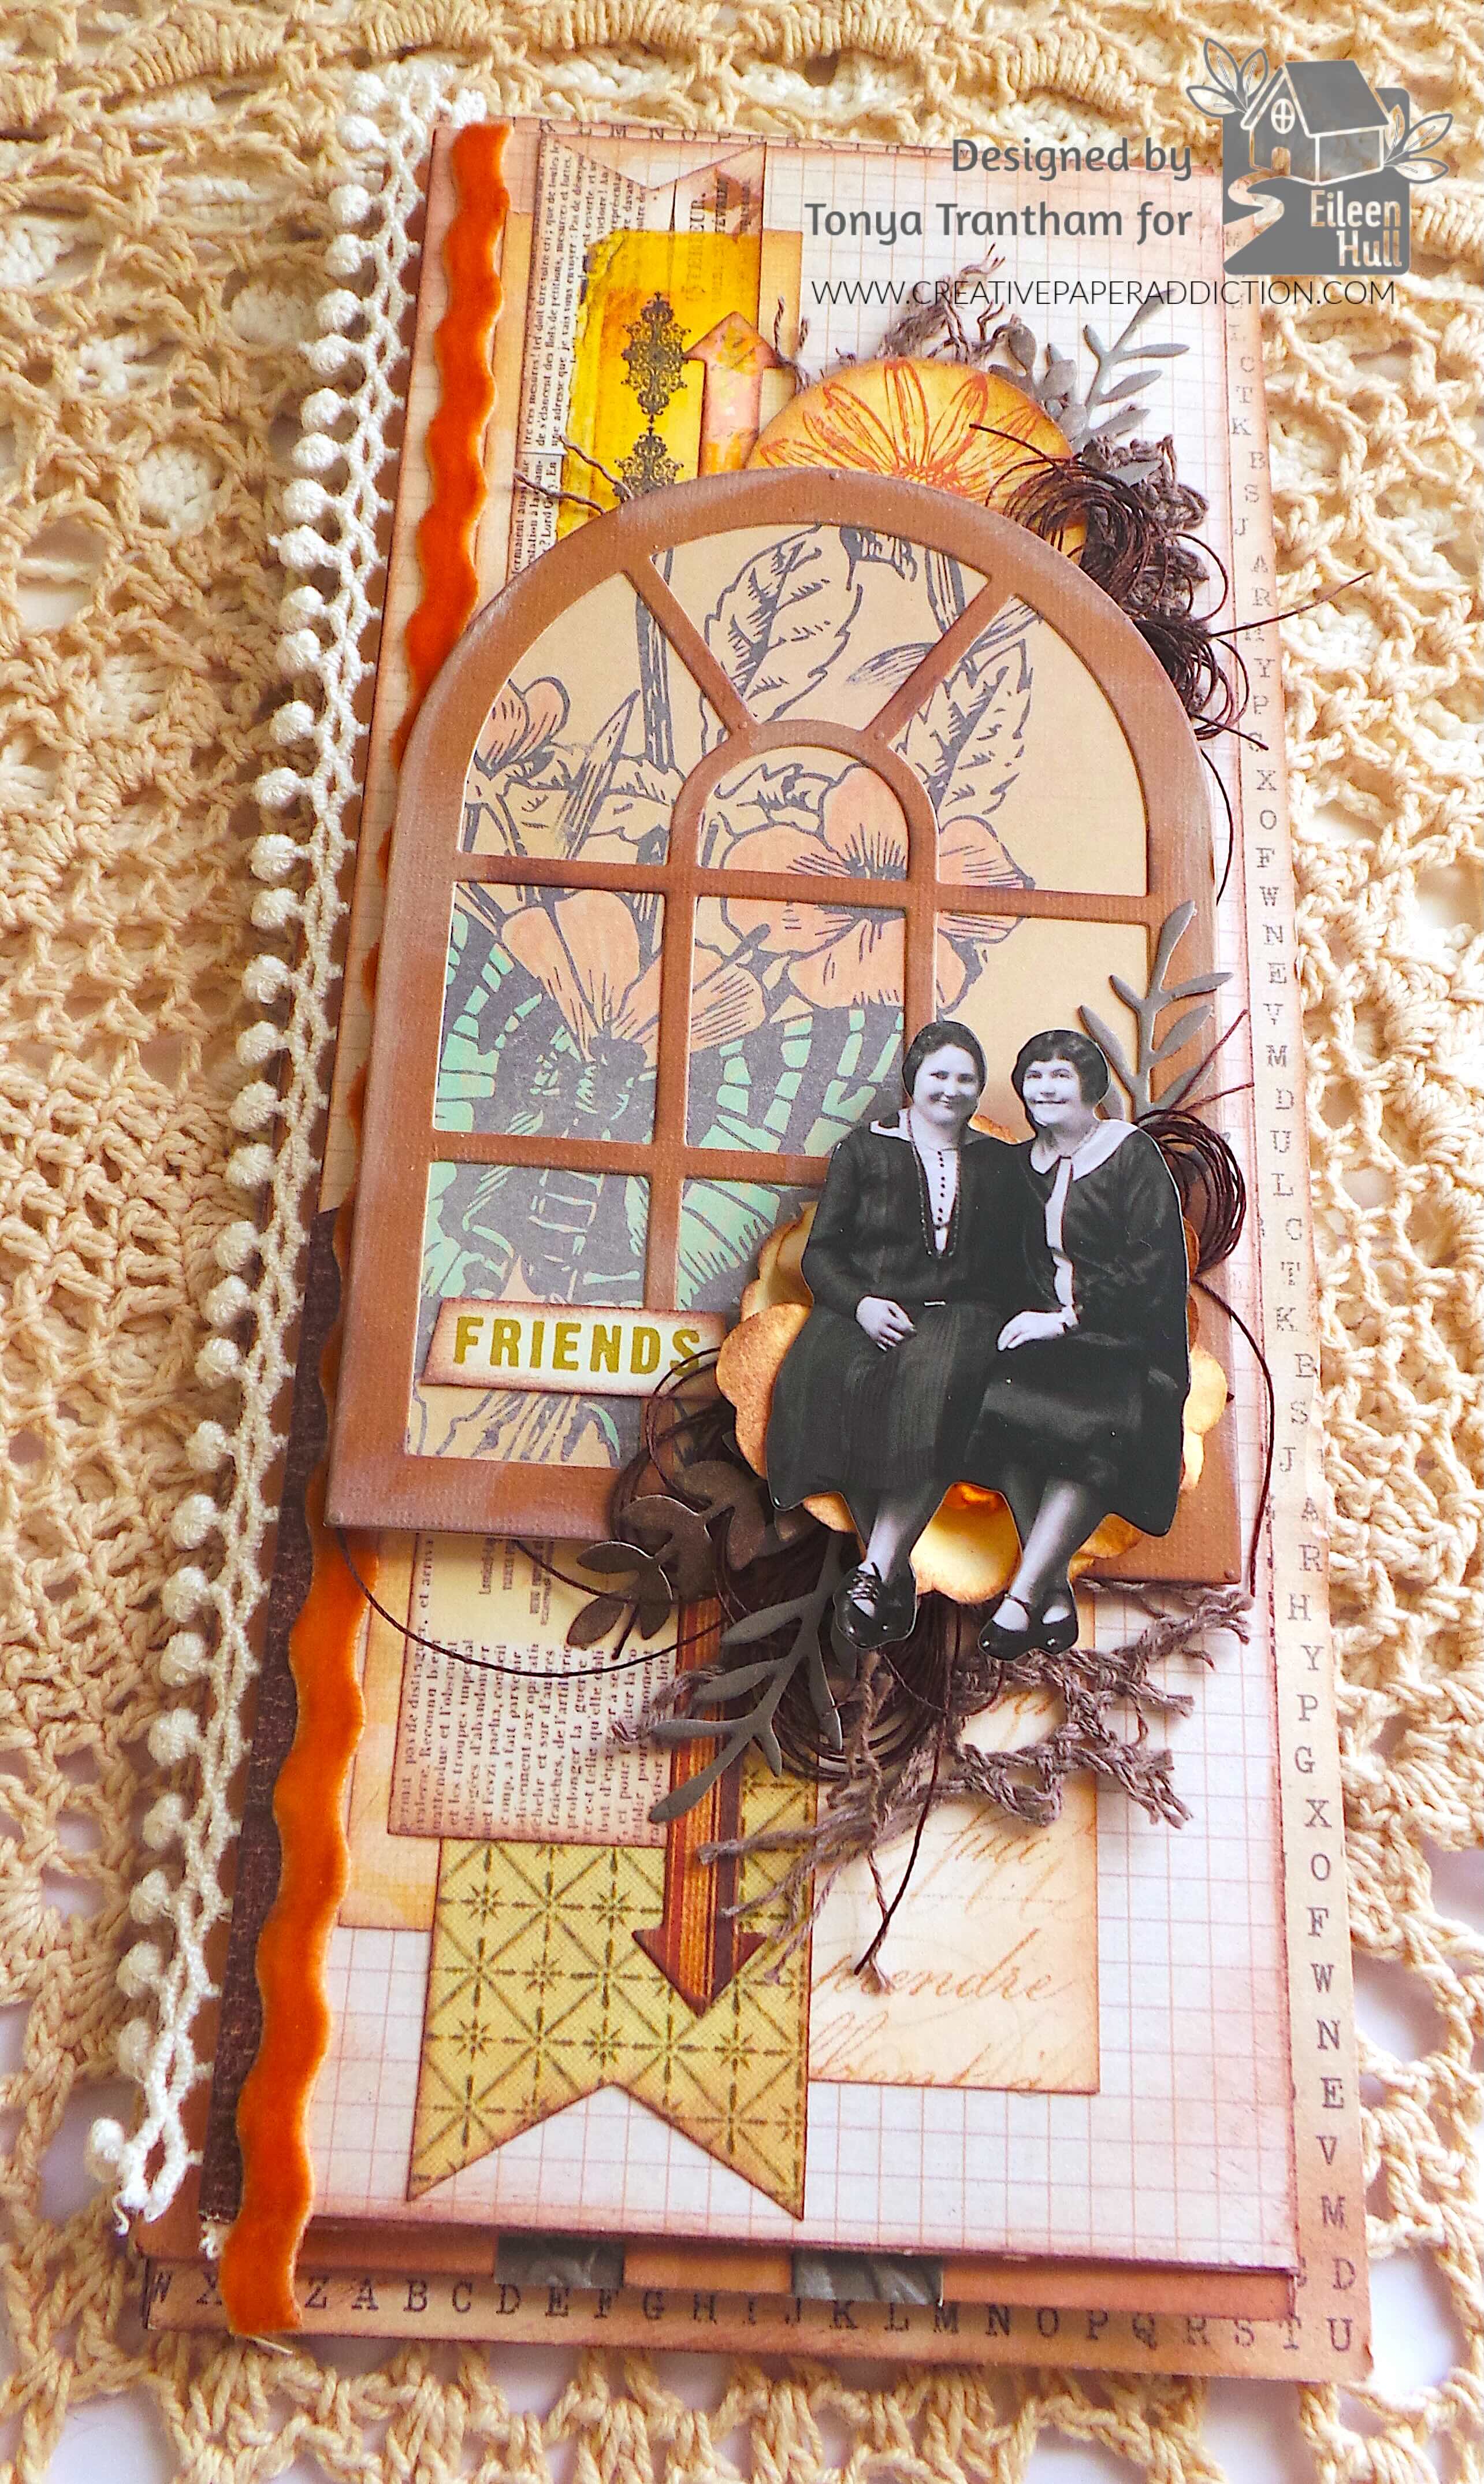
I went with an Autumn/Vintage theme and picked cardstock and embellishments to match. I covered both sides of all the tri fold journal with cardstock. I had chosen a section of a sheet of cardstock that had a butterfly and florals and cut the largest arch die from the Tunnel Arches Framelits Diecuts. I also cut the window frame die from the Windowsill Flowers and Vase Thinlits Diecuts. I glued the window frame on top of the arch and lightly inked with white chalk ink.
I added an assortment of scraps of cardstock along with two of the longest arrows from the Rainbow Wheels Thinlits to the cover. On the edge of the cover I adhered a piece of velvet ric rac. I added Foam Pop Dots to the back of the window frame and placed on the cover. I dug into my stash and added a yellow flower to the corner of the window frame.
I created three bows out of thread and glued one behind the window frame and two behind the flower. I cut a part scraps of lace and glued behind the window frame along with a floral circle that I lightly inked with brown chalk ink. I inked with brown chalk ink a friend sentiment and adhered to the window frame. I picked a set of women from the Mini Paper Dolls and glued on top of the flower. I cut a total of four leaf sprigs from the Windowsill Flowers and Vase Thinlits Diecuts. I glued three under the large flower and one to the top of the cover.
The middle page of the journal I created a pocket with a journaling spot from my stash. I added glue to the bottom edge. I cut a squirrel, rabbit and two suns from the Home Sweet Home Thinlits Diecuts. I also cut out one label and two key holes from the Journal Hardware Diecuts. I embossed the top edge of a piece of cardstock with the Lacy Leaves Embossing Folder. I folded over and stapled some scraps of cardstock to create a place to add photos or journaling. I glued the label, the outer part of the sun and rabbits to the fold over. I adhered the squirrel to the bottom corner of the journaling spot.
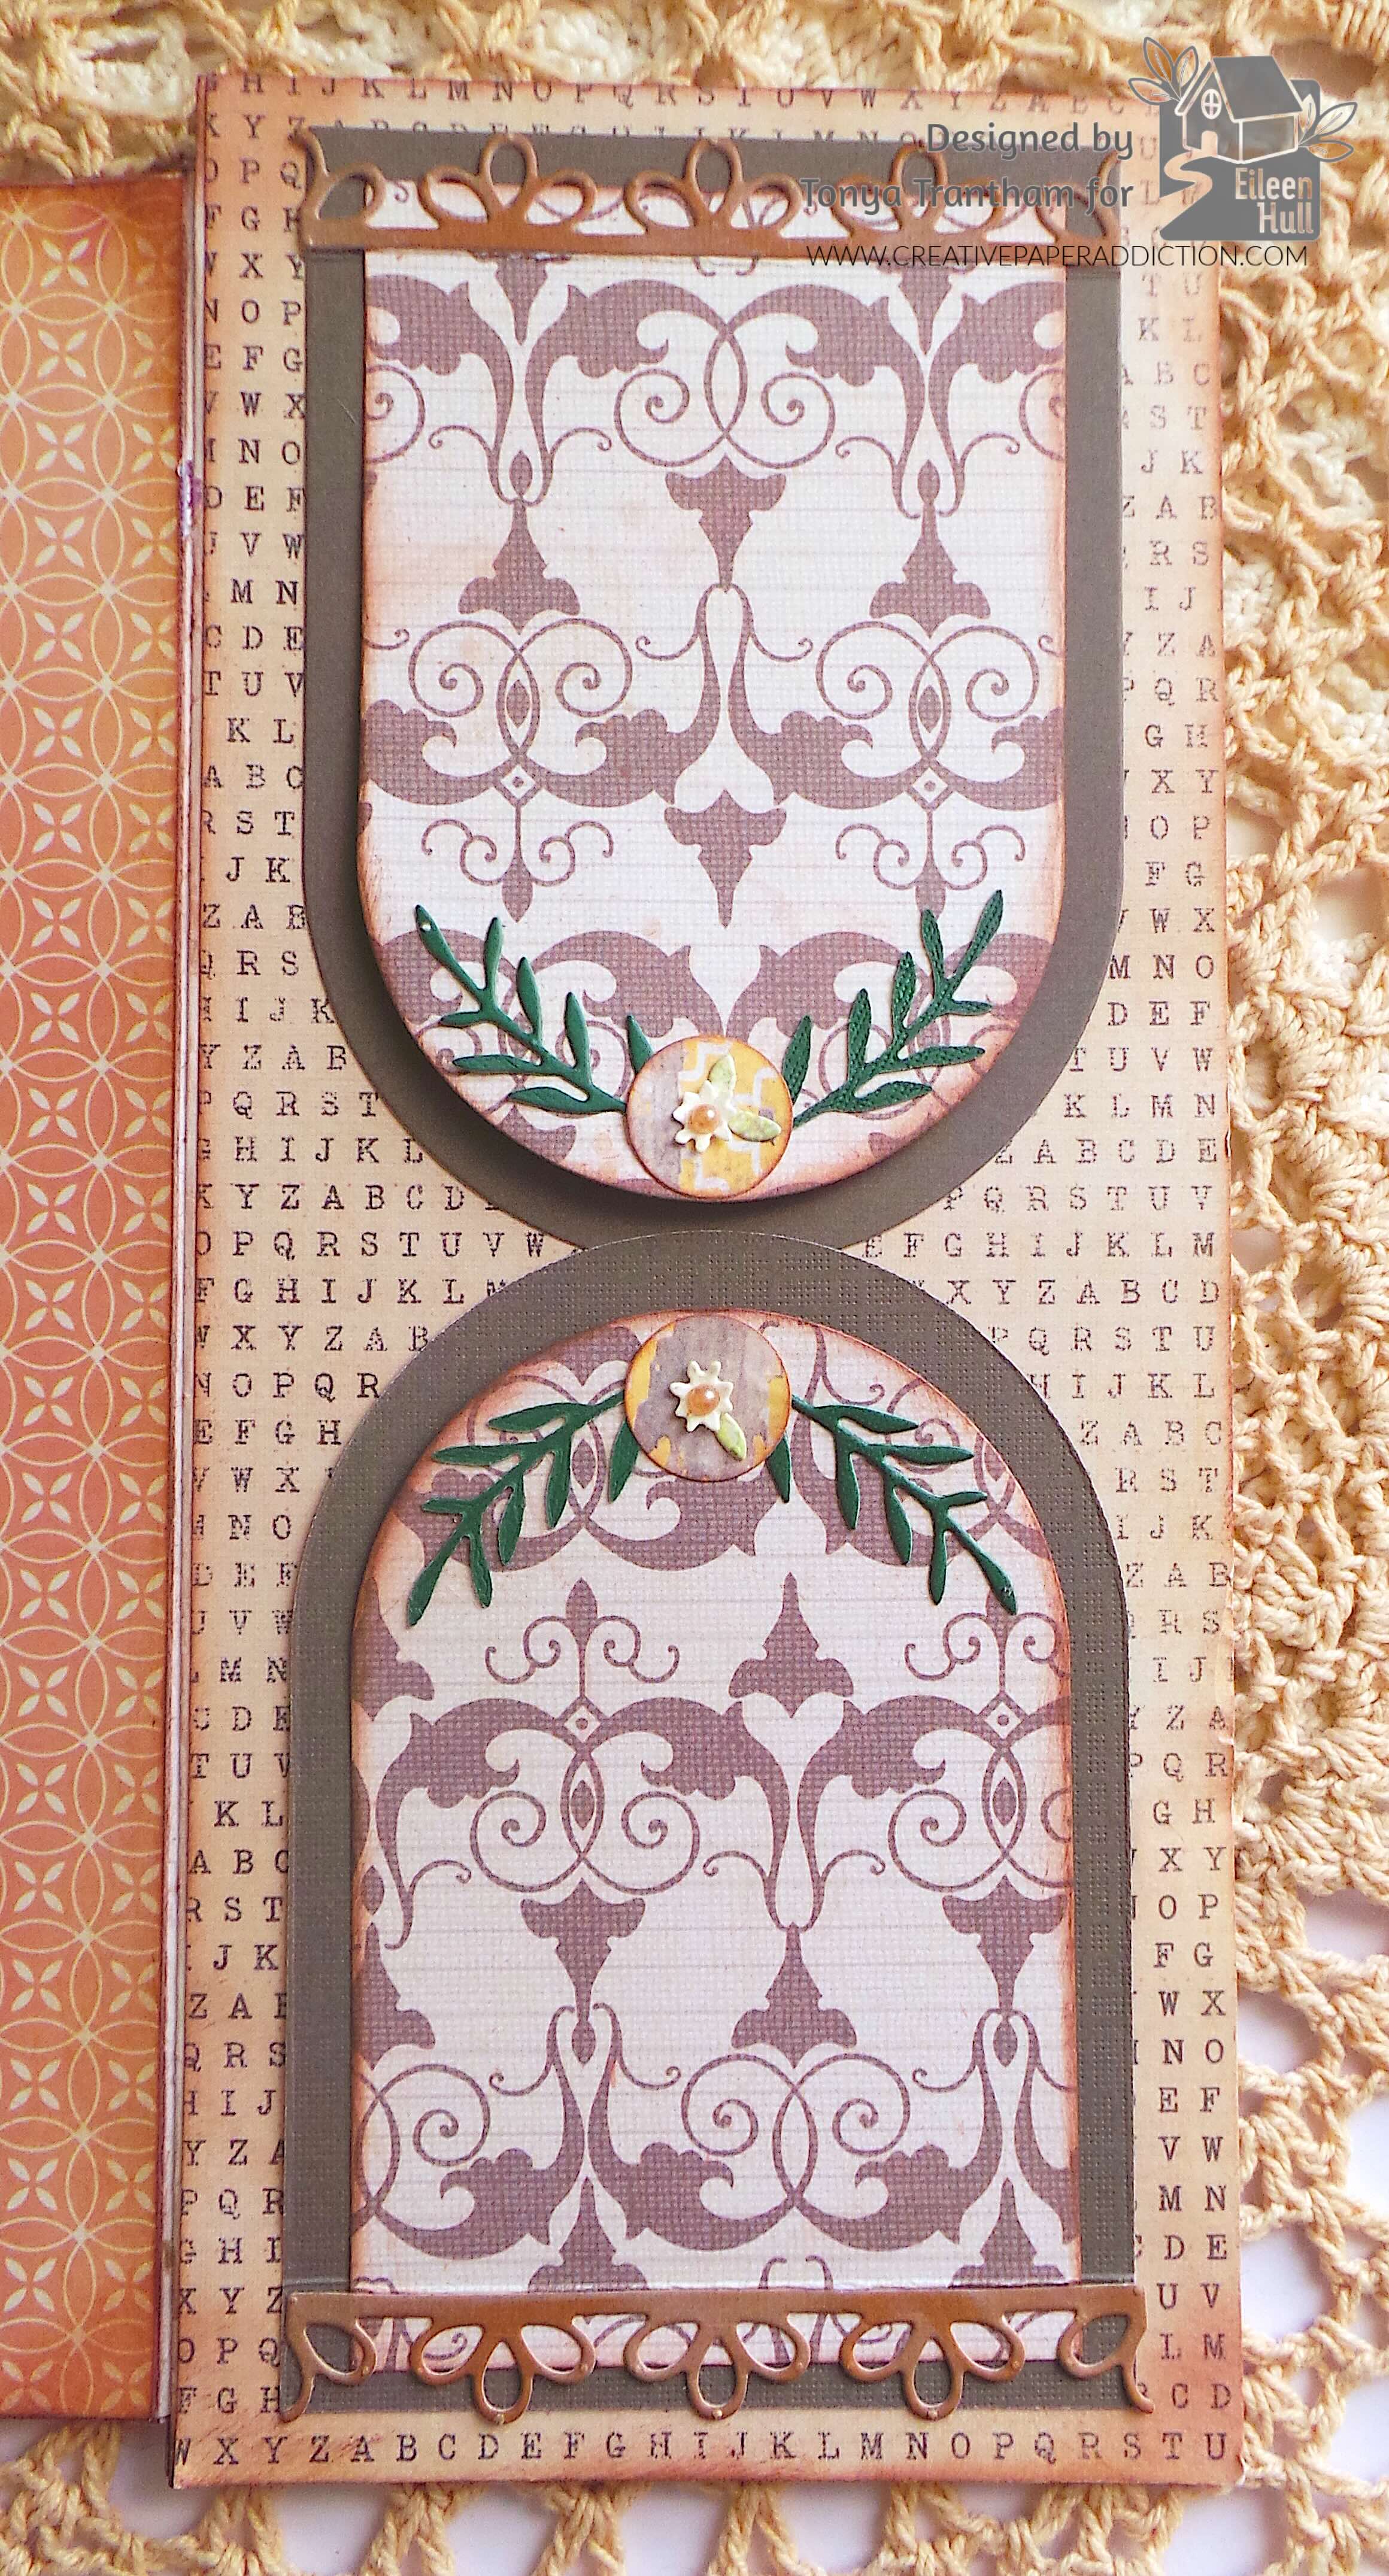
I cut two of the largest arches and two of the next size down arches from the Tunnel Arches Framelits Diecuts. I added glue to the top edge of both smaller arches and placed on top of the largest arch. I then added adhesive to the top of both largest arch and placed both onto the journal page. I cut two each of the following: lace trim, smallest flowers and larger flowers from the Windowsill Flowers and Vase Thinlits Diecuts. I also cut five of the leaf sprigs from the same set of dies. I adhered two leaf sprigs, one circle from the center of the sun diecut and two leaves cut from one of the leaf sprigs and the small flower to each outer flap. I placed a Flat Back Pearls to the center of each flower.
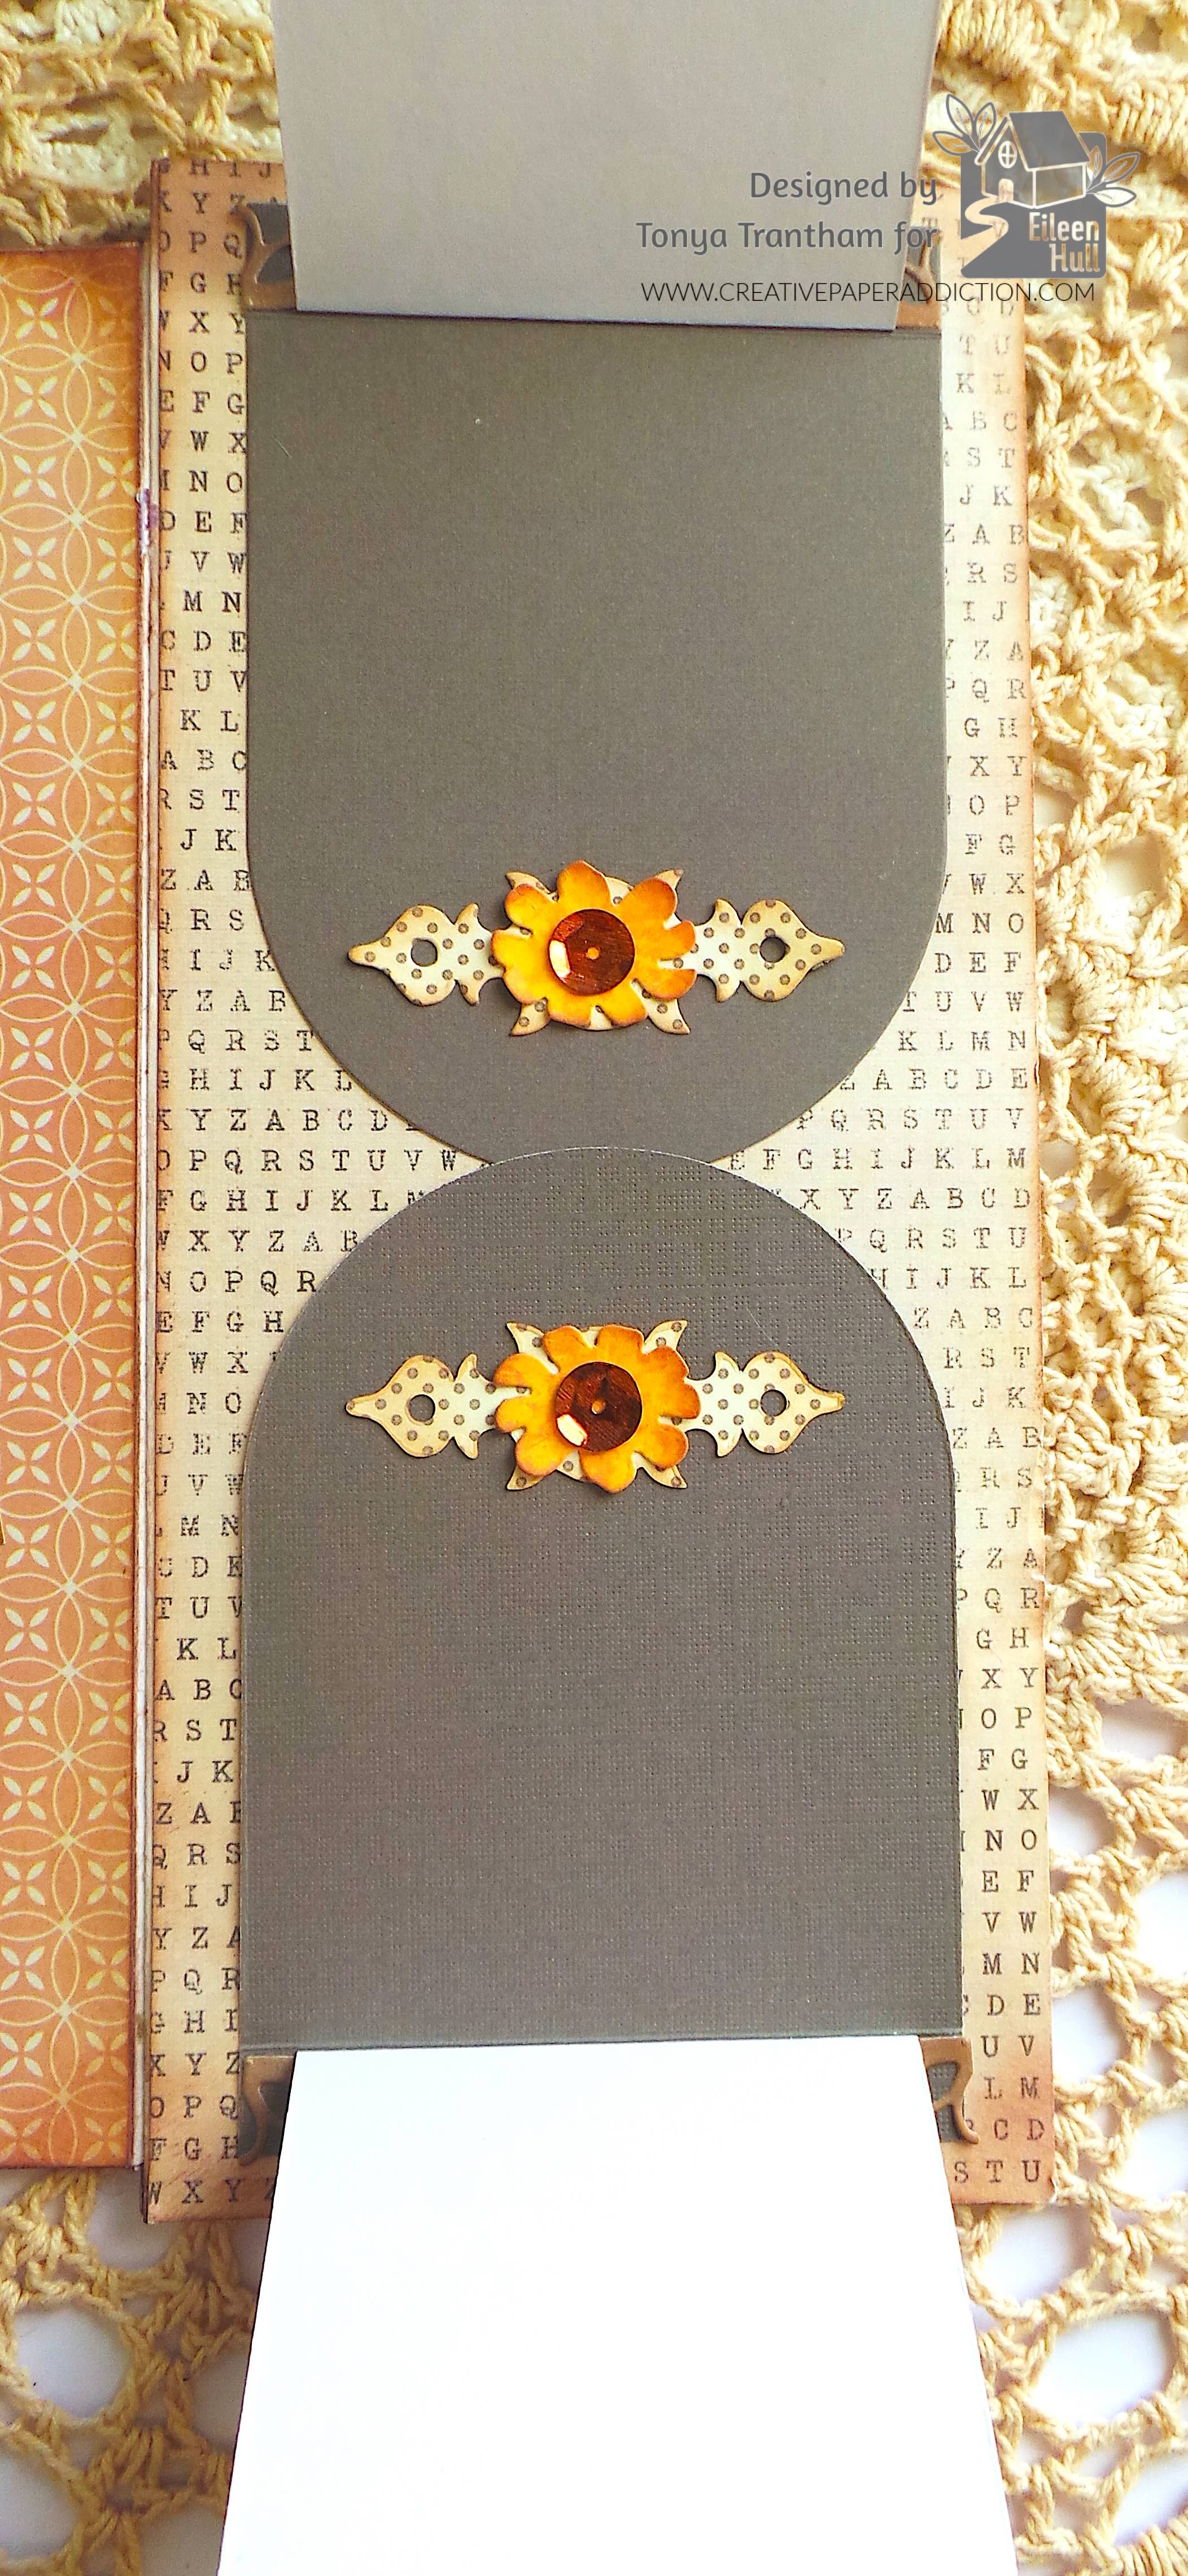
The inside flap I glued a key hole die side ways on each flap. I adhered the large flower to the middle of the key hole die and placed a sequin in the center of each flower.
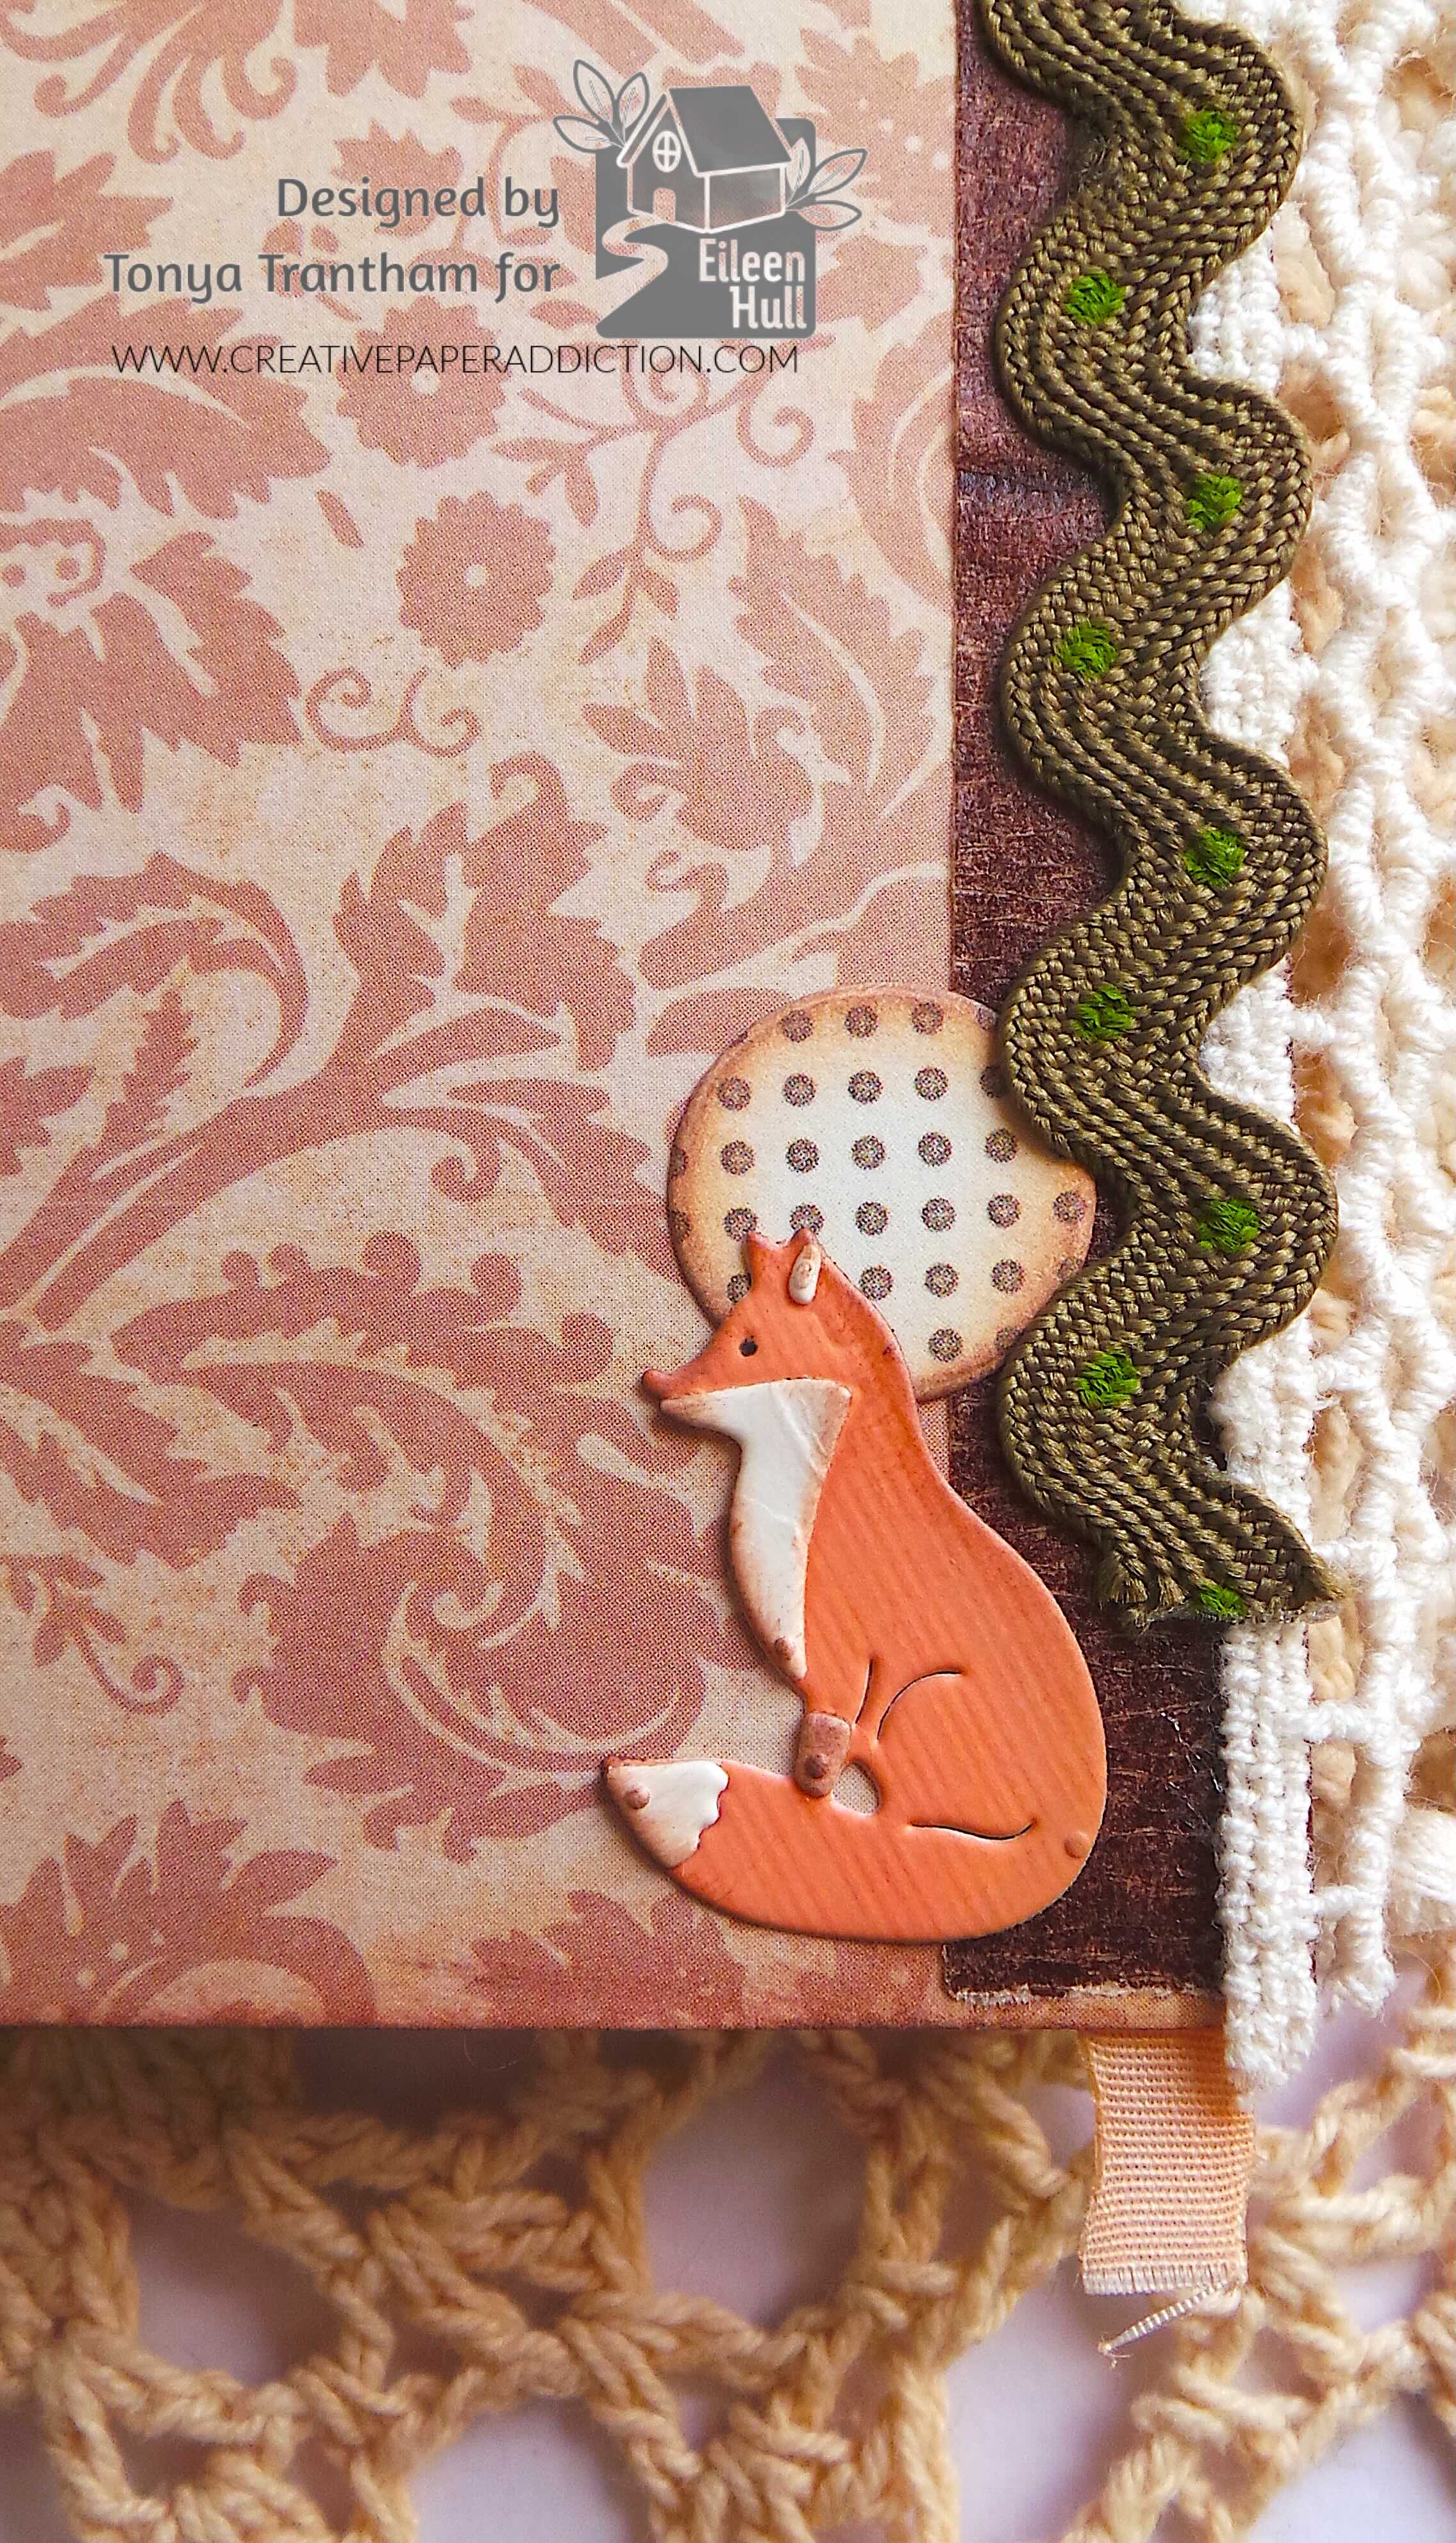
The other side of the journal. I embossed two strips of cardstock with the Lacy Leaves Embossing Folder and inked with white chalk ink. I glued one piece to the back edge of a page along with a strip of cardstock. The middle page I added adhesive to both end of the embossed cardstock. I placed in the center of the page to create a tuck spot and added a folded piece of cardstock. I glued a strip of cardstock to the center of the embossed cardstock. The other page I added a piece of ric rac to the edge of the page. I glued the circle from the center of the sun and a fox from the Home Sweet Home Thinlits Diecuts to finish.
This project is a great way to recycle envelopes you get in the mail and use up scrap of cardstock that you might have laying around in your supplies.
Also if you haven’t been by Eileen Hull’s blog lately to see what her team has been up to you can find the latest post HERE. As always if you have any questions or comments please leave them below.
(Products listed above are Affiliated Links for your convenience)
DISCLAIMERS
This blog is compensated to provide opinion on products, services, websites, and various other topics. Even though the owner(s) of this blog receives compensation for our posts or advertisements. I always give my honest opinions, findings, beliefs, or experiences on those topics or products. The views and opinions expressed on this blog are purely my own. Any product claim, statistic, or quote should be checked with each manufacturer. Verify other representations about a product or service with the provider or party in question.This blog contains affiliate links. Clicking these links helps to support Tonya Trantham Designs – Creative Paper Addiction. It’s at no additional cost to you.Today’s features are Sizzix, Eileen Hull, Scrapbook.com and Spellbinders Products.
Thanks for stopping by, I hope your Tuesday is great and enjoy creating!
Hi everyone! It’s that time again! Eileen Hull has a new release and this collection was inspired by nature and the cozy feeling of home. It was designed to coordinate with the Handbound Journal (sold separately) to create a tunnel book. But each die set also stands beautifully on its own and can be used in so many creative ways!
First, I would like to share a sneak peek of a project I created. I used all the dies and embossing folder in this one project. I will be share the reveal later this month so be sure to stop back by!
Lacy Leaves Embossing Folder A bold, intricate lacy pattern measuring 6” x 8 ½”—perfectly sized for journal covers and cards. This design was inspired by an actual piece of lace from my collection that reminded me of leaves. I love the mix of nature and lace! Whether you emboss or deboss the pattern, the result is simply beautiful.
Home Sweet Home Die Set This 24-piece set includes layered forest animals (deer, fox, bunny, squirrel, and butterflies), pine trees, grassy hills, greenery, clouds, sun, moon, and a cozy house. The sweet deer alone makes this set worth it! Perfect for holiday projects, baby themes, everyday cards, journals, and tags.
Windowsill Flowers & Vase Die Set A 13-die set designed to coordinate with the Tunnel Arches. The window die matches the largest arch. It lets you build a 3D scene that looks as though you’re peering through a window. The tiny vase and flowers (yes, I had to make them that small for scale!) are wonderful for using scraps. The little lacy piece also makes a lovely accent for junk journal pockets and cards.
Tunnel Arches Die Set Who knew arches could be so versatile? Make a rainbow! Use the negative cuts to create graduated windows in journals, cards, and home decor. Use the positive pieces as card bases and tags. Nothing goes to waste! This 7-die nesting set ranges in size from 4 ½” x 3 ¼” down to teeny-tiny (so cute!). They were designed to fit perfectly inside the Handbound Journal. You might want to try your hand at a tunnel book. Watch for upcoming tutorials on Eileen’s YouTube Channel which can be found HERE!
(Products listed above are Affiliated Links for your convenience)
DISCLAIMERS
This blog is compensated to provide opinion on products, services, websites, and various other topics. Even though the owner(s) of this blog receives compensation for our posts or advertisements. I always give my honest opinions, findings, beliefs, or experiences on those topics or products. The views and opinions expressed on this blog are purely my own. Any product claim, statistic, or quote should be checked with each manufacturer. Verify other representations about a product or service with the provider or party in question.This blog contains affiliate links. Clicking these links helps to support Tonya Trantham Designs – Creative Paper Addiction. It’s at no additional cost to you.Today’s features are Sizzix, Eileen Hull and Scrapbook.com Products.
Thanks for stopping by, I hope your Tuesday is awesome and enjoy creating!
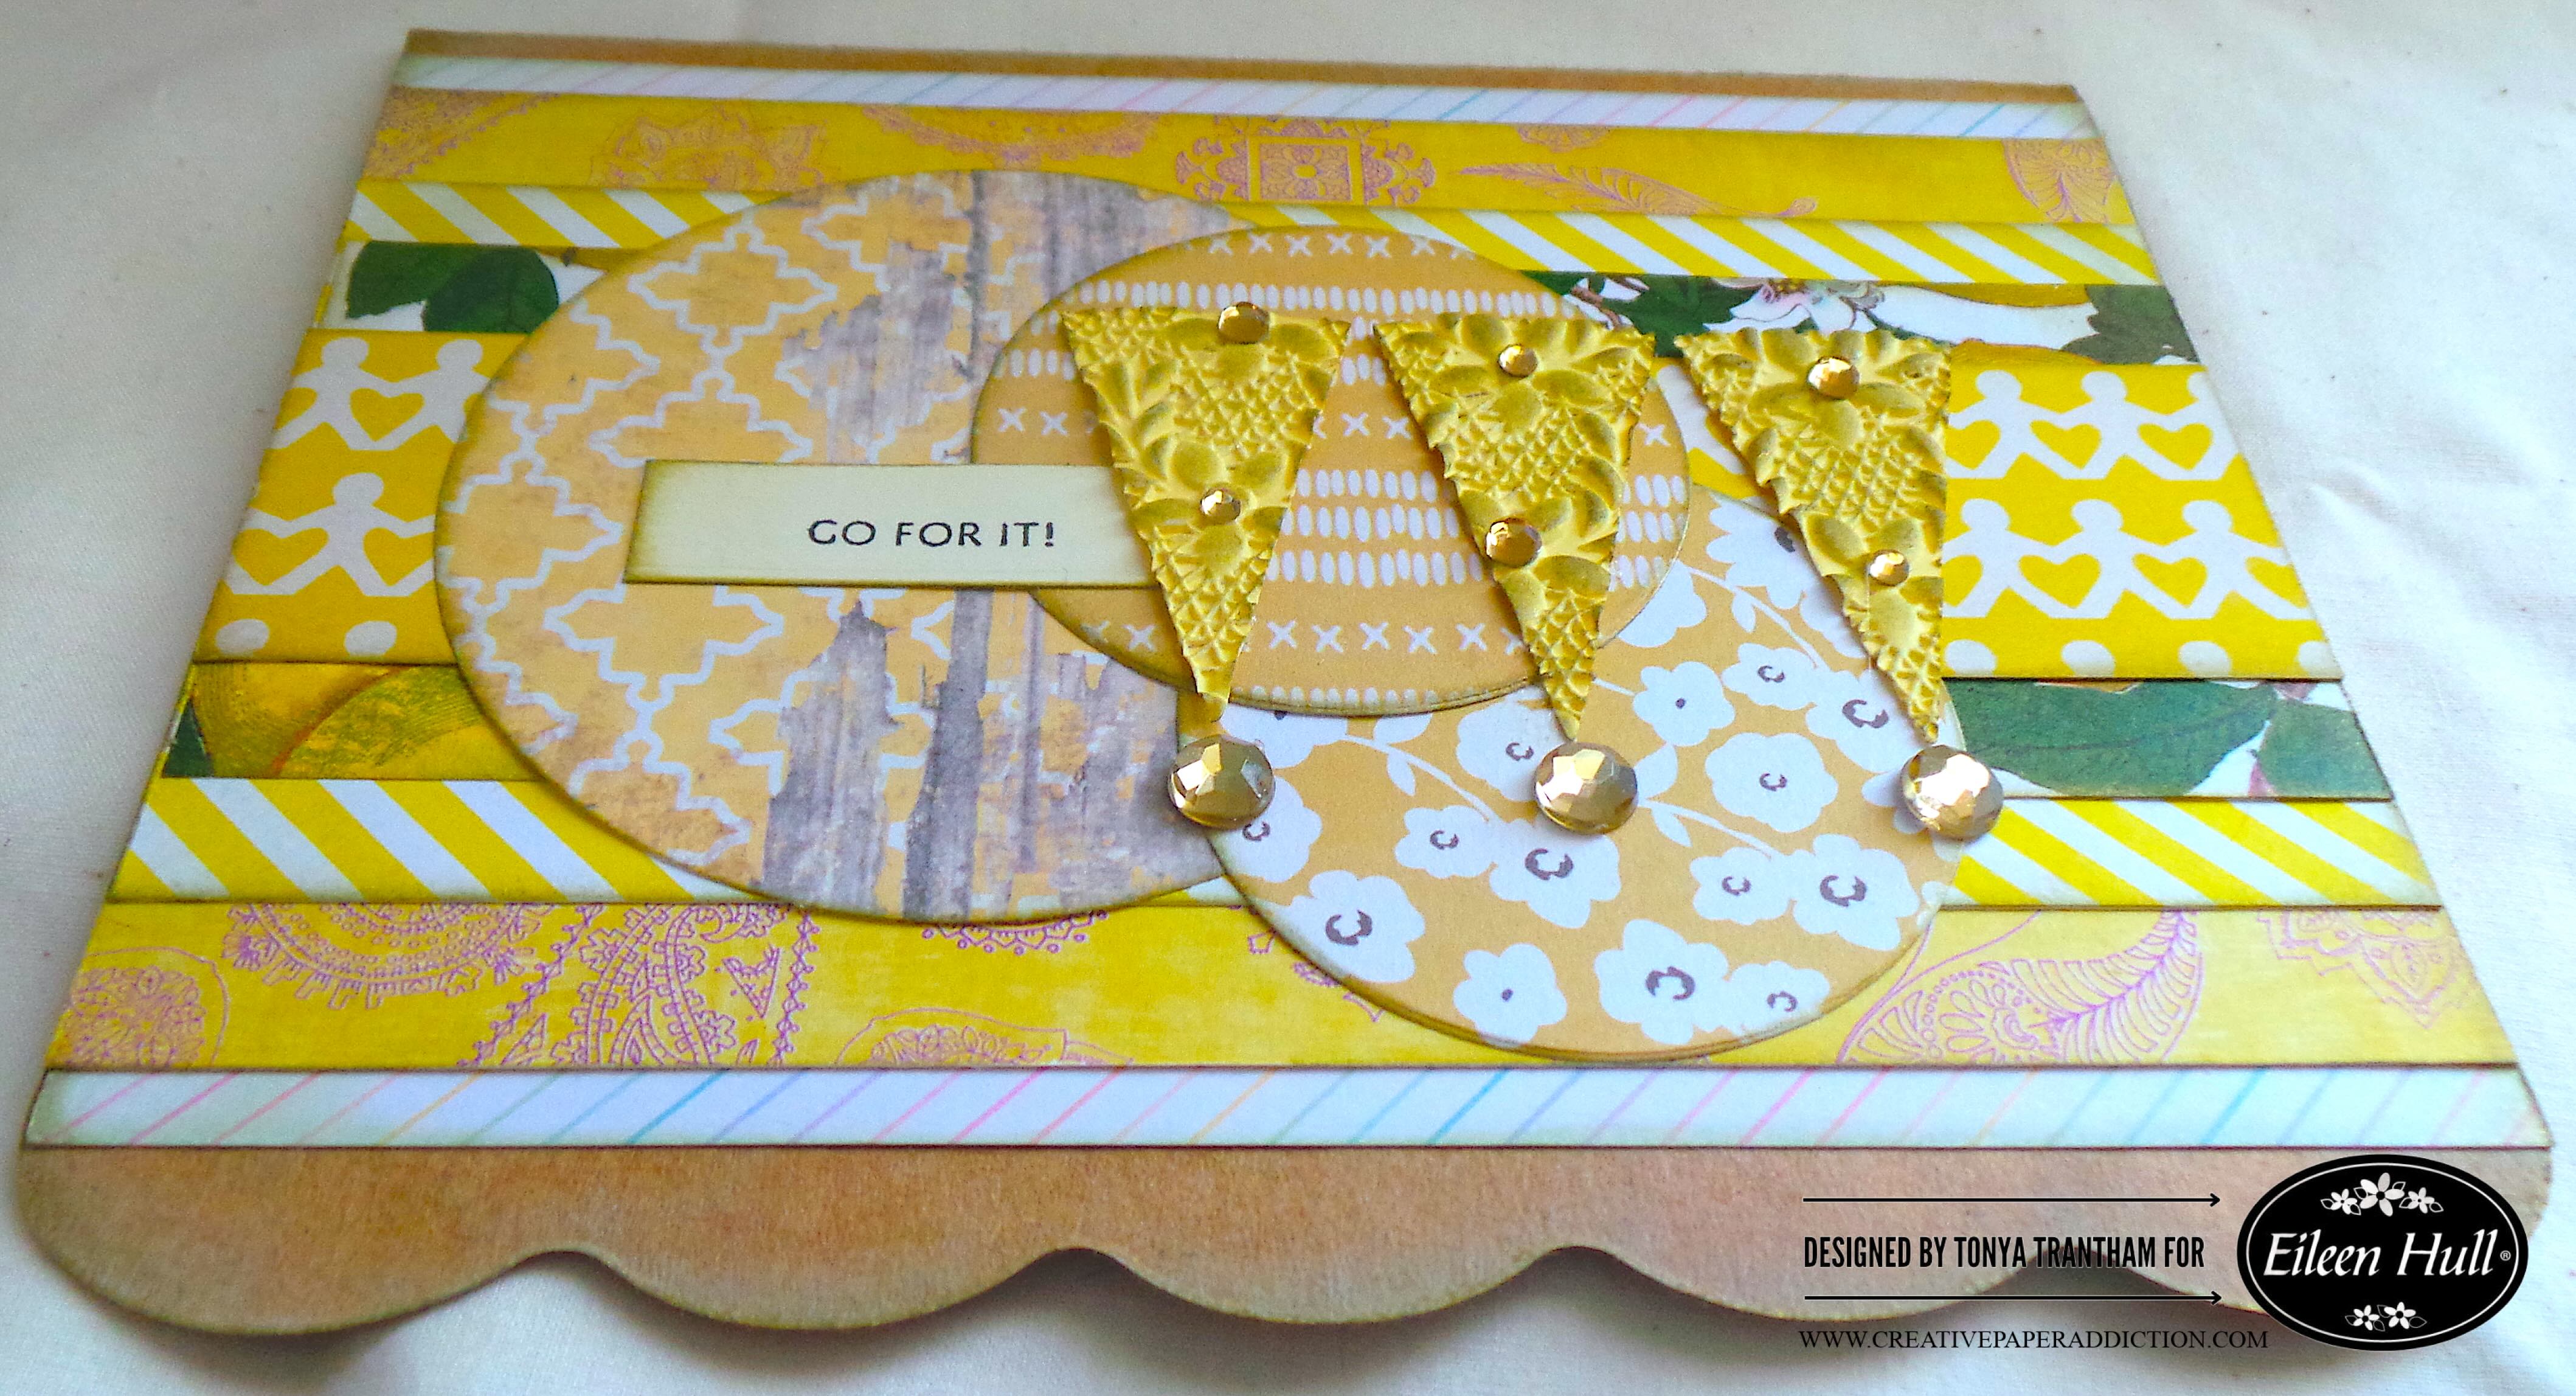
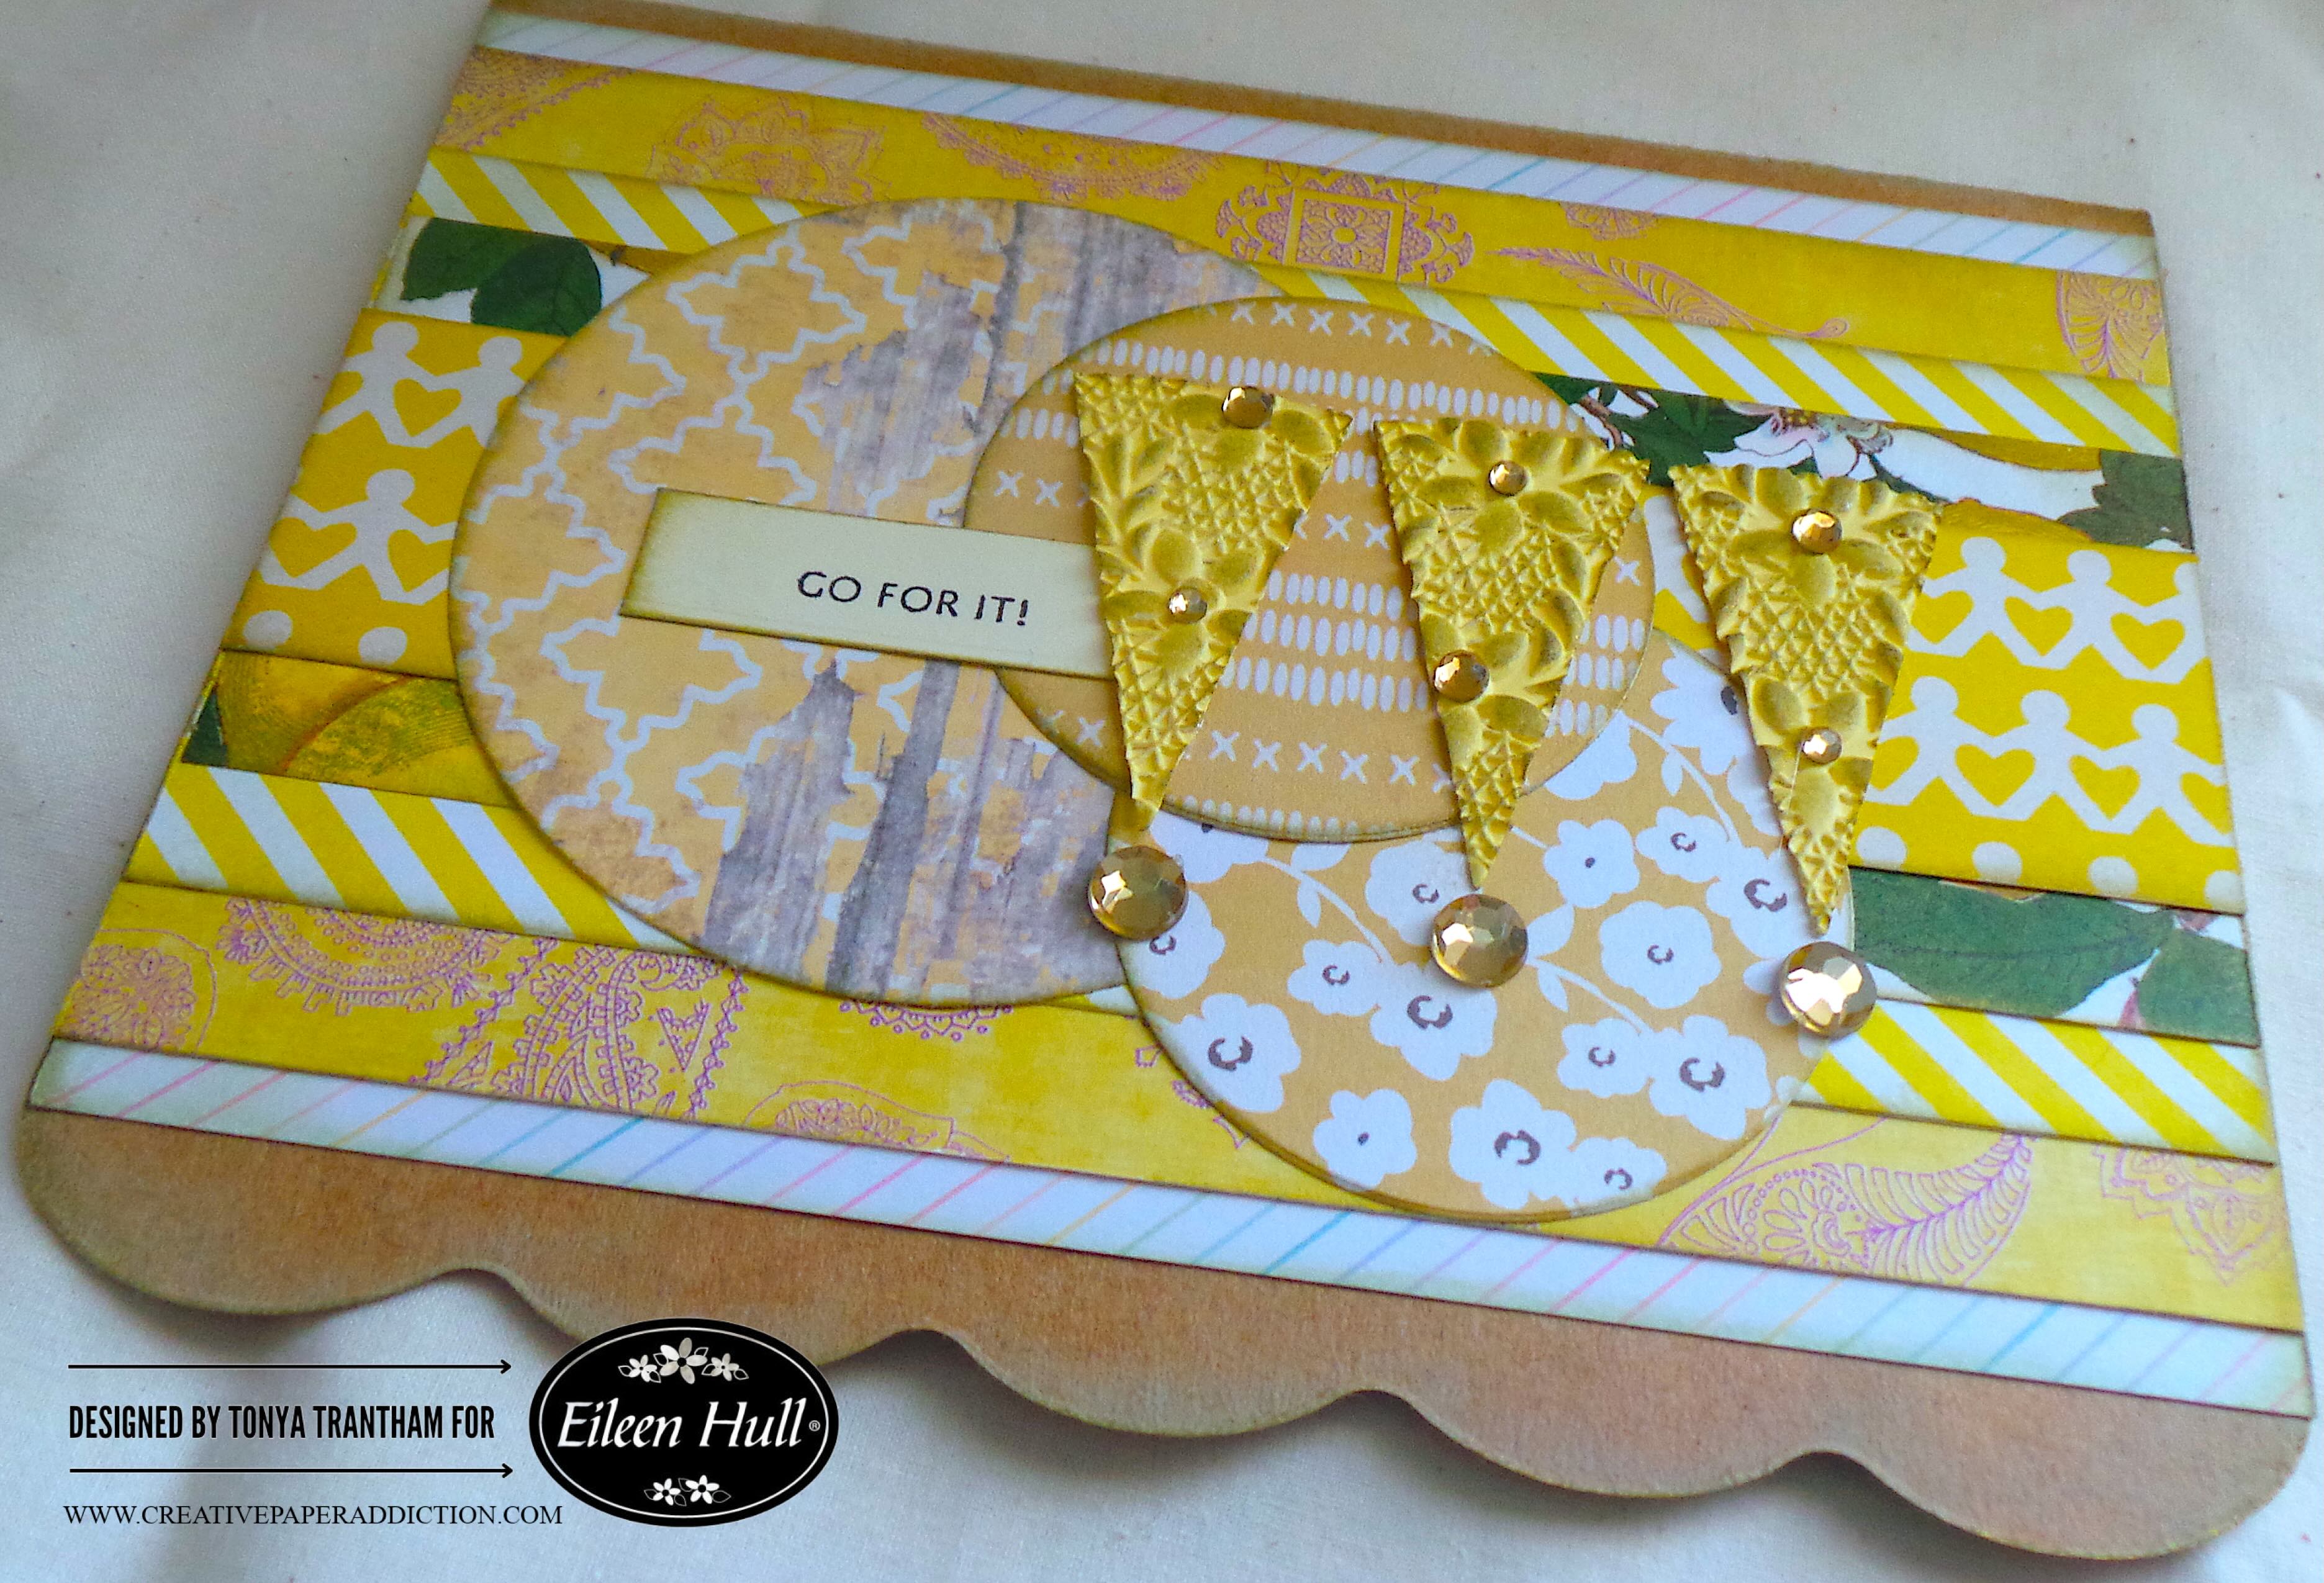
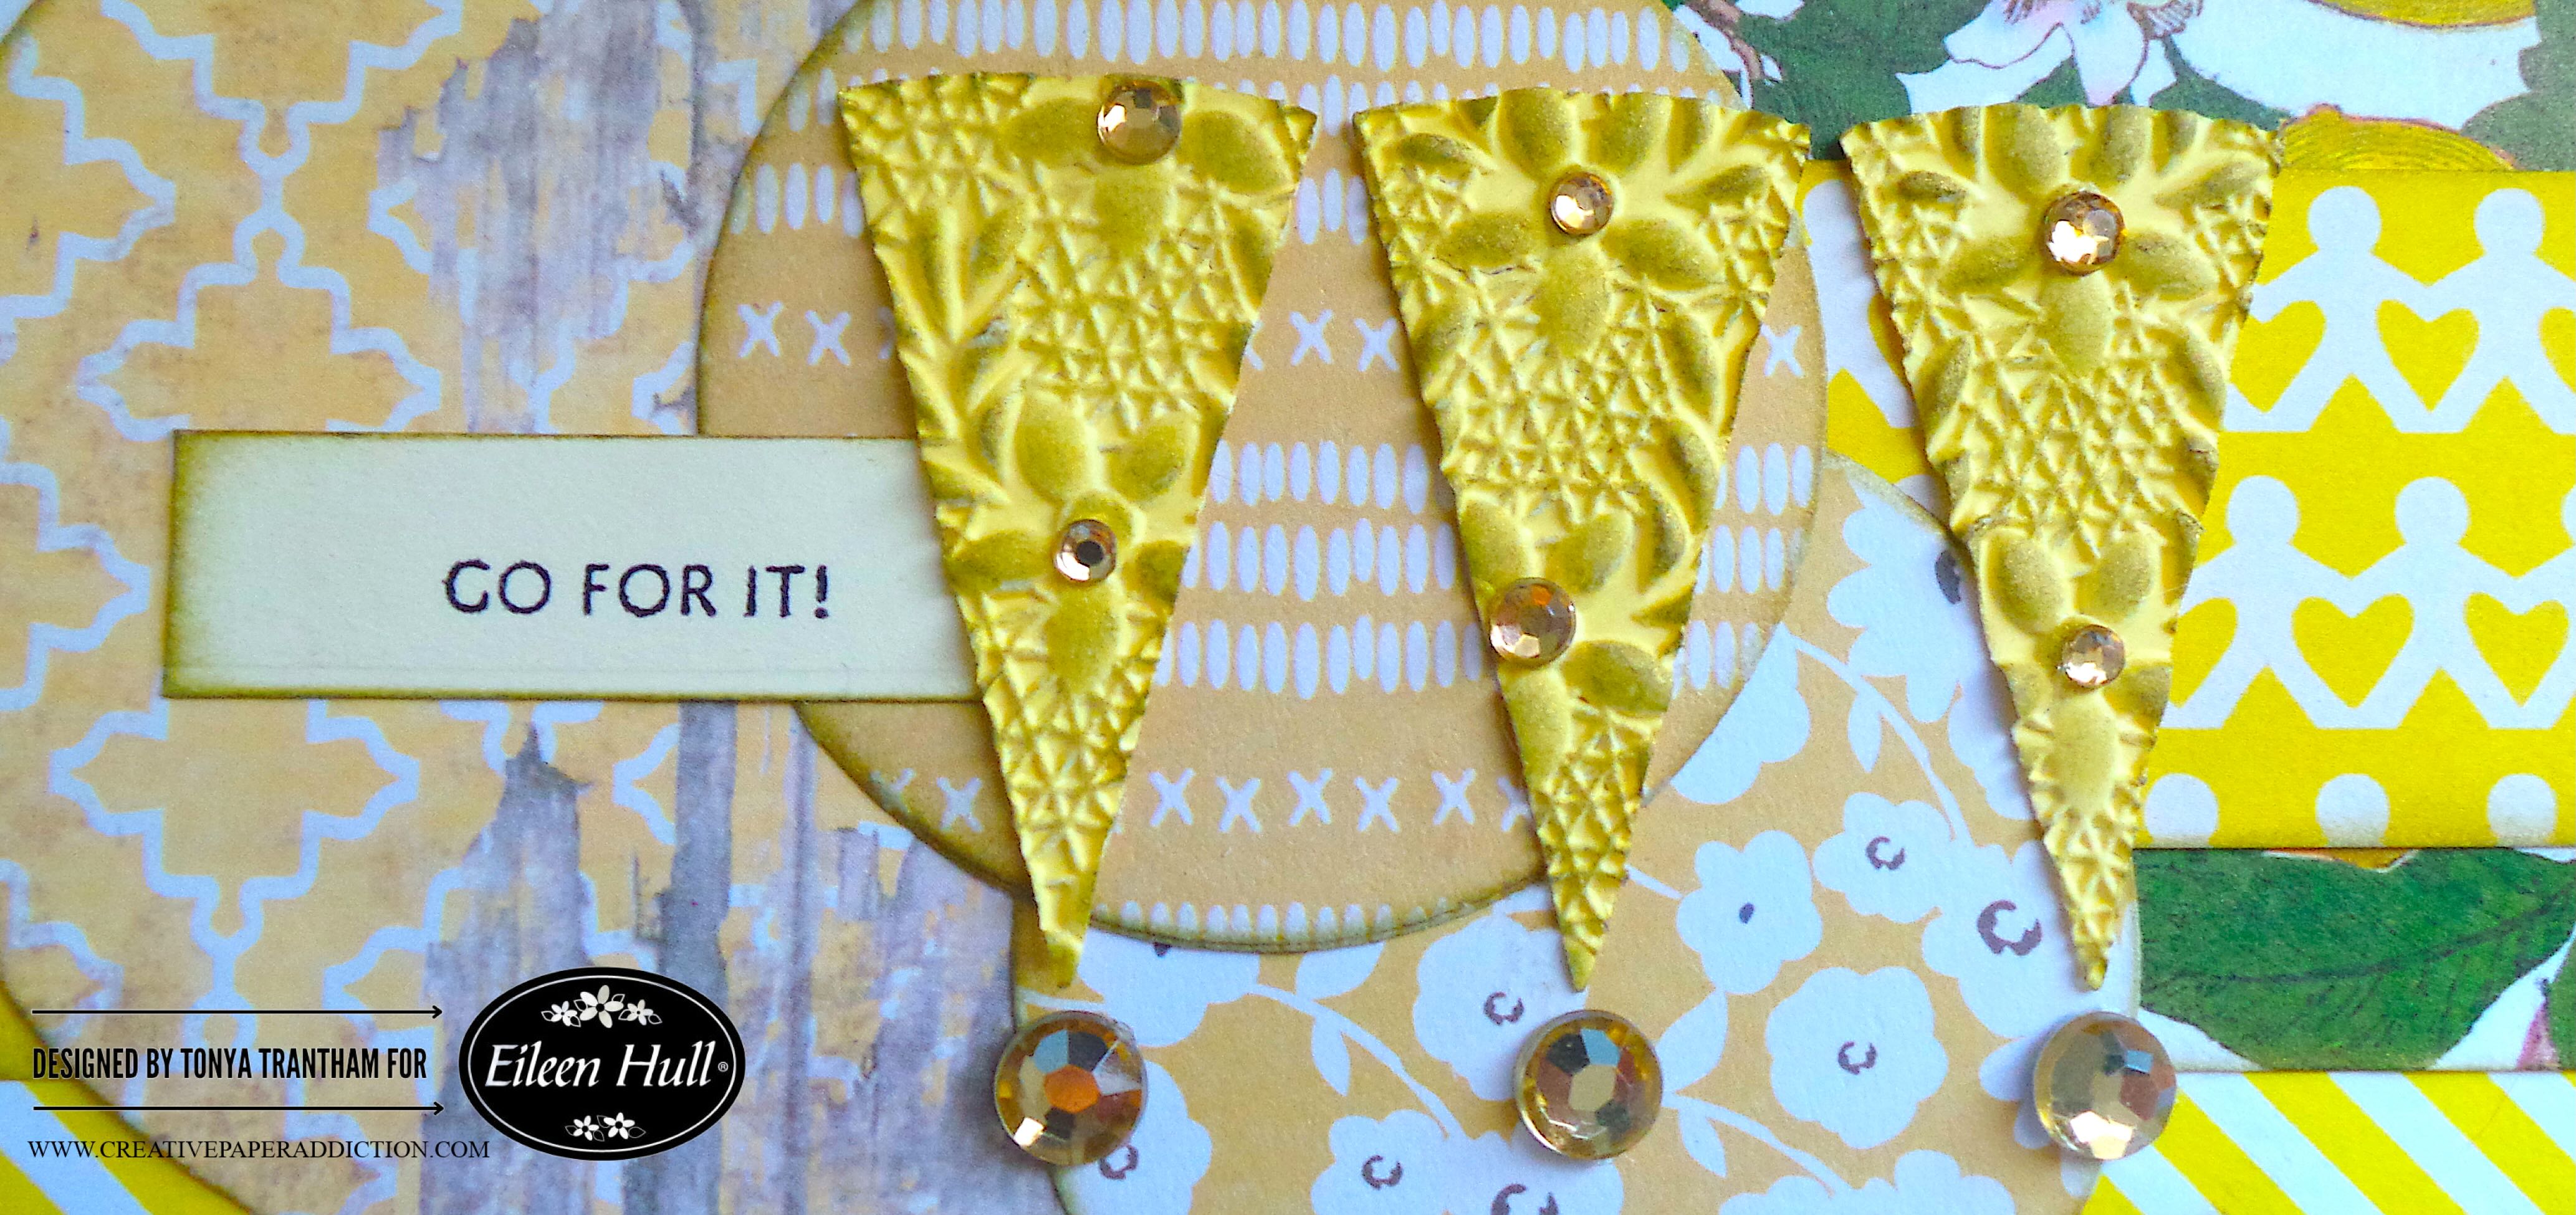
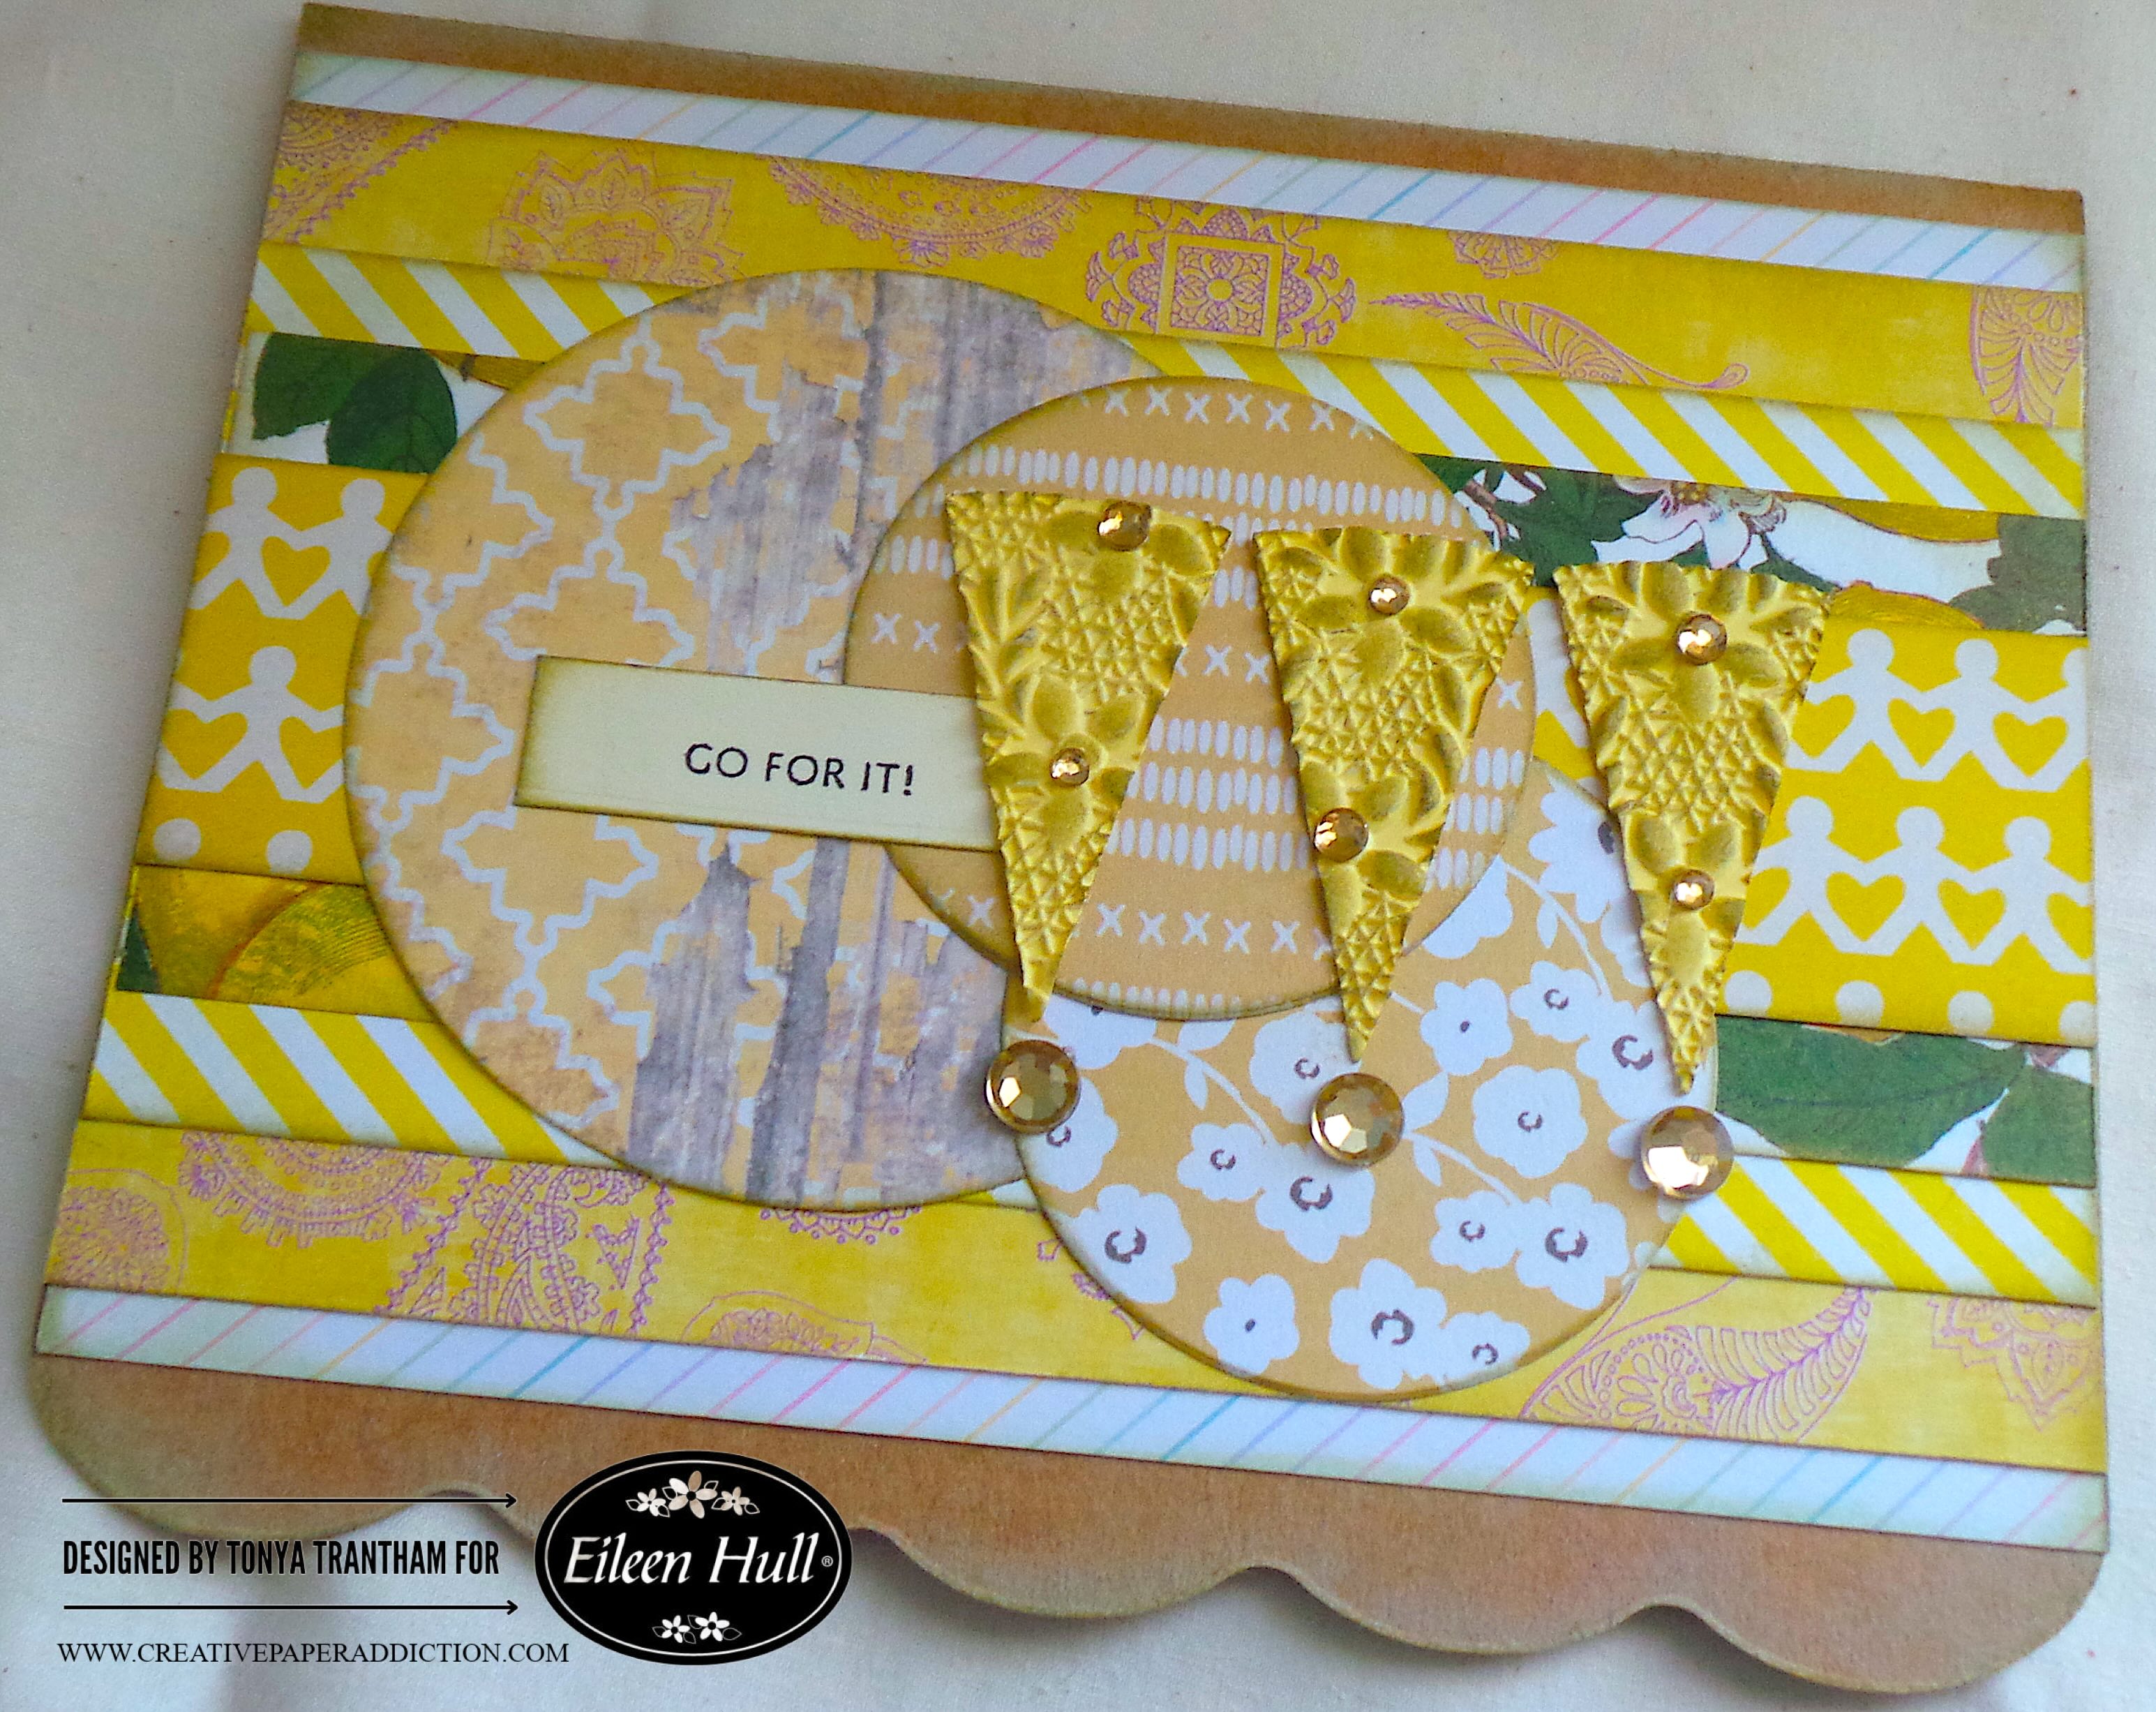
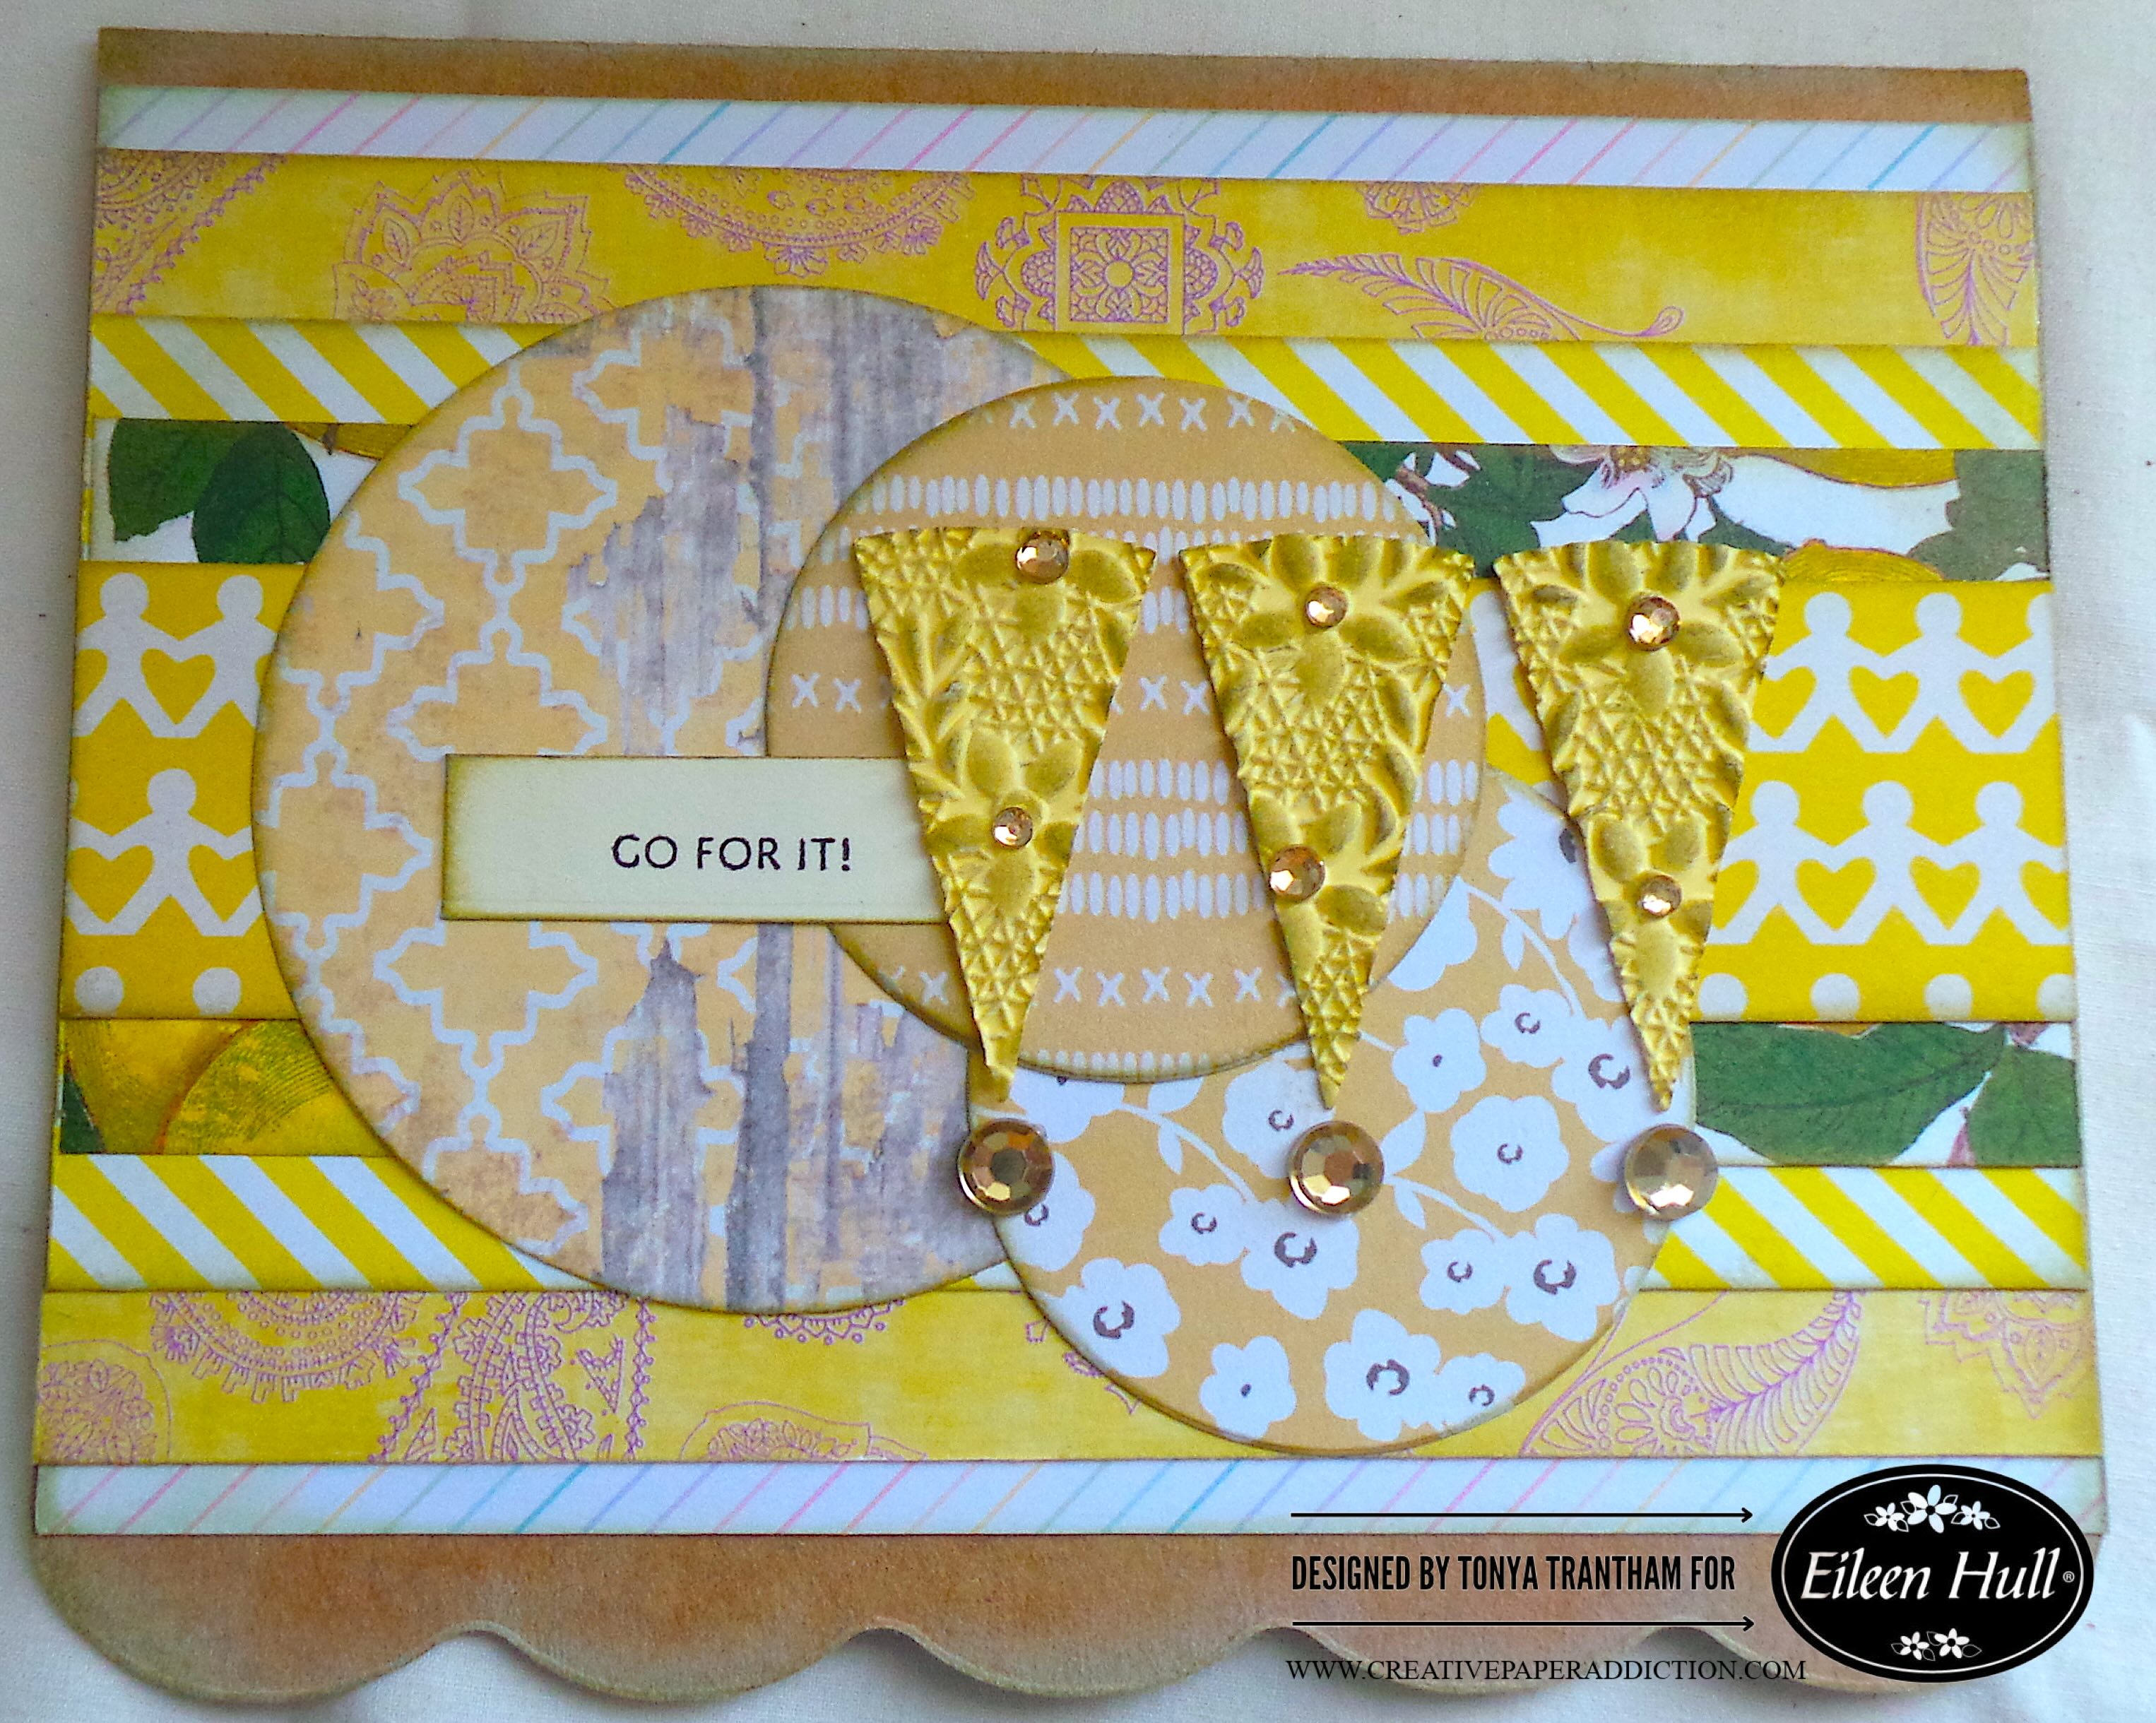
I gathered an assortment of yellow and one rainbow patterned cardstocks. I cut five strips in different sizes to fit the base of the card. I glued all in place.
I cut one large and two small circles from the Rainbow Wheels Thinlits and adhered to the card. Side note, the pie/wedge shape diecut looks like an explanation point…if you add a dot to it. I thought it would be the perfect addition to the “Go For It!” stamp that I will be using.
I adhered the pie/wedges dies and sentiment to the card. I added Gold Gems to the bottom of each pie/wedge. I also added smaller gold gems to the center of each embossed flower.
I can’t wait to make more cards with these dies and stamp set. If you haven’t been by Eileen’s blog lately you can find the latest post HERE.
If you have any questions or comments about this card, please leave them below.
(Products listed above are Affiliated Links for your convenience)
DISCLAIMERS
This blog is compensated to provide opinion on products, services, websites, and various other topics. Even though the owner(s) of this blog receives compensation for our posts or advertisements. I always give my honest opinions, findings, beliefs, or experiences on those topics or products. The views and opinions expressed on this blog are purely my own. Any product claim, statistic, or quote should be checked with each manufacturer. Verify other representations about a product or service with the provider or party in question.This blog contains affiliate links. Clicking these links helps to support Tonya Trantham Designs – Creative Paper Addiction. It runs at no additional cost to you.Today’s features are Sizzix, Eileen Hull and Scrapbook.com Products.
Thanks for stopping by, I hope your Monday is wonderful and enjoy creating!
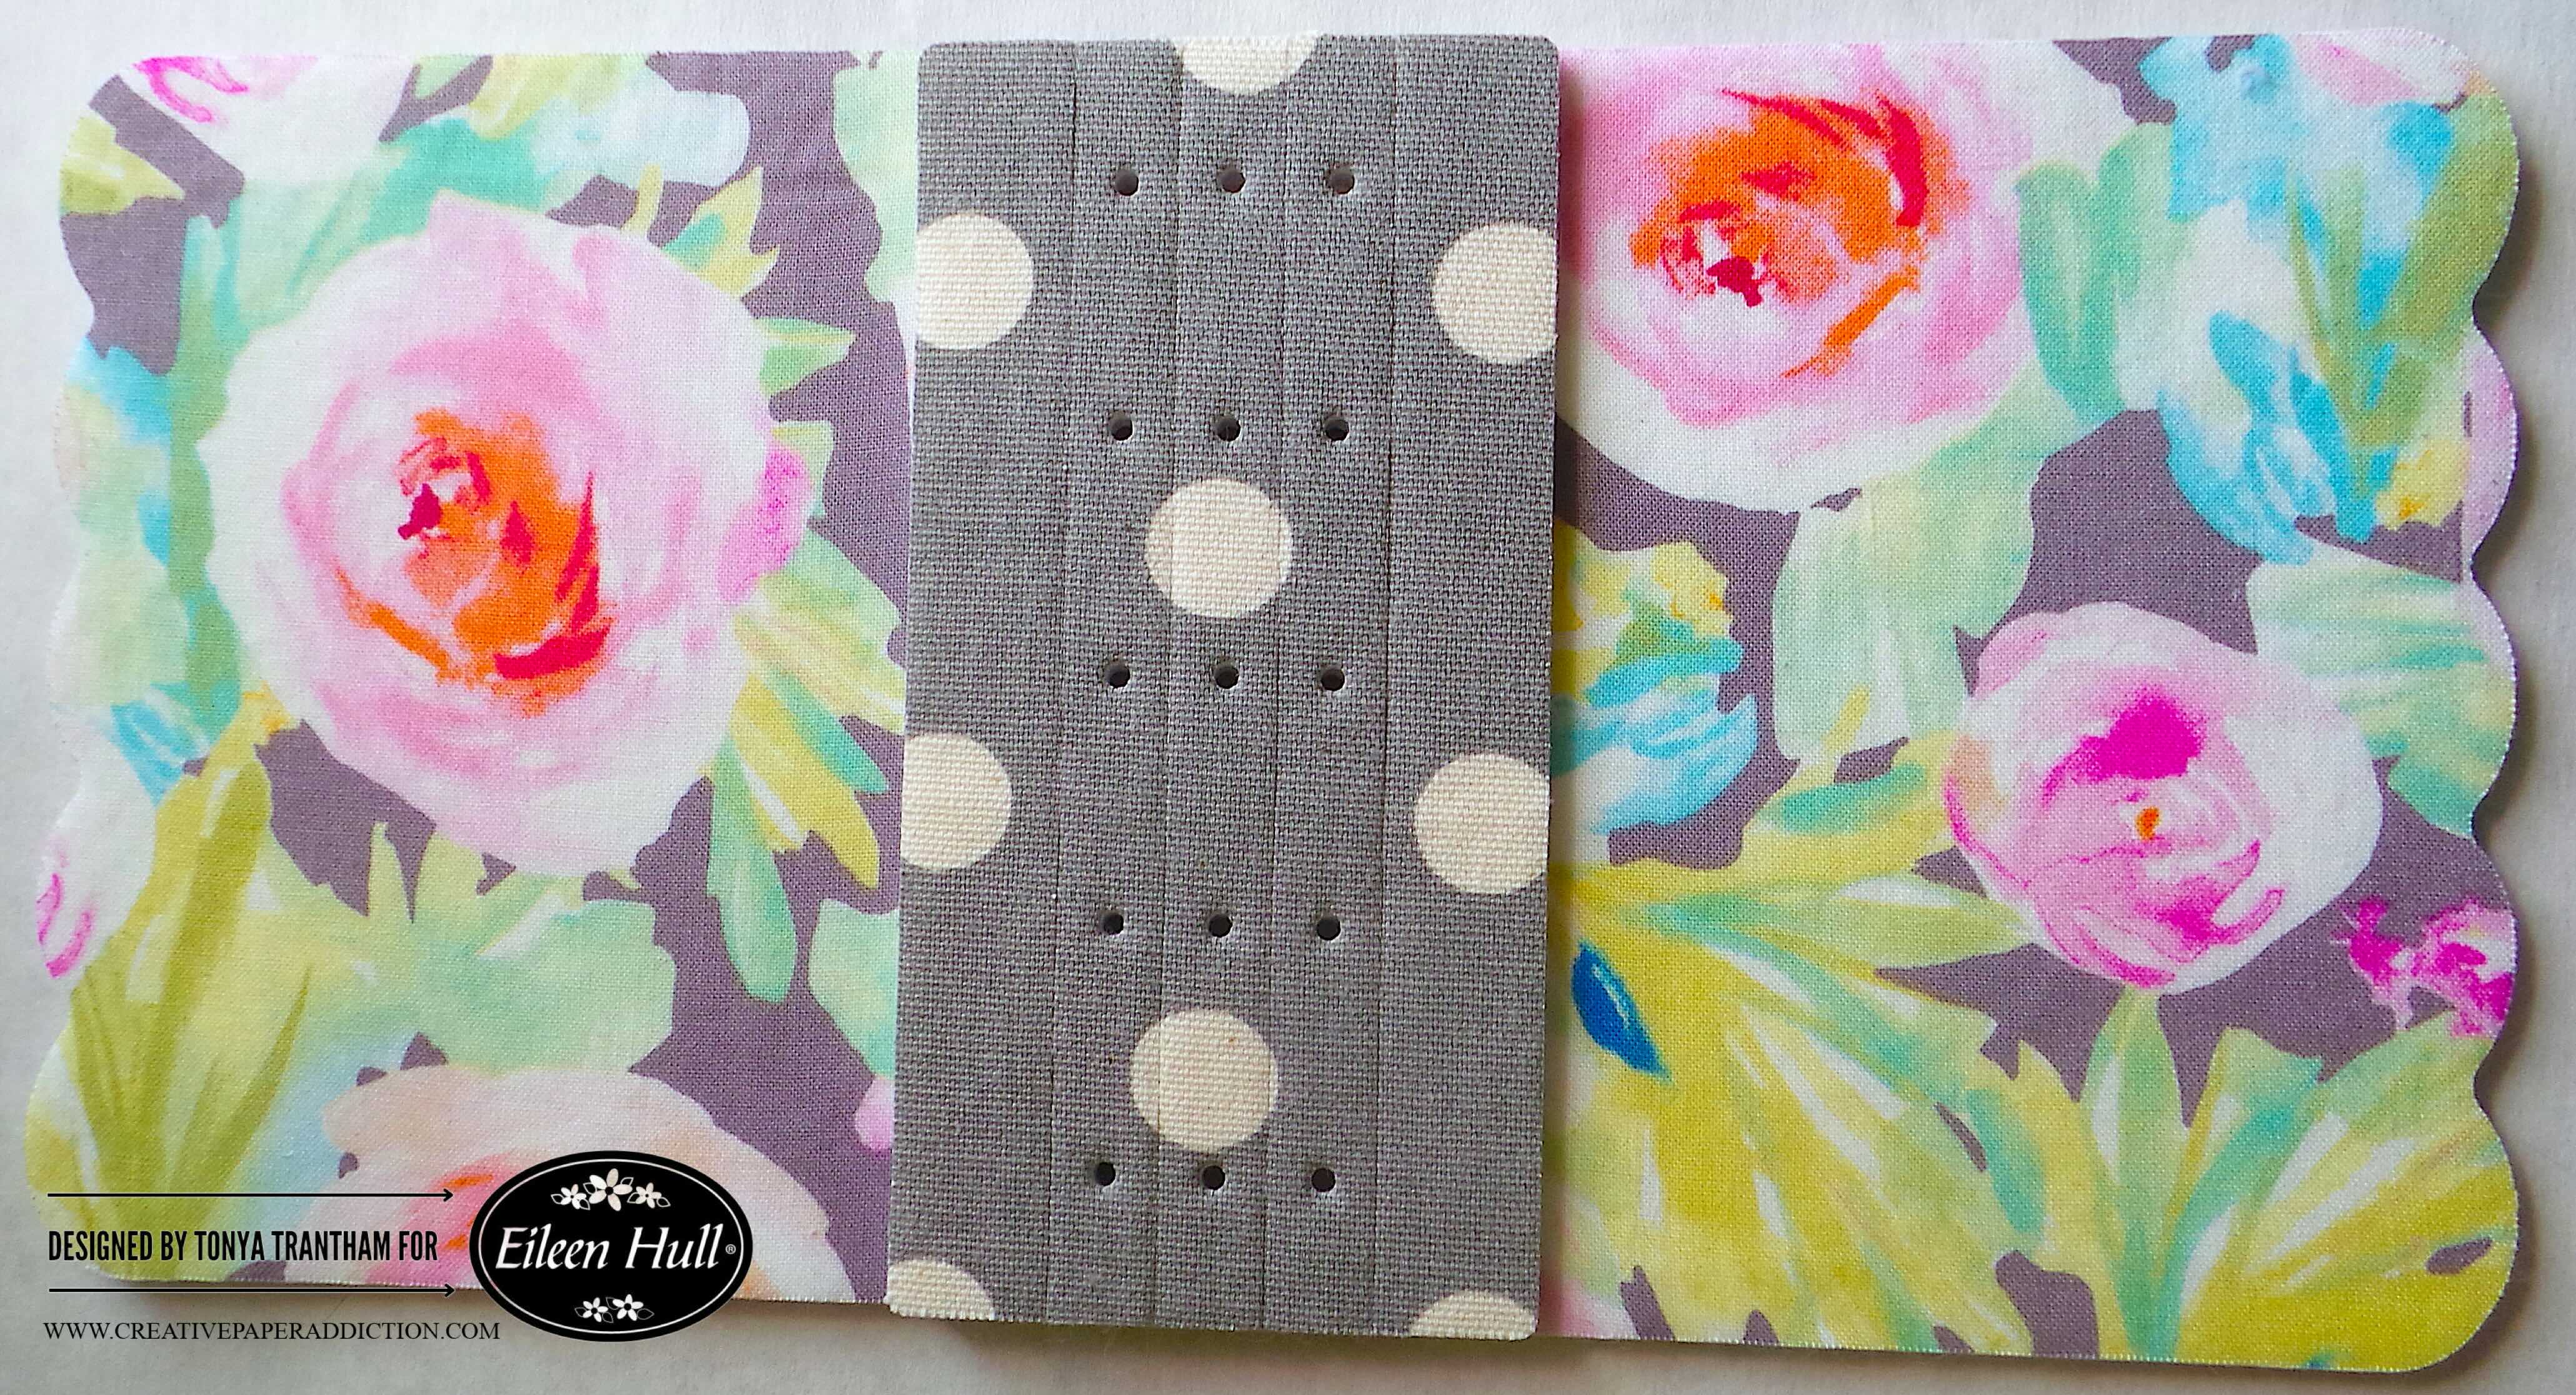
Hi everyone! I am back with the complete reveal of my swatch book. I created it using the Hardbound Journal Diecut, Swatch Cards Stamps and a few other dies, all by Eileen Hull. This was a fun journal to create. It was a great way to showcase lace, ribbon, and trim that I have in my stash. Anyways, let’s get started!
I didn’t take any step out photos of how I layered the covers and spine. So I did bullet points to break down the process. A side note… when creating the cover cut two covers and a spine with the diecut.
I cut from the Adhesive Roll strips of adhesive and applied to both sides of the cardstock.
I cut two pieces of felt the same size as the cardstock. I place the felt on either side of the cardstock.
I did the same steps as above and applied strips of adhesive to both sides of the felt and burnished.
I cut fabric and placed over the applied adhesive strips that’s covering the felt. I burnished well before placing onto the Hardbound Journal Diecut and running through the Diecut Machine.
I glued the end flaps to each straight side of the journal cover.
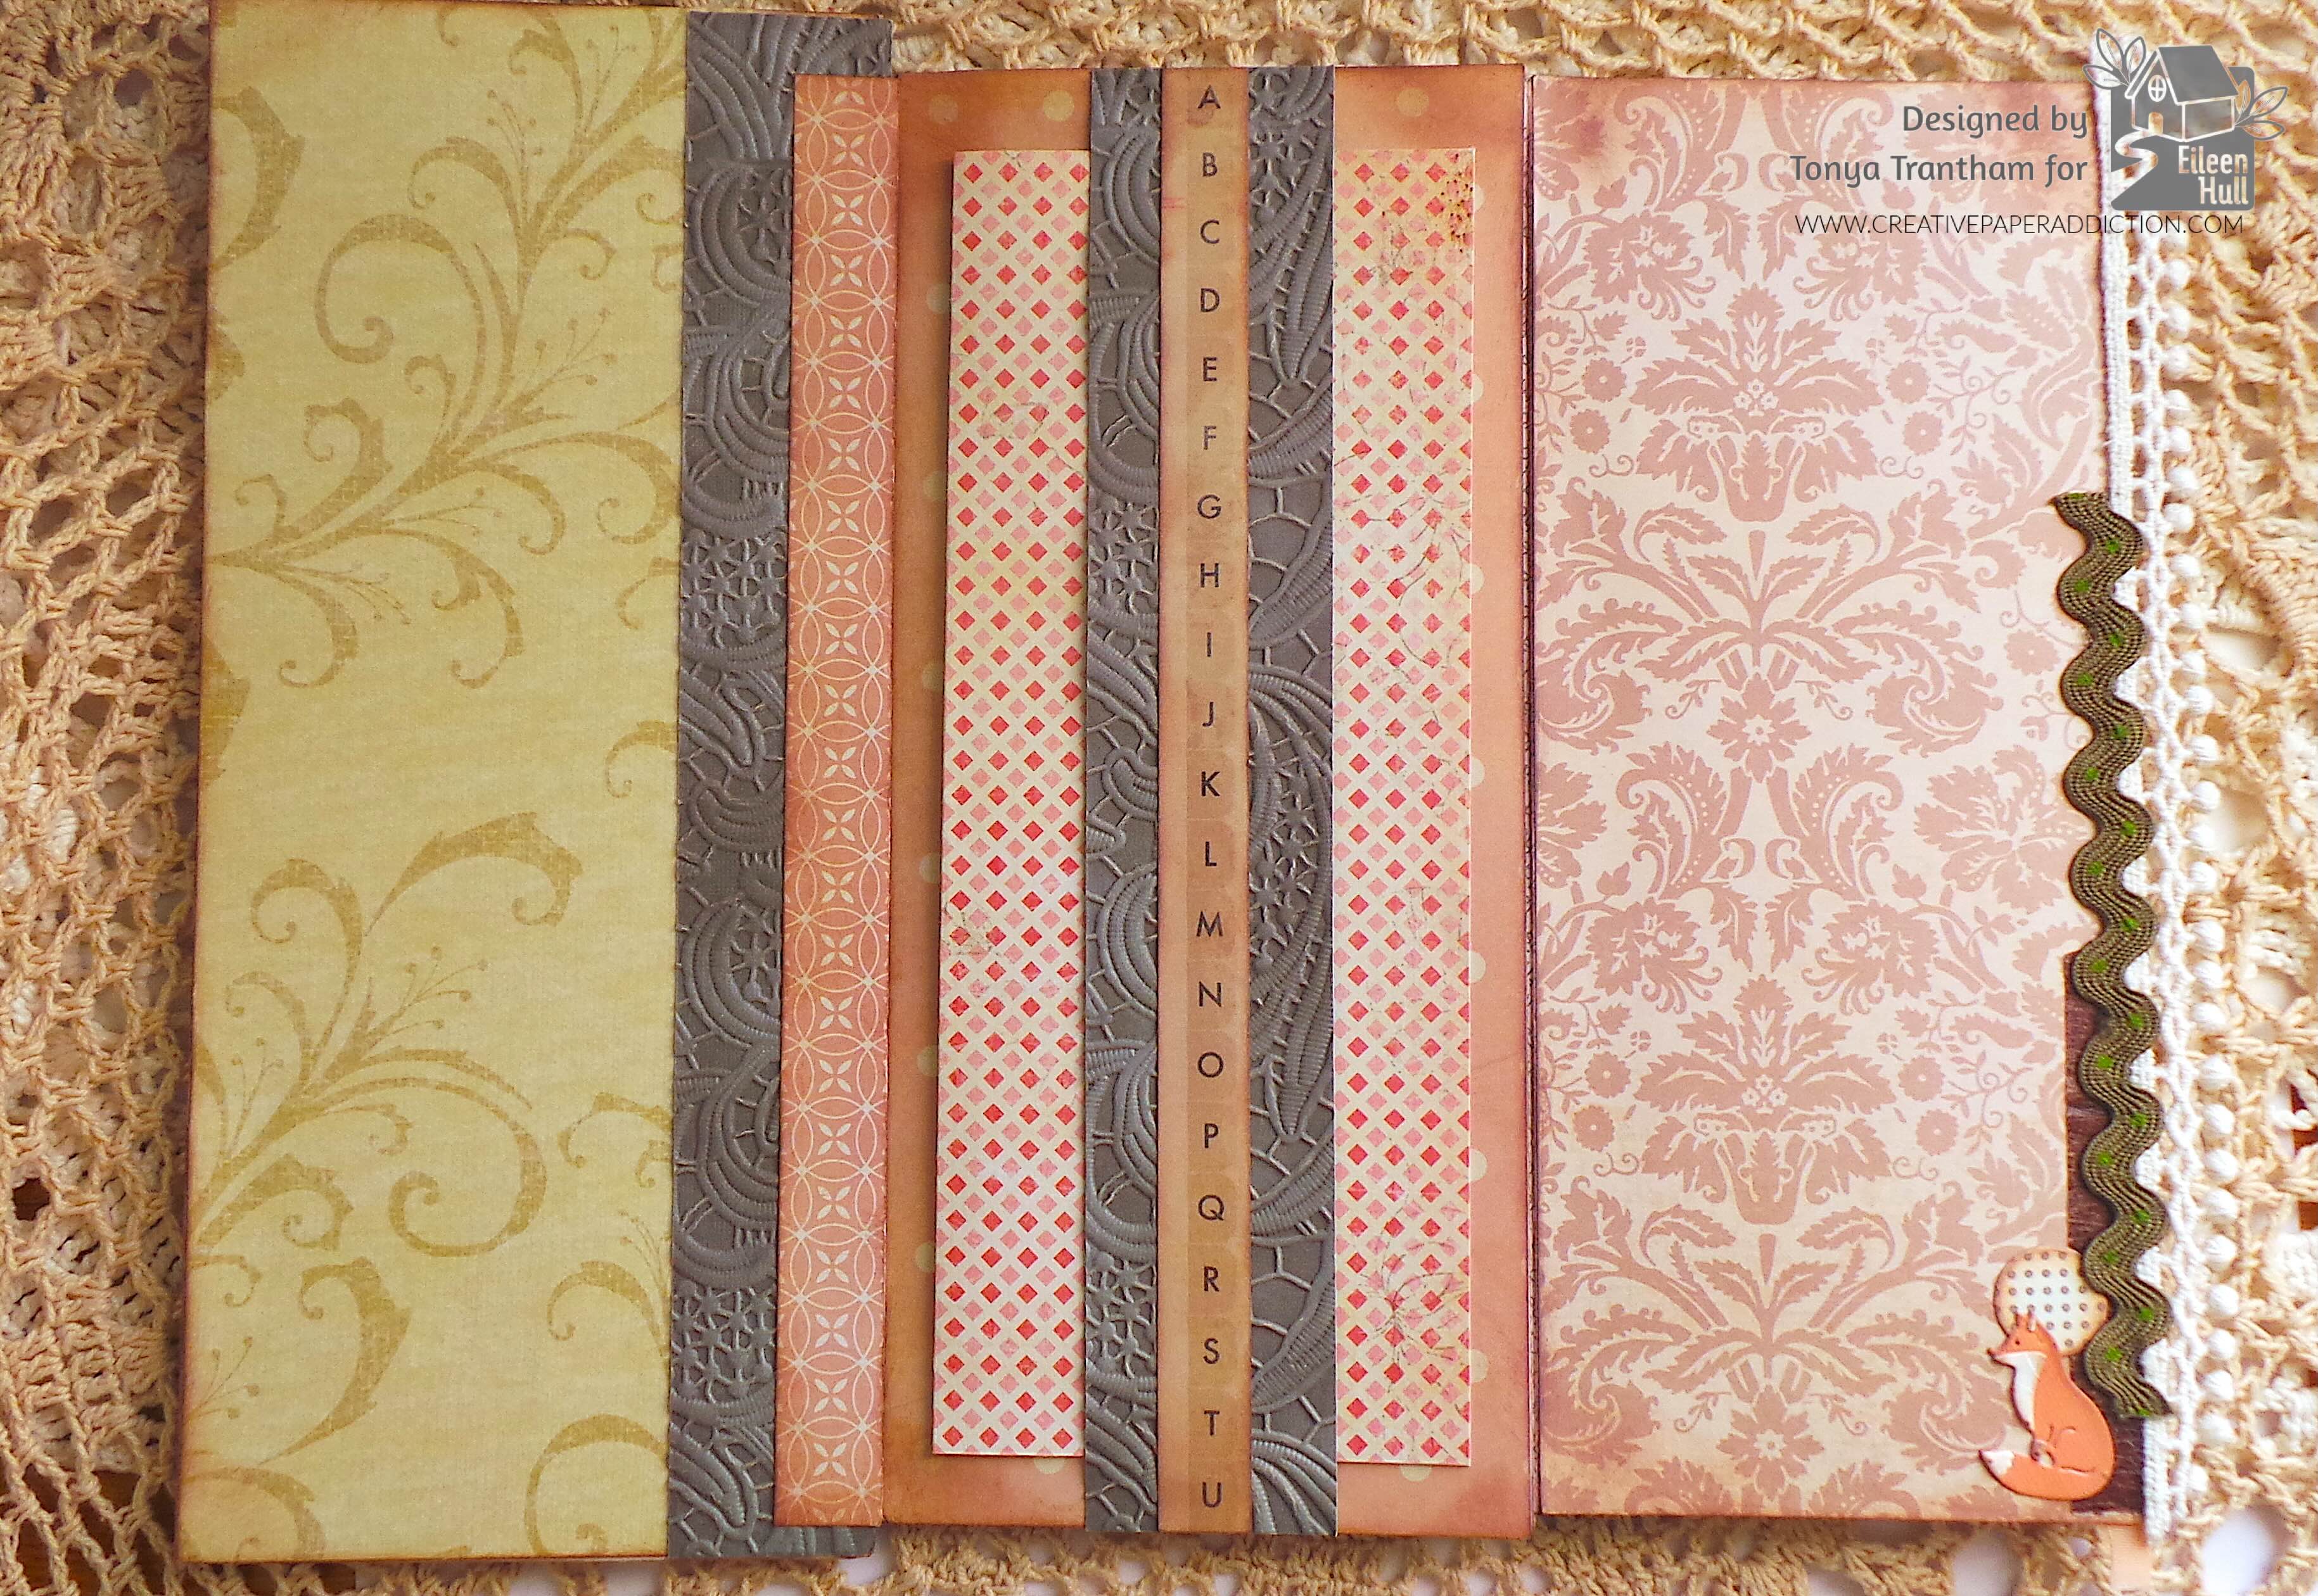
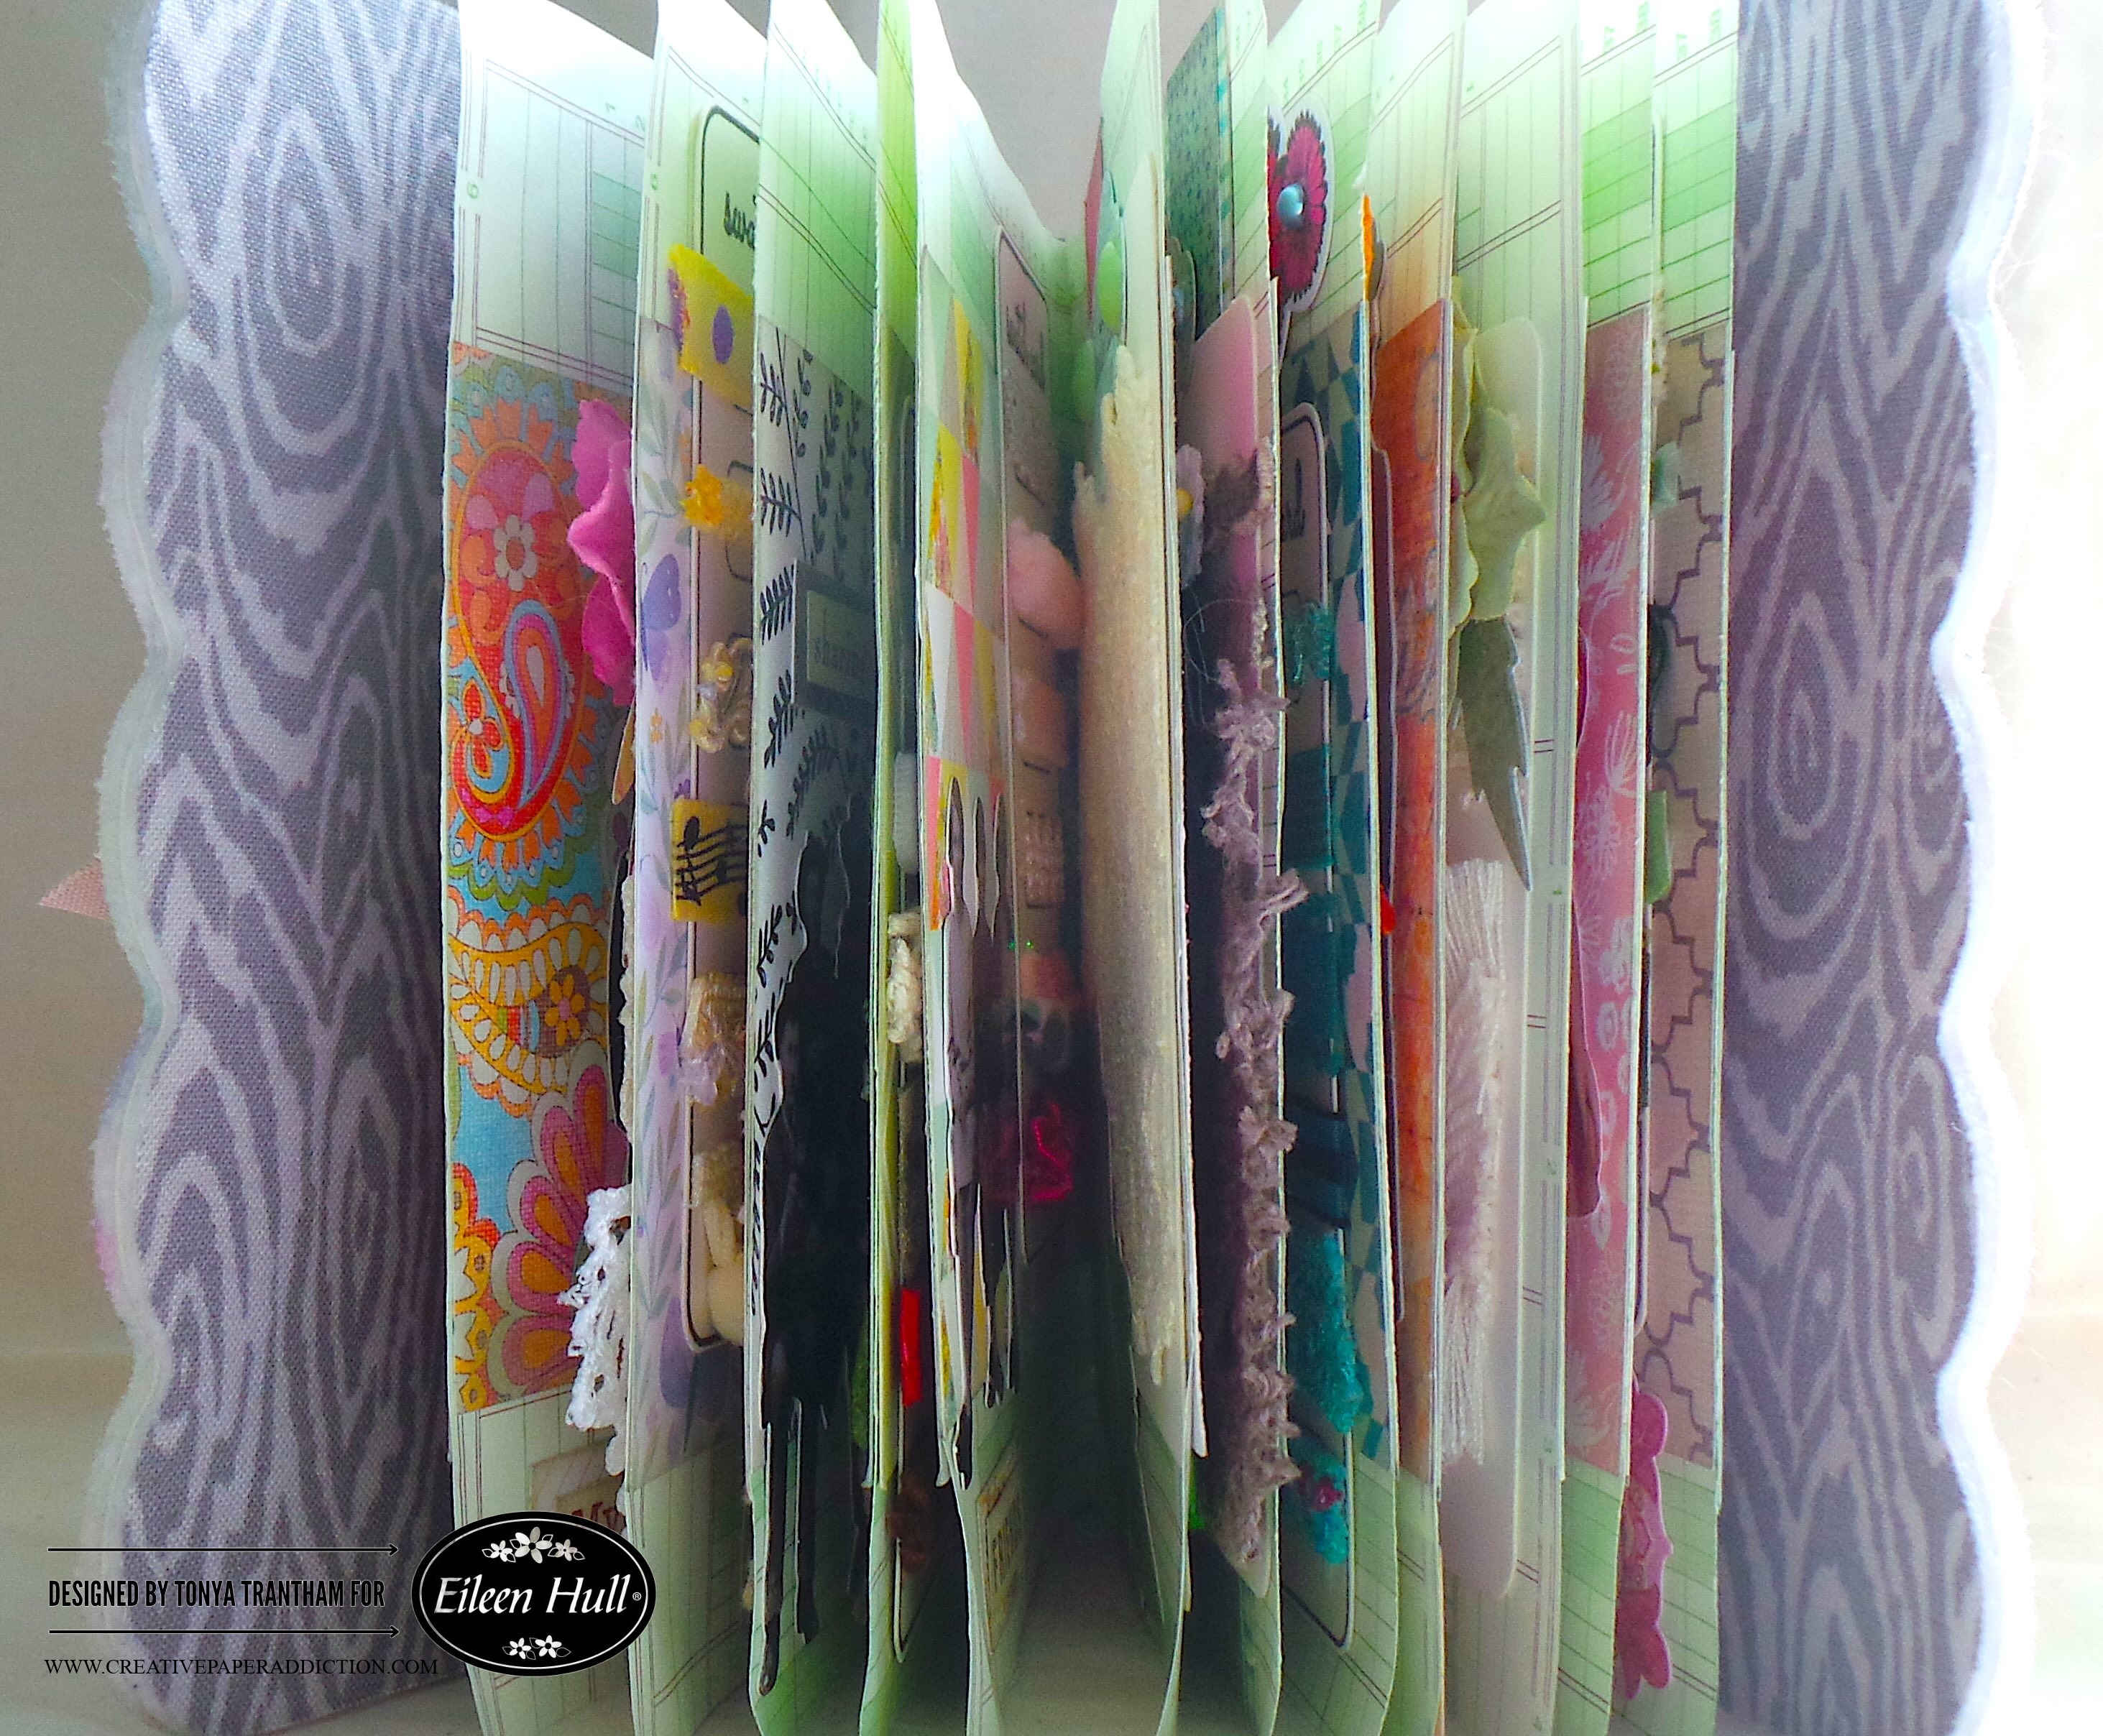
I cut a total of six papers for the journal. I folded in half and made holes in the fold before sewing two papers in per signature. A side note…I had actually sewn in more pages but had to remove them. The extra pages would have “bulked” up the journal too much.
I went through my lace, ribbon and trim and glued to the swatches. I also used the Journal Hardware Diecut to create labels for the larger lace and trim in my stash.
I adhered cardstock to each page before adding a swatch card.
This is a great way to use those bits and pieces of random embellishments.
Even though it’s fun seeing all the lace, ribbon and trim I included in this journal. It’s kind of alarming that I didn’t even make a dent in what I still have in my collection.
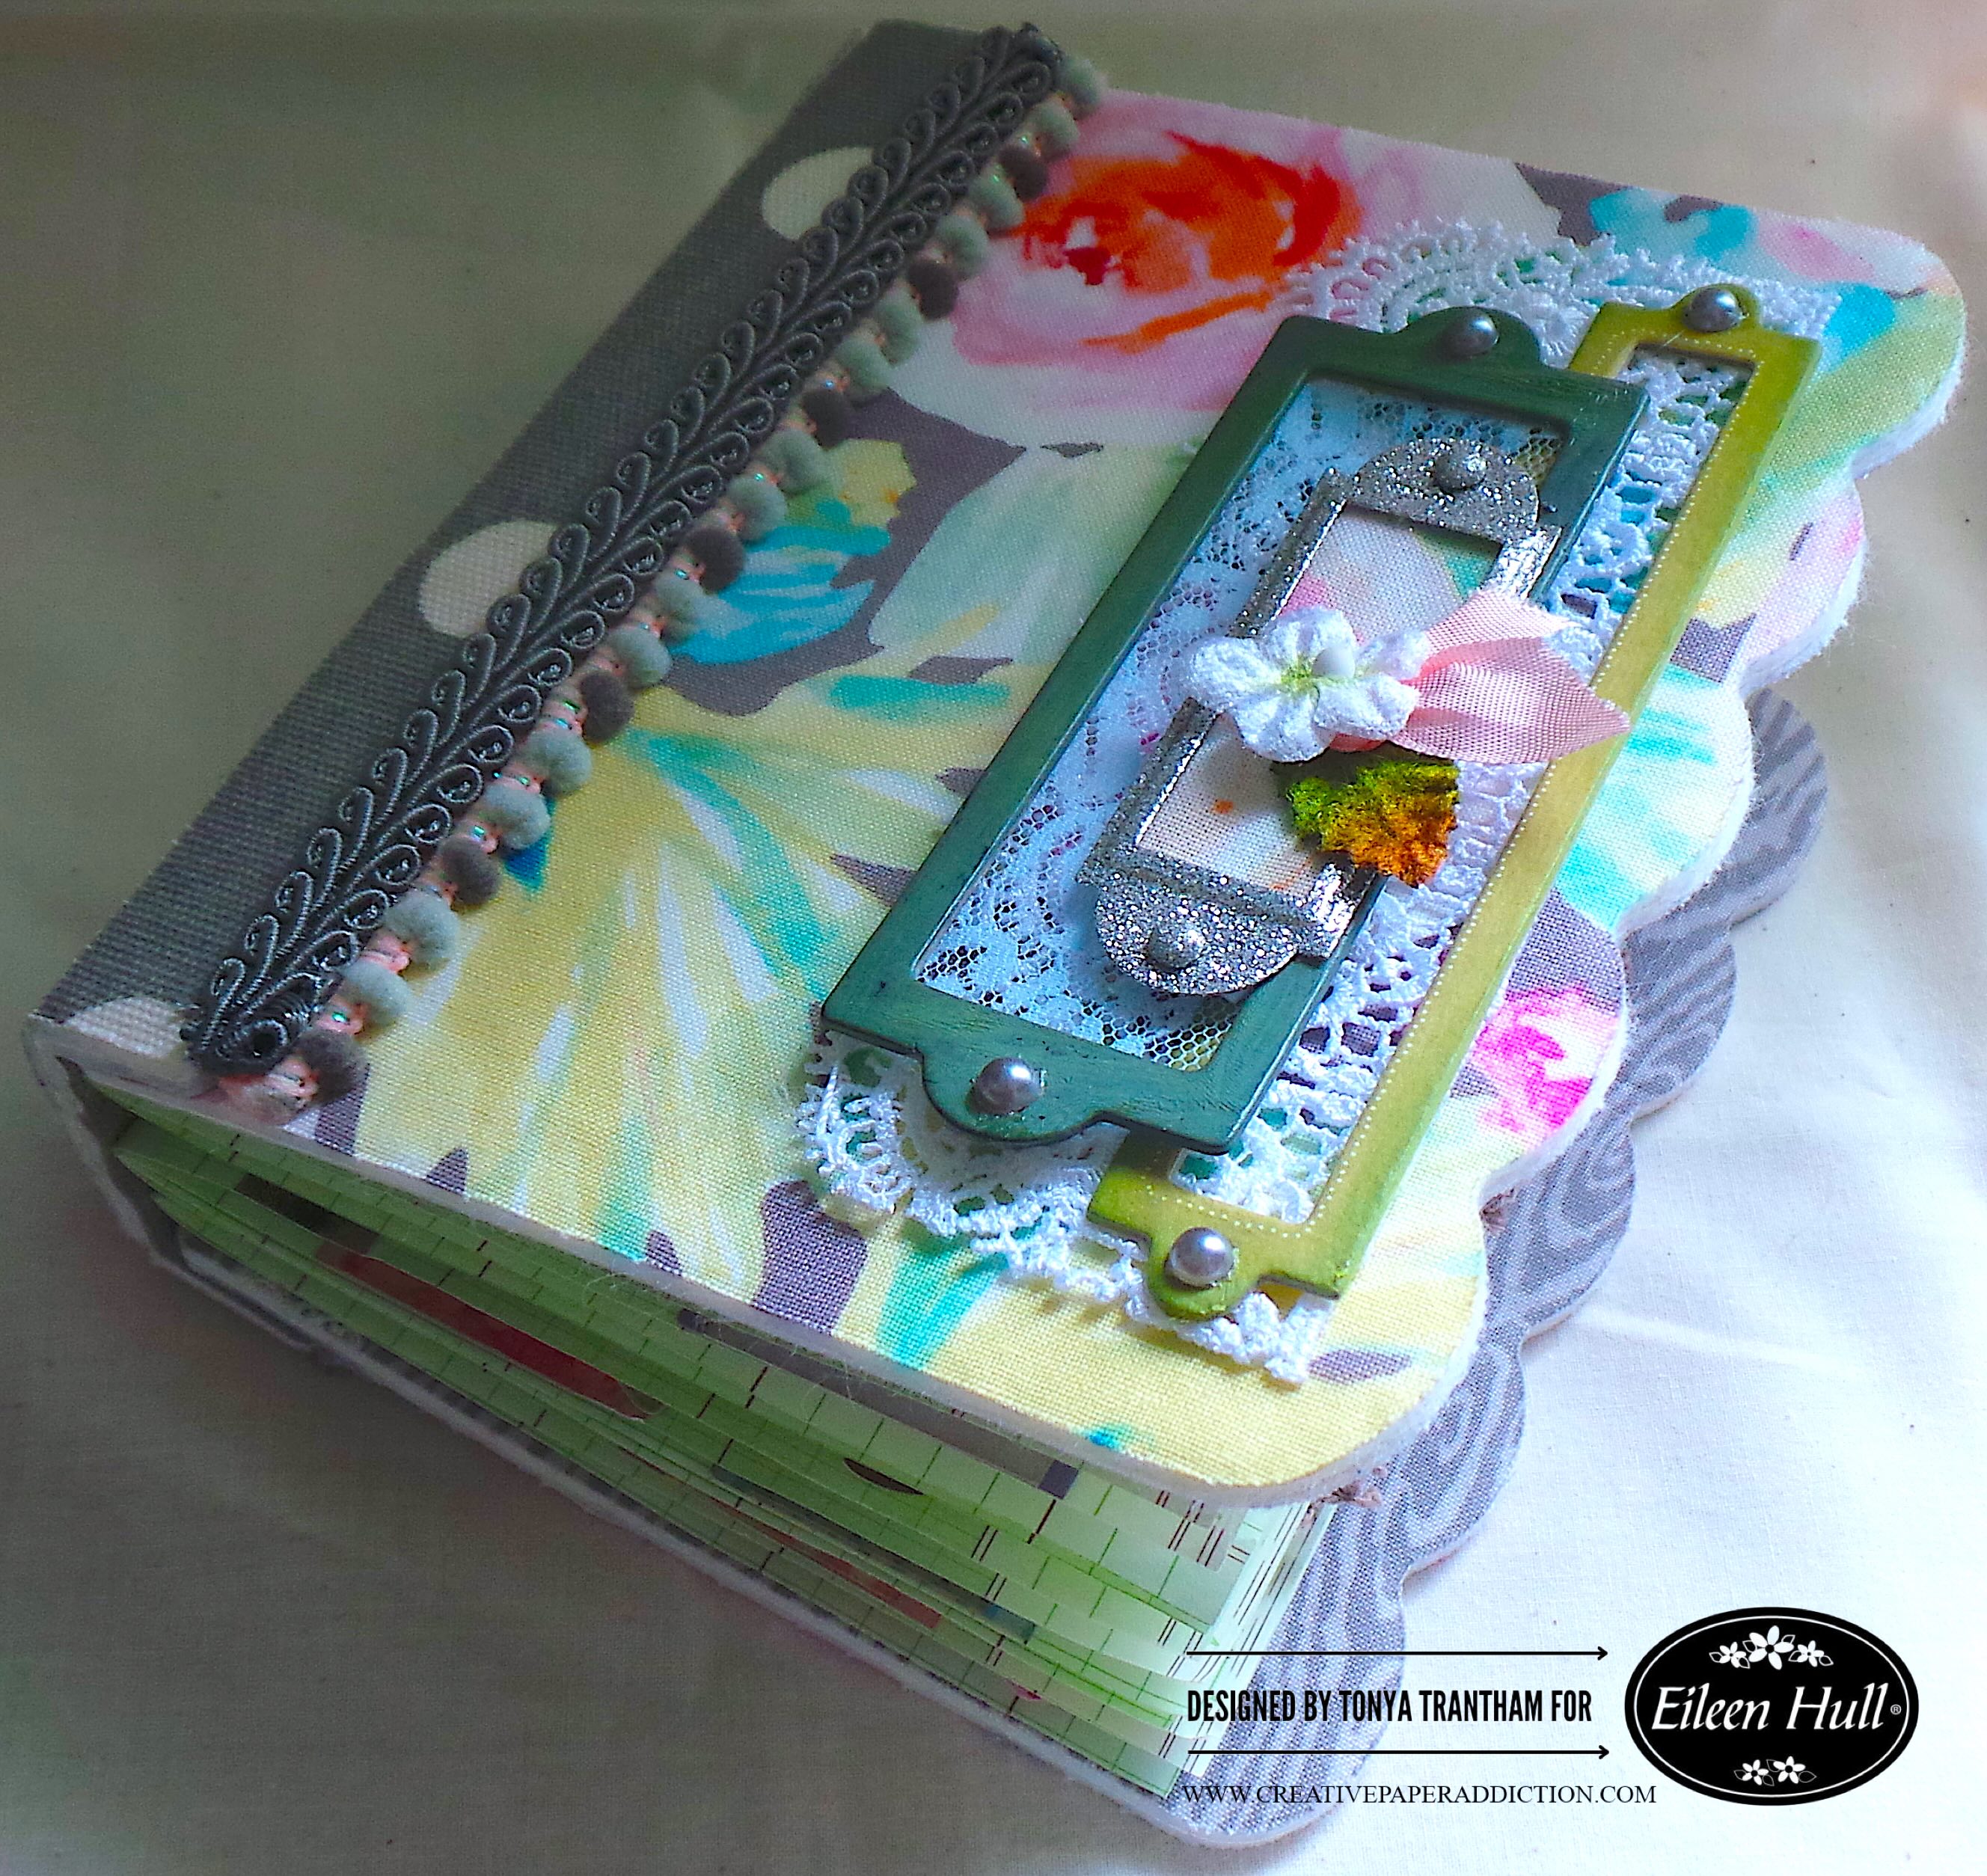
The cover I added a piece of lace and three bookplates in different sizes. The first bookplate, I adhered onto the lace. The second bookplate, I glued a piece of light blue lace inside the plate. I also added Foam Pop Dots to the back edge. I added a scrap of fabric to the third bookplate. Then I stacked all three on top of each other and glued them to the cover.
I added Gray Flatback Pearls to the ends of each bookplates. I also glued a flower with a leaf and a bit of pink seam binding to the bookplate. The finishing touch was adding mini pom pom trim to the edge of the spine and cover of the book.
I can’t wait to make more of these types of journals. Maybe the next journal will be swatches of all the Washi tape that I own?
Anyways, if you haven’t been by Eileen Hull’s blog lately you can find the latest post HERE. Also if you have any questions about this journal or comments in general leave them below.
(Products listed above are Affiliated Links for your convenience)
DISCLAIMERS
This blog is compensated to provide opinion on products, services, websites, and various other topics. Even though the owner(s) of this blog receives compensation for our posts or advertisements. I always give my honest opinions, findings, beliefs, or experiences on those topics or products. The views and opinions expressed on this blog are purely my own. Any product claim, statistic, or quote should be checked with each manufacturer. Verify other representations about a product or service with the provider or party in question.This blog contains affiliate links. Clicking these links helps to support Tonya Trantham Designs – Creative Paper Addiction. It runs at no additional cost to you.Today’s features are Sizzix, Eileen Hull and Scrapbook.com Products.
Thanks for stopping by, I hope your Wednesday is great and enjoy creating!
Hi everyone! It’s that time again and the May Release by Eileen Hull is here! I will be sharing sneak peeks of my projects and will do blog posts later.
The Handbound Journal is a ScoreBoards XL die designed to cut and score thick materials like matboard, leather, and felt. It includes built-in score lines, holes, a spine piece, and large labels—no measuring needed! The book measures 6″ x 5″. You can customize its thickness. You can also choose hand or quick binding. It comes with a pretty scalloped edge. One of the most versatile designs yet.
The Bigz Journal Hardware Die offers latches, hinges, and pen loops. These components are perfectly sized to coordinate with the journal. It also cuts a variety of materials.
The Color Wheel Stencil is a three-layer stencil that creates a continuous color wheel—use traditional ROYGBIV or customize your palette. Pair it with the Rainbow Wheel Die, which cuts the framework, segmented circle, and arrows for a functional color wheel.
The Swatch Card Stamp Set includes a round palette, rectangular and pie-shaped swatch cards. Plus color-themed phrases perfect for cards or journals.
(Products listed above are Affiliated Links for your convenience)
DISCLAIMERS
This blog is compensated to provide opinion on products, services, websites, and various other topics. Even though the owner(s) of this blog receives compensation for our posts or advertisements. I always give my honest opinions, findings, beliefs, or experiences on those topics or products. The views and opinions expressed on this blog are purely my own. Any product claim, statistic, or quote should be checked with each manufacturer. Verify other representations about a product or service with the provider or party in question.This blog contains affiliate links. Clicking these links helps to support Tonya Trantham Designs – Creative Paper Addiction. It runs at no additional cost to you.Today’s features are Sizzix, Eileen Hull and Scrapbook.com Products.
Thanks for stopping by, I hope your Thursday is great and enjoy creating!
Hi everyone! This past Saturday was the Spring Fling Craftalong Event hosted by Eileen Hull. There was ten designers sharing how to projects using an assortment of Eileen Hull’s diecuts. Lots of fun was had by all and even though the event maybe over you can still purchase the craftalong/classes for $30. That’s eight classes with a couple of bonus projects thrown in too. Once purchased you will be added to the Spring Fling Craftalong Facebook group and you will have unlimited access to all the videos too. You can find the link to purchase this event HERE.
Hi everyone! I’m back with a project I created using Eileen Hull’s newest stamp set called Making Plans with Maker Forte! This set of stamps has so many possibilities! From cards, tags, journals and so much more! I used these stamps on the cover of an unfinished album from a tutorial that Eileen shared on one of her Facebook Lives. Anyways, let’s get started!
I placed an assortment of the label stamps onto the MISTI Stamping Tool, inked and stamped onto Cream Cardstock and various patterned scraps of cardstock. I also inked up the “dream a little” sentiment stamp and stamped onto one of the labels I had already stamped. I fussy cut all of the labels out and what I don’t use now will be used in finishing the inside…the plan is to do a part two blog post later…so stay tuned!
The label stamps are so fun to layer! I had a “partial” label diecut from the Extra Large Journal Diecut that I layered with a bookplate and the “dream a little” sentiment, used water splatter rub ons (49 and Market) and more label stamps along with several flowers, leaves gems and thread loops to finish the cover.
Be sure to stop by Eileen’s blog for more creativity from the Inspiration and Educator Teams and details on how you can purchase this stamp set. You can find the blog HERE.
(Products listed above are Affiliated Links for your convenience)
DISCLAIMERS
This blog is compensated to provide opinion on products, services, websites, and various other topics. Even though the owner(s) of this blog receives compensation for our posts or advertisements. I always give my honest opinions, findings, beliefs, or experiences on those topics or products. The views and opinions expressed on this blog are purely my own. Any product claim, statistic, quote or other representation about a product or service should be verified with each manufacturer, provider, or party in question.This blog contains affiliate links, clicking and shopping through these links helps to support and run Tonya Trantham Designs – Creative Paper Addiction at no additional cost to you. Today’s features are Makers Forte, Eileen Hull, Sizzix and Scrapbook.com Products.
Thanks for stopping by, hope your Tuesday is wonderful and enjoy creating!
I placed the button card stamp onto the MISTI Stamping Tool, inked with a Brown Ink and stamped onto a piece of Cream Cardstock. The Damask Stamp I completed the same steps as with the button card stamp but stamped onto a piece of Navy Cardstock.
Next I used an assortment of embossing powders to “grudge up” the damask image.
I cut a piece of patterned cardstock slightly larger than the stamped images. I adhered the damask and button card images onto the patterned cardstock.
I fussy cut out a body, crown and butterfly wings and before placing onto the page I adhered buttons with cording to the button card. I glued the butterfly wings to the body and added Foam Pop Dots and placed onto the page. Next two buttons together and adhered where the head should be on the body. I finished by gluing the crown to the head, printing and cutting out the “Unbutton Your Mind” sentiment to the page.
If you haven’t stopped by Eileen’s blog lately stop by and see what the Inspiration and Educator Teams have been up to. You can find the latest posts HERE, HERE and HERE.
(Products listed above are Affiliated Links for your convenience)
DISCLAIMERS
This blog is compensated to provide opinion on products, services, websites, and various other topics. Even though the owner(s) of this blog receives compensation for our posts or advertisements. I always give my honest opinions, findings, beliefs, or experiences on those topics or products. The views and opinions expressed on this blog are purely my own. Any product claim, statistic, quote or other representation about a product or service should be verified with each manufacturer, provider, or party in question.This blog contains affiliate links, clicking and shopping through these links helps to support and run Tonya Trantham Designs – Creative Paper Addiction at no additional cost to you. Today’s features are Makers Forte, Eileen Hull and Scrapbook.com Products.
Thanks for stopping by, hope your Tuesday is great and enjoy creating!