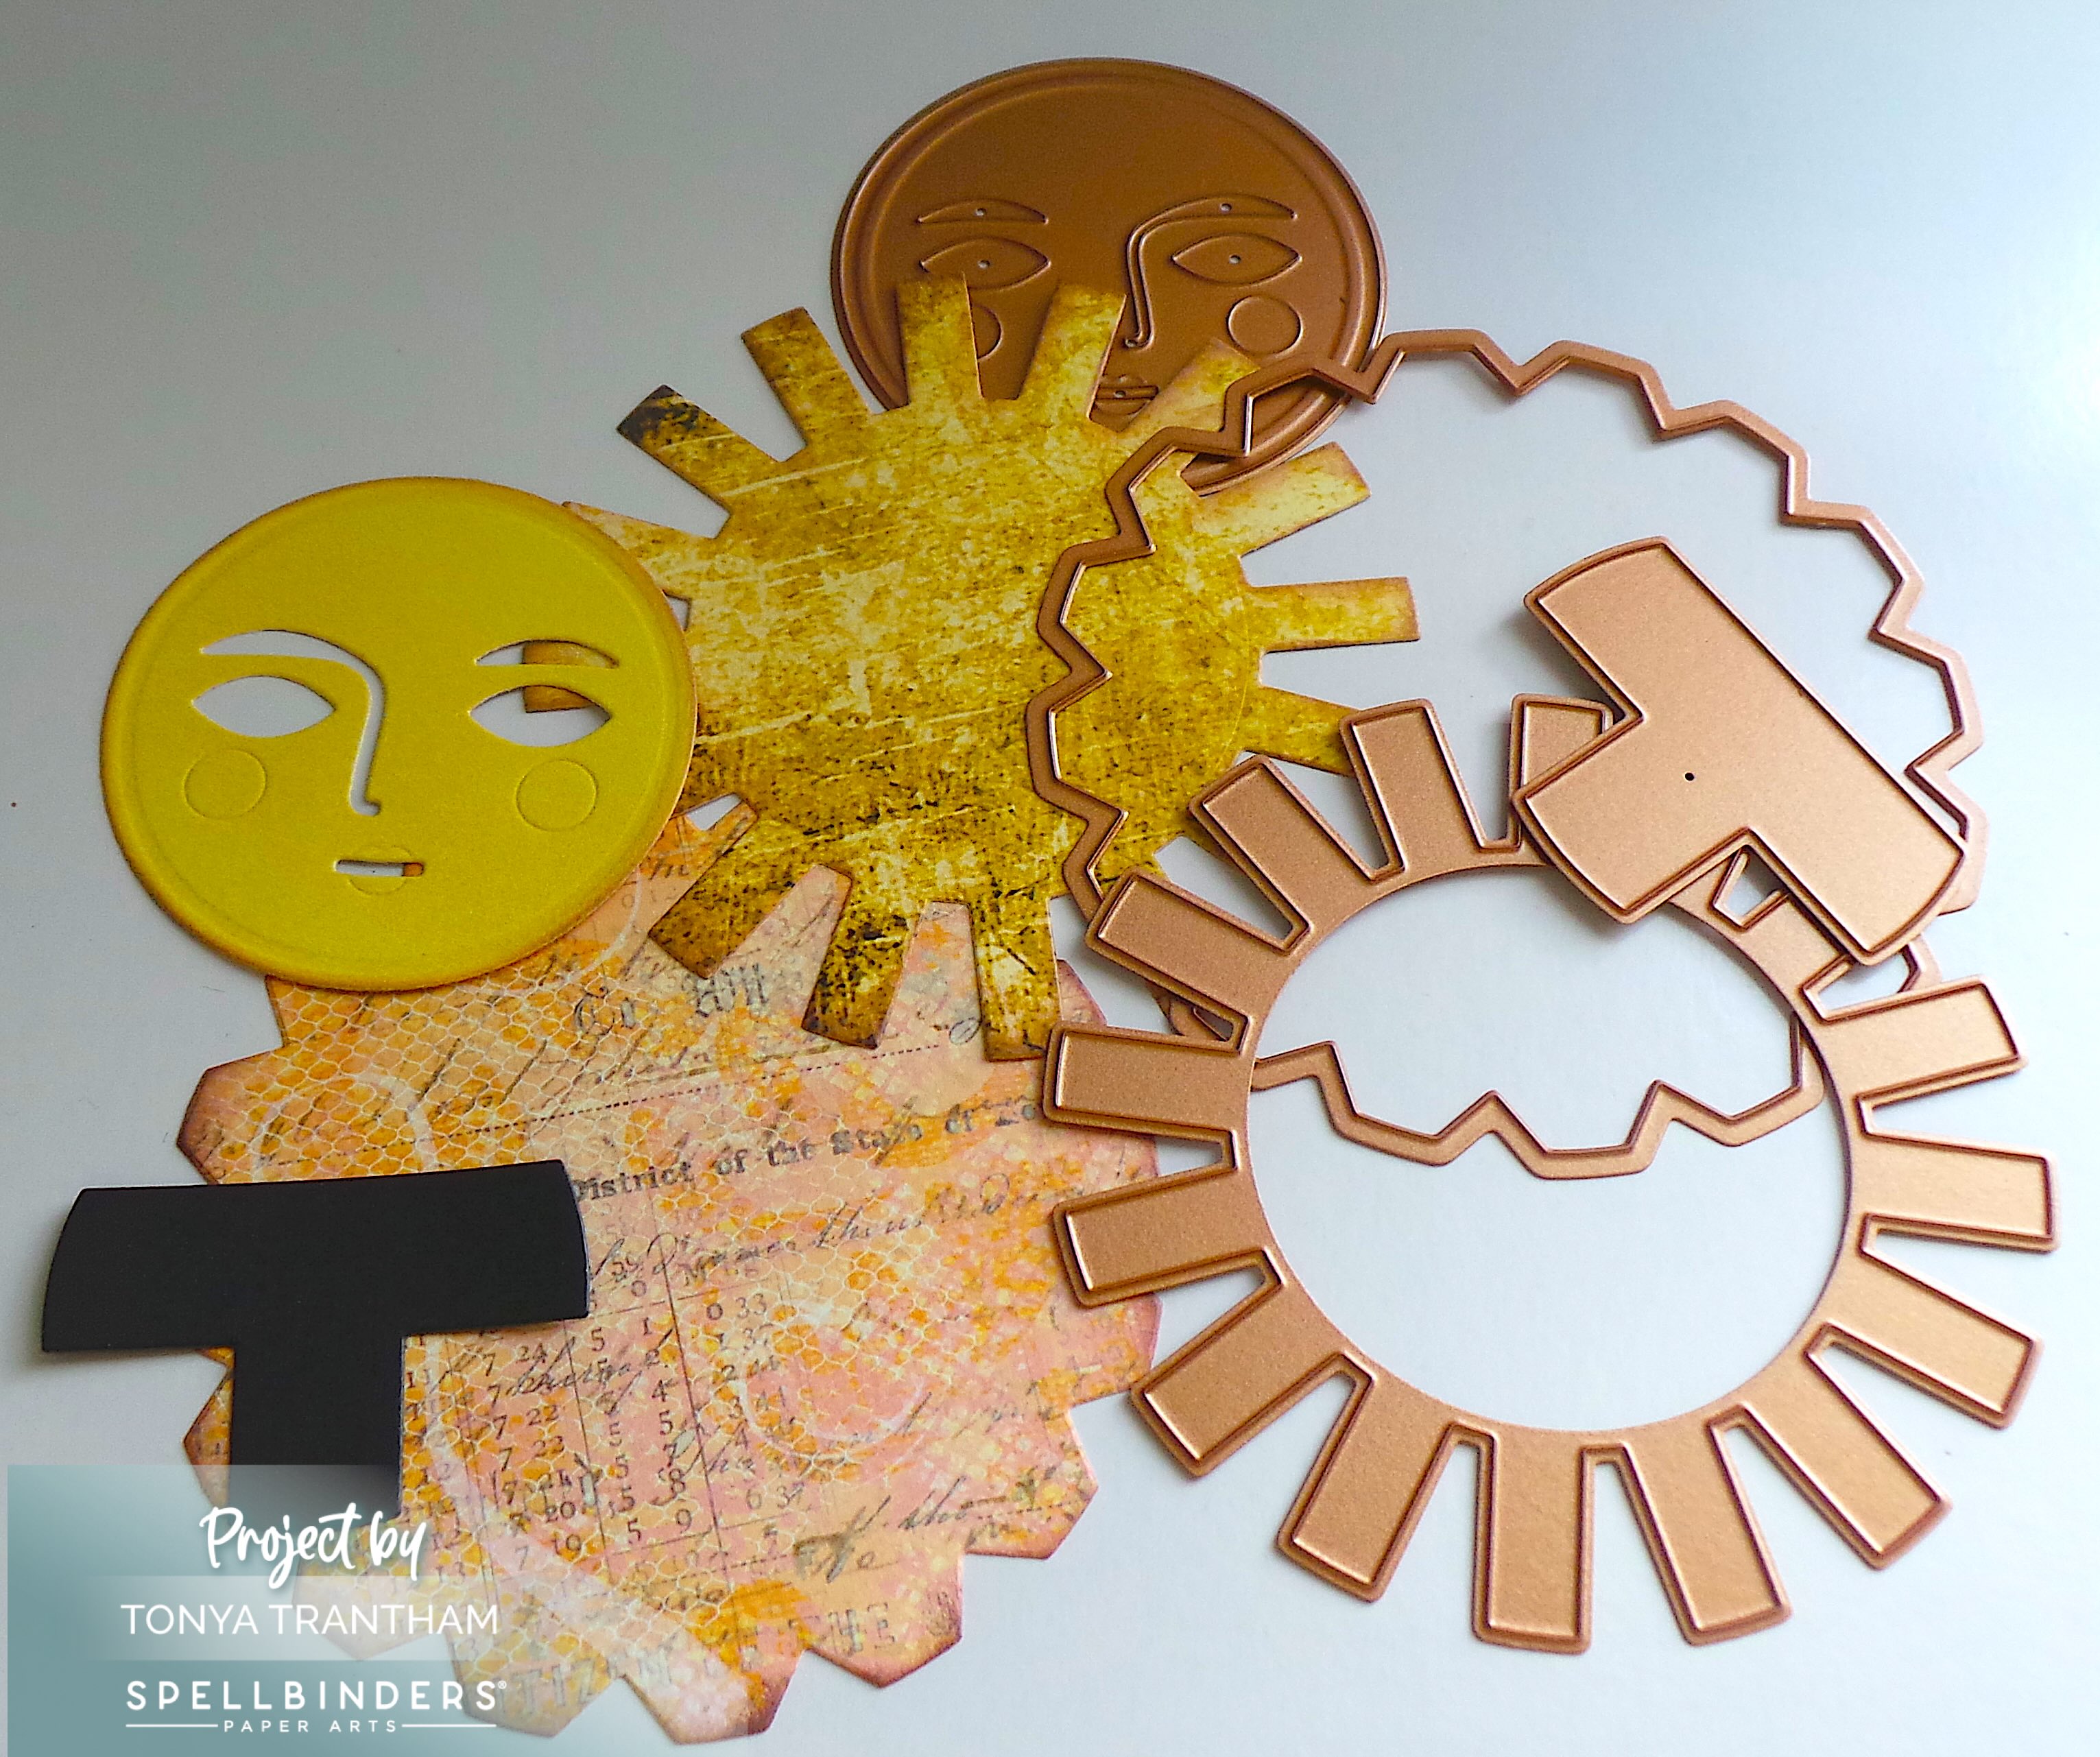
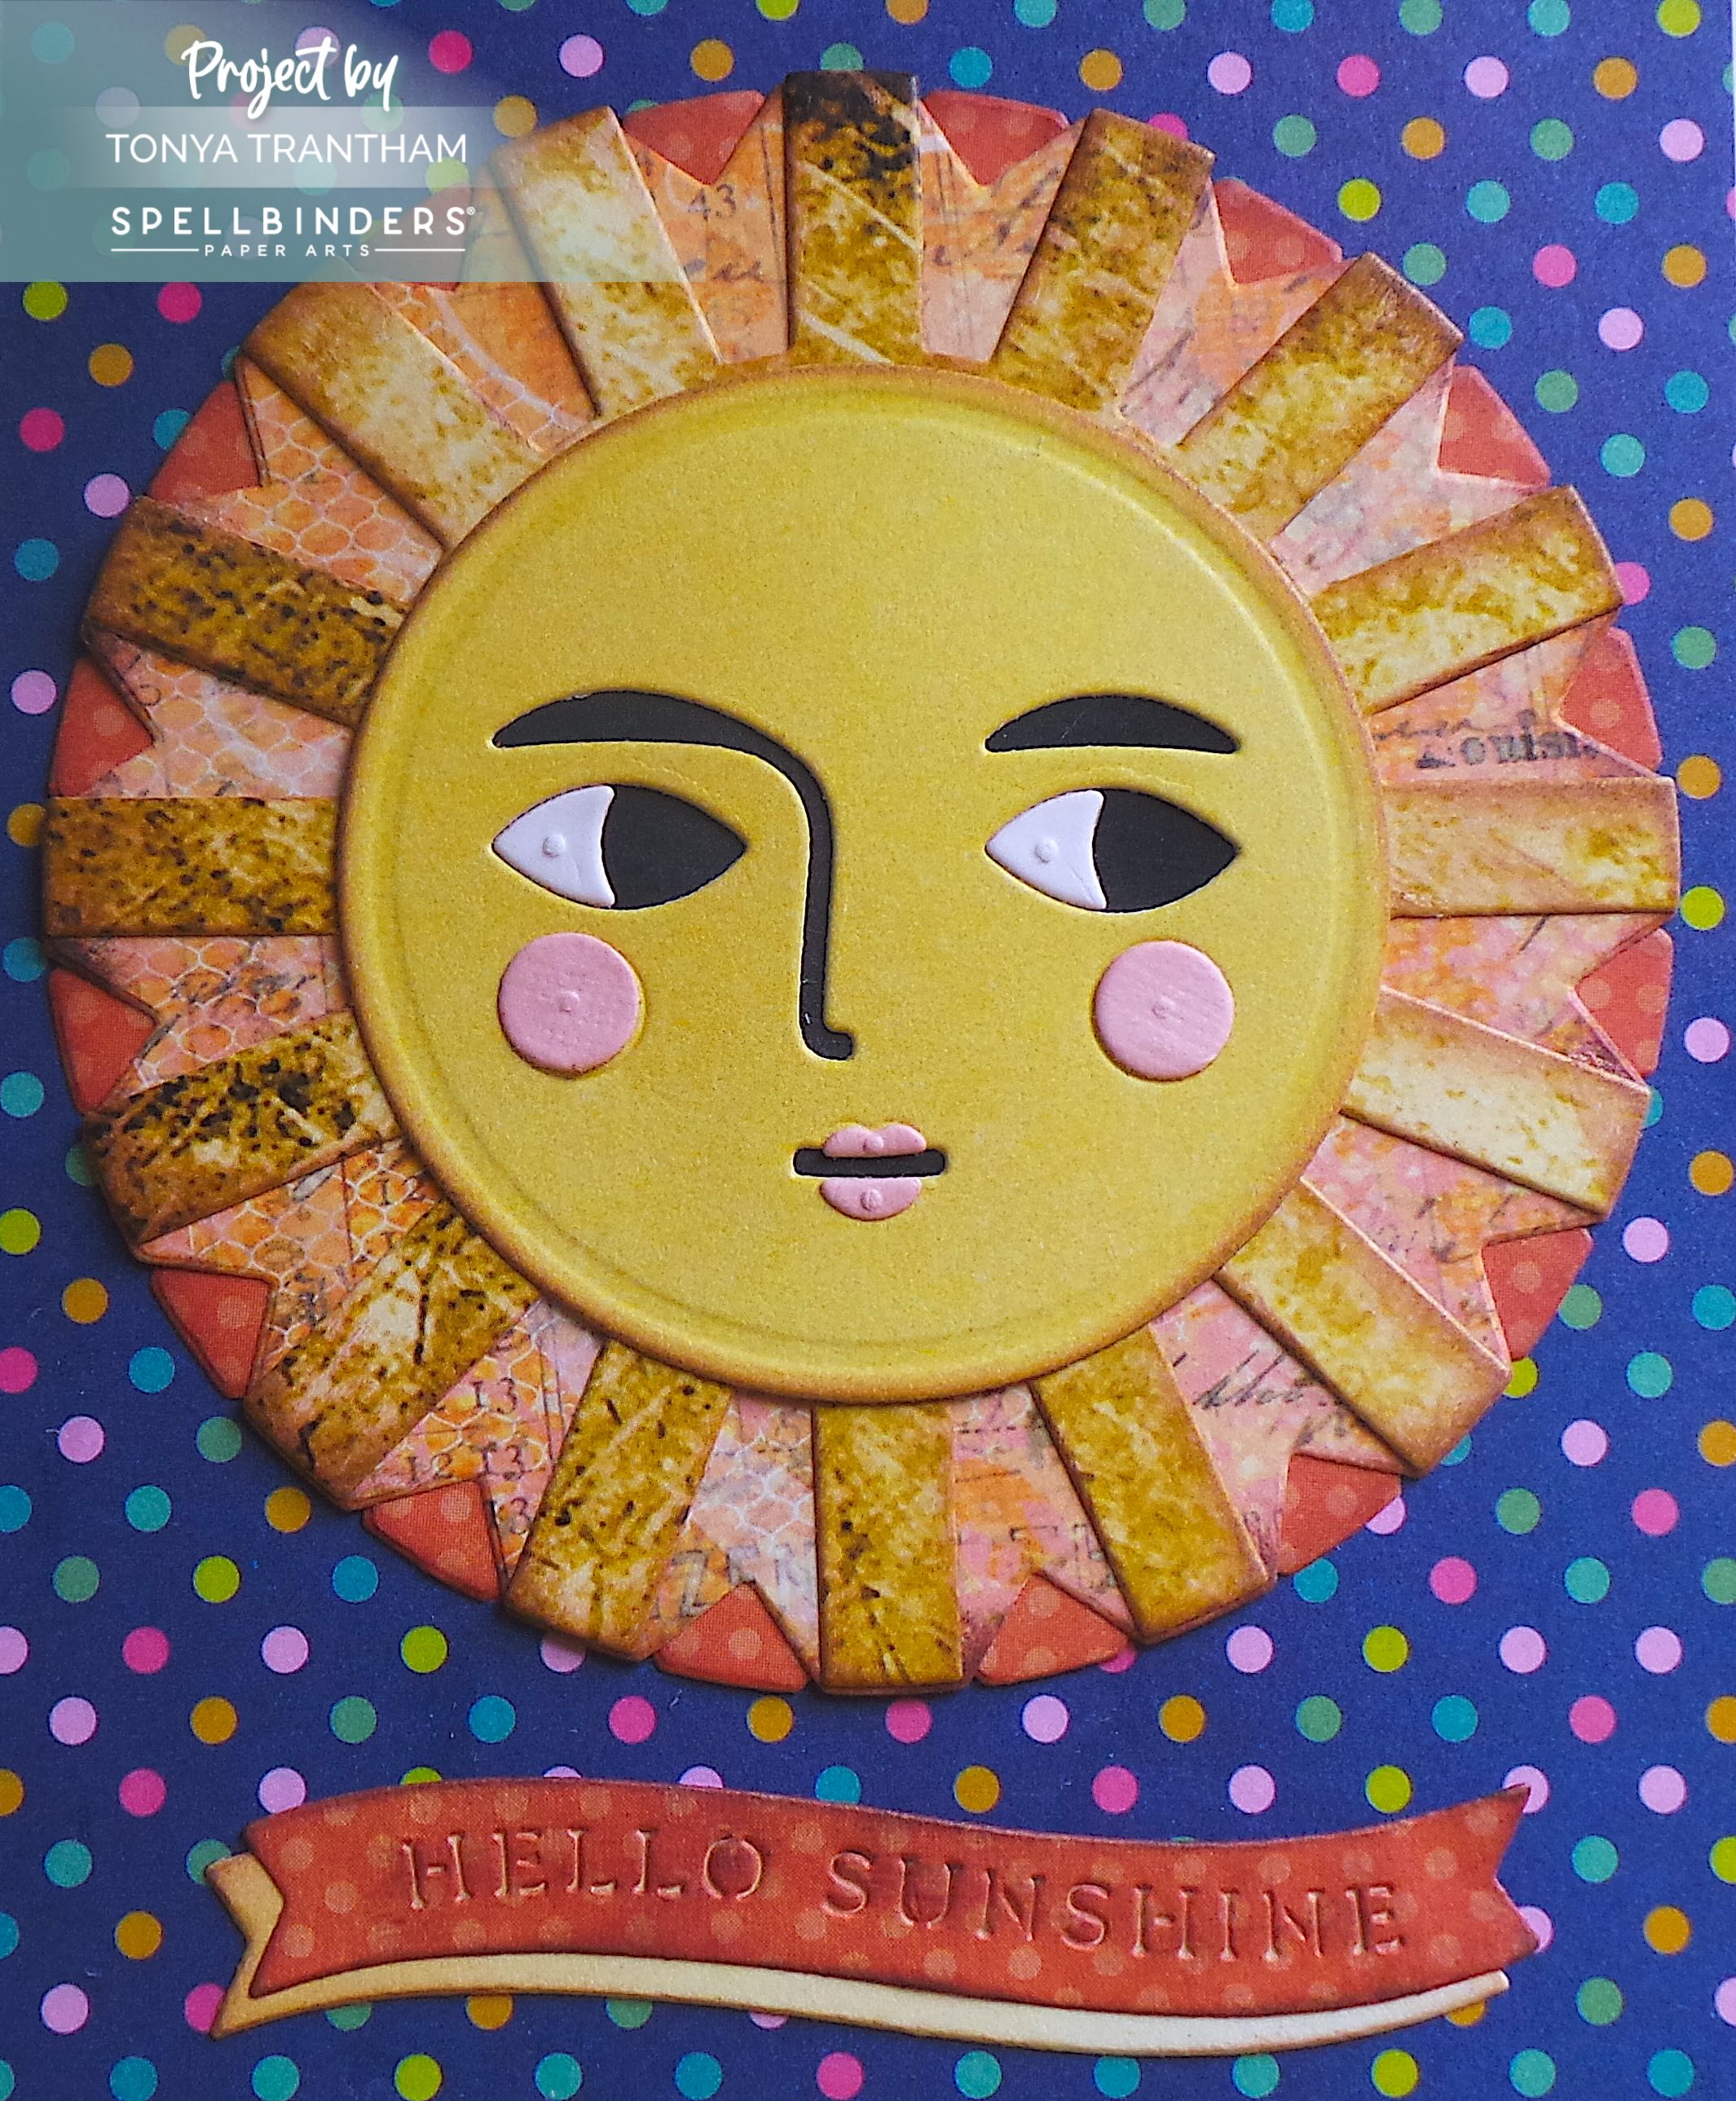
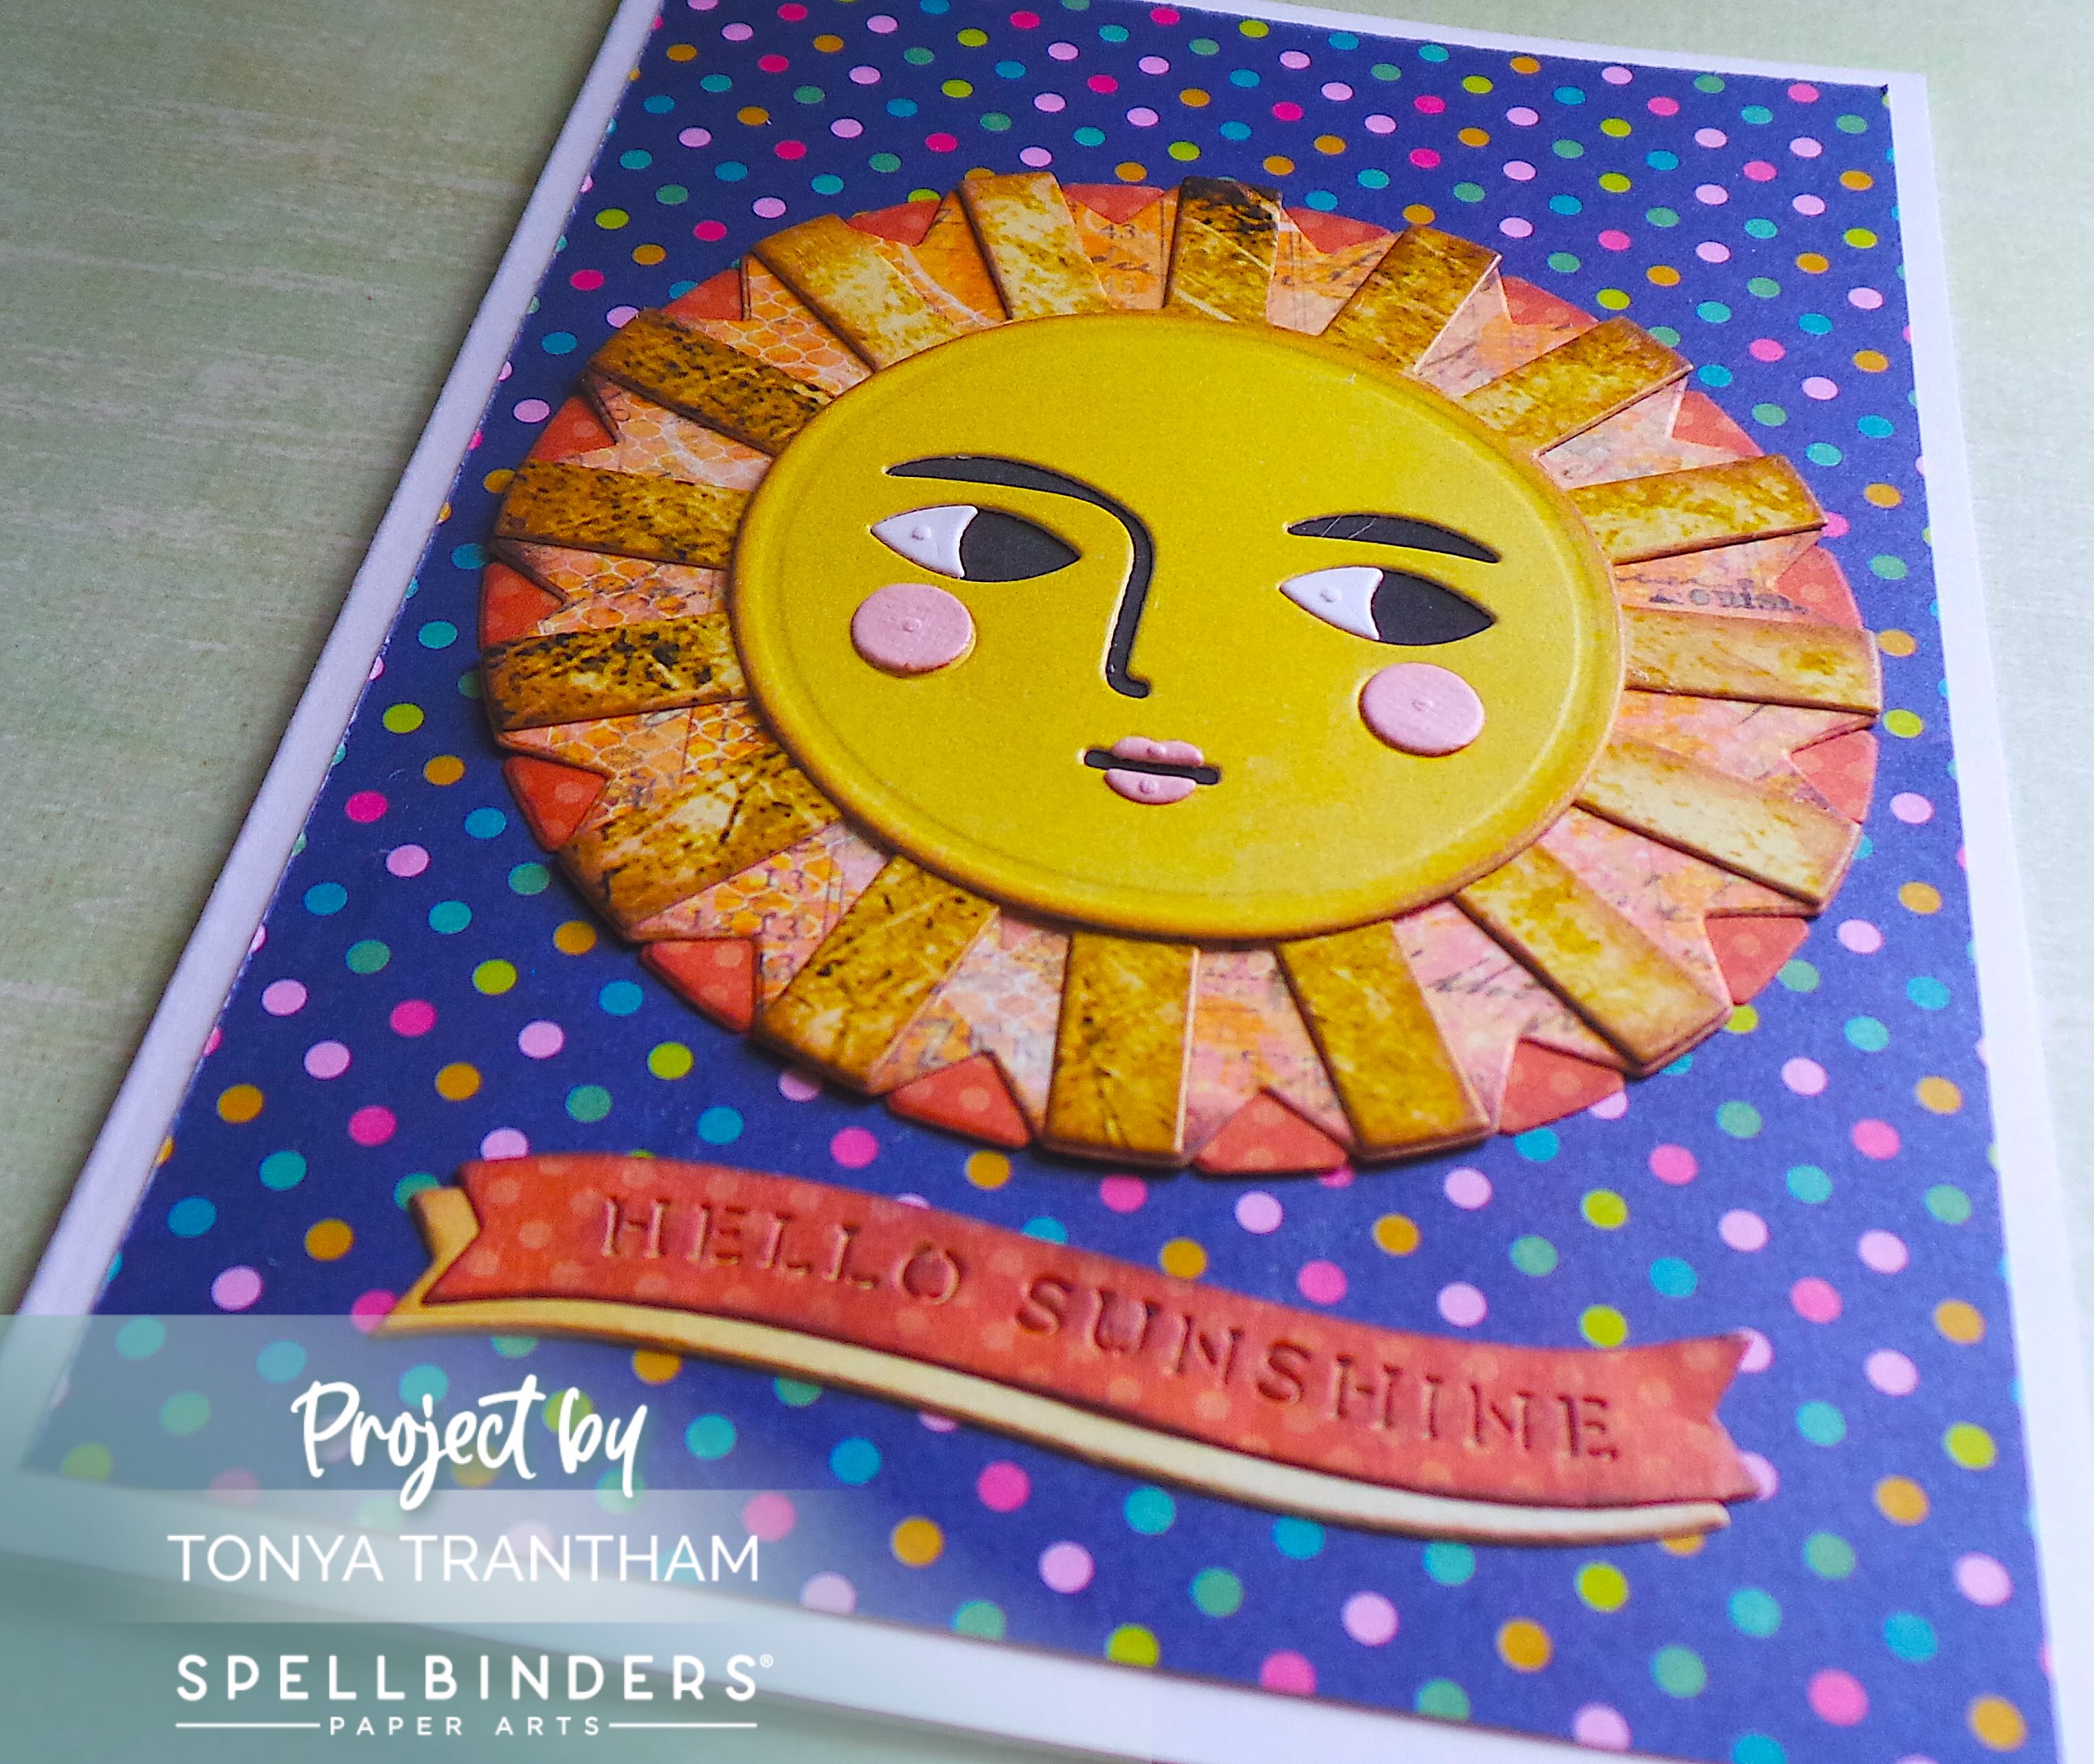
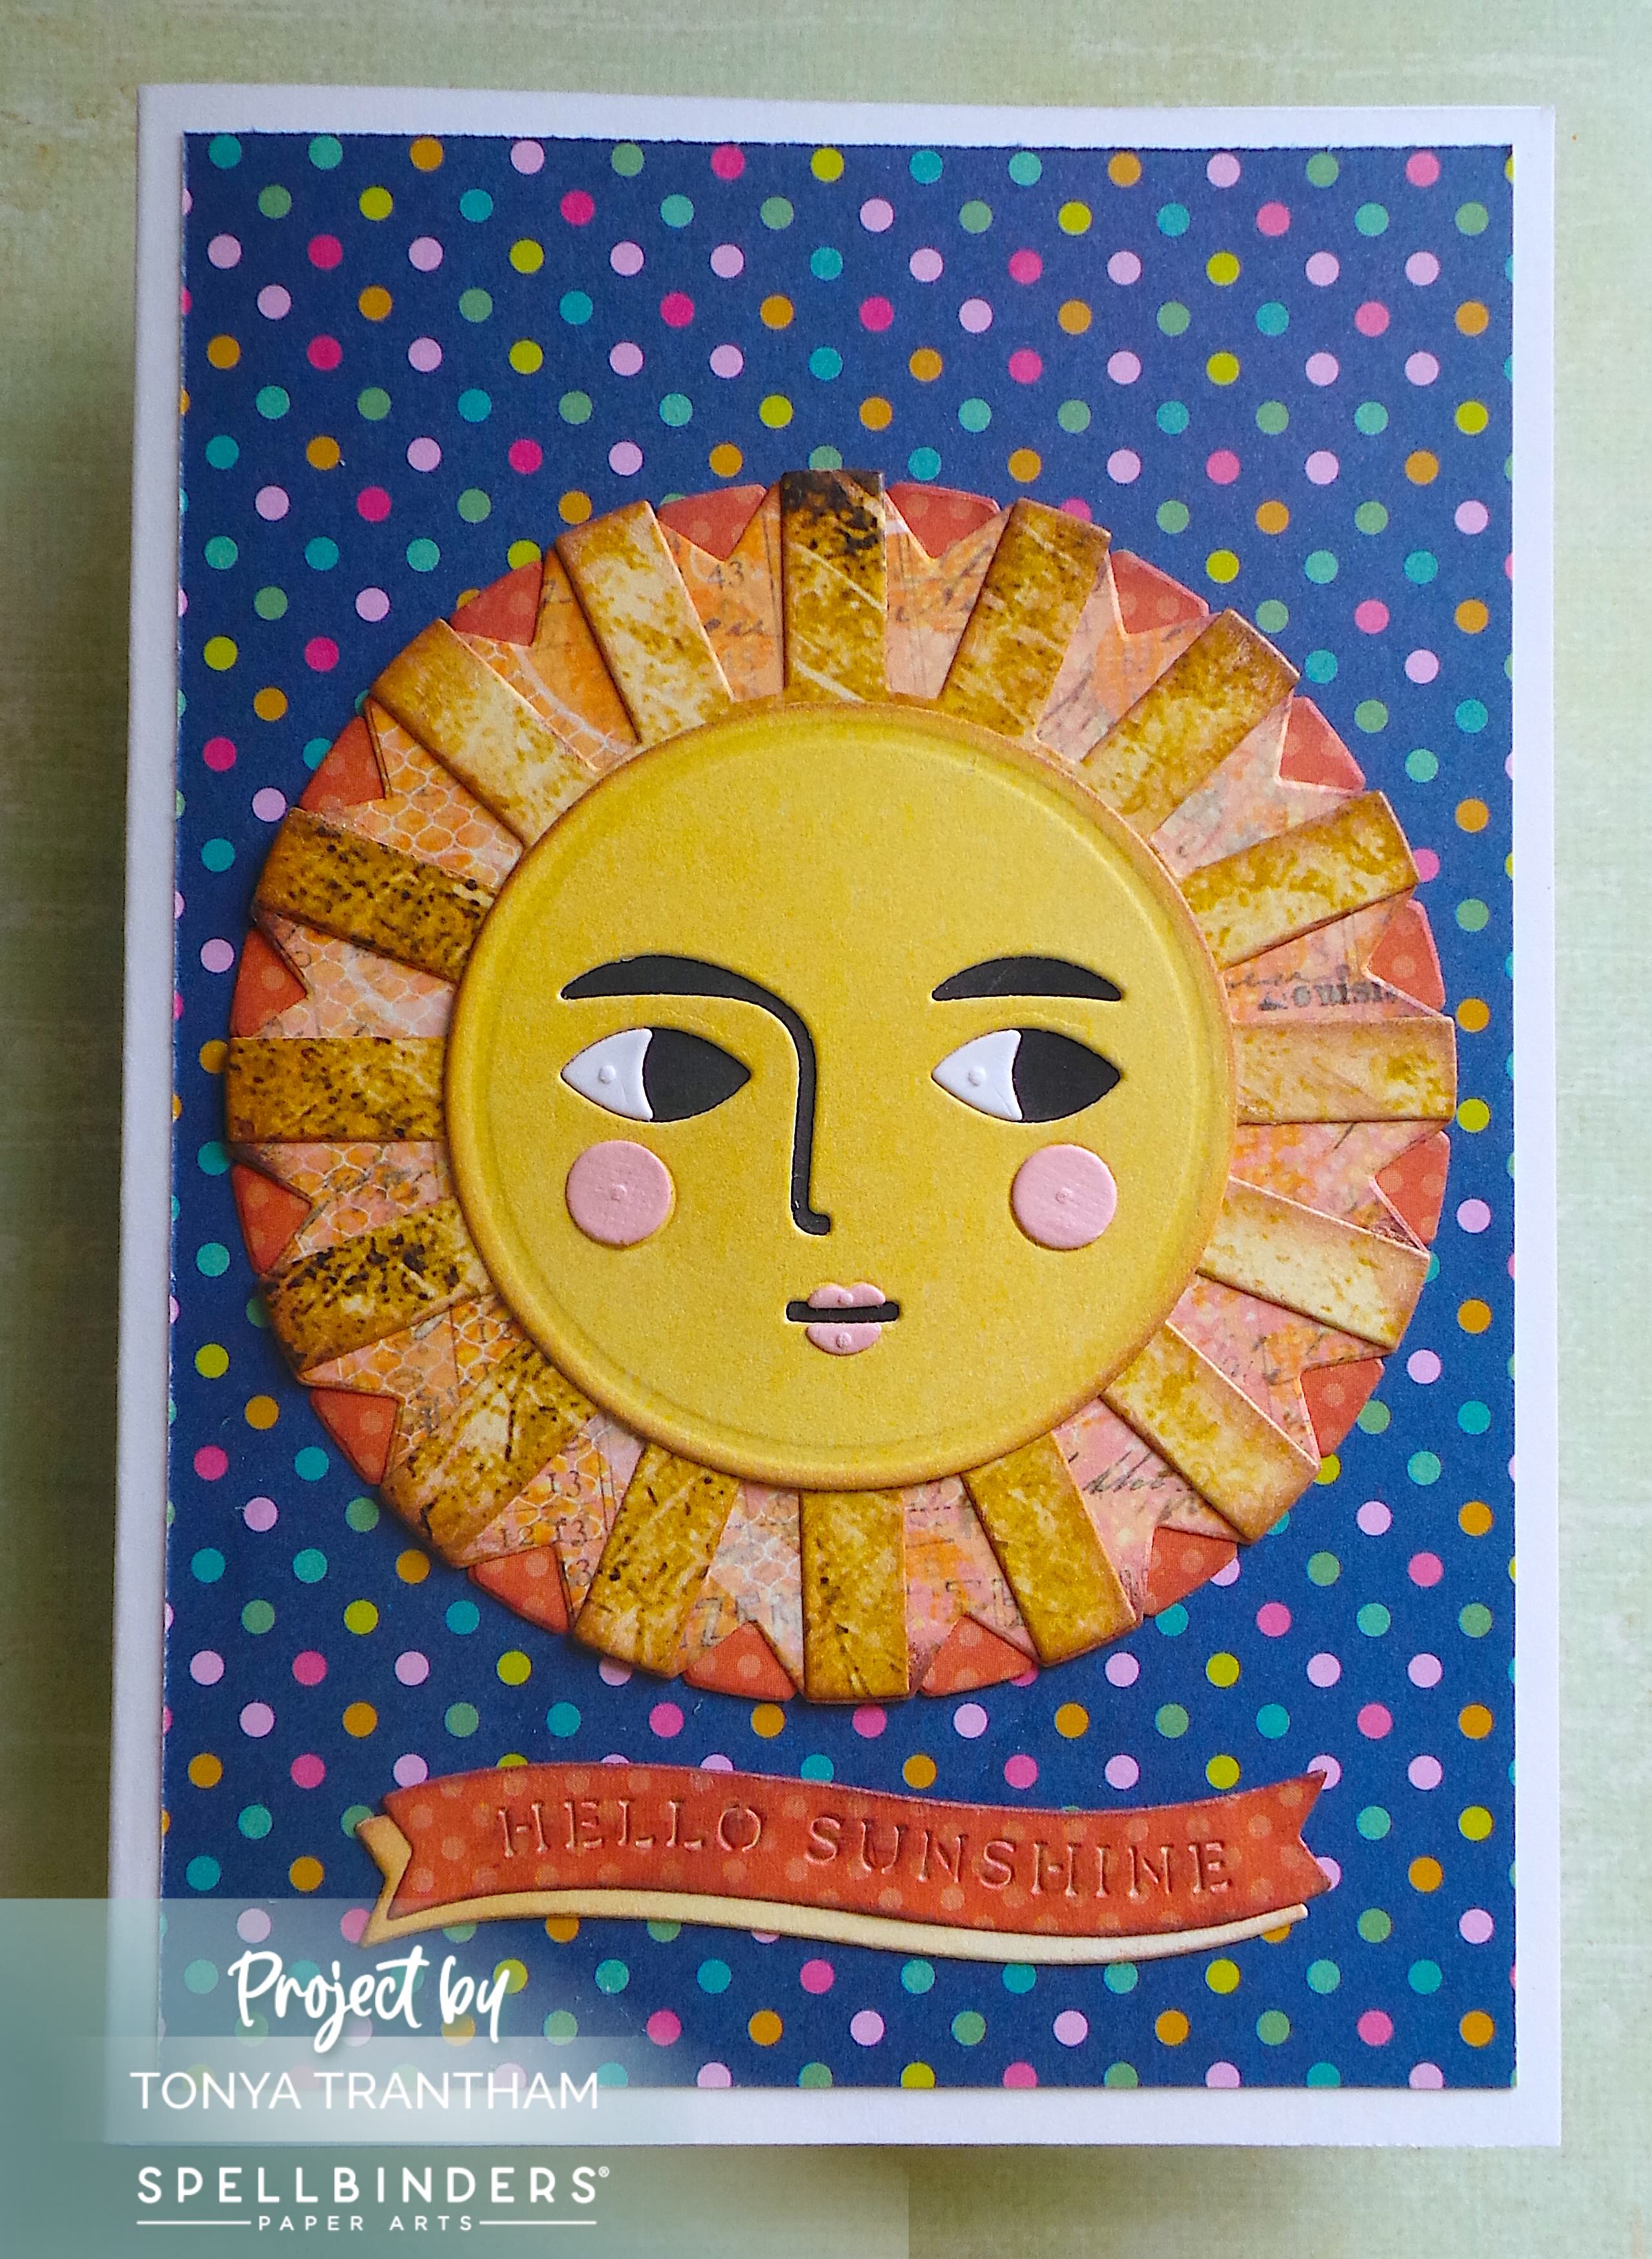
I cut out two sun rays and one each of the following: face, sun, background for the eyes. I also cut two of the following: eyes, cheeks and lips. I did apply Adhesive to the back of the cardstock of the smaller pieces before cutting out. All cuts are from the Under the Sun Etched Dies.
Side note, both yellow cardstocks, the face and sun ray are from Tattered and Worn Paper Collection. My friend Pam Bray created this collection and I’m so excited to include in creating this card.
I lightly inked all the pieces with Brown Chalk Ink before assembling the sunshine face.
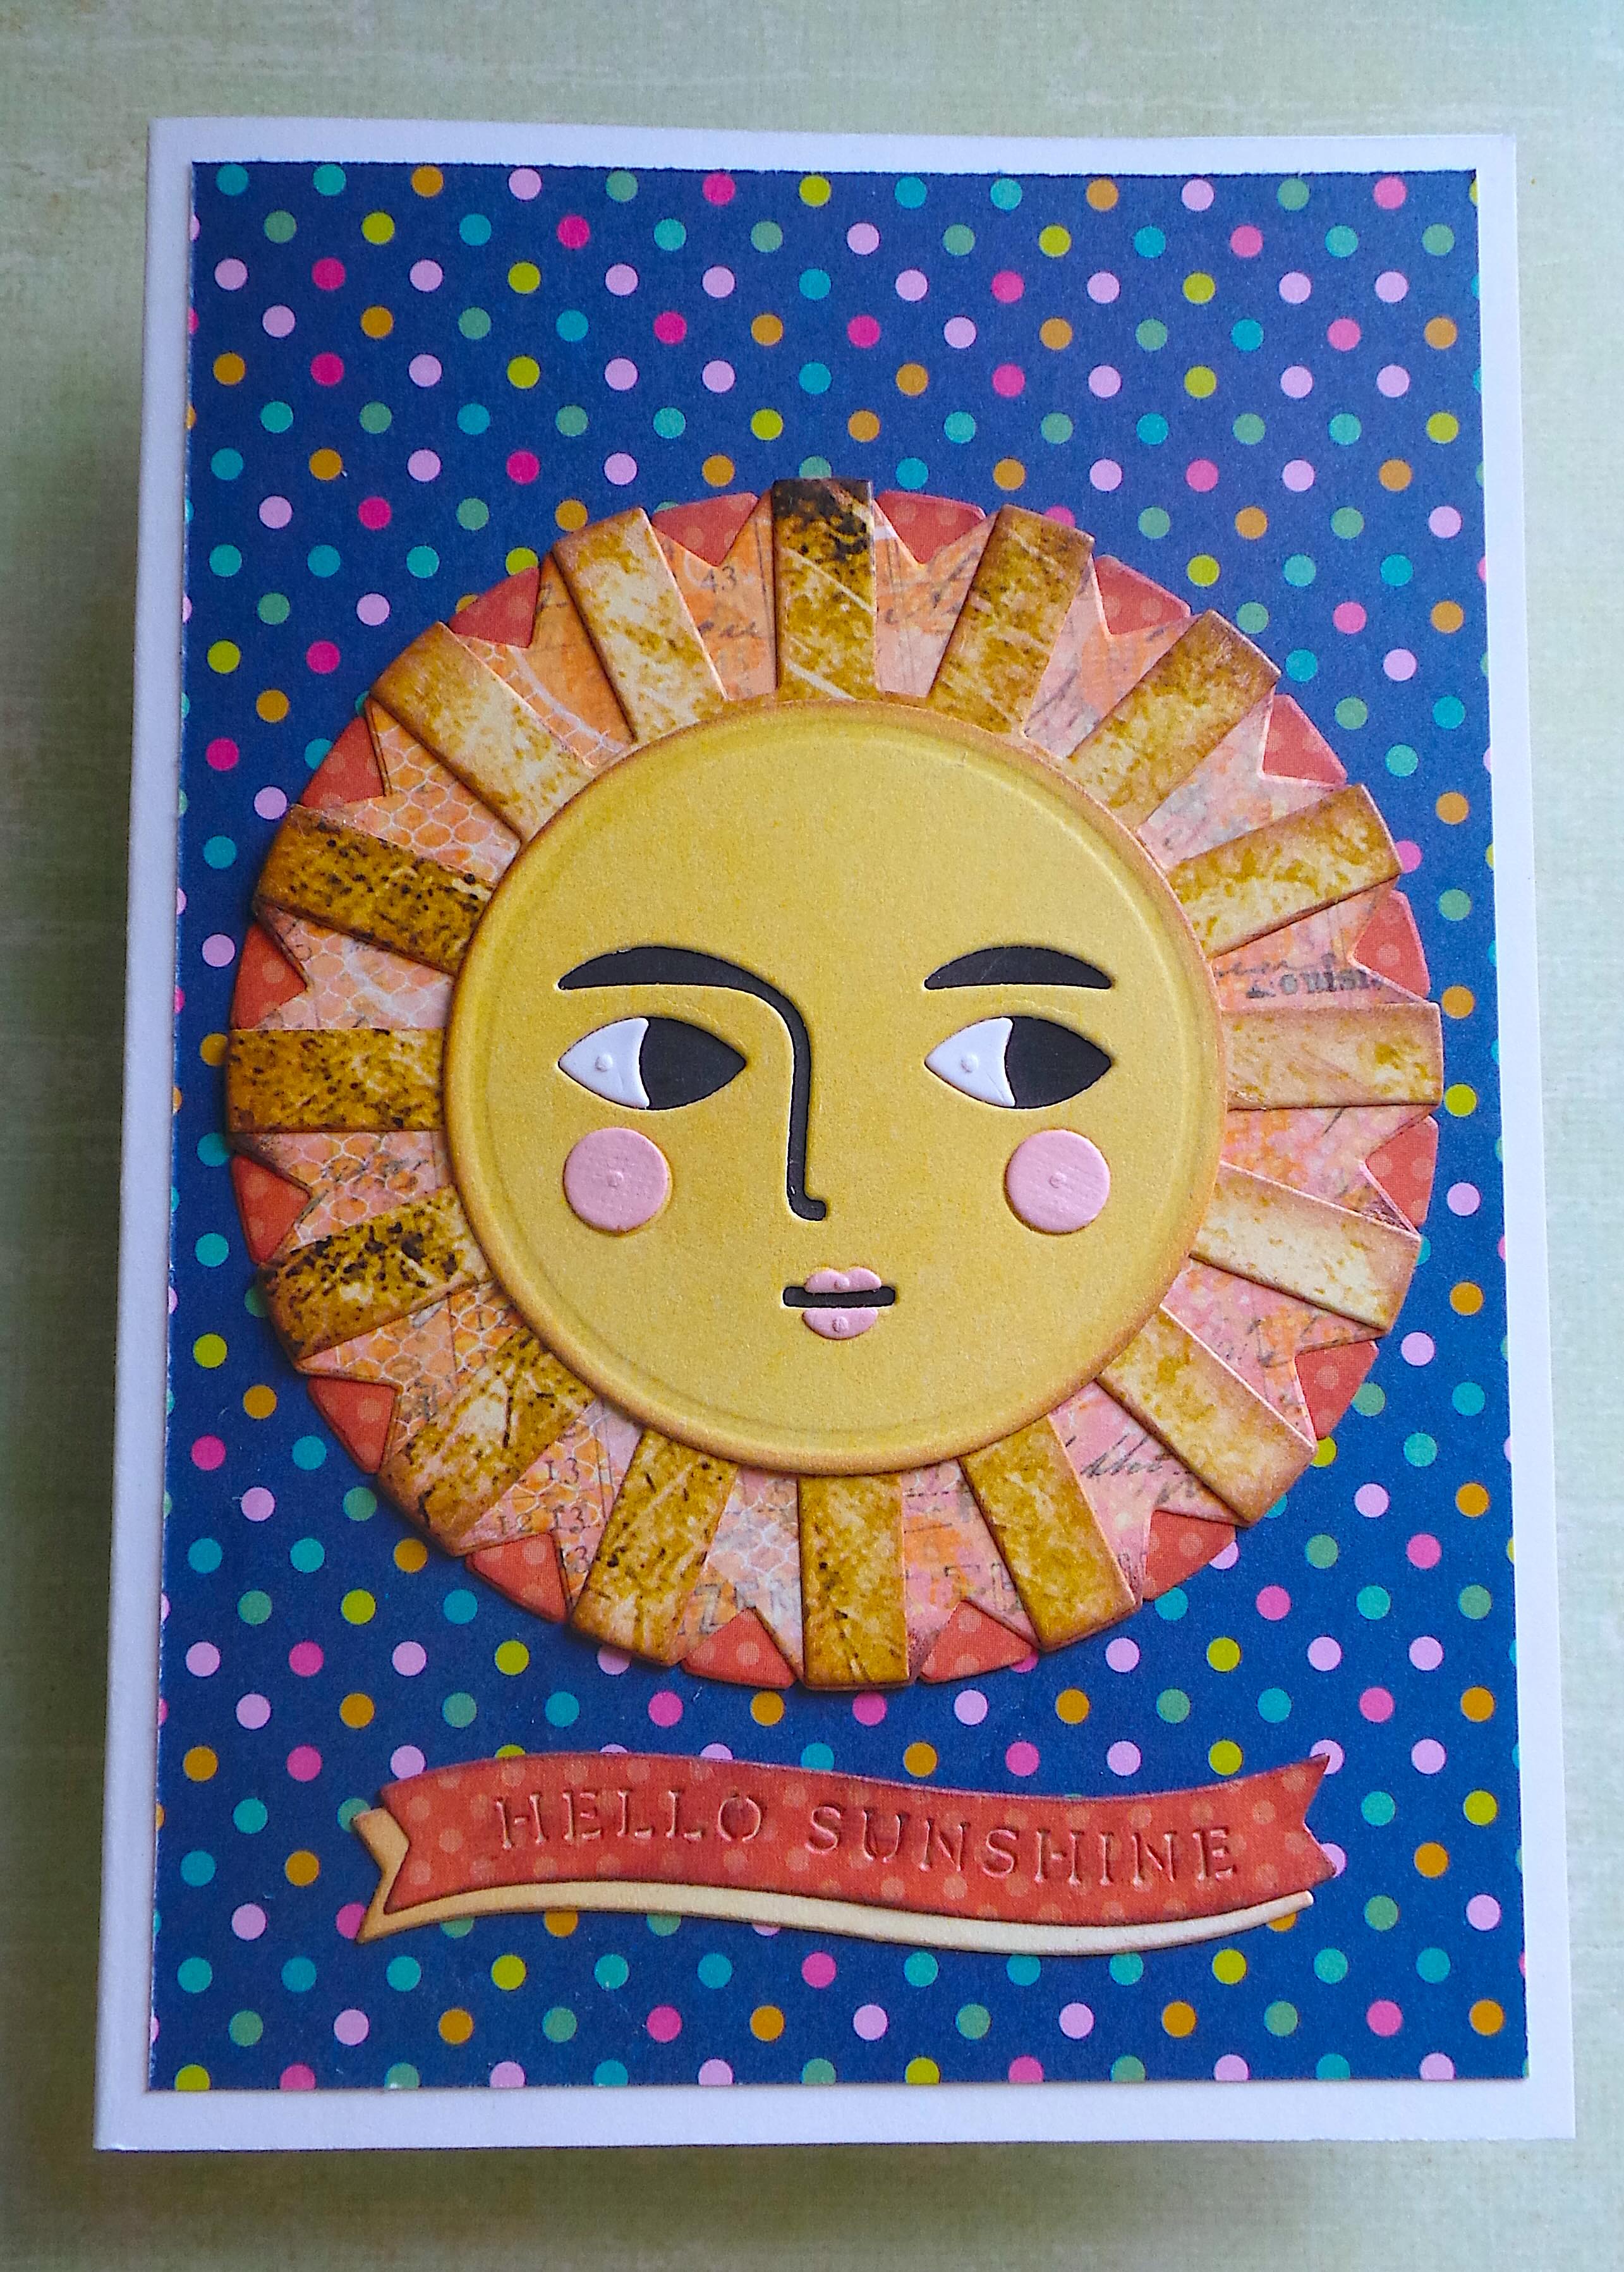
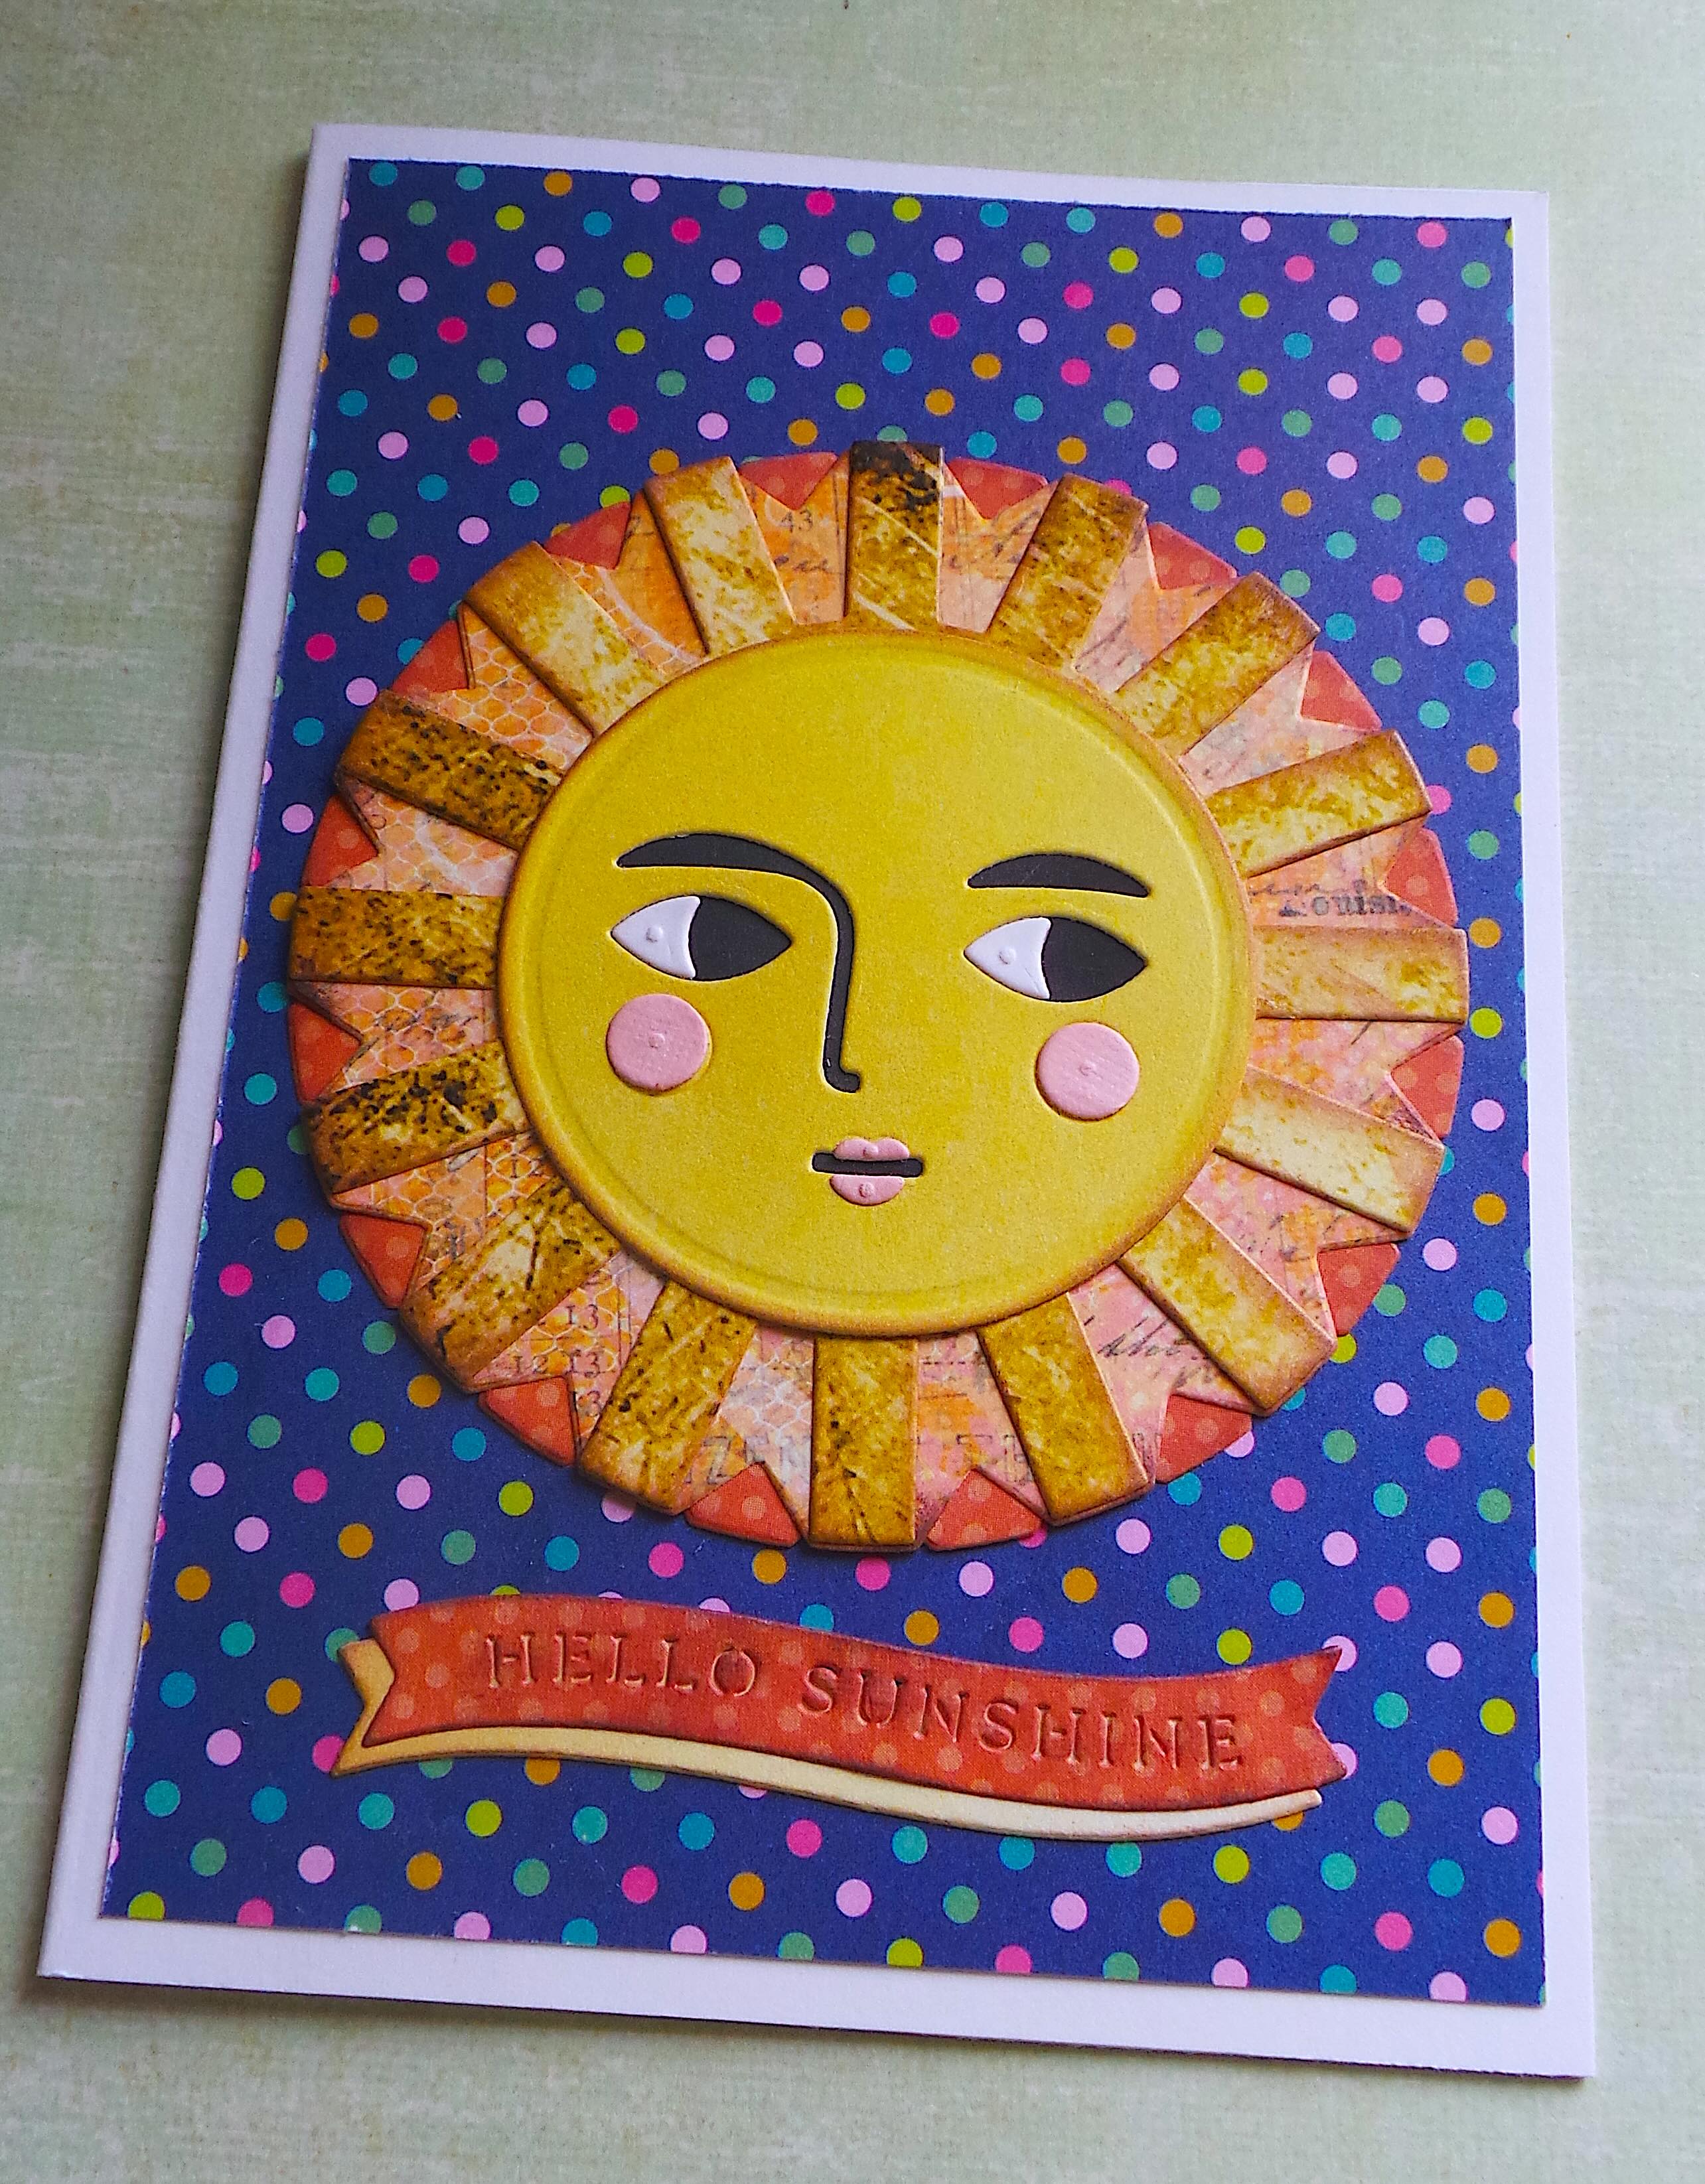
I cut and folded a piece of cardstock, 4 1/4″x 5 1/2″, to create the base for the card. I cut a polk-a-dot mat from the Just Saying Paper Collection slightly smaller than the card base. I adhered to the base of the card along with the sunshine face.
I cut a banner and the “hello sunshine” sentiment from the La Dolce Vita Banners Etched Dies. I lightly inked with Brown Chalk Ink before gluing the sentiment off center of the banner. I adhered to the card base to finish.
If you have questions of comments about this card please leave them below.
(Products listed above are Affiliated Links for your convenience)
DISCLAIMERS
This blog is compensated to provide opinion on products, services, websites, and various other topics. Even though the owner(s) of this blog receives compensation for our posts or advertisements. I always give my honest opinions, findings, beliefs, or experiences on those topics or products. The views and opinions expressed on this blog are purely my own. Any product claim, statistic, or quote should be checked with each manufacturer. Verify other representations about a product or service with the provider or party in question.This blog contains affiliate links. Clicking these links helps to support Tonya Trantham Designs – Creative Paper Addiction. It’s at no additional cost to you.Today’s features are Spellbinders, Blank Page Muse/Pam Bray and Scrapbook.com Products.
Thanks for stopping by, I hope your Thursday is great and enjoy creating!
Hi everyone! How is everyone’s summer going? We are in the last week of June and it has turned scorching hot! We went from rain everyday to 90 degree + weather. I like warm weather but not this warm. It has turned the swimming pool into what feels like bath water. But I wouldn’t mind if I was enjoying the sun on a beach with my toes in the ocean.
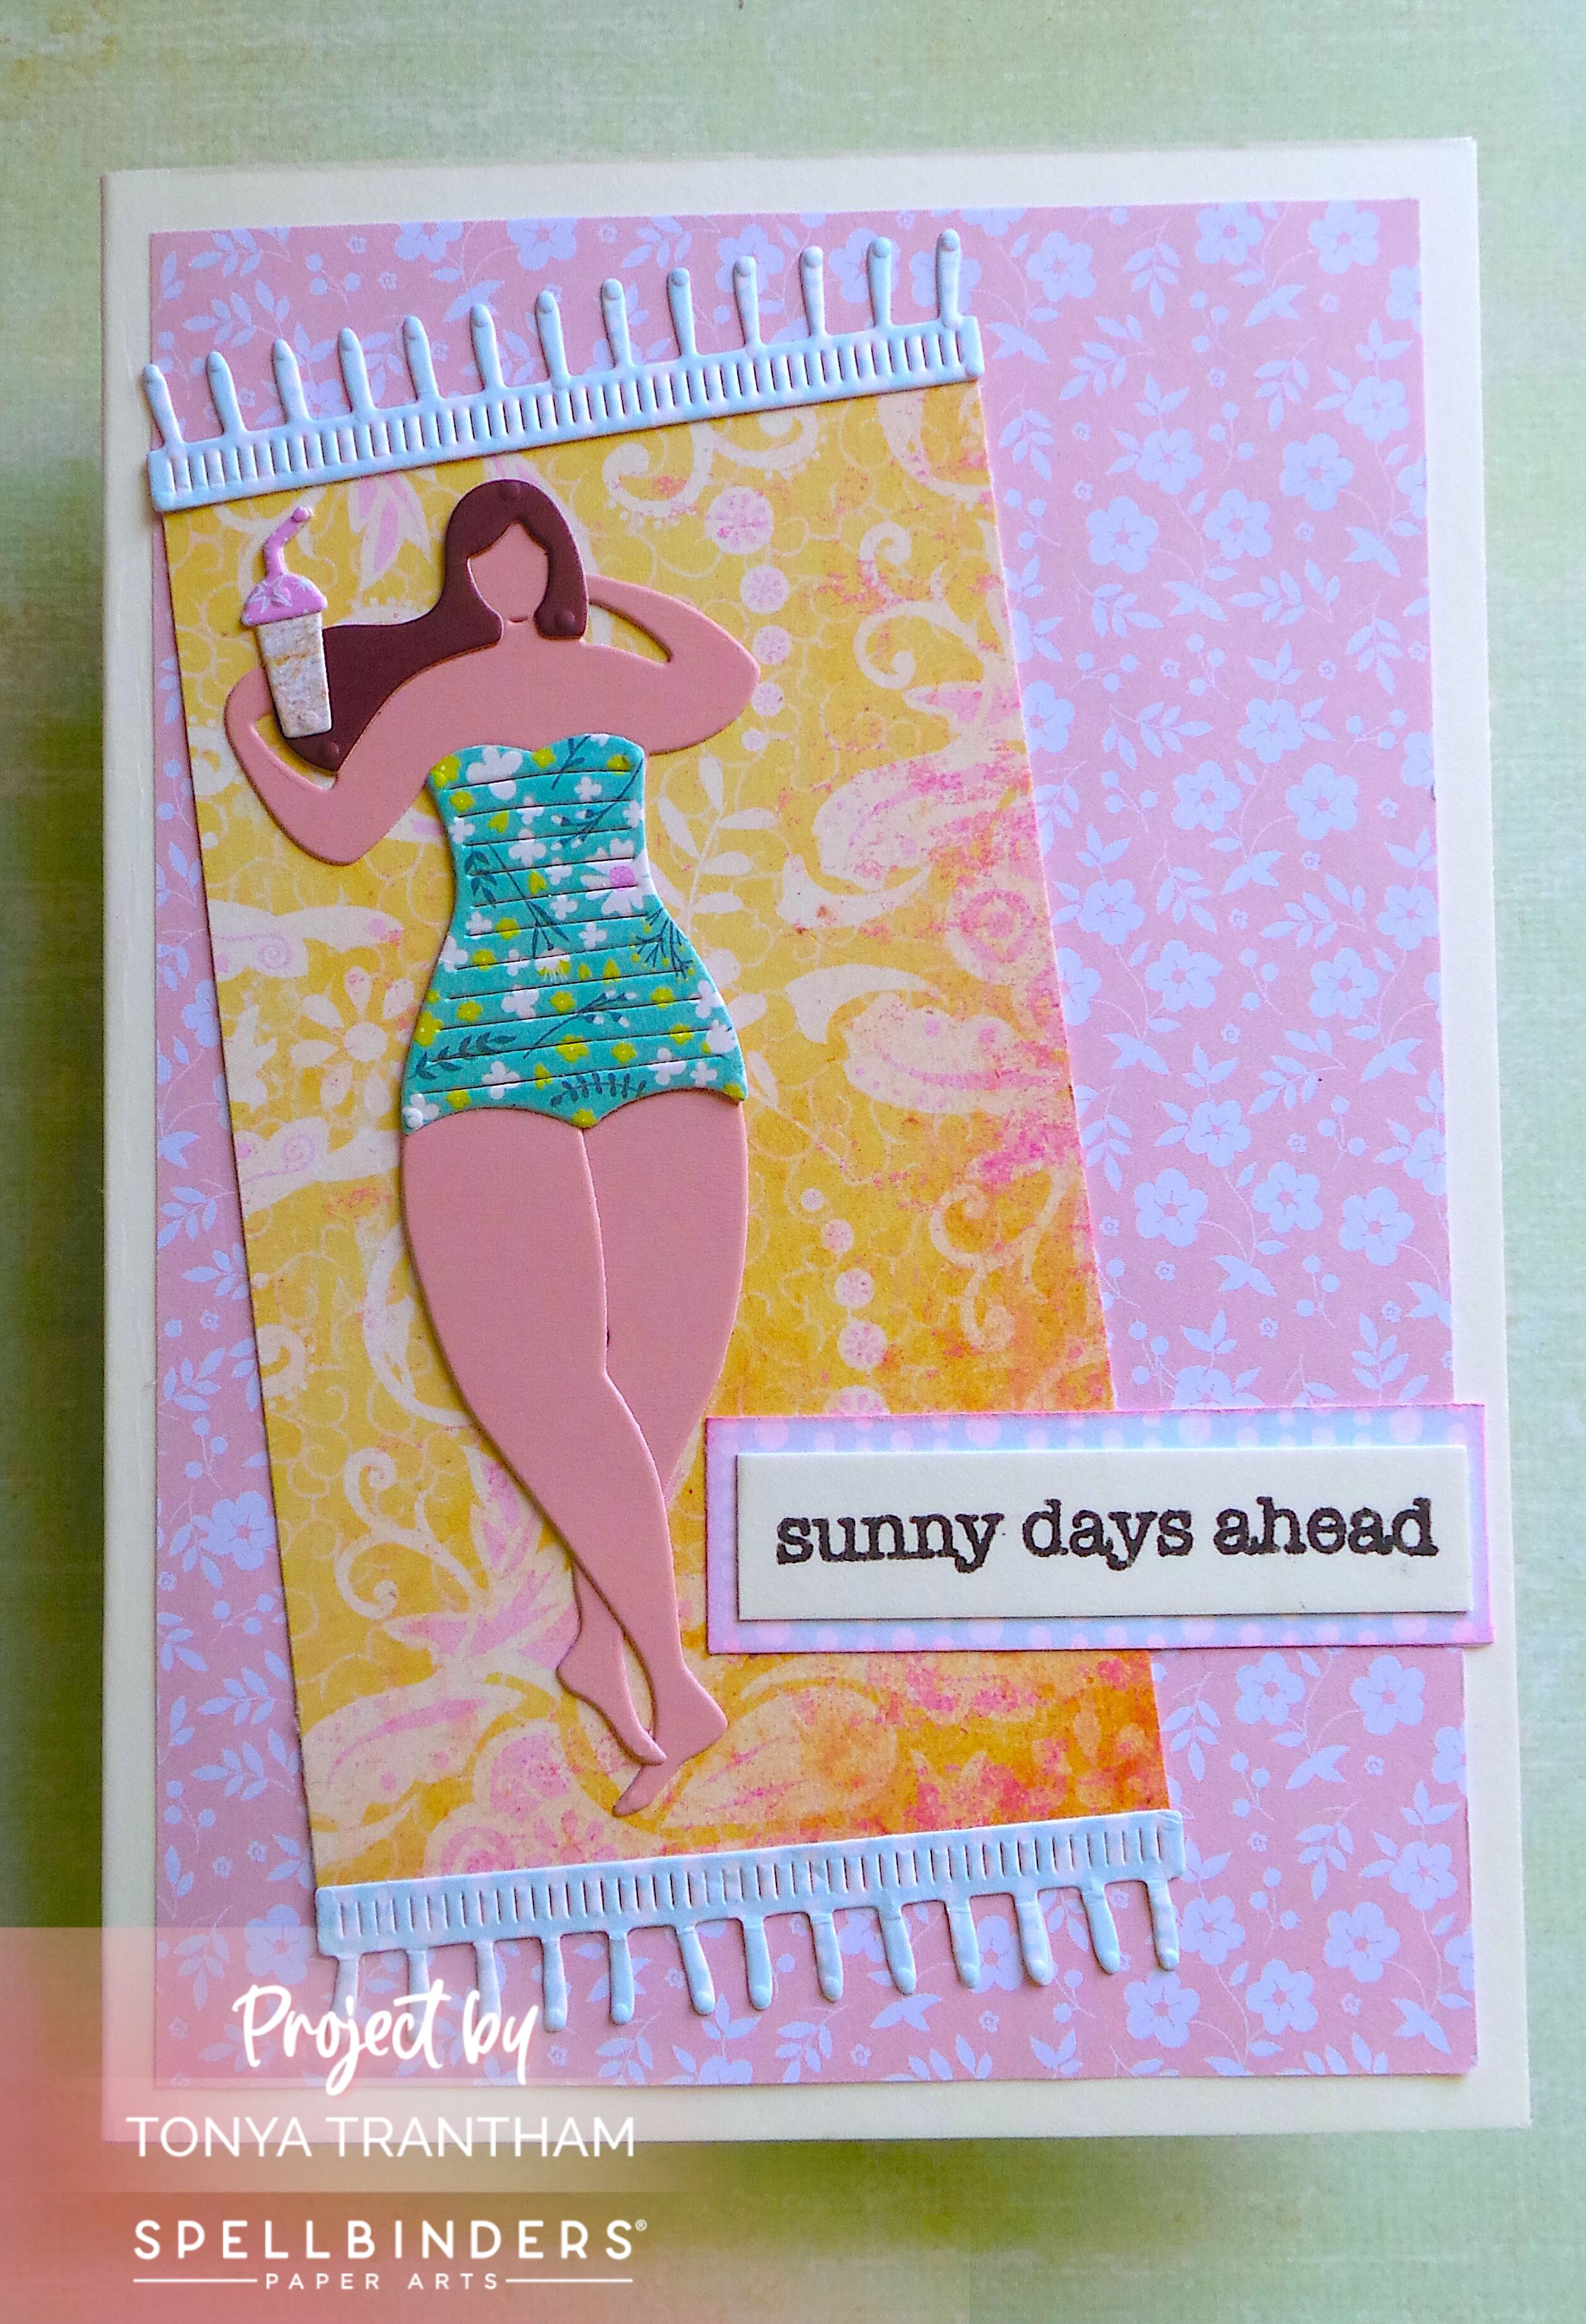
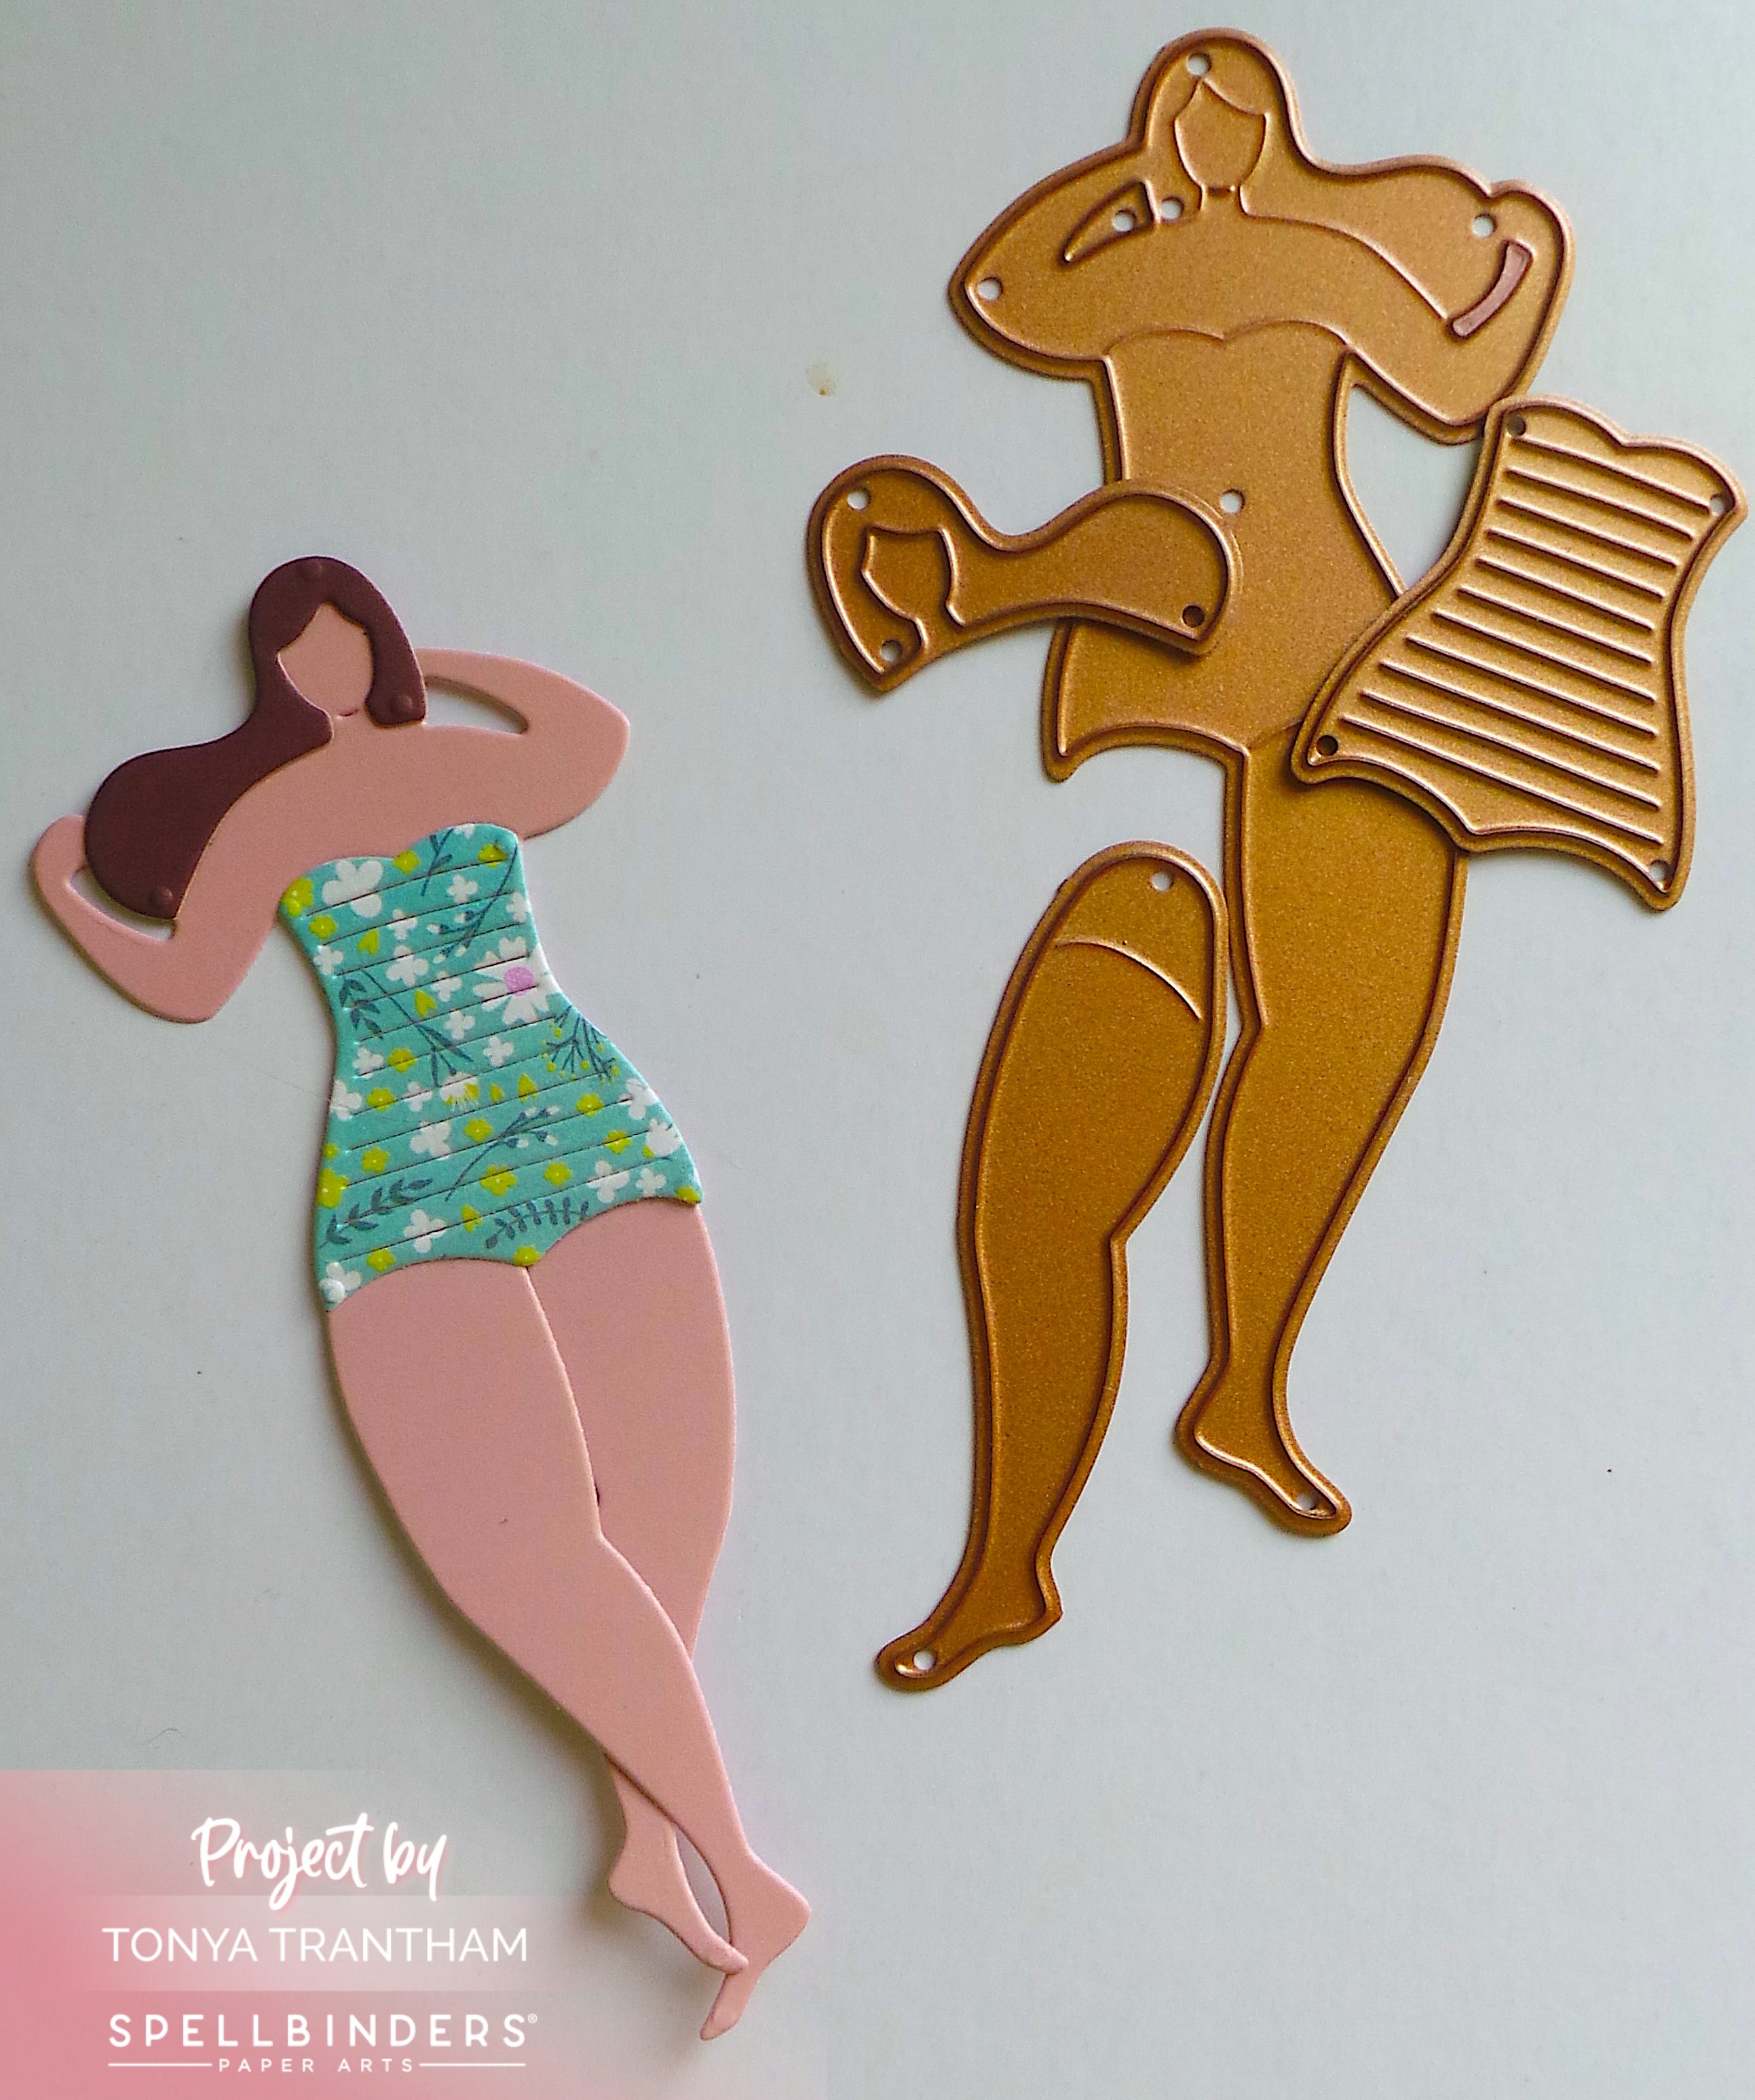
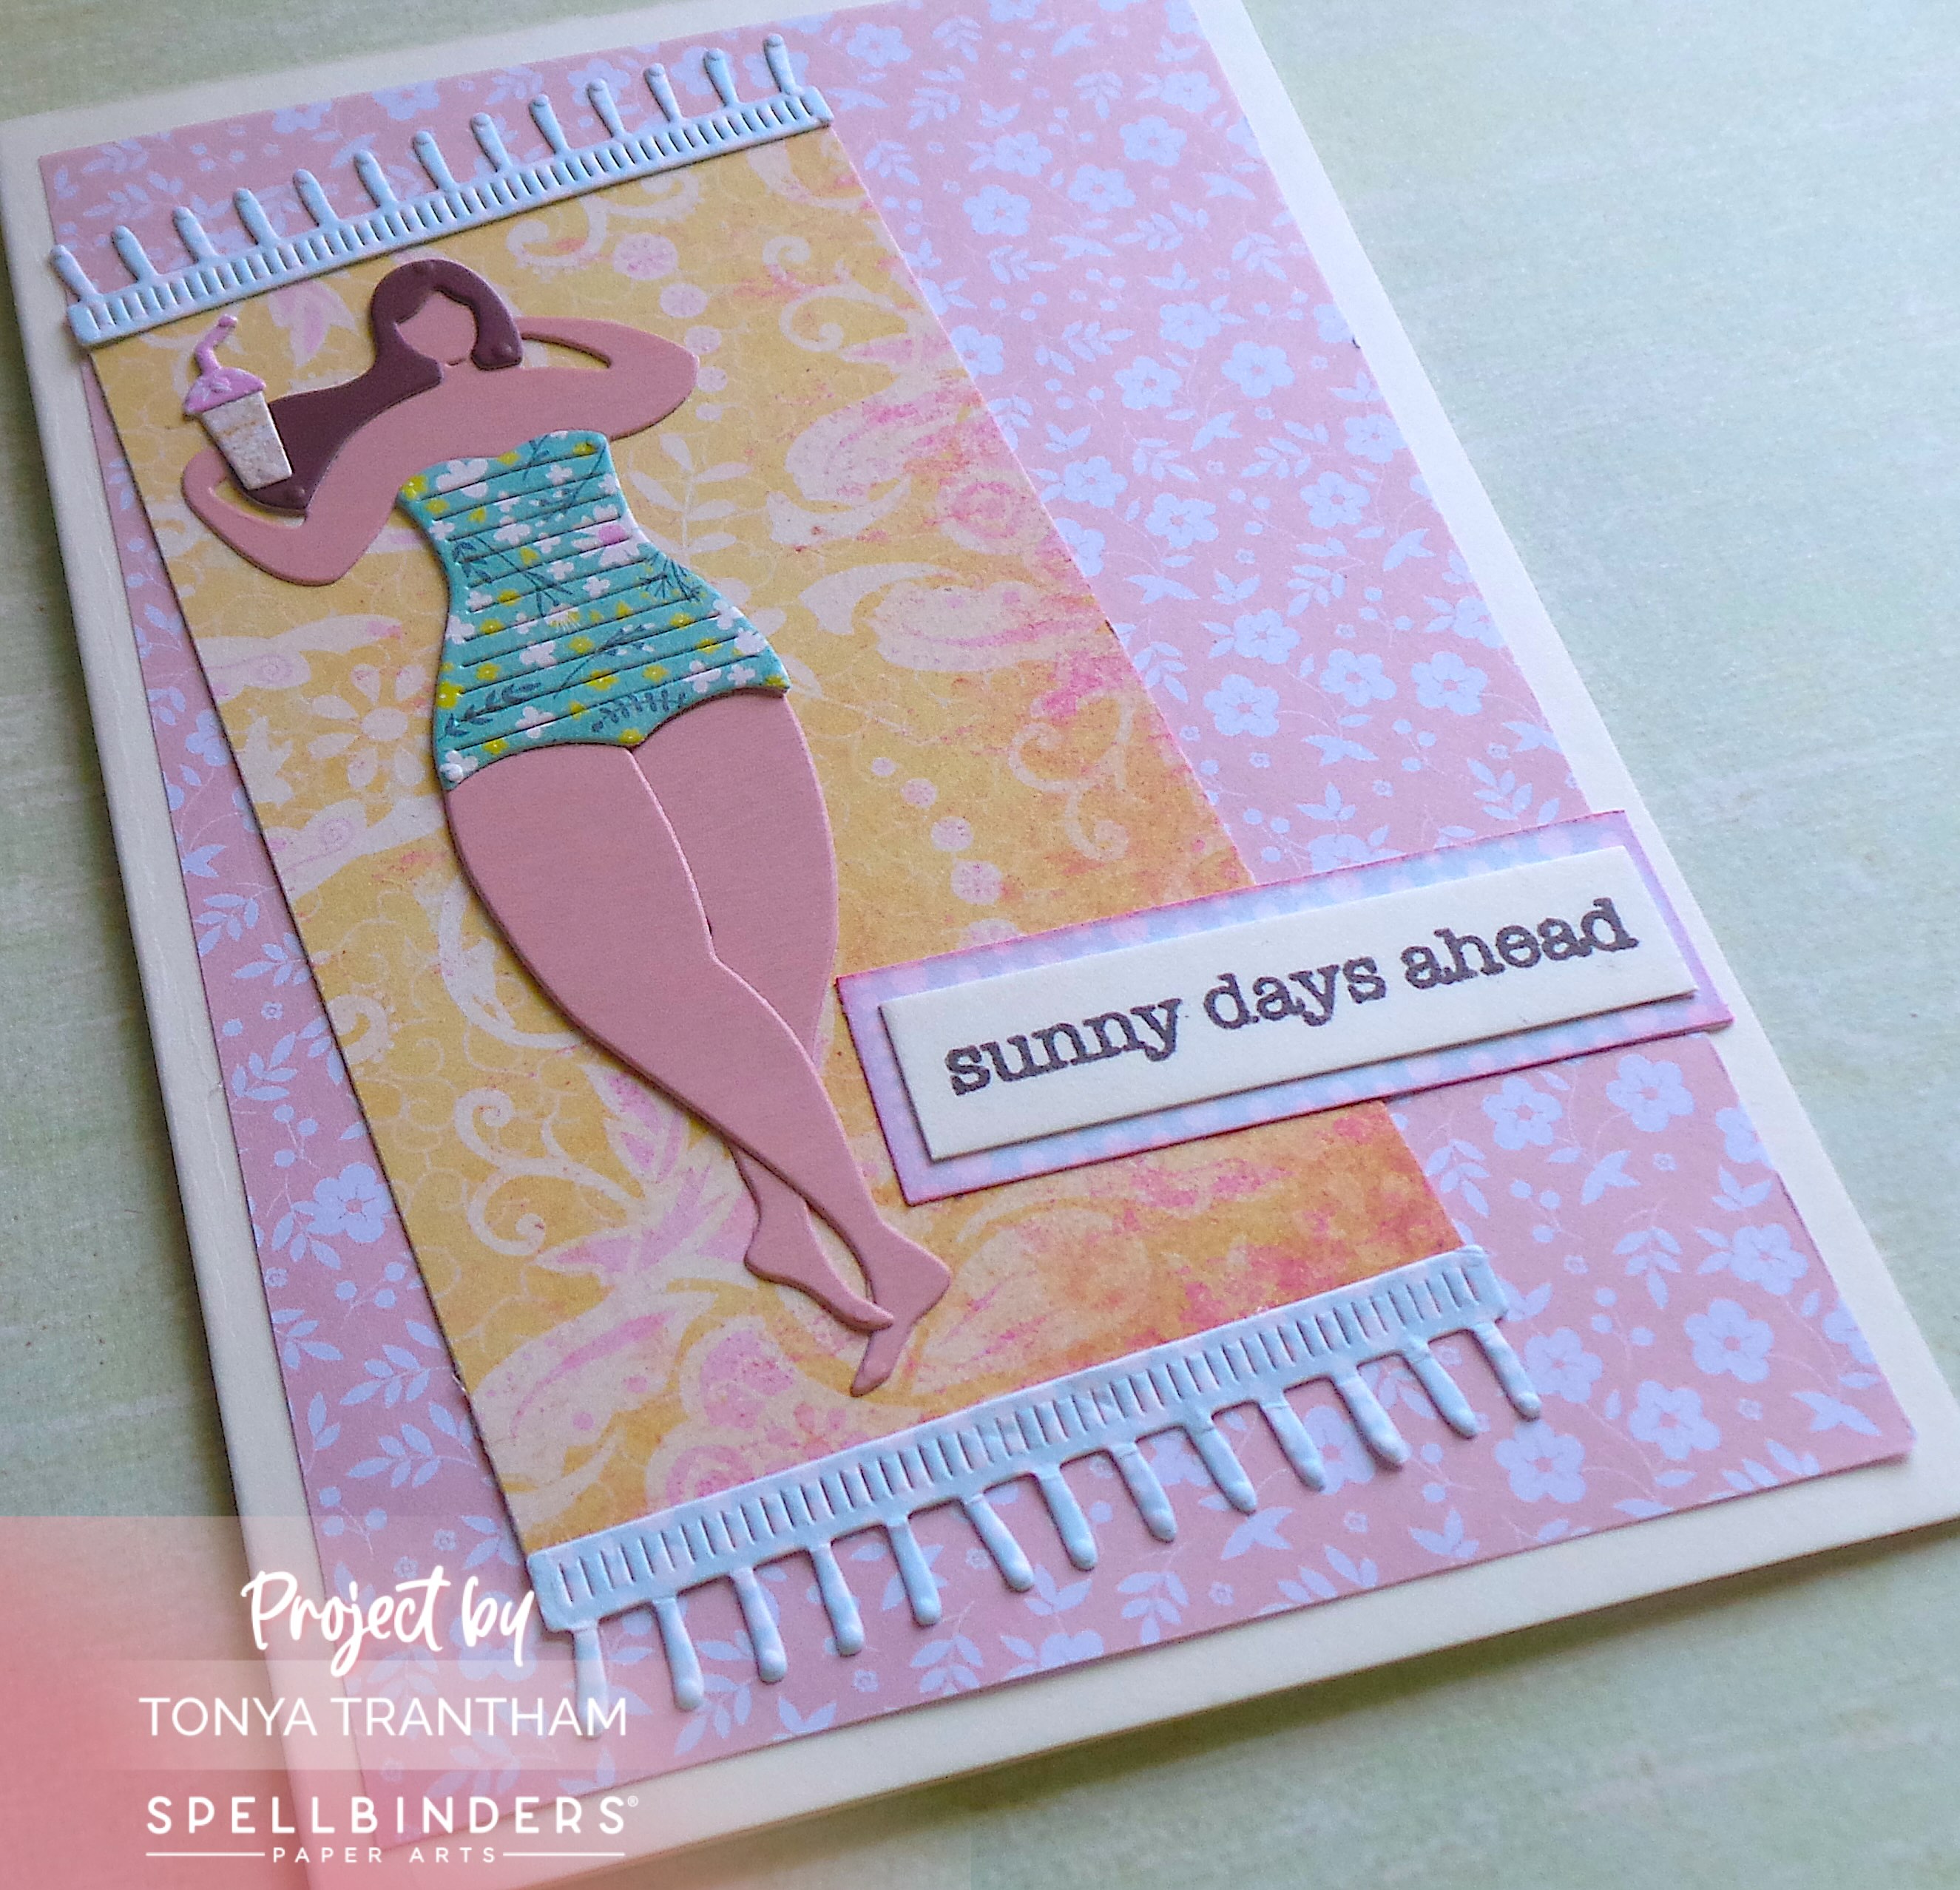
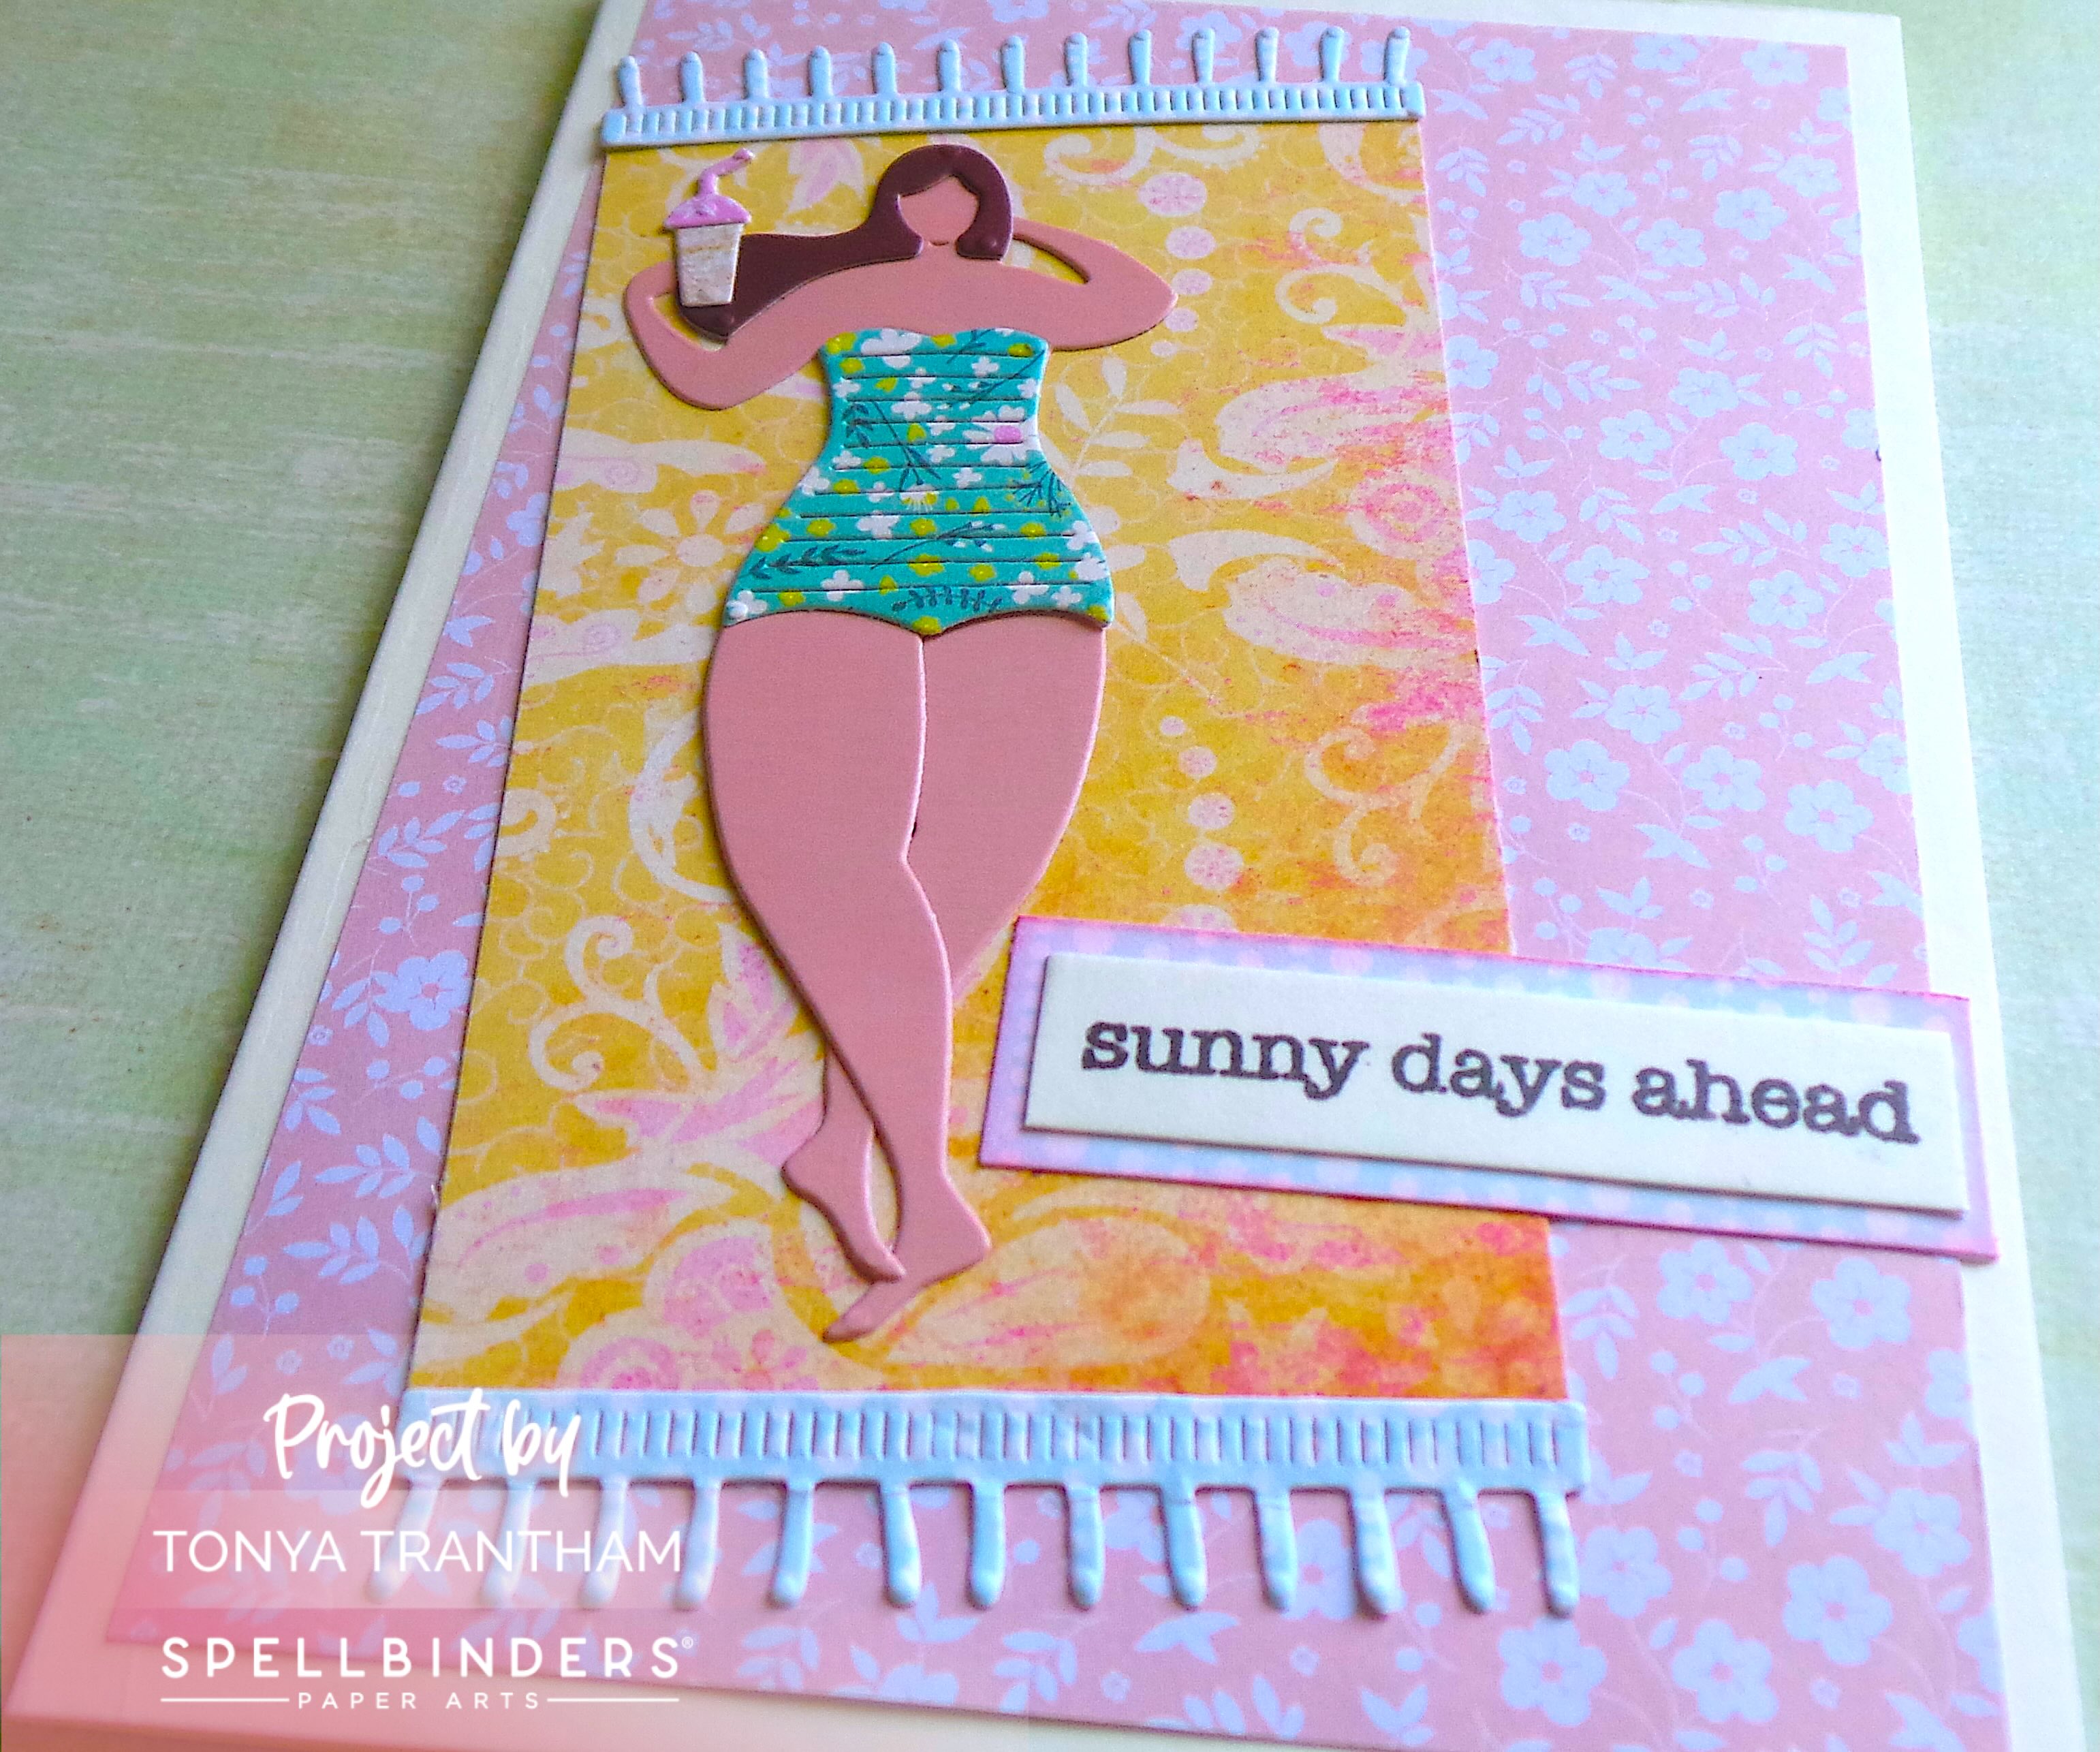
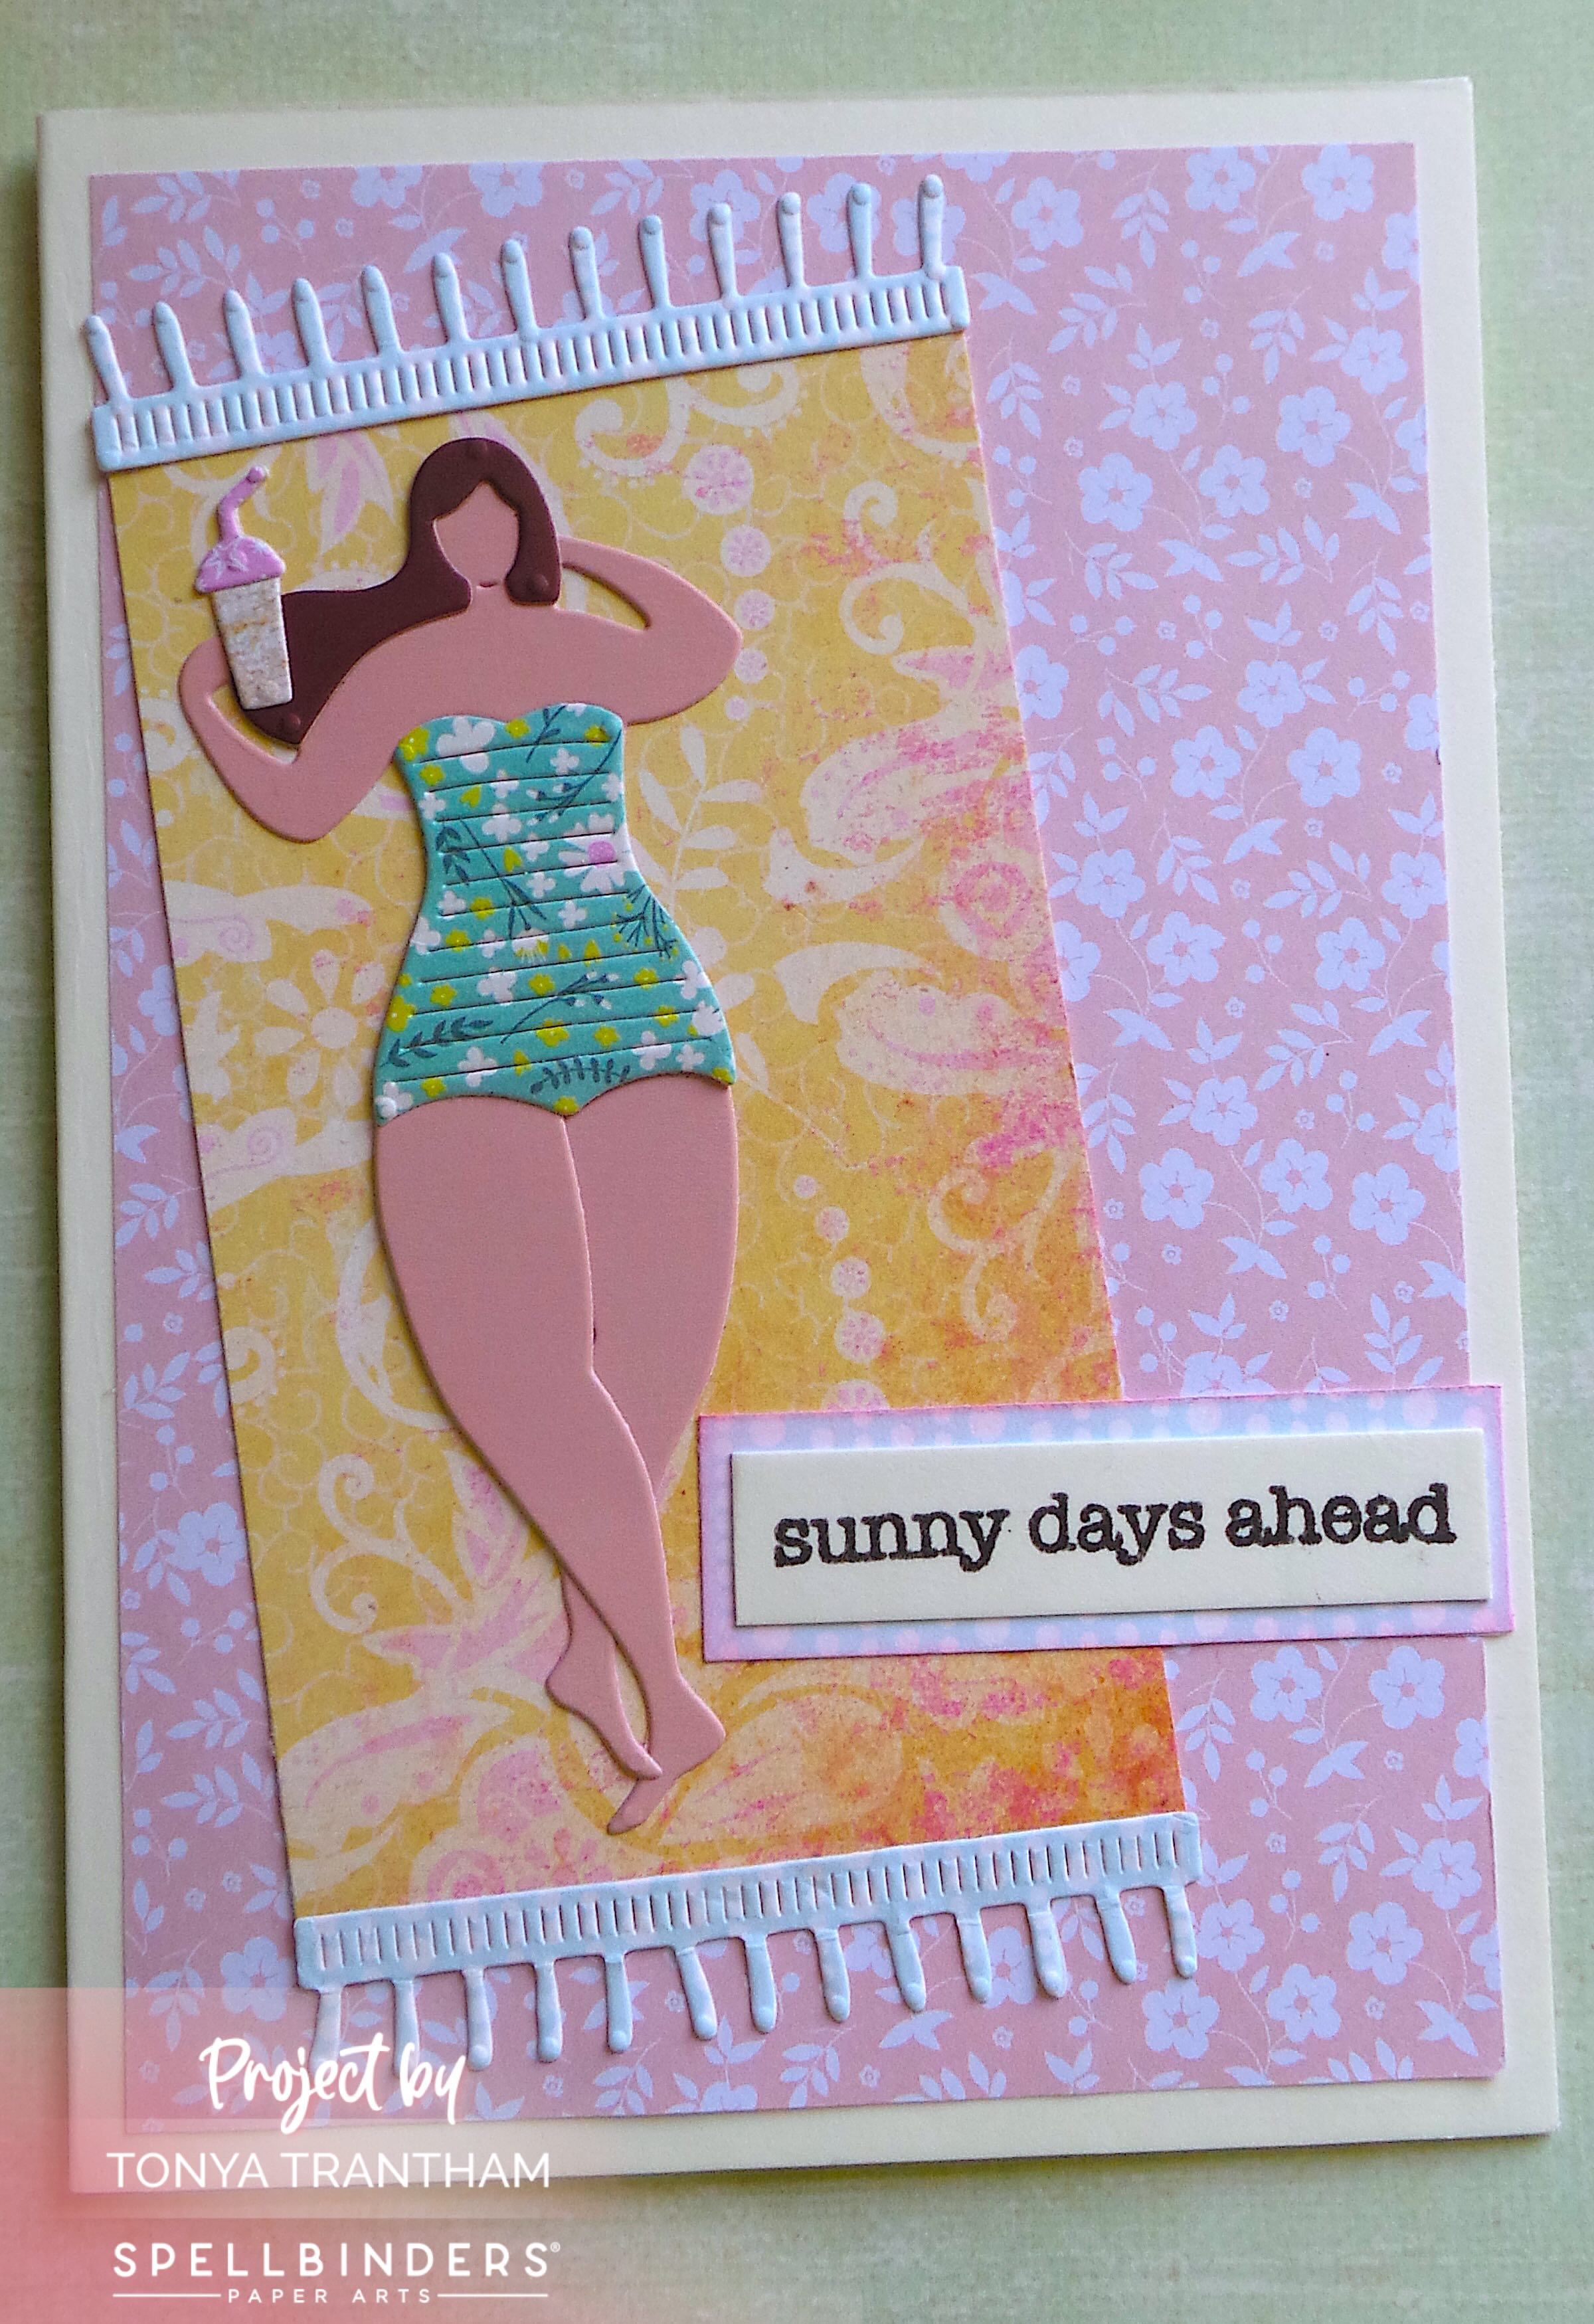
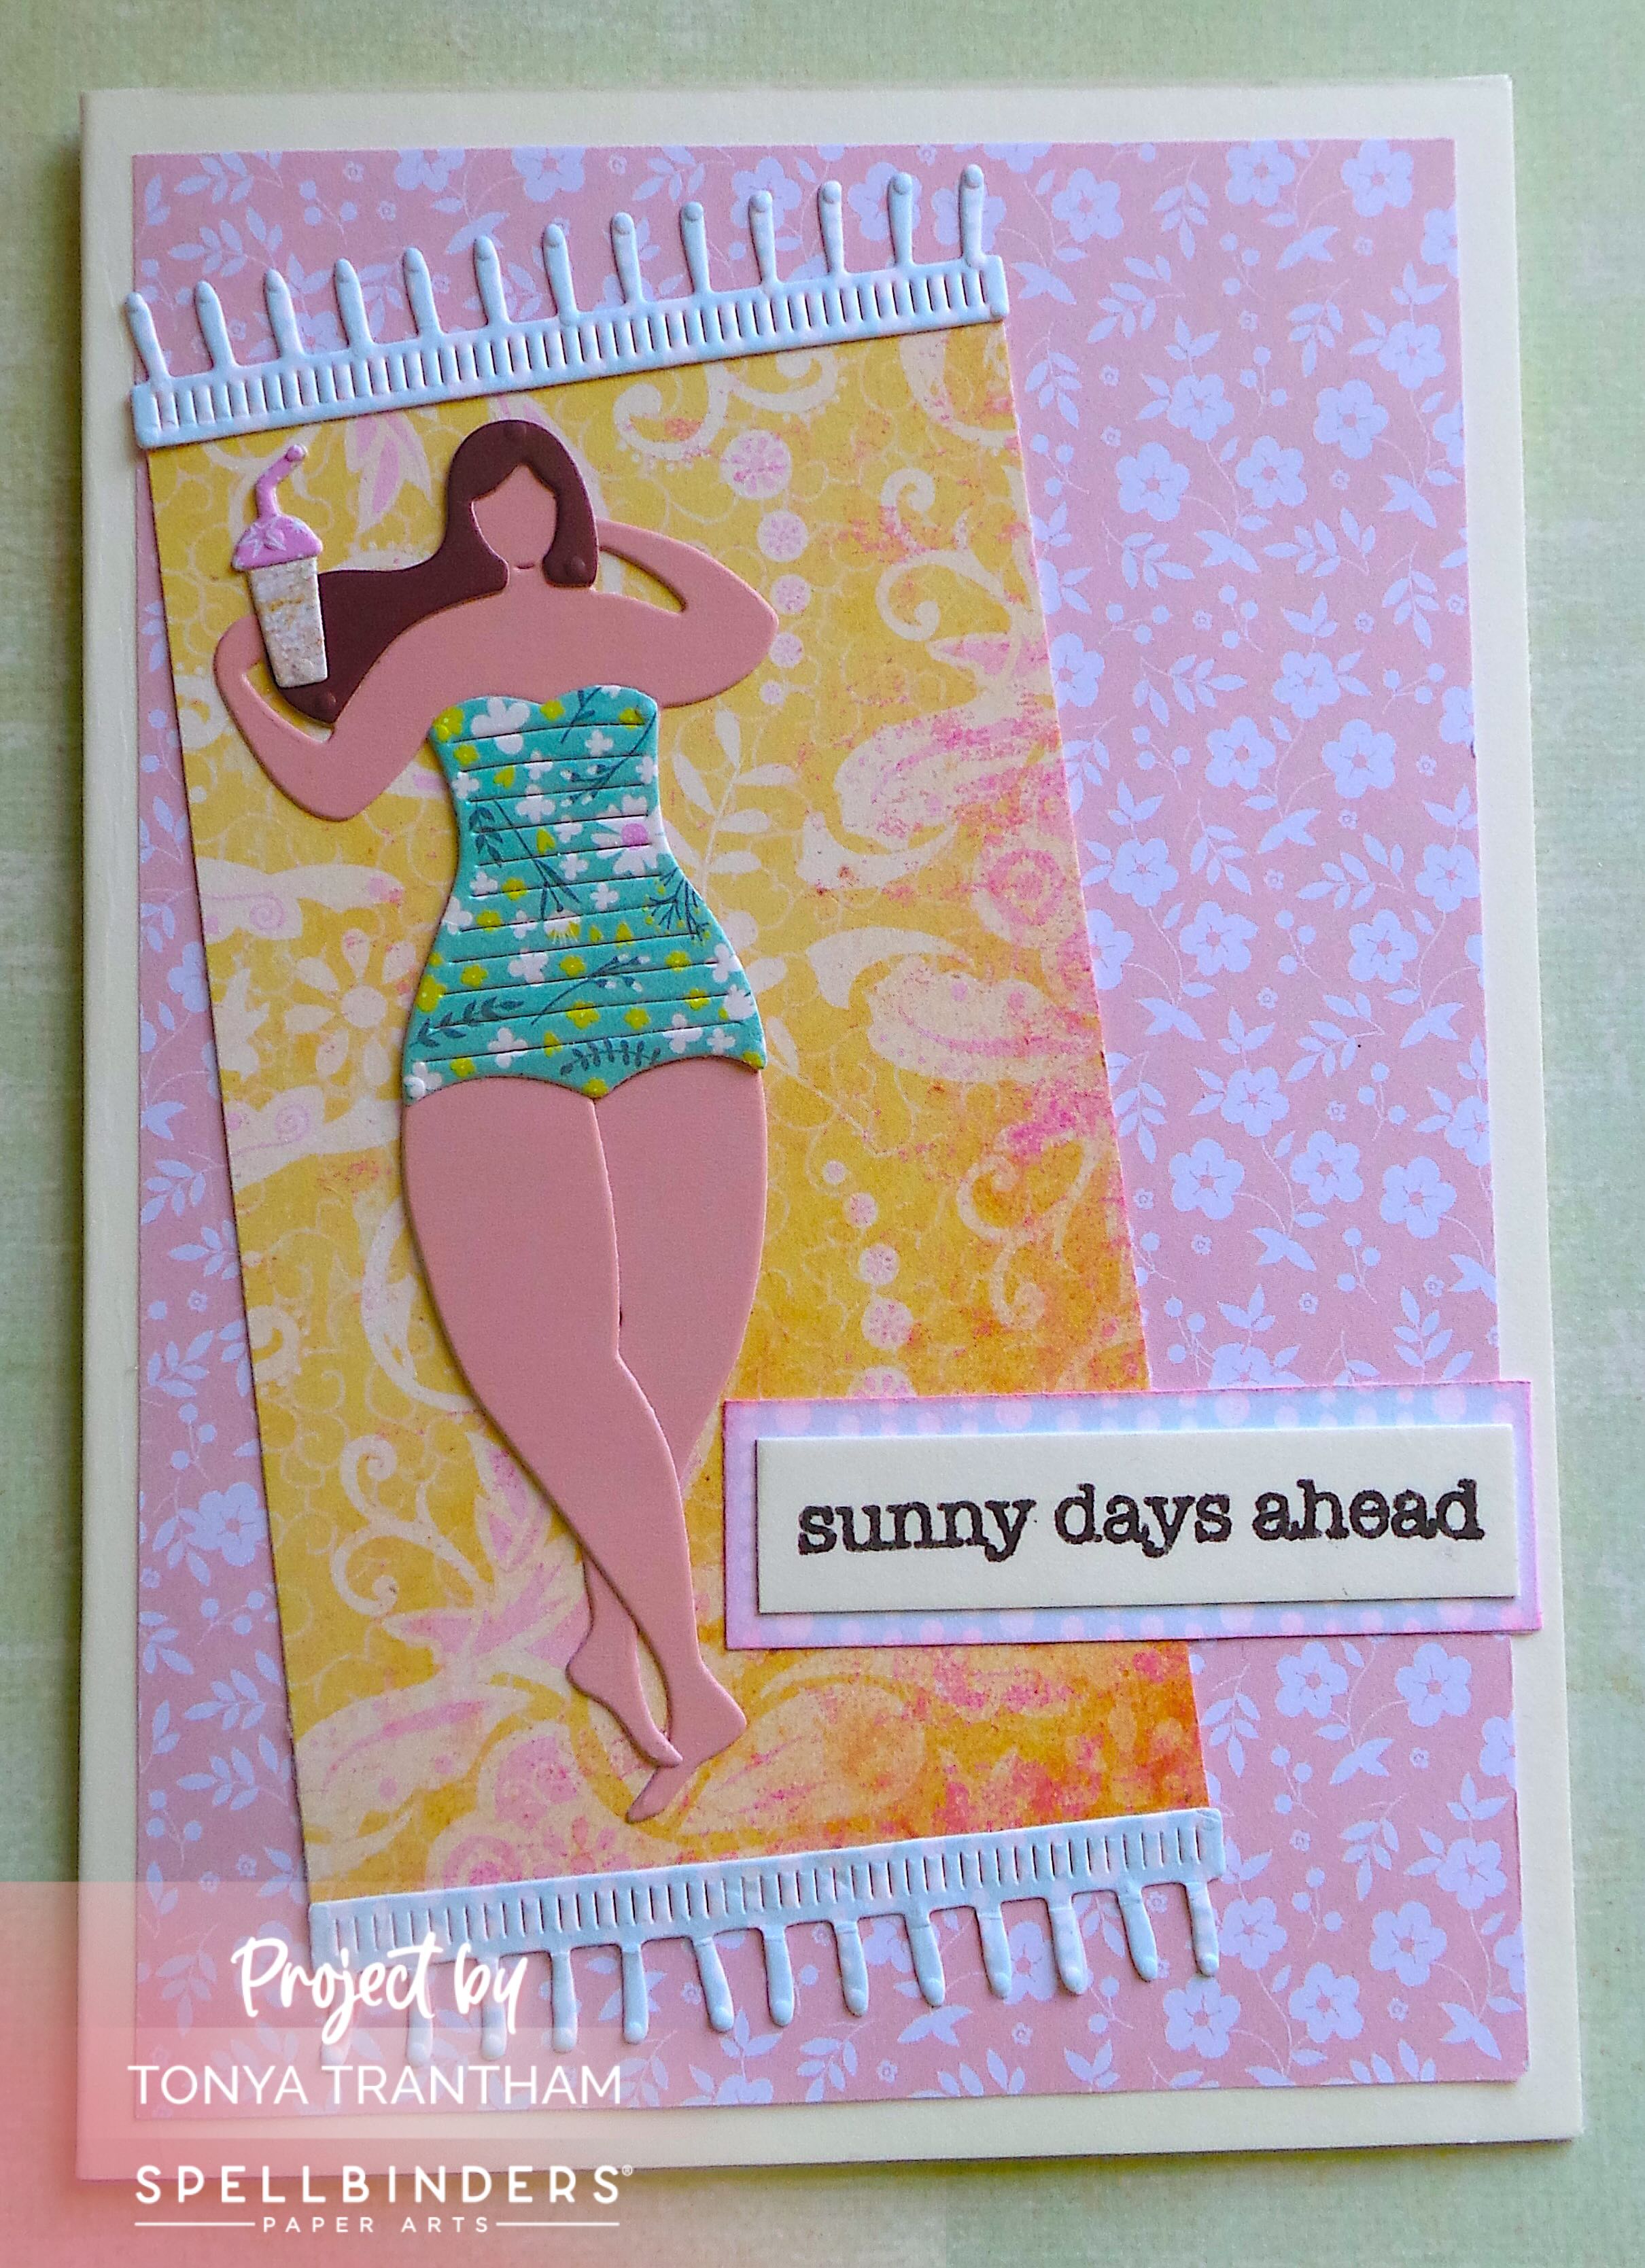
The first thing I did was cut all the pieces of the sun bather out. But before doing that I applied Adhesive to the back of each piece of cardstock. I used a sheet of cardstock from the Just Saying Paper Collection for the bathing suit. I removed the backing from the adhesive and put the sun bather together.
I cut and folded a piece of cardstock, 4 1/4″x 5 1/2″, to create the base of the card. I cut a floral mat slightly smaller than the base and adhered to the card. I applied adhesive to the back of two small pieces of cardstock. I cut two fringes from the die set. Next I cut a piece of cardstock the same width as the fringe and longer than the sunbather.
I placed the fringe on either end of the piece of cardstock and glued at an angle onto the card. Next I added the sun bather on top of the “blanket”.
I placed the “sunny days ahead” stamp from the Typewriter Adventure Sentiments Stamp Set onto the MISTI Stamping Tool. I inked with Black Ink and stamped onto a piece of cardstock. I cut a mat slightly larger than the sentiment and lightly inked with Pink Chalk Ink. I glued the sentiment onto the mat and placed on the card to finish.
If you have any questions or comments about this card please leave them below.
(Products listed above are Affiliated Links for your convenience)
DISCLAIMERS
This blog is compensated to provide opinion on products, services, websites, and various other topics. Even though the owner(s) of this blog receives compensation for our posts or advertisements. I always give my honest opinions, findings, beliefs, or experiences on those topics or products. The views and opinions expressed on this blog are purely my own. Any product claim, statistic, or quote should be checked with each manufacturer. Verify other representations about a product or service with the provider or party in question.This blog contains affiliate links. Clicking these links helps to support Tonya Trantham Designs – Creative Paper Addiction. It’s at no additional cost to you.Today’s features are Spellbinders and Scrapbook.com Products.
Thanks for stopping by, I hope your Tuesday was wonderful and enjoy creating!
Hi everyone! Even though we are now in September. I want to share a file folder that I had altered and turned into a summery journal. I actually had this finished and ready to share a couple of months ago. My dad passed away, and it’s been hard to get back into the swing of things. But I’m getting there. I didn’t do any step out photos of the process…sorry. Anyways let’s get started!
The file folder I measured and folded. I folded the top of both sides into the inside of the cover. This created tuck spots. I glued the bottom edge of both tuck spots to the inside cover.
I tucked some notebook paper to the back cover. I had cut it down and added a rub on from the 49 and Market: Rouge Collection.
The front inside tuck spot. I added glue to either end of a cut a part. This was done after I had decorated the cover…details of the cover will come later.
I added a couple journaling cards to the belly band. I also added another piece of notebook paper with rub ons to the tuck spot.
The cover of journal measures 6″x11 1/2″ after folding the tuck spots to the inside of the journal. I gathered up an assortment of cardstock, grid paper, large doily and watercolor paper. I cut to fit and folded in half before punching holes, in the fold of all pages and the cover. I threaded a needle with cording and stitched all together. I tied off on the outside of the cover.
I tied seam binding and fiber to cover where I had tied off on the spine. I also adhered trim to the back and front cover.
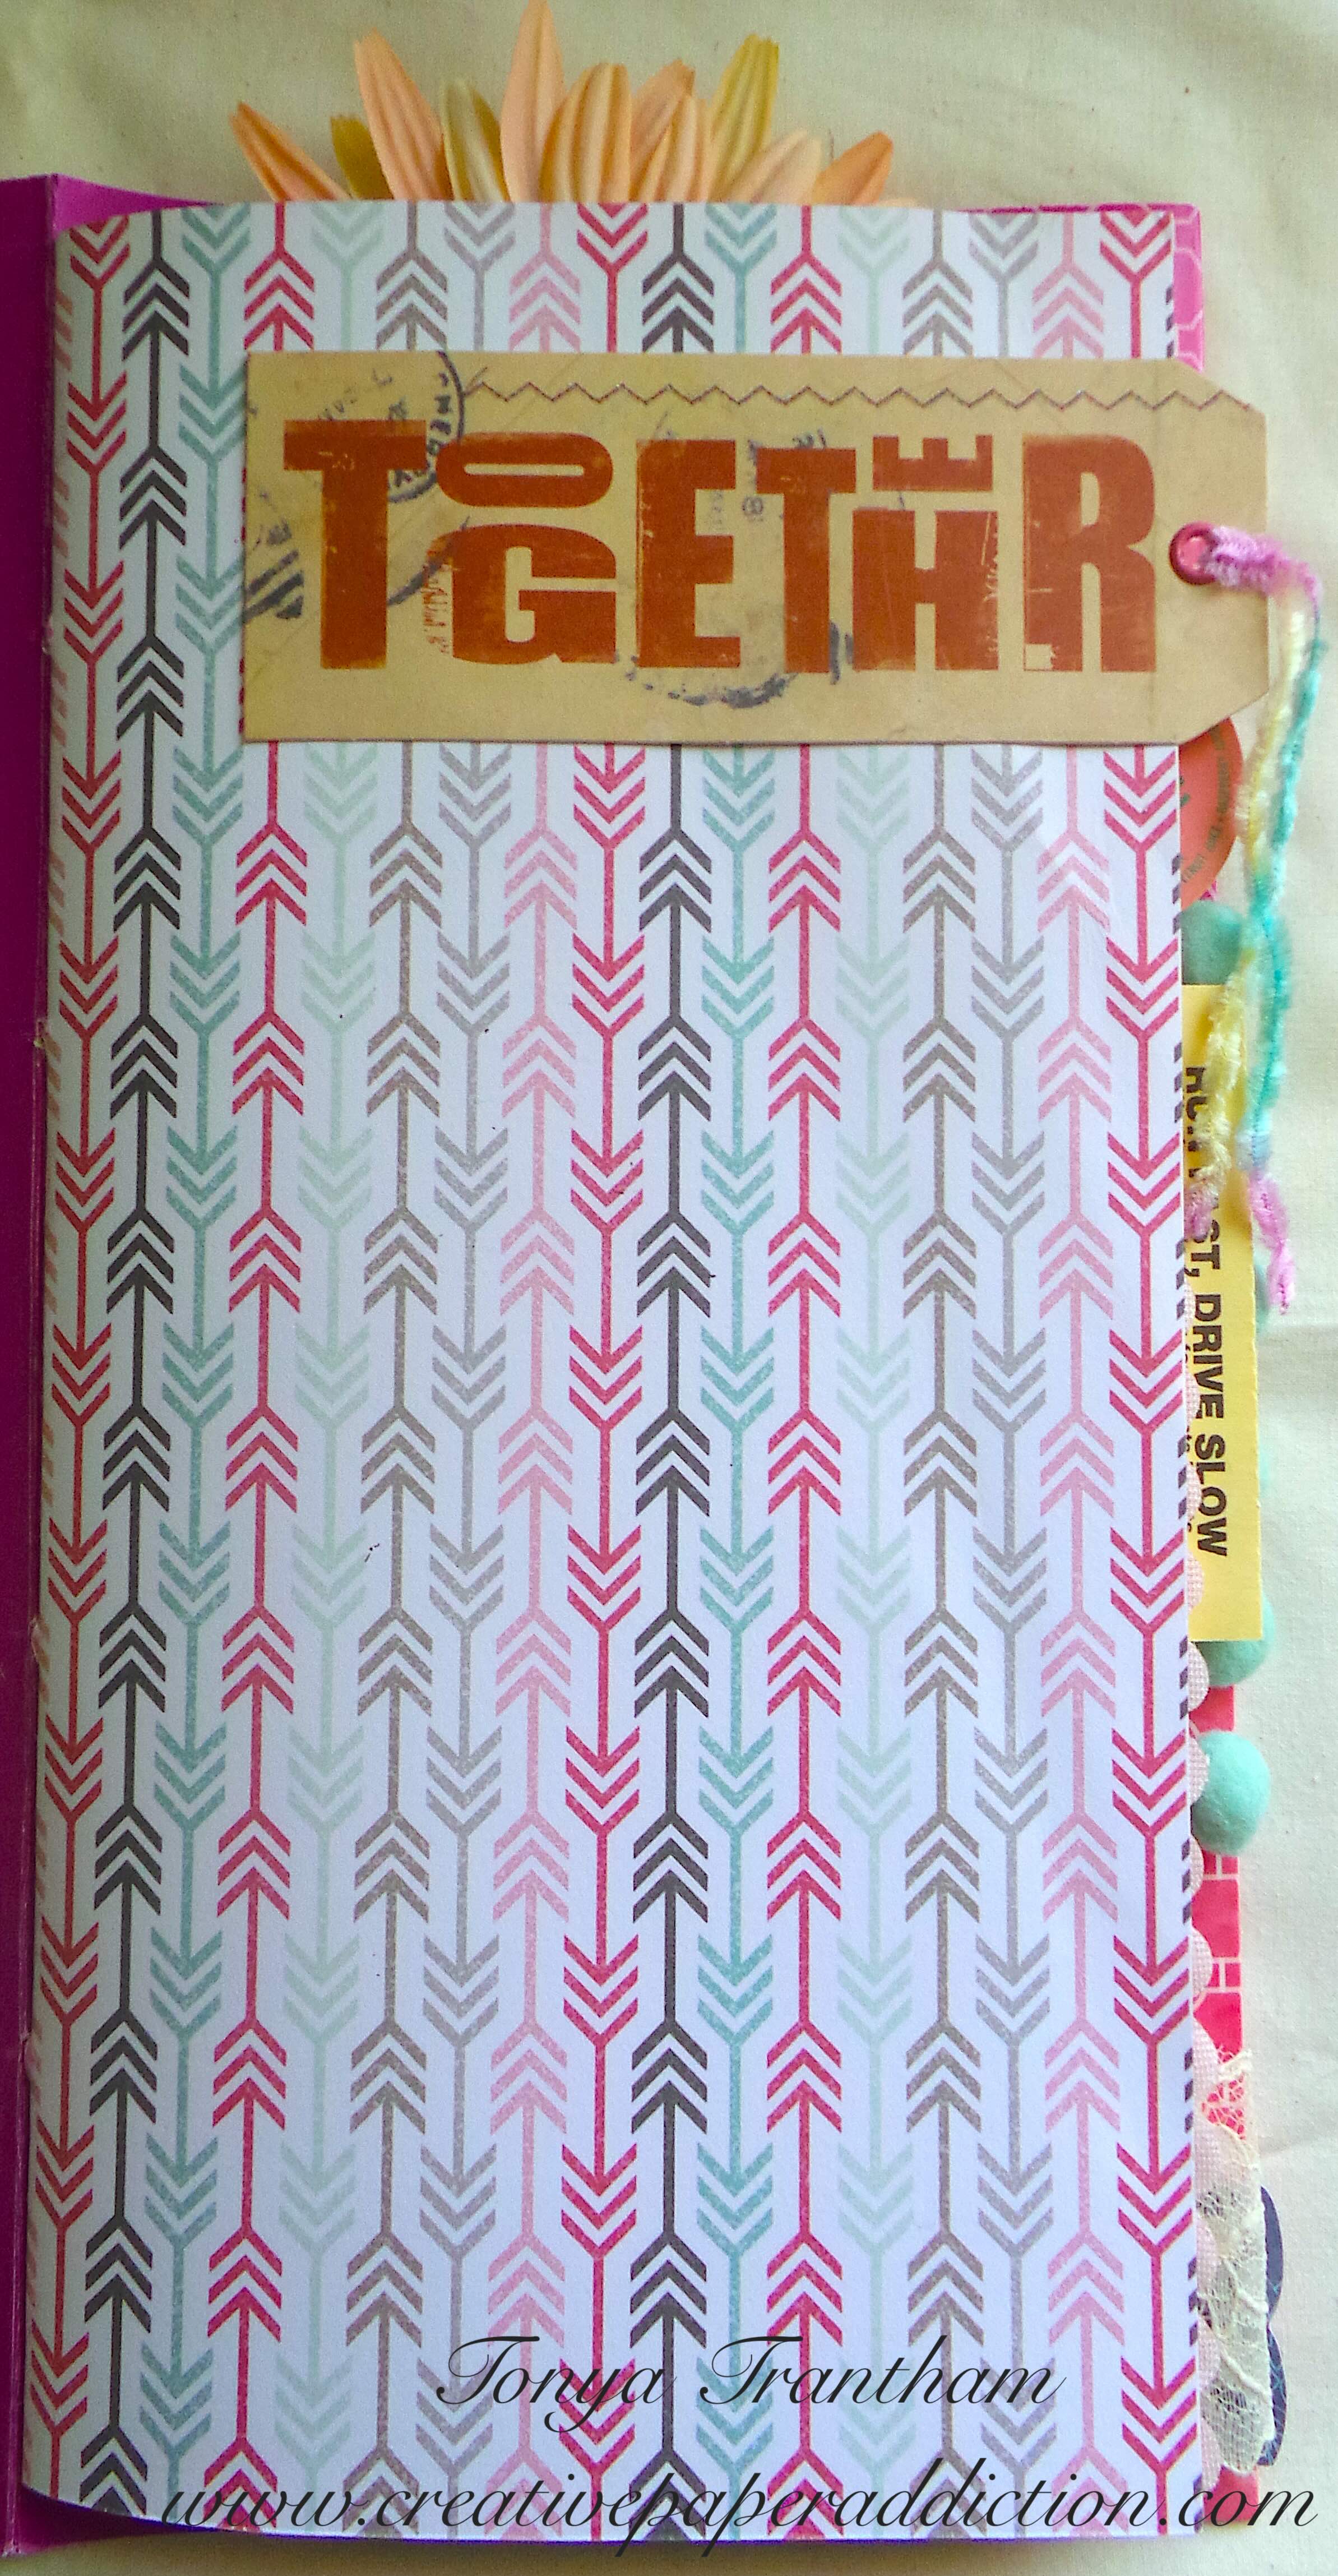
The cover I adhered a rectangle doily that I glued to the cover. The extra bit of the doily I wrapped and glued to the tuck spot of the inside. I dug into my stash of paper diecuts. I added a bingo card, frame and a floral image to the cover.
For the inside pages, I used an assortment of paper diecuts and embellishments.
I used one of the journaling cards as a tuck spot.
The two pages in one I thought was pretty cool.
I loved adding the bright green doily as a page to the journal. I also used a parking garage ticket as a tab on a page.
I used a sheet of watercolor paper in the journal. On the back side of the page, I fussy cut out a floral image from a scrap piece of cardstock. I adhered two of the sides to the page to create a pocket. I added scraps of cardstock as journaling spots to the pocket.
User comments
I used a journaling card that had a perforated edge. Instead of tearing it from the booklet it was in I carefully removed it with the perforated edge intact. I adhered to the top of the page. I added a strip of cardstock to cover where I tore it from the booklet.
I glued a journaling card along the bottom and added to the middle of the page. I created a tuck spot. I added a scrap of cardstock. I also included a journaling card and a paint chip. I had picked up the paint chip in the paint department at Walmart. These items were added to the tuck spot.
I added glue to the bottom of the “Good Times” cut a part. I placed it on the bottom of the page to create a tuck spot. I added a scrap of cardstock to the pocket.
I added a small Polk a dot paper bag to the side of the page. I secured it by adding washi tape to the page and bag. I glued a sentiment to the bag along with a butterfly embellishment. I placed a decorative journaling card inside of the bag.
I created another tuck spot with a decorative card from my stash.
I filled the tuck spot with journaling cards and scraps of cardstock.
More tuck spots and a flip up card for journaling or adding photos.
I dug into my stash and found this little felt flower and paper leaves I had not used. I thought it was a perfect addition to the page. On the opposite page, I glued another journaling card to the corner. I also added a scrap of cardstock with a sentiment.
The last page in the journal I adhered a butterfly diecut to the top of the page to finish.
This journal was so much fun to put together! If you don’t have file folders laying around your home, you can find them at places like Walmart and Target. You can also check your local office supply stores. For the rest, use what craft supplies you have on hand! You will be surprised how quick one of these journals comes together.
(Products listed above are Affiliated Links for your convenience)
DISCLAIMERS
This blog is compensated to provide opinion on products, services, websites, and various other topics. Even though the owner(s) of this blog receives compensation for our posts or advertisements. I always give my honest opinions, findings, beliefs, or experiences on those topics or products. The views and opinions expressed on this blog are purely my own. Any product claim, statistic, quote or other representation about a product or service should be verified with each manufacturer, provider, or party in question.This blog contains affiliate links, clicking and shopping through these links helps to support and run Tonya Trantham Designs – Creative Paper Addiction at no additional cost to you. Today’s features are Scrapbook.com Products.
Thanks for stopping by, hope your Friday wonderful and enjoy creating!
Hi there! I hope everyone is enjoying warmer weather like I am. This happens to be the most favorite time of year for me, lounging in the pool, reading books, gardening and cooking out. But I still have time to craft and I want to share a project I created using a few of Eileen Hull’s diecuts and thinlits. This month’s theme over on Eileen Hull’s blog is using leftover bits and pieces and this project that I am getting ready to share is just that…a lot of leftovers. So lets get started!
I had one sheet of leftover cardstock from 49 and Market: Vintage Artistry Sage Collection and I thought that would make a great little shadow box (the cardstock is a heavy weight and is perfect for creating this box). I also had created a wedding album with this collection which you can find that post HERE.
I cut four of the smaller “frames” from the Shadow Box Frames Set 2 Thinlits, put together according to the directions and cut to fit a piece of cardstock for the back of the shadow box.
I always cut from whatever small scraps of cardstock I have leftover from previous projects leaves, flowers, etc. to have on hand. To me it’s one less step in cutting those out when in the middle of making something. The wreaths I had cut from the Wreath and Snowflake Thinlits.
I cut two a part and “wove” around the one not cut a part to make it look fuller.
I had also cut out a couple of leaf sprigs from the same wreath and snowflake thinlits and the flowers I cut from the Shadow Box Elements Thinlits. I adhered the wreath to the inside of the shadow box, shaped and glued the flower and leaves together, placed a gem in the center of the flower before adding a Foam Pop Dot to the back and placing in the center of the wreath.
I used hinges from the Treasure Box Diecut (retired) to dress up the corners of the shadow box. I also added gems to each corner of the hinges to finish off the box.
If you haven’t been by Eileen’s blog lately to see what her teams have been up to you can find the latest blog posts HERE and HERE..
(Products listed above are Affiliated Links for your convenience)
DISCLAIMERS
This blog is compensated to provide opinion on products, services, websites, and various other topics. Even though the owner(s) of this blog receives compensation for our posts or advertisements. I always give my honest opinions, findings, beliefs, or experiences on those topics or products. The views and opinions expressed on this blog are purely my own. Any product claim, statistic, quote or other representation about a product or service should be verified with each manufacturer, provider, or party in question.This blog contains affiliate links, clicking and shopping through these links helps to support and run Tonya Trantham Designs – Creative Paper Addiction at no additional cost to you. Today’s features are Sizzix, Eileen Hull and Scrapbook.com Products.
Thanks for stopping by, hope your Monday is great and enjoy creating!
Gwen Studios has a wonderful selection of beautiful ribbons, trims and bows and I’m so excited to be able to use a few of these on my journal page!
I love to use up what scraps of cardstock that I have laying around so I decided to create a page for my journal. First I gathered scraps of patterned cardstocks and the Peach Pom Pom, Tassel and Ribbon Box Set.
I adhered the scraps of cardstocks together and cut a piece of the peach ribbon to fit the bottom of the page. I punched a hole into the ribbon and cardstock on either side of the page. I selected from the Oh Snap! Snap Fastener Kit (online Walmart July 2021) a heart shaped snap, placed into the punched hole and set with the fastener tool.
(Products listed above are Affiliated Links for your convenience)
DISCLAIMERS
This blog is compensated to provide opinion on products, services, websites, and various other topics. Even though the owner(s) of this blog receives compensation for our posts or advertisements. I always give my honest opinions, findings, beliefs, or experiences on those topics or products. The views and opinions expressed on this blog are purely my own. Any product claim, statistic, quote or other representation about a product or service should be verified with each manufacturer, provider, or party in question.This blog contains affiliate links, clicking and shopping through these links helps to support and run Tonya Trantham Designs – Creative Paper Addiction at no additional cost to you. Today’s features are Gwen Studios and Scrapbook.com Products.
Thanks for stopping by, hope your day is wonderful and enjoy creating!
Hi everyone! I am back with a project I had originally created for ClearSnap using their ColorBox products. If you haven’t heard ClearSnap has closed there doors 😭 which makes me very sad. Their chalk inks where the first I had ever used and I absolutely fell in love with them. I hope that there is some company out there that might buy them out so we all can still enjoy using their wonderful inks, stamps, art screens, etc. I also used Eileen Hull’s Notebook Diecut for this project which is very easy to decorate.
First off I placed the Mat Board on top of Notebook Diecut and placed between cutting plates and run through the Diecut Machine. I placed the Geometrics Art Screen on top of the notebook diecut, loaded Art Daubers with the following Misty Meadow Chalk Inks: Ice Blue, French Blue, Ice Jade and Wisteria Chalk Inks and inked the cover.
Once the notebook was completely covered I removed the art screen.
I removed the cover from a plain store bought notebook, punched two holes (top and bottom) in the spine of the notebook cover and did the same with plain notebook.
Before tying off the plain notebook to the inside cover I add a tassel to spine with Jute.
I placed white cardstock on top of journal diecut from the Journaling Words Diecuts placed between cutting plates and run through diecut machine. I inked an art dauber with Wisteria Chalk Ink from the Misty Meadow Chalk Inks, inked the journal diecut and adhered above seashell image.
I finished off by punching a hole in front cover of notebook and placing a screw fastener. I cut and tied jute to the jute on spine, tied off and placed around the Screw Fastener to create a closure. Since I used Eileen’s diecuts in this project you can find more inspiration from the rest of her team HERE and HERE. As always if you have any questions about this project please let me know.
Hi everyone! I wanted to share a quick fan project I created! The weather has been HOT around here…mid to upper 90’s and it’s hard to stay cool so I thought I would create this fun fan using some of my ColorBox inks!
I started by placing a piece of Watercolor Paper on top of the “Postage Stamp” looking diecut from the Creative Book Pages Diecuts. I placed between the cutting plates and run through the Diecut Machine. I cut off 1/2″ on each side of diecut with a Paper Cutter. I inked the glass tray with Sunshine Blends 2 Ink added water to ink mixture, placed the diecut in the ink mixture and once completely covered with ink removed and let dry.
Next I inked the following letter rubber stamps “stay” with Wicked Black Archival Dye Ink and stamped onto a piece of patterned cardstock. I cut cardstock to fit the fan and before adhering I cut a small banner from orange cardstock and glued both to fan.
I inked the glass tray with following Blends 2 Inks: Stop, Golden and Sunshine Blends 2 Inks, added water to each ink, laid a scrap of watercolor paper in the ink mixtures. Once the watercolor paper was completely covered I removed and let dry.
I placed an Adhesive Sheet on the back side of watercolor paper and placed on top of following letter diecuts: C, O (cut 2) and L. Next I placed between cutting plates and run through the diecut machine. I removed the adhesive backing from letter diecuts and placed under the “stay” wording.
I finished by adhering a wooden paddle/stick to the fan. I know it is in no way a substitute for air conditioning but it does help a little to stir a breeze when you are hot and sweaty. Also this would be a fun craft to do with your children too. As always if you have any questions about this project please let me know.
Hi everyone! I am back this week with a new project for Eileen Hull’s Inspiration Team! I used Eileen’s newest diecut, House Ornament Diecut, from the Chapter 3 Collection and I went with a beach theme for my little house using theTutti Frutti 6’x6″ Paper Pad and the Tutti Frutti Decorative Brads by My Mind’s Eye.
I started by cutting out two house diecuts from Mat Board with a Diecut Machine. With a pair of Scissors I cut one of the bottom flaps off since it won’t be needed. I adhered the house together according to directions on the packaging.
I added White Frost Metallic Lustre to the smaller Vignette Baseand let dry while continuing to work on the beach house.
The little window tag from the house diecut I inked with what was leftover on my Art Dauber and I also cut the cross section out from the window. From the Tutti Frutti 6’x6″ Paper PadI traced and cut out a swimmer on a float and adhered to the back of the window. I made sure the face showed through the window.
From the same paper pad I cut and adhered patterned paper to the roof but before adhering I inked the edges of the roof with chalk ink. I fussy cut an assortment of flowers and leaves out and adhered to the side of the roof.
I cut three flowers out from the Tag and Pocket Bookmark Diecuts. I slightly crumpled all three flowers and then shaped the edges with a Stylus. I added a brad from the Tutti Frutti Decorative Brads to the flower and adhered a bit of ribbon and yellow thread to the back before gluing to the roof.
I made a small bow with seam binding and covered the center of the bow with a brad from the Tutti Frutti Decorative Brads. I used a small amount of seam binding to tie the roof together and then adhered the bow on top of that. I added a small bow to the window tag and tied that around the seam binding bow. From the computer I printed the sentiment “Beach Babe” which I cut out and adhered to the tag. I fussy cut a small flower and leaves from the paper pad and added to the roof and the corner of the tag. I also added a couple small loops of thread to the corner of the tag.
I cut and adhered patterned paper from the same paper pad to the outside and bottom of the house. I adhered trim to both sides of the roof. I printed the Beach House sentiment and adhered to the front of the house and added blue gems to the top of the roofs on both sides and to either side of the sentiment.
Before adding the swim suit girl from the Tutti Frutti Decorative BradsI changed out the brad and I cut a small flower diecut from the same paper pad using the smallest flower diecut from the Tag and Pocket Bookmark Diecuts and added to the swim suit girl.
I added more fussy cut images from the paper pad to the bottom of the house.
For the life preserver I used a smaller circle punch and punched out the center first and used a larger punch to the punch out the life preserver.
I adhered the base to the bottom of the house and there you have it! Finished! Wouldn’t these make great gifts for small Christmas gifts or add a gift card for a house warming gift. So many possibilities!!! Be sure to stop by Eileen Hull’s blog and see what the rest of the Inspiration Team has been up to. You can find her blog HERE. As always if you have any questions about this project please let me know.