Little Birdie Crafts: Snowman Snow Globe

Hi everyone! Are you ready for Christmas??? Me? I am almost there…I still have some shopping to do, wrapping presents and crafting also…not enough hours in the day for everything!
I want to share a snow globe I created from a wine glass and paper tart pan. For more photos and the how to’s you can find the blog post HERE.

If you have any questions about this project please let me know.

Thanks for stopping by, hope your day is awesome and enjoy creating!

Little Birdie Crafts: Altered Snowman Box

Hi everyone! I am super excited to share that I have been asked to be a part of the Little Birdie Crafts design team! I’m so in love with all the beautiful flowers, trims and paints the company has to offer…plus there is so much more! You can find the website HERE.

For my first project I decided to alter a cell phone box that I had lying around…actually I have several boxes laying around…and create a retro style Christmas themed gift box. For the full tutorial you can find my blog post HERE

 Thanks for stopping by hope your day is awesome and enjoy creating!

To Find the Perfect Tree Train Case

Hi everyone! I am here to share my Eileen Hull’s Inspiration Team’s  Art with Heart project for this month using the bottom half of the Train Case diecut.

I cut the bottom from mat board and covered it with Graphic 45’s cardstock from the Gilded Lily collection. I know it isn’t really Christmasy but I wanted more of a wintery/snowman feel for my project since my house is decorated more in those colors. Plus I thought the little girl with the tree was prefect because I can keep this out and enjoy it in the winter months ahead.

The snowman I made from a 1″ and 1 1/2″ SmoothFoam balls. I gessoed and painted with an off white paint and once dry I put together and applied Antique Mod Podge and covered with glitter. I had baked “carrot noses” from Sculpey clay according to directions on the package. I adhered the nose and two dew drops to the snowman and added more glitter to the face. The “arms” are cut from wire which I rolled to make hands and then inserted on either side of the body and then added a little glue to secure.

I filled the inside of the case with tissue paper, adhered the bottle brush trees to that and the snow girl image I printed from the internet. I fussy cut out and adhered to one of the trees and added the snowman. 

The silver snowflake is an ornament that I had bought in a package of snowflakes and this one was deformed so instead of tossing it I decided to use as a back ground of sorts.

I worked tulle in and around the decorations and edges the ends with the gesso and glitter.

I finished off with snowflake sequins, paper flowers and thread. Be sure to hop over to Eileen Hull’s blog and link up your Favorite Things creation and see what the rest of the inspiration team has created!

Thanks for stopping by, hope your Tuesday is awesome and enjoy creating!

The Robin’s Nest: Snowman Sleigh Ride

Hi everyone! I’m here to share this month’s projects I created for the Robin’s Nest using the Winter Collection. I cut a sleigh (Sleigh Favor Box die from Brenda Walton) out of the Winter Retreat Swirl Cardstock and put together according directions. You can find the how to video on YouTube here.

For more info and photos on both projects please hop on over to the Chattering Robin’s blog!

Supplies Used:
Other Supplies: Sizzix: Brenda Walton-Sleigh Favor Box, Tim Holtz-Reindeer Flight Diecut and Snow Flurries and Dot-Matrix Embossing Folders, Martha Stewart Punch, Sequins, Buttons, Twine, Lace, Tulle, Wire, SmoothFoam 1/2″ and 1 1/2″ Balls, Silver Tinsel, Pearl Spray, Mini Bottle Brush Tree, Pipe Cleaner, Sculpey Clay, Antique Mod Podge, Acrylic Paint, Chalk Ink, Glitter

If you have any questions please let me know. Thanks for stopping by, hope your Sunday is awesome and enjoy creating!

What is in your stocking?

Hi everyone! I’m here to share an ornament I had actually started last Christmas but with all the craziness and such that normally goes on around this time of year I didn’t finish it. Well I did get a complete of photos of me starting the process though. 🙂

The stocking ornament is from SmoothFoam which I had received last year for a blog hop that the Robin’s Nest and SmoothFoam was hosting together. 
I started by lightly sanding and applying a coat of gesso which once dry I painted the stocking with red acrylic paint. I cut the cuff of the stocking from White on White Classic Glitter Swirl Cardstock. I  applied antique Mod Podge to the stocking and then sprinkled glitter all over. Once dry I painted one of the packages, added some lace around the cuff and I put it away for the year.
I dug it out and this is how I finished it off. I used some Prima poinsettias and added a sequin and dew drop to the center for an elegant look.

I added a mini bottle brush tree, along with bells, pearl sprays and miniature Christmas lights.

I finished off with a little gold trim and a holly leaf.

Don’t you think it looks lovely on my four foot tinsel tree I got for 66% off at Hobby Lobby last year. It was a floor model and pre-lit. It reminds me of my great grandmother’s tinsel tree but hers had a color wheel with it. I remember sitting at her house at Christmas time watching the tree turn different colors…such great memories. 🙂

If you have any questions about this project please let me know.

Thanks for stopping by, hope your Monday is awesome and enjoy creating!

Christmas Time Snowman

Hi there! I’m here to share a quick little snowman that created using a 1″ SmoothFoam ball. I love making these little guys. So much fun and easy too! All I had to do was sand a little of the rough edge off of the ball, gesso and once dry I painted with a combination of off white and white acrylic paint. Once that dried I painted two black dots for eyes, a pink dot for the mouth and I “pounced on” some pink paint for the cheeks.

I had baked up a nose from orange Sculpey clay which I followed the direction on the packaging. I adhered the nose to the snowman and then applied Antique Mod Podge all over and then sprinkled with glitter. A way to make applying the glue and glitter easier I stuck a pin in it.


I drawed out a hat on copy paper and then traced out on cardstock which I then cut out and rolled up to create a hat. I ran a small line of glue on the edge of the hat and held until it was dry. Also be sure to leave a tiny hole in the top of the hat so you can run a pipe cleaner through. I curled the top of the pipe cleaner and the end that is inside of the hat I glued to inside of the hat. I finished off with tinsel around the hat and a small felt snowflake for the base. This can be used as a table decoration or it can be hung on the tree. The choice is yours. 🙂
If you have any questions please let me know.

Thanks for stopping by, hope your Saturday is awesome and enjoy creating!

Snowflake Snowman

Hi everyone! We are almost half way through August! Can you believe that??? Summer has sure flown for me. I have painted one of our bathroom and three coats of paint later I can say the walls are finished. Now all I need is to paint the trim and door, install the new light and flooring, vanity, mirror, faucet, make a curtain and I’m finished. 🙂
I want to share a snowman decoration I created. I received a box full of Smooth Foam ornaments last year for a blog hop and this is one of the leftovers I didn’t use in the hop.
First off I applied gesso to the ornament, let dry and then painted with white acrylic paint. While the ornament was drying I shaped a carrot nose from orange Sculpey Clay and baked according to the directions on the package. I also cut from a sheet of vintage sheet music a small hat. I rolled it into a cone and adhered together and glued silver tinsel along the bottom of the hat.

I adhered two black dew drops and carrot nose to the ornament shape, painted a dot for the mouth and then I applied Antique Mod Podge all over then covered in glitter.
I painted a chipboard snowflake white and once dry I applied antique Mod Podge and sprinkled glitter over the whole snowflake. I then adhered to the base of the ornament the snowflake, tied seam binding around the “neck” and finished off with dew drops to the bow and snowflake.

Lastly I glued the little hat to the snowman’s head. Easy peasy decoration to set out at Christmas or a super cute gift to give. 🙂

Supplies Used:

SmoothFoam: Ornament, Robin’s Nest: Dew Drops, Seam Binding, Glitter, Sculpey Clay, Tinsel, Vintage Sheet Music, Chipboard Snowflake, Black and White Acrylic Paint, Gesso
If you have any questions please let me know. Thanks for stopping by, hope your Thursday is wonderful and enjoy creating!

Red, White and Beautiful Snowman

Hi everyone! I’m here to share my project for Eileen Hull’s Art with Heart Challenge and this month’s theme is Red, White and Beautiful. I didn’t do the traditional 4th of July summery project but I decided to “practice” making snowmen. I’ve been asked to participate in a craft show in September (which I’m still trying to decide do I really want to do it) and I had bought a 4 ft kinda of silvery/looks like it has turned (vintage looking)  tinsel tree I bought at Hobby Lobby for 66% off, after Christmas, and with lights too. The tree reminds me of when I was little and would go to my great grandmother’s house for Christmas. She had a big silver tinsel tree with the color wheel and I would sit in front of it and watch it change different colors. So cool! 🙂 I plan on making snowmen to add to the tree along with some of my other ornaments I have collected through the years.
I decided to try out Eileen Hull’s candy drawer on this project. I started by cutting out the candy drawer from mattboard and then cut out the drawer again with scrapbook paper. I inked and adhered the scrapbook paper to the drawer. I then assembled and adhered the drawer together and let dry. I used a combination of Zip Dry glue and Mod Podge and cloths pin to hold it together until it dried.

The snowman head I gessoed, painted with white acrylic paint and once dried I lightly drawed out the placing of its eyes, nose and mouth. The mouth I painted on with black acrylic paint and  added pink for the cheeks. I shaped and then baked the “carrot nose” according to the direction on the Sculpey Clay packaging. Then I glued two Black Dew Drops and the carrot nose to create his face.  

I applied Antique Mod Podge to all of the snowman’s head…nose and eyes too…and then glittered him up. Also I painted two Snowflakes Chipboard Diecuts white and added glitter to them too. 

I have drawn out my own pattern to created the hat for my snowman. I roll it up first to determine where I’m going to glue it and to make sure the size is right. Once I’ve got that right I glue together and then adhere the tinsel twine around the brim and then glue to the snowman’s head.

I also cut out a medallion diecut, assemble and glue to the top of the candy drawer along with a snowflake diecut. Then I adhered the head on top of the snowflake. I also added a snowflake and button to the drawer to top it off. Now all I have to do is fill it up with goodies when Christmas rolls around and give it to that someone special. 🙂

Supplies Used:
Sizzix: Eileen Hull’s: Candy Drawer Diecut, Medallion Diecut
Paper Studio Scrapbook Paper
Smooth Foam 1 1/2″ Ball
Gesso
White, Pink and Black Acyclic Paint
Antique Mod Podge
Button
Glitter
Orange Sculpey Clay
Robin’s Nest: Black Dew Drops
Tim Holtz: Tinsel Twine
Chalk Ink 
If you have any questions about this project let me know. Please be sure to stop by Eileen Hull’s Art with Heart Challenge and check out what everyone else has created and there is also time to still play along!
Thanks for stopping by, hope your Monday is wonderful and enjoy creating!!!

Snowman Love

Hi everyone! Can you believe Christmas is only nine days away?!!?!? YIKES!!! I have been shopping, wrapping presents and crafting up a storm and I’m still not finished. I decided to take a break and share a snowman I created using a Smooth Foam ball I had received in package of ornaments a month or so ago.
I started out by applying two coats of gesso to the ball and then painting with some white acrylic paint. I lightly penciled in the eyes and mouth. Painted the mouth with black and “pounced” the cheeks with a light pink acrylic paint, adhered two black Dew Drops to the ball for the eyes and shaped a carrot nose from Sculpey clay and then baked it.

The chipboard snowflake cut out I painted with white paint and then added a fine glitter to it. I gessoed a bottle cap which I used as the “neck” of my snowman.

I used an old sheet of music to make a cone hat for my little snowman fellow. Added some silver tinsel, button, mini snowflake and a white Dew Drop to it. I set the hat aside and then covered the whole snowman head and scarf with fine glitter. Let dry and then glue the cone hat to the snowman. 

I plan on adding this little fellow to my collections of other snowmen that I have on the  fireplace mantle.

Supplies Used:
Chipboard Snowflake Shape
Bottle Cap
Fine Glitter
Vintage Sheet of Music
Tinsel
Round and Snowflake Buttons
Orange Sculpey Clay 
Gesso
Antique Mod Podge

Black and Pink Acrylic Paint

If you have any questions please let me know and I’ll do my best to answer them. Hope you can stop by tomorrow…Tuesday…cause I have another quick project to share. 🙂 Thanks for stopping by today, hope your Monday is wonderful and enjoy creating!!!


Ornament Blog Hop: Wish Snow Globe

Hi everyone! It finally hit me that Christmas is just right around the corner. I have lots of projects and swaps that I’m working on and I’m running out of time…YIKES!!! But I do have this adorable project that I have just finished using a SmoothFoam snowman body and Robin’s Nest products that I would like to share. This snow globe is for the “An Ornament Blog Hop” linky party that The Robin’s Nest and SmoothFoam are hosting. So please be sure to hop on over to the Chattering Robin’s Blog and checkout everyone else’s creations using Robin’s Nest and SmoothFoam product and be sure to become a follower of each blog for a chance to win prizes…now who doesn’t love prizes??? I know I do. 🙂
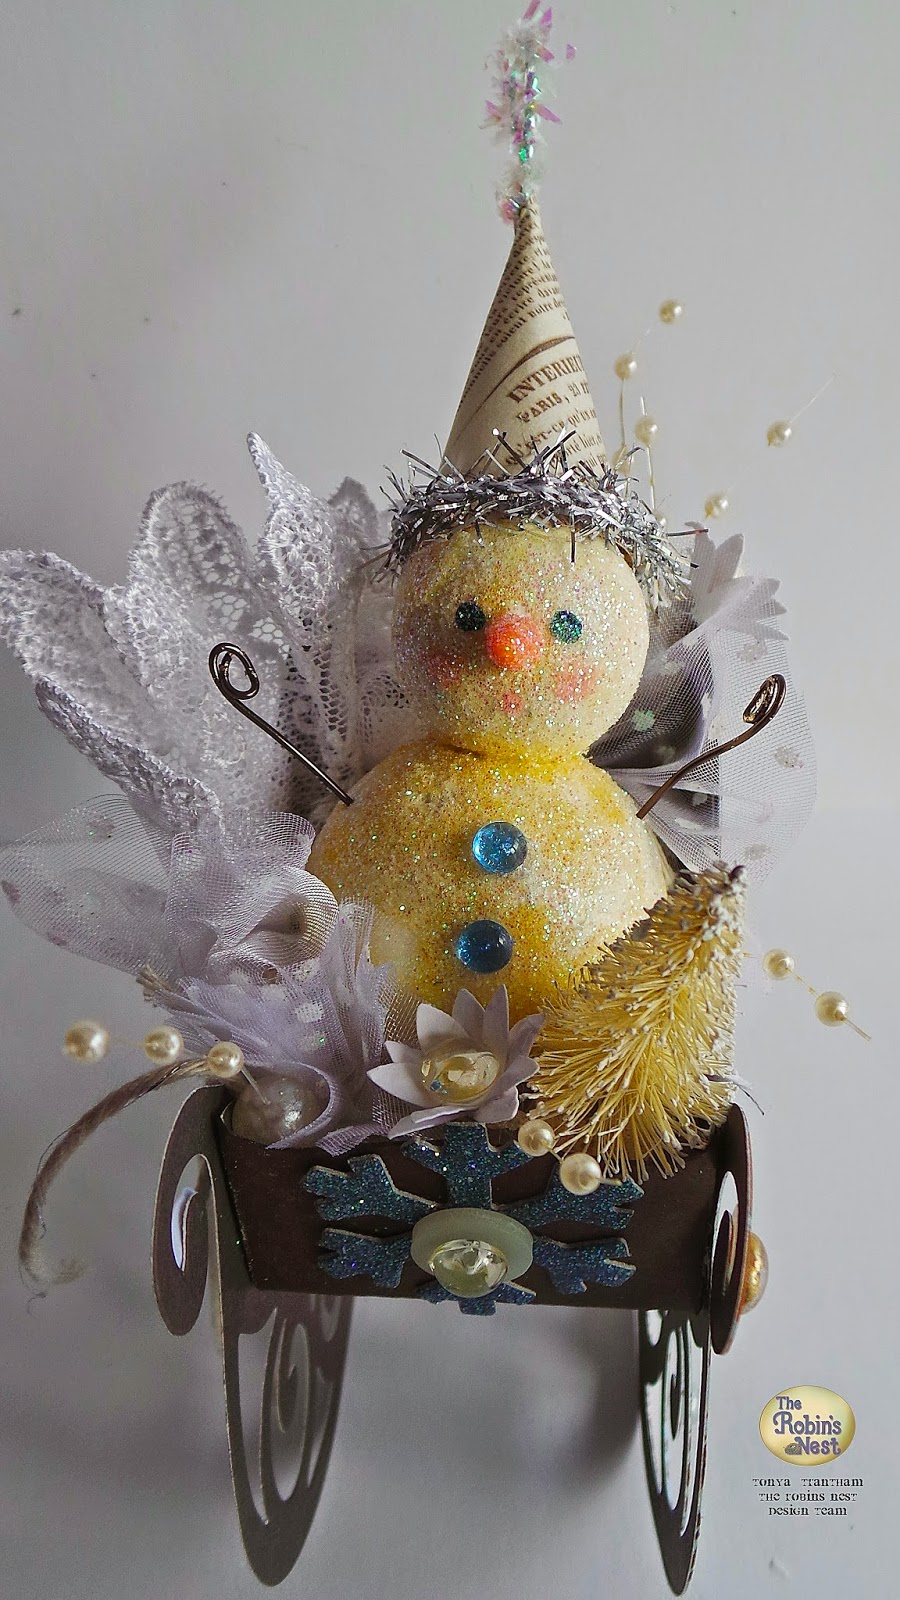
I used an old Tostitos creamy spinach dip (1 lb. 7 oz.) jar which I had no problem cleaning out. 🙂 The lid I gessoed and once dry painted with turquoise paint and then seal with Mod Podge. Next I gessoed the snowman body twice and then painted white paint. I lightly penciled in eyes and mouth and then painted with black paint. Load pink paint on a brush and “pounce” most of the paint off onto a piece of paper and then “pounce” the rest on the snowman for cheeks. While all of that is drying I took a small piece of sculpey clay and created a “carrot” nose and then I followed the baking directions on the side of the package. Once the nose has baked and cooled adhere it to the snowman. I poked tiny holes and added a bit of glue to the twigs before I added to either side of the body and I glued three dew drops down the front of the body too.  Now comes the fun part…GLITTER!!! I sponged Mod Podge to all of the snowman and then sprinkled glitter all over. Let dry.

Next I cut a 1/8″ strip from AquaMarine Glitter Sorbet Cardstock to make a scarf. Cut to fit around the neck and glue. Now cut four small pieces and curl the ends with a pair of scissors and glue to the side of the neck and add a Pearl Dew Drop to top it off. Then lightly  Mod Podge the scarf and add glitter.

For the hat it needs to be cone shaped. I free handed a pattern and once I got it the size I wanted it I traced it onto a vintage sheet of music and cut out. Now roll up to make a cone and then adhere. Also add tinsel around hat and glue to the head.

Take the lid and adhere a smaller lid to the inside.

Draw a circle slightly bigger than the lib onto felt and cut out. Then adhere to the inside of lid over the smaller lid. Now adhere the snowman to the top of the smaller lid and then sprinkle shaved ice glitter over the felt.

Now screw the “globe” over the snowman, add shear ribbon around bottom and tie off.  Adhere dew drop, button and Winter Glitter Chipboard Snowflakes together. Once dry Mod Podge and sprinkle glitter over the snowflake and then glue to the middle of the bow.

I adhered together a wooden snowflake, medallion (made from AquaMarine Glitter Sorbet Cardstock), Winter Glitter Chipboard Snowflakes, button and jingle bell. Lightly Mod Podge and add glitter. I added a Pearl Dew Drop to the tip of the snowflake “arms” and then glued to the top of the “globe”.

Cut out four banners, Mod Podge, add glitter and let dry. Print the word WISH, cut apart and adhered to the banner. Thread onto baker’s twine alternating between beads and banner. I’m so please with how it turned out!!! I can’t wait to now display it on the mantel along with all my other Christmas decorations.

Supplies Used:

Glass jar with lid
Ceramcoat Turquoise Acrylic Paint
Anita’s White Acrylic Paint
Gesso
Antique Mod Podge
Twigs from a tree
Extra Fine Glitter
Shaved Ice Glitter
White Felt
Sheer Ribbon
Silver Bell
Wooden Snowflake
Vintage Sheet Music
Silver Tinsel
Blue Buttons
Blue Jewelry Beads
Spellbinders Nested Lacey Pennants
Sizzix Medallion 
Timeless Aqua and White Twine 
Sculpey III Oven Bake Clay
I do have more Christmas ornaments in the works and I will share once I’m finished.  Remember to follow each blog for a chance to win and if you have any questions please let me know. Thanks for stopping by, hope your day is wonderful and enjoy creating!!!