How to Make a Stunning Hand Sewn Strawberry Card

Hi there! I’m back with a card I created using the Felt Berry Blossom Etched Dies by Nichol Spohr and Spellbinders. You can use, fabric, felt, or in my case, cardstock with this set of dies. I love the versatility! Anyways let’s get started!

A handmade card featuring a large pink strawberry with a green leaf, accompanied by a small white flower with a yellow center and a sentiment that reads 'Find Beauty in the Simple Things,' set against a striped background.

I went with muted colored cardstock for this project. I cut one each of all the dies except the back die of the strawberry. There is no need since it will be glued to the card base. I also cut two dies each of the flower and button.

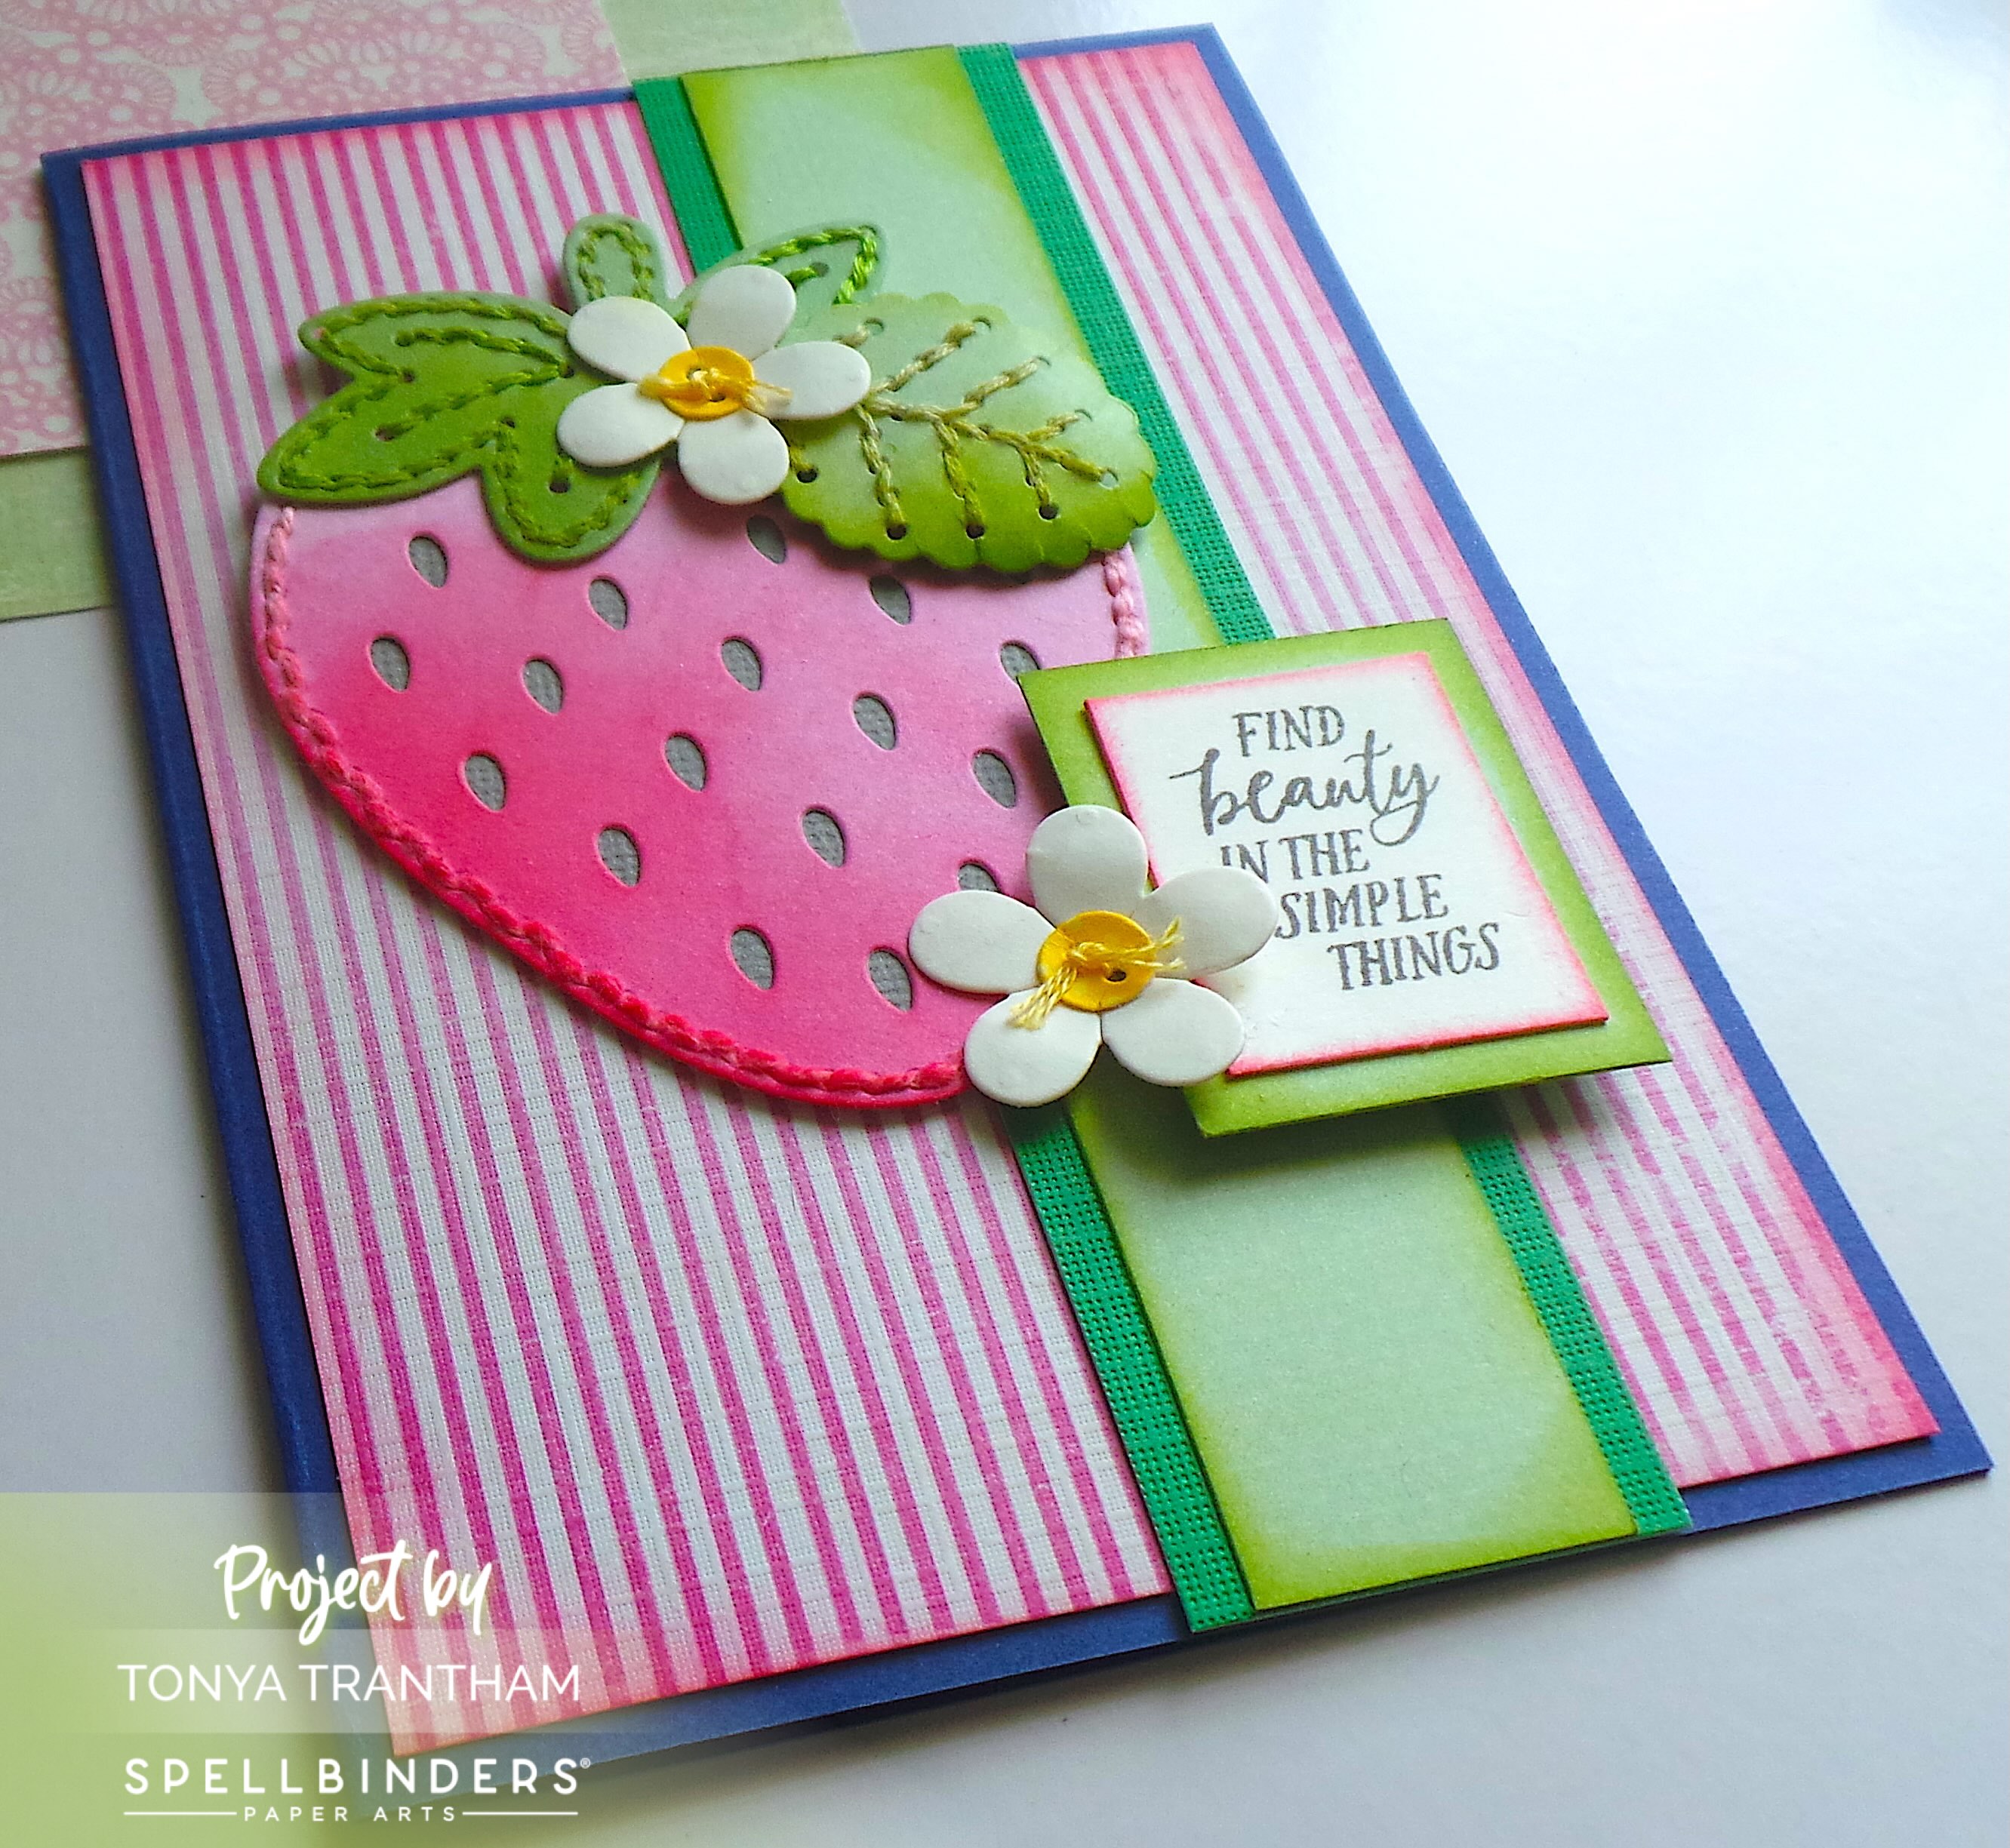
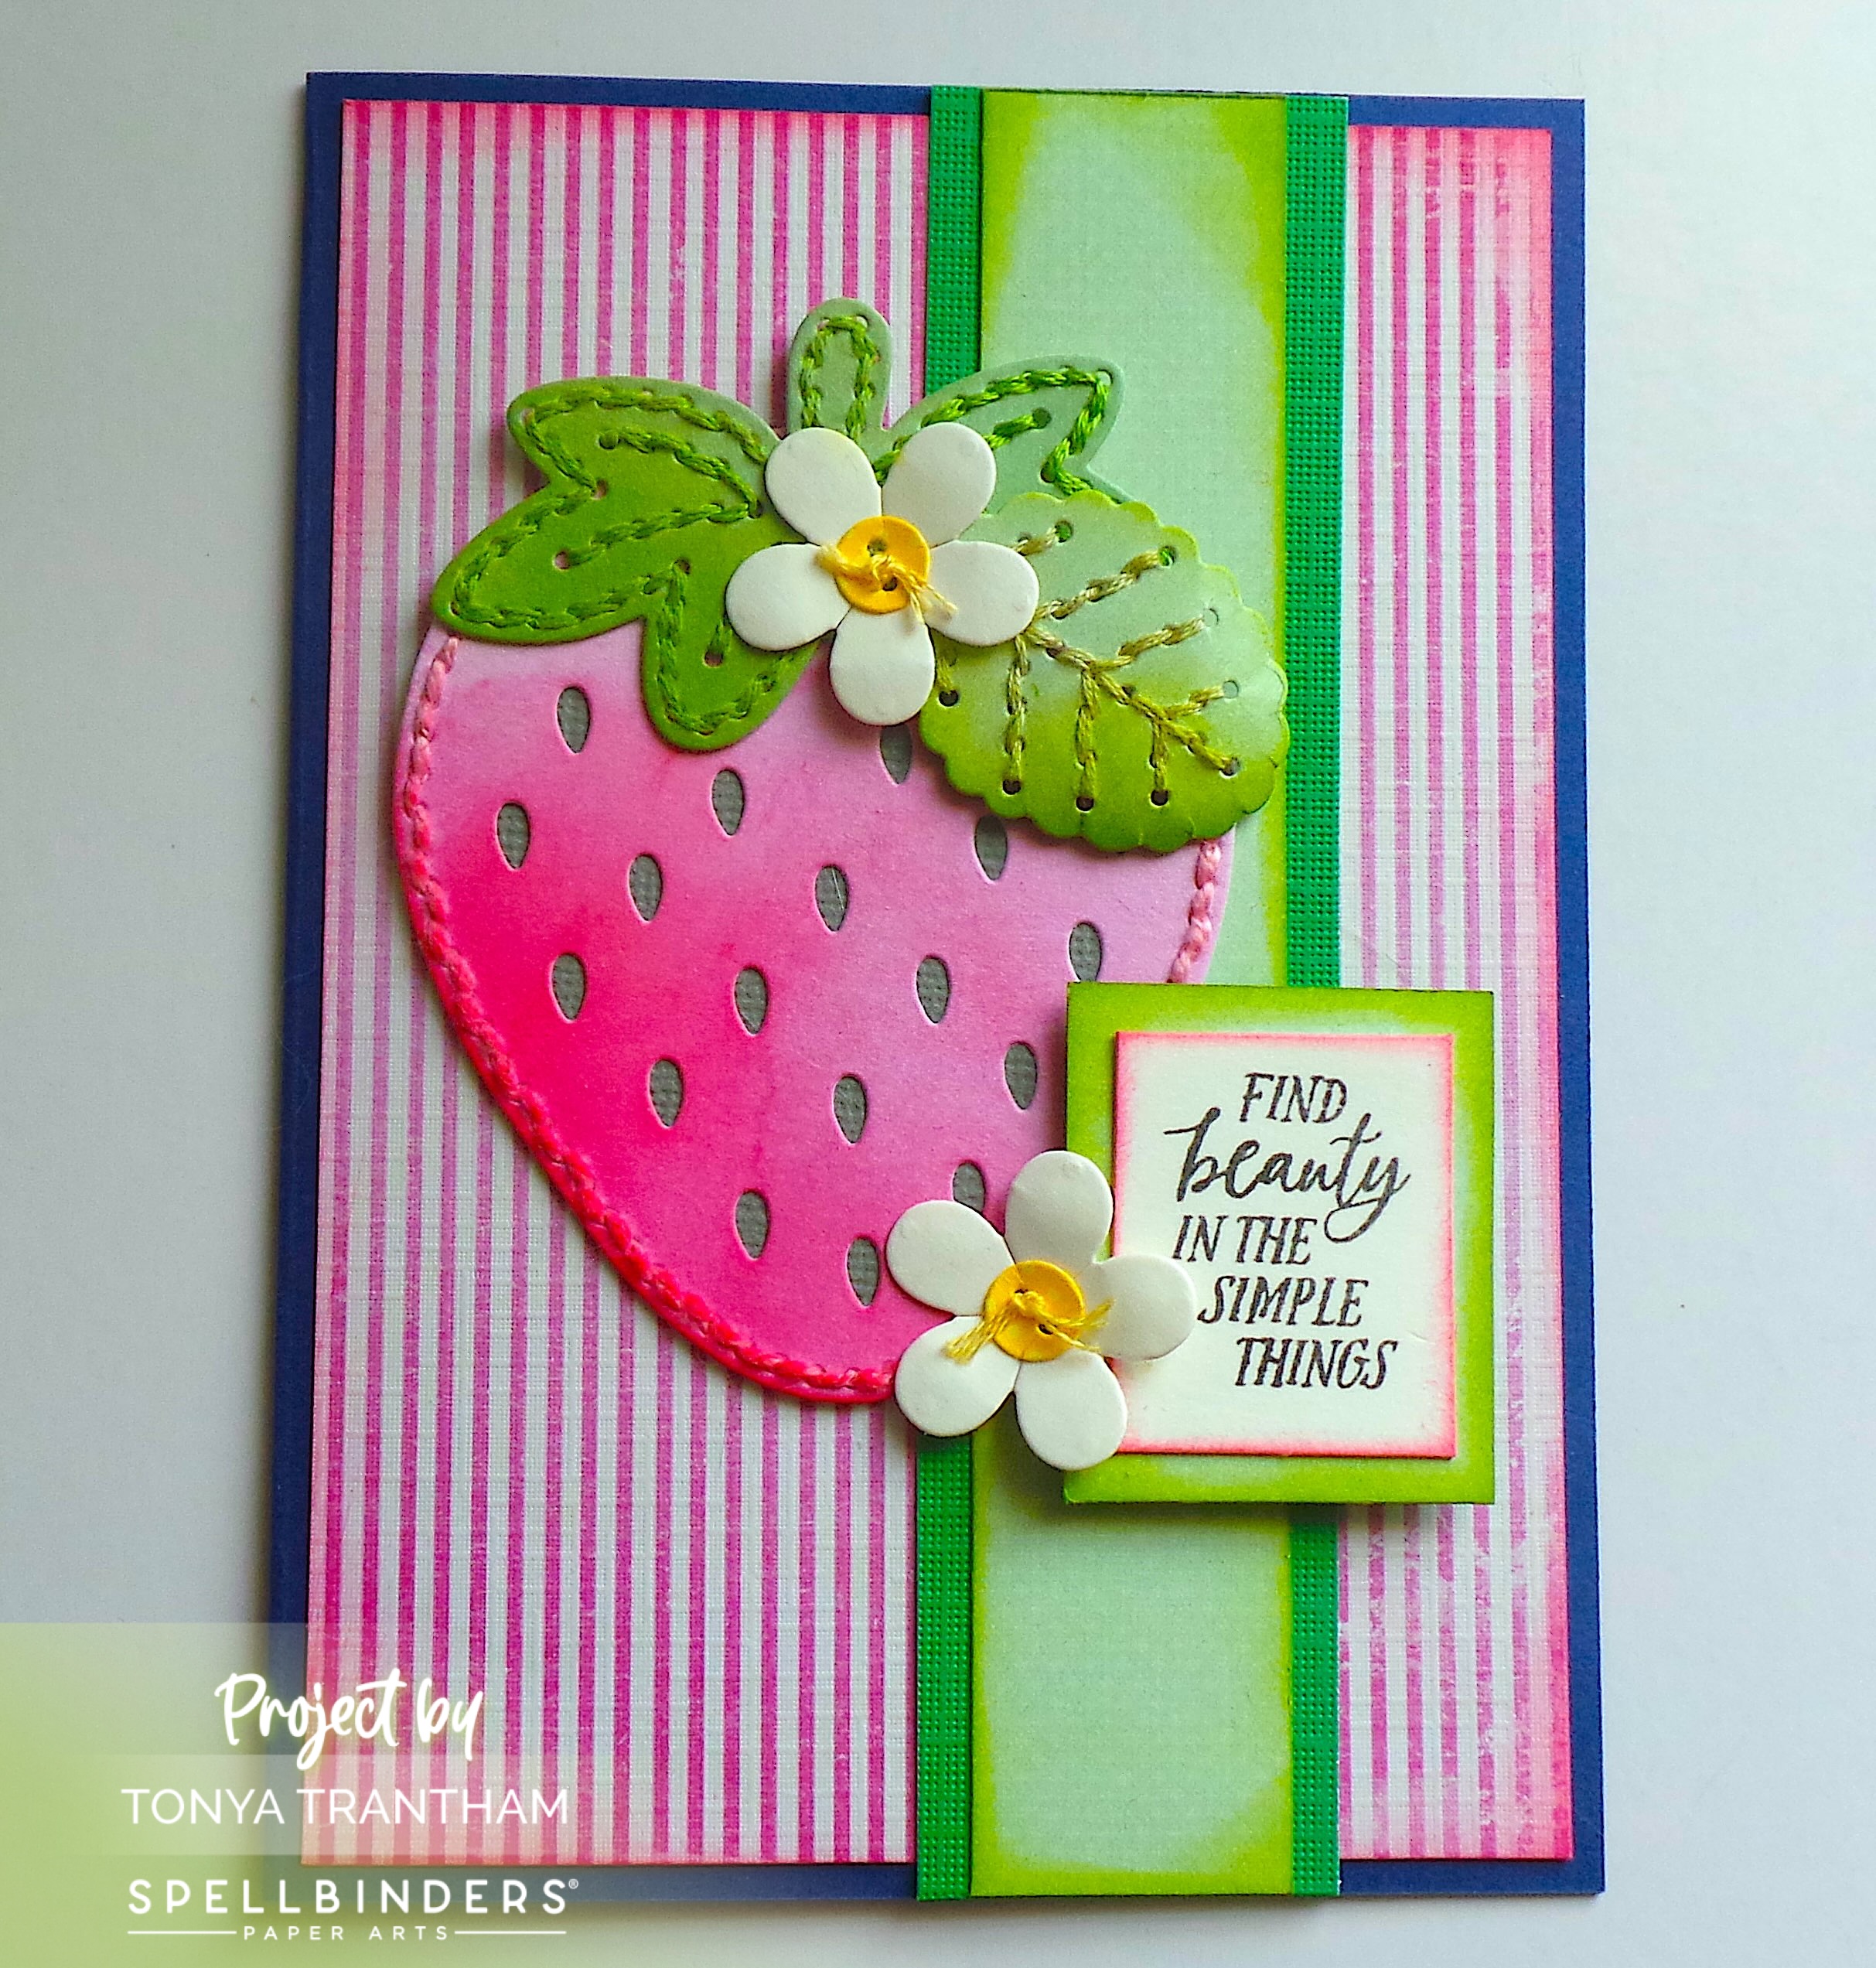
I did a back stitch around the strawberry, leaf and “cap” of the strawberry. If you don’t know how to do the back stitch research on your favorite search engine or YouTube. I glued the gray die behind the strawberry. I inked around the edges of the berry, cap and leaf with Pink and Green Chalk Ink.

Close-up of a pink paper strawberry with stitching details, a green leaf die-cut, and a sewing needle with thread. Background is a muted color.

The base of the card folded is 4 1/4″x 5 1/2″. I cut a mat slightly smaller than the base adhered to the card. I cut two strips of cardstock, one slightly smaller than the other and inked with green chalk ink. I glued off center of the card.

A handmade card featuring a vibrant pink felt strawberry with green leaves and small white flowers. The card includes the sentiment 'Find beauty in the simple things' in a decorative frame, set against a striped background.

I glued the strawberry and cap to the card. I shaped the leaf with a Stylus before adding to the cap. I stitched the button die in the center of each flower and tied off. I shaped the flowers with Stylus. I glued one flower to the cap of the berry.

I place the “Find Beauty” sentiment from the Field Notes Sentiments Stamp Set onto the MISTI Stamping Tool. I inked with Black Ink and stamped onto a piece of cardstock.

A colorful handmade card featuring a large pink strawberry, green leaves, and small white flowers. The sentiment 'Find Beauty in the Simple Things' is framed in green and pink. The background includes striped patterns and additional green accents.

I inked the edges with a pink chalk ink and matted with a green piece of cardstock. I added Foam Pop Dots to the back before placing onto the card. I glued the other flower to the edge of the sentiment to finish.

Colorful handmade card featuring a pink strawberry with stitched details, green leaves, and white flowers. The sentiment 'Find beauty in the simple things' is presented on a small card beside the strawberry. The background is a mix of patterned and solid cardstocks with strips of green ribbon.

Supplies

Spellbinders/Nichol Spohr: Felt Berry Blossom Etched Dies

Spellbinders: Field Notes Sentiments Stamp Set

Diecut Machine

Foam Pop Dots

DMC Floss Sampler Bundle

Needle

Paper Cutter

Scissors

MISTI Stamping Tool

Black Ink

Chalk Ink

Stylus

Plain and Patterned Cardstocks

Beacon Adhesives: Zip Dry Adhesive

(Products listed above are Affiliated Links for your convenience)

DISCLAIMERS

This blog is compensated to provide opinion on products, services, websites, and various other topics. Even though the owner(s) of this blog receives compensation for our posts or advertisements. I always give my honest opinions, findings, beliefs, or experiences on those topics or products. The views and opinions expressed on this blog are purely my own. Any product claim, statistic, or quote should be checked with each manufacturer. Verify other representations about a product or service with the provider or party in question.This blog contains affiliate linksClicking these links helps to support Tonya Trantham Designs – Creative Paper Addiction. It’s at no additional cost to you. Today’s features are Spellbinders and Scrapbook.com Products. 

A handmade card featuring a large pink strawberry with green leaves and white flowers, accompanied by a sentiment box that reads 'Find beauty in the simple things'. The card has a striped pink background and is accented with green ribbon.

Thanks for stopping by, I hope your Thursday is awesome and enjoy creating!

A decorative graphic featuring a bird perched among colorful flowers with the name 'Tonya' artistically rendered in cursive.

Vintage Buttons Tag

Hi everyone! I’m back with my tag for the week. I used leftover scraps from pervious projects and used Eileen Hull’s Vintage Buttons 3D Embossing Folder and the Tag and Bookplate Diecut (retired) by Tim Holtz. Anyways, let’s get started!

First, I had leftover scraps of Mat Board that I cut a tag from using the Tag and Bookplate Diecut (retired). Since the piece of mat board was shorter than the actual tag die I have a “short” version of the tag.

I placed the tag into the Vintage Buttons 3D Embossing Folder and run through the Diecut Machine.

I lightly inked the tag with a few different shades of blue inks.

Second, I really didn’t like the how the blue looked “flat” so I lightly inked over the raised areas with a green chalk ink. Then, I applied Rose Gold Luster Wax over the raised areas of the tag. You can use a Blending Tool to apply the wax but I chose to use my finger.

Third, I gathered up my cardstock scraps, these are from 7 Gypsies… I miss this company so much, I added those to the tag. I cut a a crochet piece from the Crochet #2 Thinlits, inked with a brown chalk ink and glued to the tag. The button card piece I did add thread to each button hole before adding to the tag.

Fourth, I dug into my stash of flowers and found this vintage looking flower and glued it onto the tag.

Fifth, I finished this side of the tag with bows made from thread and lace and a button.

Sixth, I covered the back of the tag with a polkadot cardstock. I kept this side simple by adding a few scraps of cardstock to the tag.

Seventh, the little boy image and butterfly wings was already fussy cut and ready in my stash. This printable is from the Steampunk Fairy Boys Paper Dolls. I glued another piece of the crochet diecut to the tag along with the butterfly boy, a bit of lace and a button to finish this side of the tag.

If you have any questions about this tag or comments in general please leave them below. Also if you haven’t been by Eileen Hull’s blog for the latest from her teams you can find the post HERE.

Supplies

Sizzix/Eileen Hull: Vintage Buttons 3D Embossing Folder

Sizzix/Tim Holtz: Tag and Bookplate Diecut (retired)

Sizzix/Tim Holtz:

Rose Gold Luster Wax

Mat Board

Diecut Machine

Various Shades of Blue Inks

Green and Brown Chalk Ink

Blending Tool

Flower and Leaf

Thread, Needle and Buttons

Various Cardstocks

itKupilli imagenarium: Steampunk Fairy Boys Paper Dolls Printables

Scissors

Paper Cutter

Beacon Adhesives: Zip Dry Adhesive

(Products listed above are Affiliated Links for your convenience)

DISCLAIMERS

This blog is compensated to provide opinion on products, services, websites, and various other topics. Even though the owner(s) of this blog receives compensation for our posts or advertisements. I always give my honest opinions, findings, beliefs, or experiences on those topics or products. The views and opinions expressed on this blog are purely my own. Any product claim, statistic, quote or other representation about a product or service should be verified with each manufacturer, provider, or party in question.This blog contains affiliate links, clicking and shopping through these links helps to support and run Tonya Trantham Designs – Creative Paper Addiction at no additional cost to you. Today’s features are Sizzix, Eileen Hull, Scrapbook.com and A Cherry on Top Store Products. 

Thanks for stopping by, hope your Friday is wonderful and enjoy creating!

Floral Fabric Needle Book

Hi everyone! I hope all is well with you and everyone is staying warm. In my neck of the woods we are slowing digging out from under 7 inches of snow and ice and hopefully by the end of the week the temperatures with be in the low 60’s. I function so much better in warmer temps. Anyways, I’m back with a quick project that I created using Eileen Hull’s Needle Book Diecut. So let’s get started!

First, I ironed and cut a piece of piece floral fabric and a piece of Rouge Foundations 04 Cardstock to fit the Needle Book Diecut. I applied an Adhesive Sheet to the cardstock and placed the fabric onto that before placing onto the Needle Book Diecut and running through the Diecut Machine. This diecut has fold lines but since I cut this with thinner materials I folded book in half since you can barely see the “spine” lines to fold. Side note, I was in the moment making this project and didn’t do step out photos…sorry about that.

Second, I cut a file folder out of felt from the Envelope, Folder and Flowers Thinlits. Instead of punching holes into the cover and the file folder I marked where I wanted to stitch on the spine of the needle book, threaded the needle with thread and sewed the file folder into of the book. I tied off on the inside of the book. I also glued the closure to the back of the book.

Third, I adhered pom pom trim to the closure and a crochet flower.

Fourth, I added needles and pearl top needles to the felt page.

Fifth, I finished by adding a bit of sheer ribbon and a button with thread to the closure. I cut several of the pom poms off the end of the trim before wrapping around the book and tucking under the closure. Those pom poms I cut off will be making an appearance in a later project a few months from now so stay tuned.

This little needle book is so easy to make and I have a few more ideas besides the obvious that I hope to try out soon.

Also if you haven’t been by Eileen Hull’s blog lately to see what her teams have been up to you can find the latest posts HERE and HERE.

Supplies

Sizzix/Eileen Hull: Needle Book Diecut

Sizzix/Eileen Hull: Envelope, Folder and Flowers Thinlits

49 & Market: Rouge Foundations 04 Cardstock

Floral Fabric

Adhesive Sheet

Diecut Machine

Button, Thread, Ribbon, Pom Pom Trim, Needle, Crochet Flower

Scissors

Paper Cutter

Beacon Adhesives: Fabri-Tac Adhesive

(Products listed above are Affiliated Links for your convenience)

DISCLAIMERS

This blog is compensated to provide opinion on products, services, websites, and various other topics. Even though the owner(s) of this blog receives compensation for our posts or advertisements. I always give my honest opinions, findings, beliefs, or experiences on those topics or products. The views and opinions expressed on this blog are purely my own. Any product claim, statistic, quote or other representation about a product or service should be verified with each manufacturer, provider, or party in question.This blog contains affiliate links, clicking and shopping through these links helps to support and run Tonya Trantham Designs – Creative Paper Addiction at no additional cost to you. Today’s features are Sizzix, Eileen Hull, Scrapbook.com and A Cherry on Top Store Products

Thanks for stopping by, hope your Wednesday is great and enjoy creating!

Rouge Floral Sewing Box

Hi everyone! Earlier this month I shared sneak peeks of the latest “It’s all about the Stitching Classic Dies” re-release by Eileen Hull. If you missed that post that I shared you can find that HERE. But today I’m sharing the complete project using the Cantilever Sewing Box Diecut along with a few other dies by Eileen. So let’s get started!

First, I gathered all the scraps of Mat Board I had been saving because the hinges, feet, lids and boxes are small and this is a great way to use up scraps. Side note, there will be a lot of cuts for this project.

Next, I covered mat board for the feet, hinges and lids with Adhesive Sheets and placed patterned cardstock from the 6″x8″ Rouge Paper Collection onto the mat board. These are the cuts you will need to make for each of the following parts for the sewing box:

Two Hole Hinges: Eight Cuts

Triple Hole Hinges: Four Cuts

Feet: Two Cuts

Lids: Two Cuts

Boxes: Six Cuts

Second, I didn’t cover the mat board for the boxes since I planned on cutting cardstock from the 12″x12″ Rouge Paper Collection to fit the boxes, this was for the inside and outside of each box. I know that’s a lot of work but is so worth the extra effort for a clean and neat look.

I covered the outside of four of the boxes and two of the boxes I adhered together before covering.

Third, I punched out the holes on the outside before adding the hinges and Brads to each of the boxes. I then cut to fit cardstock for the inside of each box. I also glued the lids to the top boxes.

Fourth, I cut out two leaves, four centers and eight of the smaller flowers from the Envelope, Folder and Flowers Thinlits, three leaf sprigs from the Wreath and Snowflake Thinlits and two flowers from the Folio Page, Pockets and Flowers Thinlits.

I took all of the flowers that are from the Envelope, Folder and Flowers Thinlits and inked the edges with a red chalk ink before shaping each with a Stylus. I layered and glued four of those flowers on top of each other along with a shaped center and a leaf. I did the same for the other of flower, center and leaves but set those aside.

Next I shaped with a stylus the other two flowers from the Folio Page, Pockets and Flowers Thinlits, another center and the all the leaf sprigs. I adhered one layered flower, sprigs and the other two flowers to the corner of the lid. I did added a flat back pearl to the smallest flower and loops of thread to finish that side of the lid.

Fifth, for the other lid I fussy cut two flowers from one of the sheets of 12″x12″ Rouge Paper Collection, shaped with a stylus and glued on top of each other. I added a leaf and center to the flower before gluing to the lid. I also added more leaf sprigs, the other layered flower, a fussy cut ticket, pearl top pins, lace and loops of thread.

Sixth, I used two sewing bobbins as knobs to open the lids. I adhered to each lid and punched a small circle from cardstock and glue to each spool. I also glued the feet to the bottom of the sewing box.

This sewing box is perfect to store sewing supplies in but would be great to hold craft supplies, candy or add trinkets and give as a gift. What would you do if you created one? Let me know in the comments below.

Also if you haven’t been by Eileen Hull’s blog lately to see what her teams have been up to you can find the latest post HERE.

Supplies

Sizzix/Eileen Hull: Cantilever Sewing Box Diecut

Sizzix/Eileen Hull: Envelope, Folder and Flowers Thinlits

Sizzix/Eileen Hull: Wreath and Snowflake Thinlits

Sizzix/Eileen Hull: Folio Page, Pockets and Flowers Thinlits

Mat Board

Adhesive Sheets

49 & Market: 6″x8″ Rouge Paper Collection

49 & Market: 12″x12″ Rouge Paper Collection

Stylus

Brads

Sewing Machine Bobbins

Thread, Lace, Pearl Top Pins,, Flat Back Pearl

Scissors

Paper Cutter

Beacon Adhesives: Fabri-Tac Adhesive

(Products listed above are Affiliated Links for your convenience)

DISCLAIMERS

This blog is compensated to provide opinion on products, services, websites, and various other topics. Even though the owner(s) of this blog receives compensation for our posts or advertisements. I always give my honest opinions, findings, beliefs, or experiences on those topics or products. The views and opinions expressed on this blog are purely my own. Any product claim, statistic, quote or other representation about a product or service should be verified with each manufacturer, provider, or party in question.This blog contains affiliate links, clicking and shopping through these links helps to support and run Tonya Trantham Designs – Creative Paper Addiction at no additional cost to you. Today’s features are Sizzix, Eileen Hull, Scrapbook.com and A Cherry on Top Store Products. 

Thanks for stopping by, hope your Tuesday is wonderful and enjoy creating!

It’s all about the Stitching with Eileen Hull!

Hi everyone and Happy New Year! I am so excited to share this collection with you. It is diecuts from Eileen Hull’s vault! Today I will share sneak peeks of the projects I created but later on this month I will share the complete details.

The fans have asked for it and Sizzix and Eileen did it! The Classic Cantilever Sewing Box, Embroidery Hoop and Needle Book dies have been brought back. These dies all relate to stitching but of course may also be used in other ways. They are all Bigz dies which are so versatile because of the number of materials that may be cut with them.

Eileen has fond memories of her Mom’s wooden sewing box and designed this Cantilever Sewing Box to replicate that. It’s great for storing sewing supplies like needles, thread, buttons, floss and pins- but it also works for hair bands and clips, small storage items, jewelry, desk organization and small treats. Use the drawers separately to organize your desk drawers or create a shadowbox- so many ways to use! Finished size is 3 1/2” x 6 1/4” x 2 1/4”.

The Embroidery Hoop measures 4” and is designed to be cut from thick material such as matboard or chipboard. You can actually tuck thin fabrics in the hoop and stitch on them. Or you can die cut from paper and use the hoop on card fronts. Use the pieces separately or all together.

The Needle Book is also a ScoreBoard die and features a pretty scalloped edge to the book. It measures 3 1/2” x 2 1/4″ x 1/2″ and is perfect for storing your stitching needles and pins- works great when made from felt! But it can also be made from matboard, chipboard, leather or fabric- one of the benefits of the Bigz dies.

Please join us for the It’s All about Stitching Release Party that will be held on Tuesday, January 2nd at noon Eastern time on my YouTube, Facebook and Instagram pages. The team and I will be sharing creative ways to use these dies- we can’t wait to share them with you! There will be giveaways so make sure to tune in and see how to enter to win!”

You can head over to Eileen Hull’s blog for complete details which can be found HERE.

Supplies

Sizzix/Eileen Hull: Cantilever Sewing Box Diecut

Sizzix/Eileen Hull: Embroidery Hoop Diecut

Sizzix/Eileen Hull: Needle Book Diecut

Sizzix/Eileen Hull: Envelope, Folder and Flowers Thinlits

Sizzix/Eileen Hull: Wreath and Snowflake Thinlits

(Products listed above are Affiliated Links for your convenience)

DISCLAIMERS

This blog is compensated to provide opinion on products, services, websites, and various other topics. Even though the owner(s) of this blog receives compensation for our posts or advertisements. I always give my honest opinions, findings, beliefs, or experiences on those topics or products. The views and opinions expressed on this blog are purely my own. Any product claim, statistic, quote or other representation about a product or service should be verified with each manufacturer, provider, or party in question.This blog contains affiliate links, clicking and shopping through these links helps to support and run Tonya Trantham Designs – Creative Paper Addiction at no additional cost to you. Today’s features are Sizzix and Eileen Hull Products. 

Thanks for stopping by, hope your Tuesday is wonderful and enjoy creating!

Sewing Notions Drawers

Hi everyone! I am back for my final project of February! I created this sewing notions drawers from Eileen Hull’s new diecut, Stacking Drawer Diecut that premiered  at Creativation in January.

Instead of stacking the drawers on top of each other I decided to place them side by side.

I cut three sets of drawers diecuts from Matboard and put together according to directions on the packaging. I adhered all three “walls” together and covered with patterned cardstock from Authentique. Actually all cardstock used on this project is from Authentique and if I remember correctly it from the Fabulous Collection.

I put all the drawers together and covered with cardstock outside and on the inside too. Before covering the inside with cardstock I added drawer pulls which I attached with brads.

I cut all the flowers and leaves from the Flowers and Leaves Jouranling Cards Diecuts.

I shaped all the flowers and added cording, lace, pearl top pins and mini spools to the top of the drawers.

I also added sequins and gems to the center of each flower. 

I dressed up the outside edges by adhering decorative trim to both sides of the drawers. Be sure to stop by Eileen Hull’s blog to see what the rest of the team has created! You can find these post HERE and HERE. As always if you have any questions about this project please let me know.

I would also like to submit this project for the following challenge:

Word Art Wednesday Anything Goes: Weeks #376-#377

Thanks for stopping by, hope your Thursday is wonderful and enjoy creating!

Quilt Queen Shadowbox

Hi everyone! I am super excited to share that my little shadow box is featured over on Canvas Corp blog today! As you know I love creating with diecuts but they can a little expensive if not on sale or if you are lucky enough to find them on clearance. When I do purchase them I always try to think of other possible uses besides the obvious use the diecut is intended for and this is the case with the House Gift Card Holder Diecut. I had purchased these cute printables from Lisa’s Altered Art on Etsy and I had wanted to use an image or two in some type of shadow box. Then I had the bright idea that I could use the House Gift Card Holder and the Make it 3D diecuts to make my own shadow box. For instructions and photos you can find the post HERE

Thanks for stopping by, hope your Monday is awesome and enjoy creating!

Eileen Hull’s New Diecut Release

Hi everyone! I am here to share my project for Eileen Hull’s November Art with Heart Challenge.


 Eileen has new diecuts called Stitchlets out this month and let me tell you I am in LOVE!!!
It is a combination of sewing and paper crafts all rolled into one! I started with the Embroidery Hoop diecut which I cut out twice with mat board. I spritzed with Tattered Angels Gold Glimmer Mist and I laid it the hoops off to the side to dry. (I didn’t spray the circles that are in the center of the hoops since I won’t be using them). Also I inked the “closure”/top of the hoop with silver ink.

Next I cut out flowers and leaves from felt with the Buttons, Border and Trim diecut. The pink flowers I layered four per flowers and tried off with cross stitch thread.
I layered two leaves and tied off with thread and the yellow flowers I actually cut it to make a spiral. I started by rolling the petal around each other until the center (two button holes) is left. I then add glue to that and pinch that to the bottom of the flower.  The border stem with leaves I cut from cardstock. I cut two leaves from that inked edges and shaped and added to the yellow flowers. 
The larger hoop I tied various lace and some ric rac to the bottom. I drew a half circle from the larger hoop onto a double sided cardstock, cut out, used a decorative punch on the straight edge, inked the edges and then cut down the center. I adhered to the backside of the hoop and then curled the edges with a pencil to created a pocket.

Next I cut netting a little bit bigger than the smaller hoop and wrapped around the hoop and then adhered to the backside of hoop. I inserted the smaller hoop into the larger one and added a little glue to the backside.  Next while the hoop is still turned over I sprinkled sequins on the netting and then adhered a second netting over that and trimmed off the excess. The second set of hoops I adhered over that.

 I arranged the flowers in the pocket and on the hoop and then glued down. I also used the Banners and Pennants diecut to finish off this fun and cut hoop.
Originally I hadn’t planned on adding sequins and netting to the projects but I really do think it turned out great…if I do say so myself. 😉 I do plan on making more of these…maybe   sequins with a Christmas/winter theme?
If you do have any questions about this project please let me know.

Thanks for stopping by, hope your Tuesday is awesome and enjoy creating!

Sewing Junk Journal

Hi everyone! Fall weather is finally here and though I am not a fan of cold weather I do enjoy the upcoming holidays and the fun I have being able to decorate. 🙂 
Why I am here I wanted to share the latest Sew AMUSEing Mailbox Muse kit project from Altered Pages that is available for purchase. This is a peak at what I created with the goodies in this kit. The base of this journal is a 6″x9″ clasp envelope…can you believe that?!?!? For the directions and for other projects from the design team be sure to hop on over to Altered Pages to get your kit before they are gone!

Thanks for stopping by, hope your Monday is awesome and enjoy creating!