Create a Quick Sunshine Card in Under 10 Minutes

Hi there! I’m back with a quick and easy card today. I used the Under the Sun Etched Dies and the La Dolce Vita Banners Etched Dies by Spellbinders. This bright and happy card came together in less than 10 minutes. Anyways, let’s get started!

A colorful handmade card featuring a smiling sun face with rays, set against a polka dot background, and a banner reading 'HELLO SUNSHINE'.

I cut out two sun rays and one each of the following: face, sun, background for the eyes. I also cut two of the following: eyes, cheeks and lips. I did apply Adhesive to the back of the cardstock of the smaller pieces before cutting out. All cuts are from the Under the Sun Etched Dies.

Assorted die-cut pieces featuring a yellow face, sun rays, and a background pattern for crafting a card.

Side note, both yellow cardstocks, the face and sun ray are from Tattered and Worn Paper Collection. My friend Pam Bray created this collection and I’m so excited to include in creating this card.

I lightly inked all the pieces with Brown Chalk Ink before assembling the sunshine face.

A bright and cheerful card featuring a sun design with facial features, set against a polka-dotted background. The card includes a banner that reads "HELLO SUNSHINE."

I cut and folded a piece of cardstock, 4 1/4″x 5 1/2″, to create the base for the card. I cut a polk-a-dot mat from the Just Saying Paper Collection slightly smaller than the card base. I adhered to the base of the card along with the sunshine face.

A cheerful card featuring a sun design with a face, surrounded by sun rays and a polka dot background, with the text 'HELLO SUNSHINE' on a banner at the bottom.

I cut a banner and the “hello sunshine” sentiment from the La Dolce Vita Banners Etched Dies. I lightly inked with Brown Chalk Ink before gluing the sentiment off center of the banner. I adhered to the card base to finish.

If you have questions of comments about this card please leave them below.

A colorful greeting card featuring a smiling sun face design on a polka dot background, with the text 'HELLO SUNSHINE' on a banner at the bottom.

Supplies

Spellbinders: Under the Sun Etched Dies

Spellbinders: La Dolce Vita Banners Etched Dies

Spellbinders/Kelly Bangs: Just Saying Paper Collection

Diecut Machine

Blank Page Muse/Pam Bray: Tattered and Worn Paper Collection

Various Plain and Patterned Cardstocks

Chalk Ink

Paper Cutter

Scissors

Adhesive Roll

Beacon Adhesives: Zip Dry Adhesive

(Products listed above are Affiliated Links for your convenience)

DISCLAIMERS

This blog is compensated to provide opinion on products, services, websites, and various other topics. Even though the owner(s) of this blog receives compensation for our posts or advertisements. I always give my honest opinions, findings, beliefs, or experiences on those topics or products. The views and opinions expressed on this blog are purely my own. Any product claim, statistic, or quote should be checked with each manufacturer. Verify other representations about a product or service with the provider or party in question.This blog contains affiliate linksClicking these links helps to support Tonya Trantham Designs – Creative Paper Addiction. It’s at no additional cost to you. Today’s features are Spellbinders, Blank Page Muse/Pam Bray and Scrapbook.com Products. 

A handmade card featuring a cheerful sun face with yellow rays, set against a polka dot background, and a 'Hello Sunshine' banner.

Thanks for stopping by, I hope your Thursday is great and enjoy creating!

A decorative graphic featuring a bird among colorful flowers with the name 'Tonya' elegantly scripted across the image.

Holiday Snowman Mini Slimline Card

Hi everyone! I’m back with a mini slimline card I created using my very own Sparkles Snowman Stamp Set which can be found over at Blank Page Muse. A mini slimline card measures 3 1/4″x6 1/4″ but I have always used a 6″x6″ piece of folded cardstock to create a 3″x6″ card base. This is a lot easier and you can get four cards out of one sheet of 12″x12″ cardstock or you can use a 6″x6″ pack of cardstock like I did. Anyways, let’s get started!

First, I placed the snowman image onto the MISTI Stamping Tool, inked with water proof Black Ink and stamped onto a piece of Watercolor Paper.

Second, I used an assortment of watercolors, inks, pastels and colored pencils to fill in the face of the snowman and once dry I cut out. I added a white diamond dot to each eye.

Third, I folded a piece of cardstock in half from the Cyan Consortium Paper Pack and cut another piece down as a mat for the snowman.

Fourth, I placed the “Happy Holiday” sentiment onto the MISTI Stamping Tool, inked with Black Ink and stamped onto a piece of watercolor paper.

I also cut a piece of the blue cardstock that I matted the snowman image to mat the sentiment and placed Foam Pop Dots on the back before placing slightly off the upper edge of the card.

I added snowflake dies, with a sequin and a gem to each, to the sentiment and face of the snowman. I finished by placing clear sequins in random spots on the card.

I’ll be creating more projects with this stamp set so be sure to come back.

As always if you have any questions about this project leave a comment below. Or if you have used this stamp set please share your projects over on Blank Page Muse’s Facebook Group. I would love to see them. Also if you aren’t following Blank Page Muse on their other social medias you can find them on:

Facebook, Instagram, Pinterest and their Website and Blog.

Supplies

Blank Page Muse/Tonya Trantham: Sparkles Snowman Stamp Set

Blank Page Muse/Pam Bray: Cyan Consortium Paper Pack

MISTI Stamping Tool

Black Ink

Watercolor Paper

Foam Pop Dots

Various Watercolors, Pastels, Colored Pencils and Inks

Watercolor Brush

White Diamond Dots

Snowflake Diecuts

Diecut Machine

Scissors

Paper Cutter

Beacon Adhesives: Zip Dry Adhesive

(Products listed above are Affiliated Links for your convenience)

DISCLAIMERS

This blog is compensated to provide opinion on products, services, websites, and various other topics. Even though the owner(s) of this blog receives compensation for our posts or advertisements. I always give my honest opinions, findings, beliefs, or experiences on those topics or products. The views and opinions expressed on this blog are purely my own. Any product claim, statistic, quote or other representation about a product or service should be verified with each manufacturer, provider, or party in question.This blog contains affiliate links, clicking and shopping through these links helps to support and run Tonya Trantham Designs – Creative Paper Addiction at no additional cost to you. Today’s features are Blank Page Muse, Scrapbook.com and A Cherry on Top Store Products. 

Thanks for stopping by, hope your Saturday is great and enjoy creating!

Spring into Eileen Hull’s Chapter 2 Collection and Slimline Card Project

Hi everyone! It’s that time again to share with everyone Eileen Hull’s Chapter Two Collection!

You will love this set of dies! It is so versatile and works side by side your other journal dies and may be combined in endless combinations. There are three dies in the set: the Card Case, Mini-Slimline & Tickets and Journaling Card, Envelope & Windows. Buy all three dies and get FREE SHIPPING on your order in the US PLUS save an additional $10! Cost to buy dies individually is $122- buy the bundle and pay only $112. Outside US, $10 will be deducted from shipping. You can find the bundle HERE.

The Card Case is a Bigz XL ScoreBoards die. This die is specially designed to cut and score thick material up to 1/16″ like matboard, chipboard, leather, felt and fabric so your finished project is nice and sturdy. The finished Card Case die measures 4 1/2″ x 3 1/2″ and has an adjustable spine that goes from 1/2″ to 2 1/2″. This is the perfect size journal to hold your 3″ x 4″ journaling cards, as well as other small items like wallet photos, ATCs and ephemera. There is a swing out flap on each side where you can add pockets or small insert books- you decide what combination you want to do. Make the spine thick or thin- your choice!

The Journaling Card, Envelope & Windows die has 6 pieces- an envelope, 3″ x 4″ Journaling Card, three window cutouts (use with envelope to remove and back with glassine like a window envelope) and a tab. The Envelope measures 4 1/2″ x 3 1/2″ and fits perfectly inside the Journal! Or use it by itself and add your favorite ephemera pieces.

The Mini-Slimline & Tickets die design is similar to the Snail Mail die, which was very popular for creating faux postage stamps. There are four dies in the set- one is the size of a mini slimline card and one is a mat that may be placed behind the perforated piece. The other two pieces are a row of tickets and mat that goes behind that. When you fold over each perforated piece and tear it, it creates individual faux postage stamps and tickets! Die cut the piece from patterned paper for an amazing background- just add a sentiment and let the paper do the work.

There’s a giveaway too! Comment in the Facebook and YouTube streams and tell us which of Eileen’s other dies would work well with this collection. You have until April 10 to post your comments.

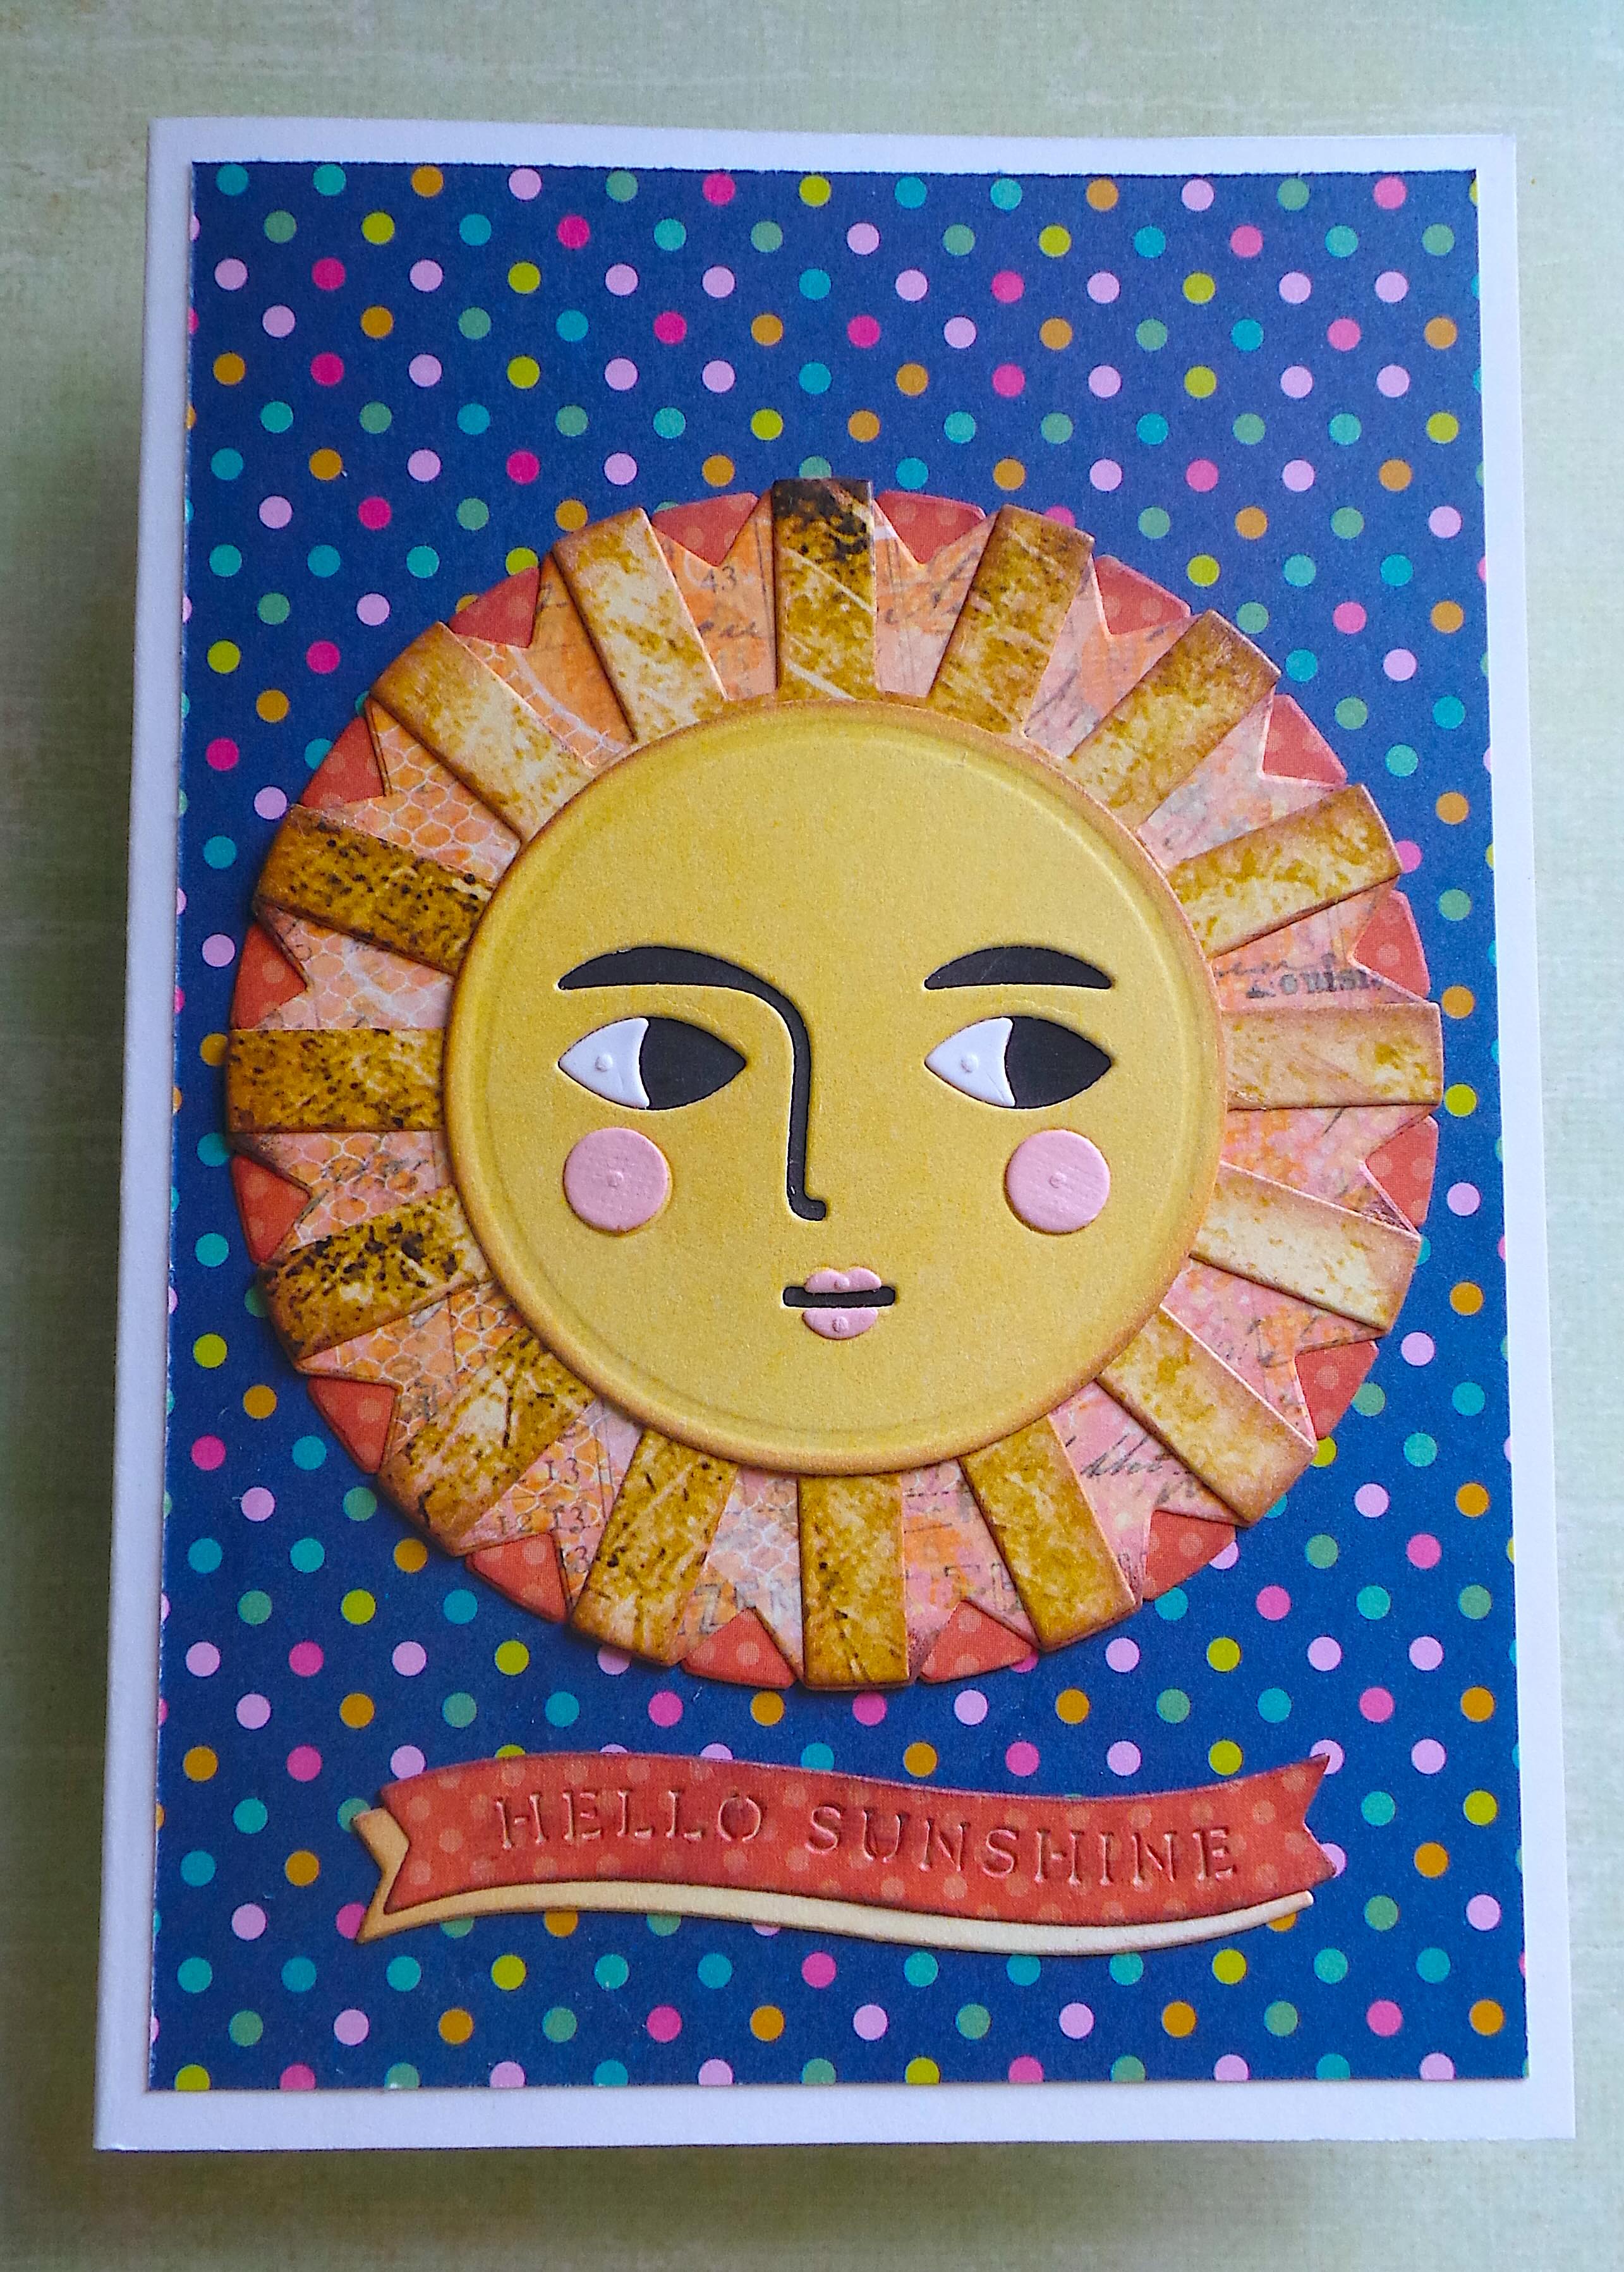
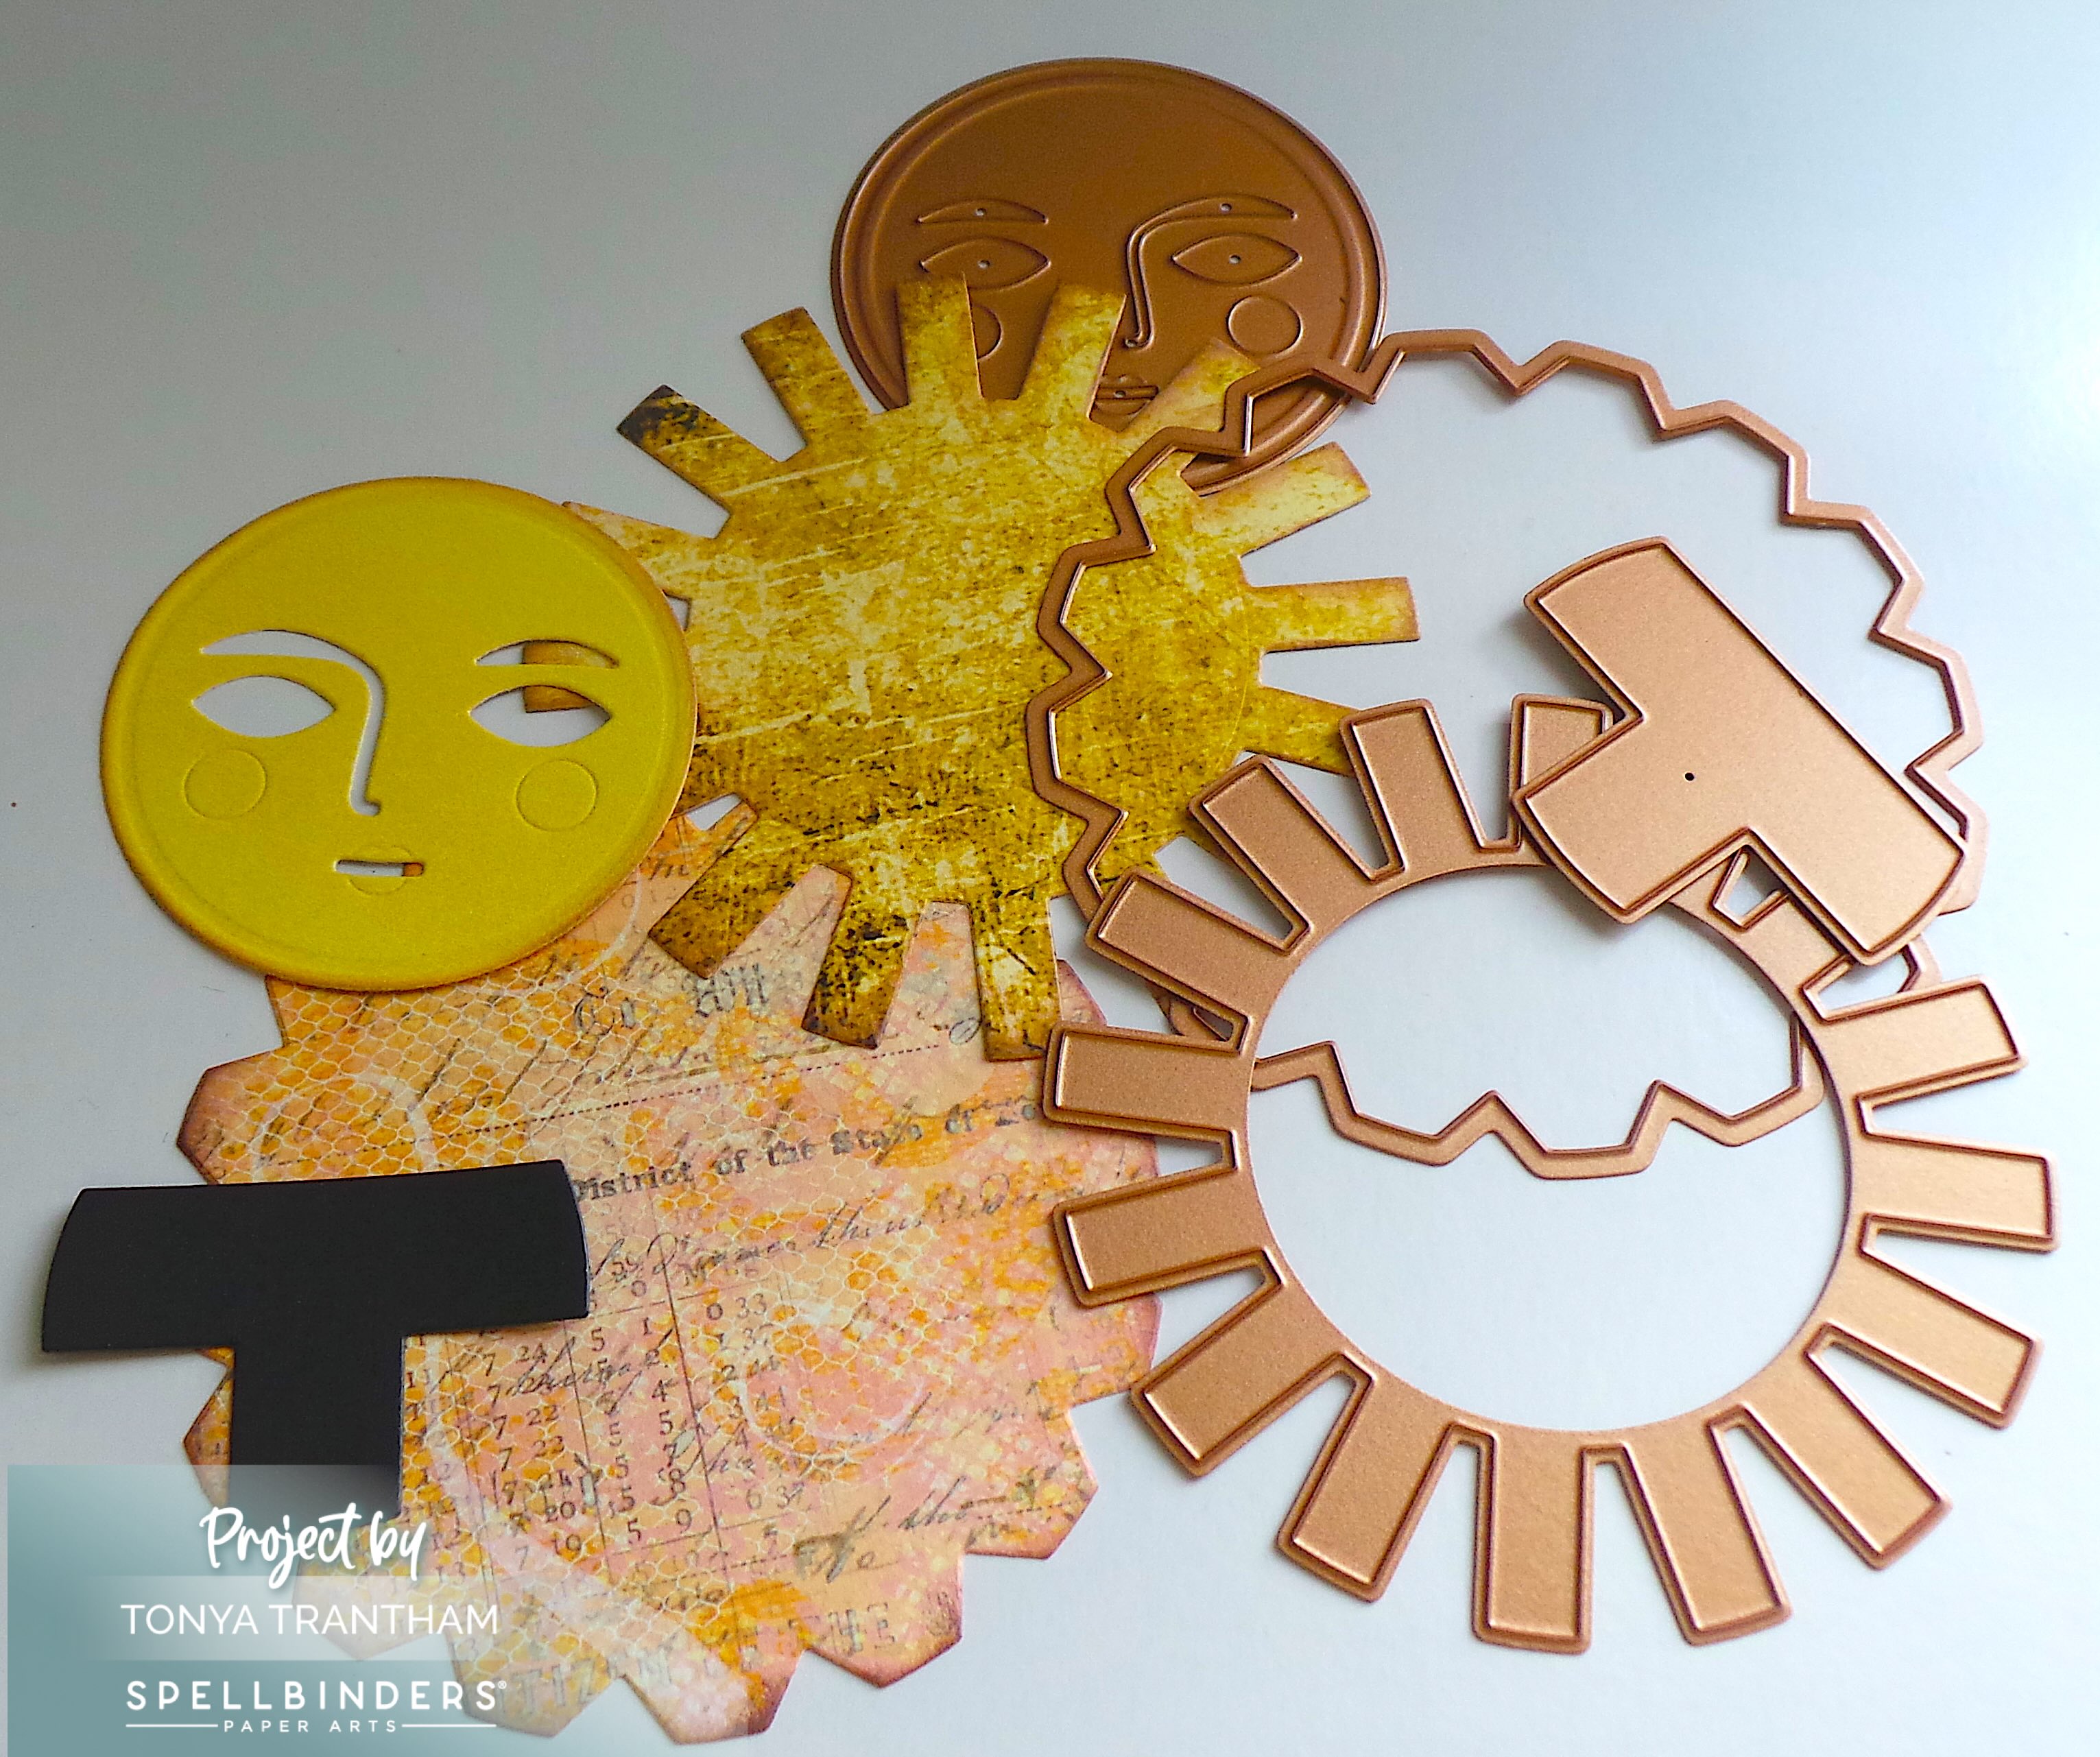
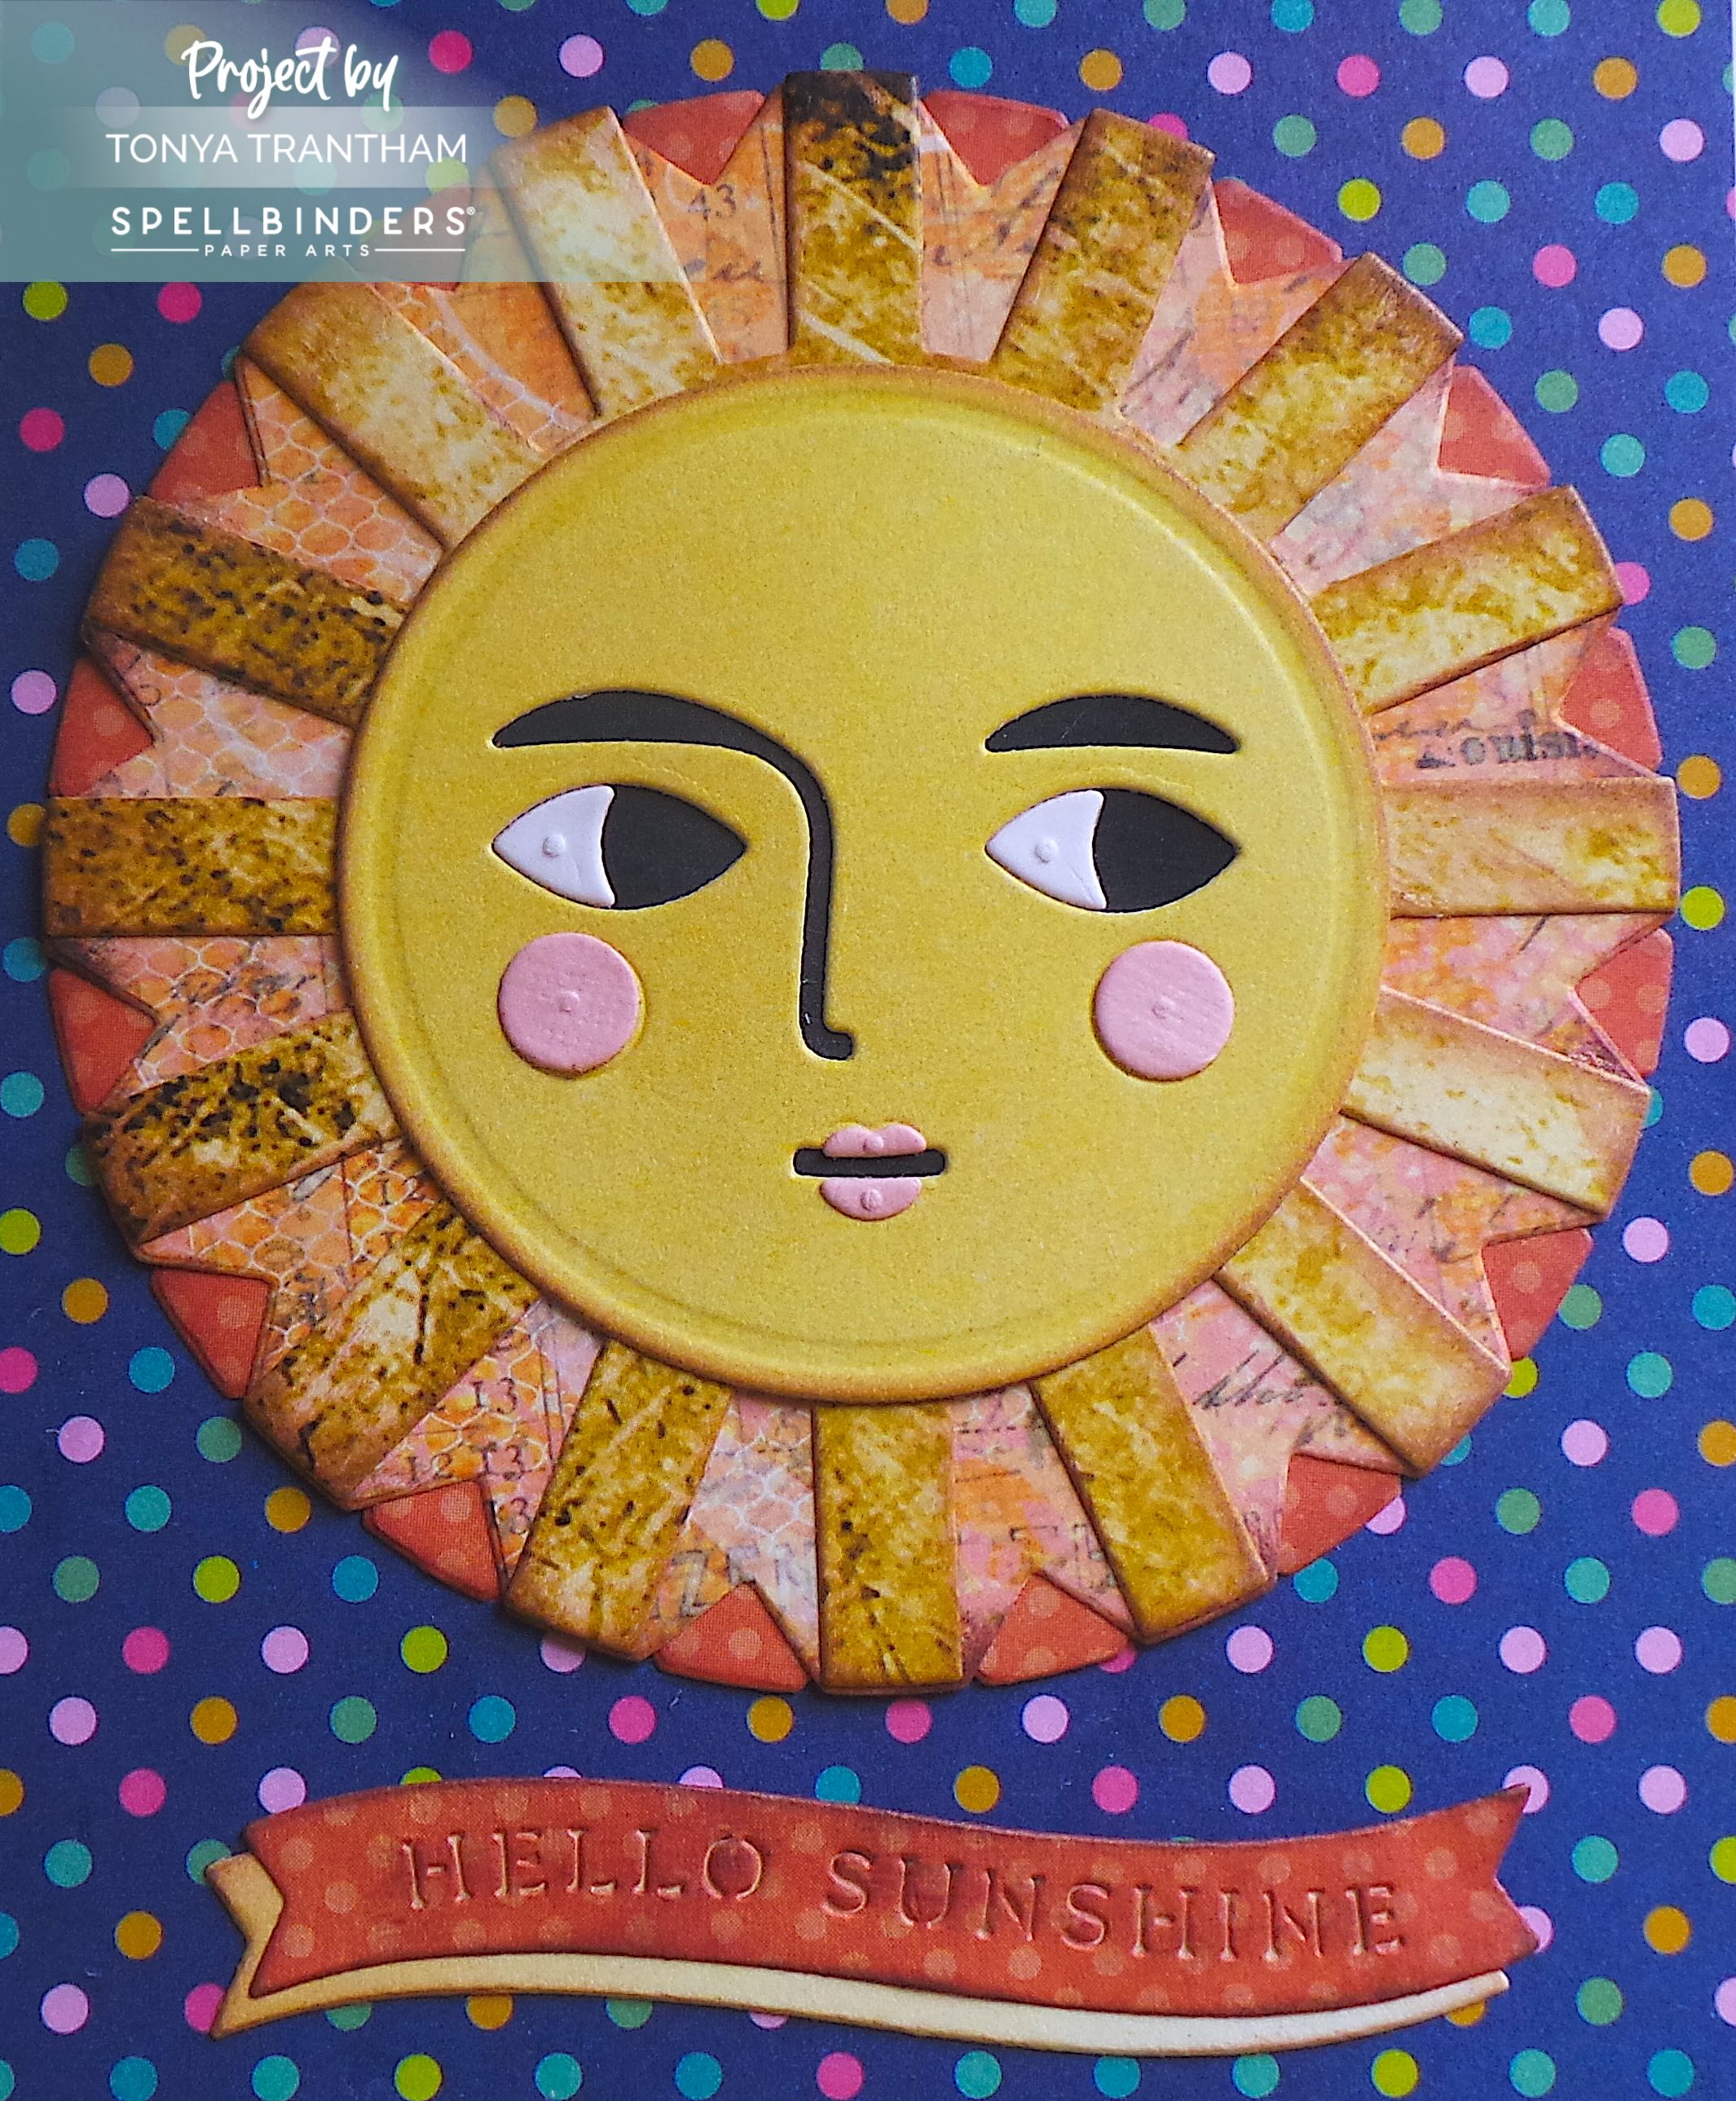
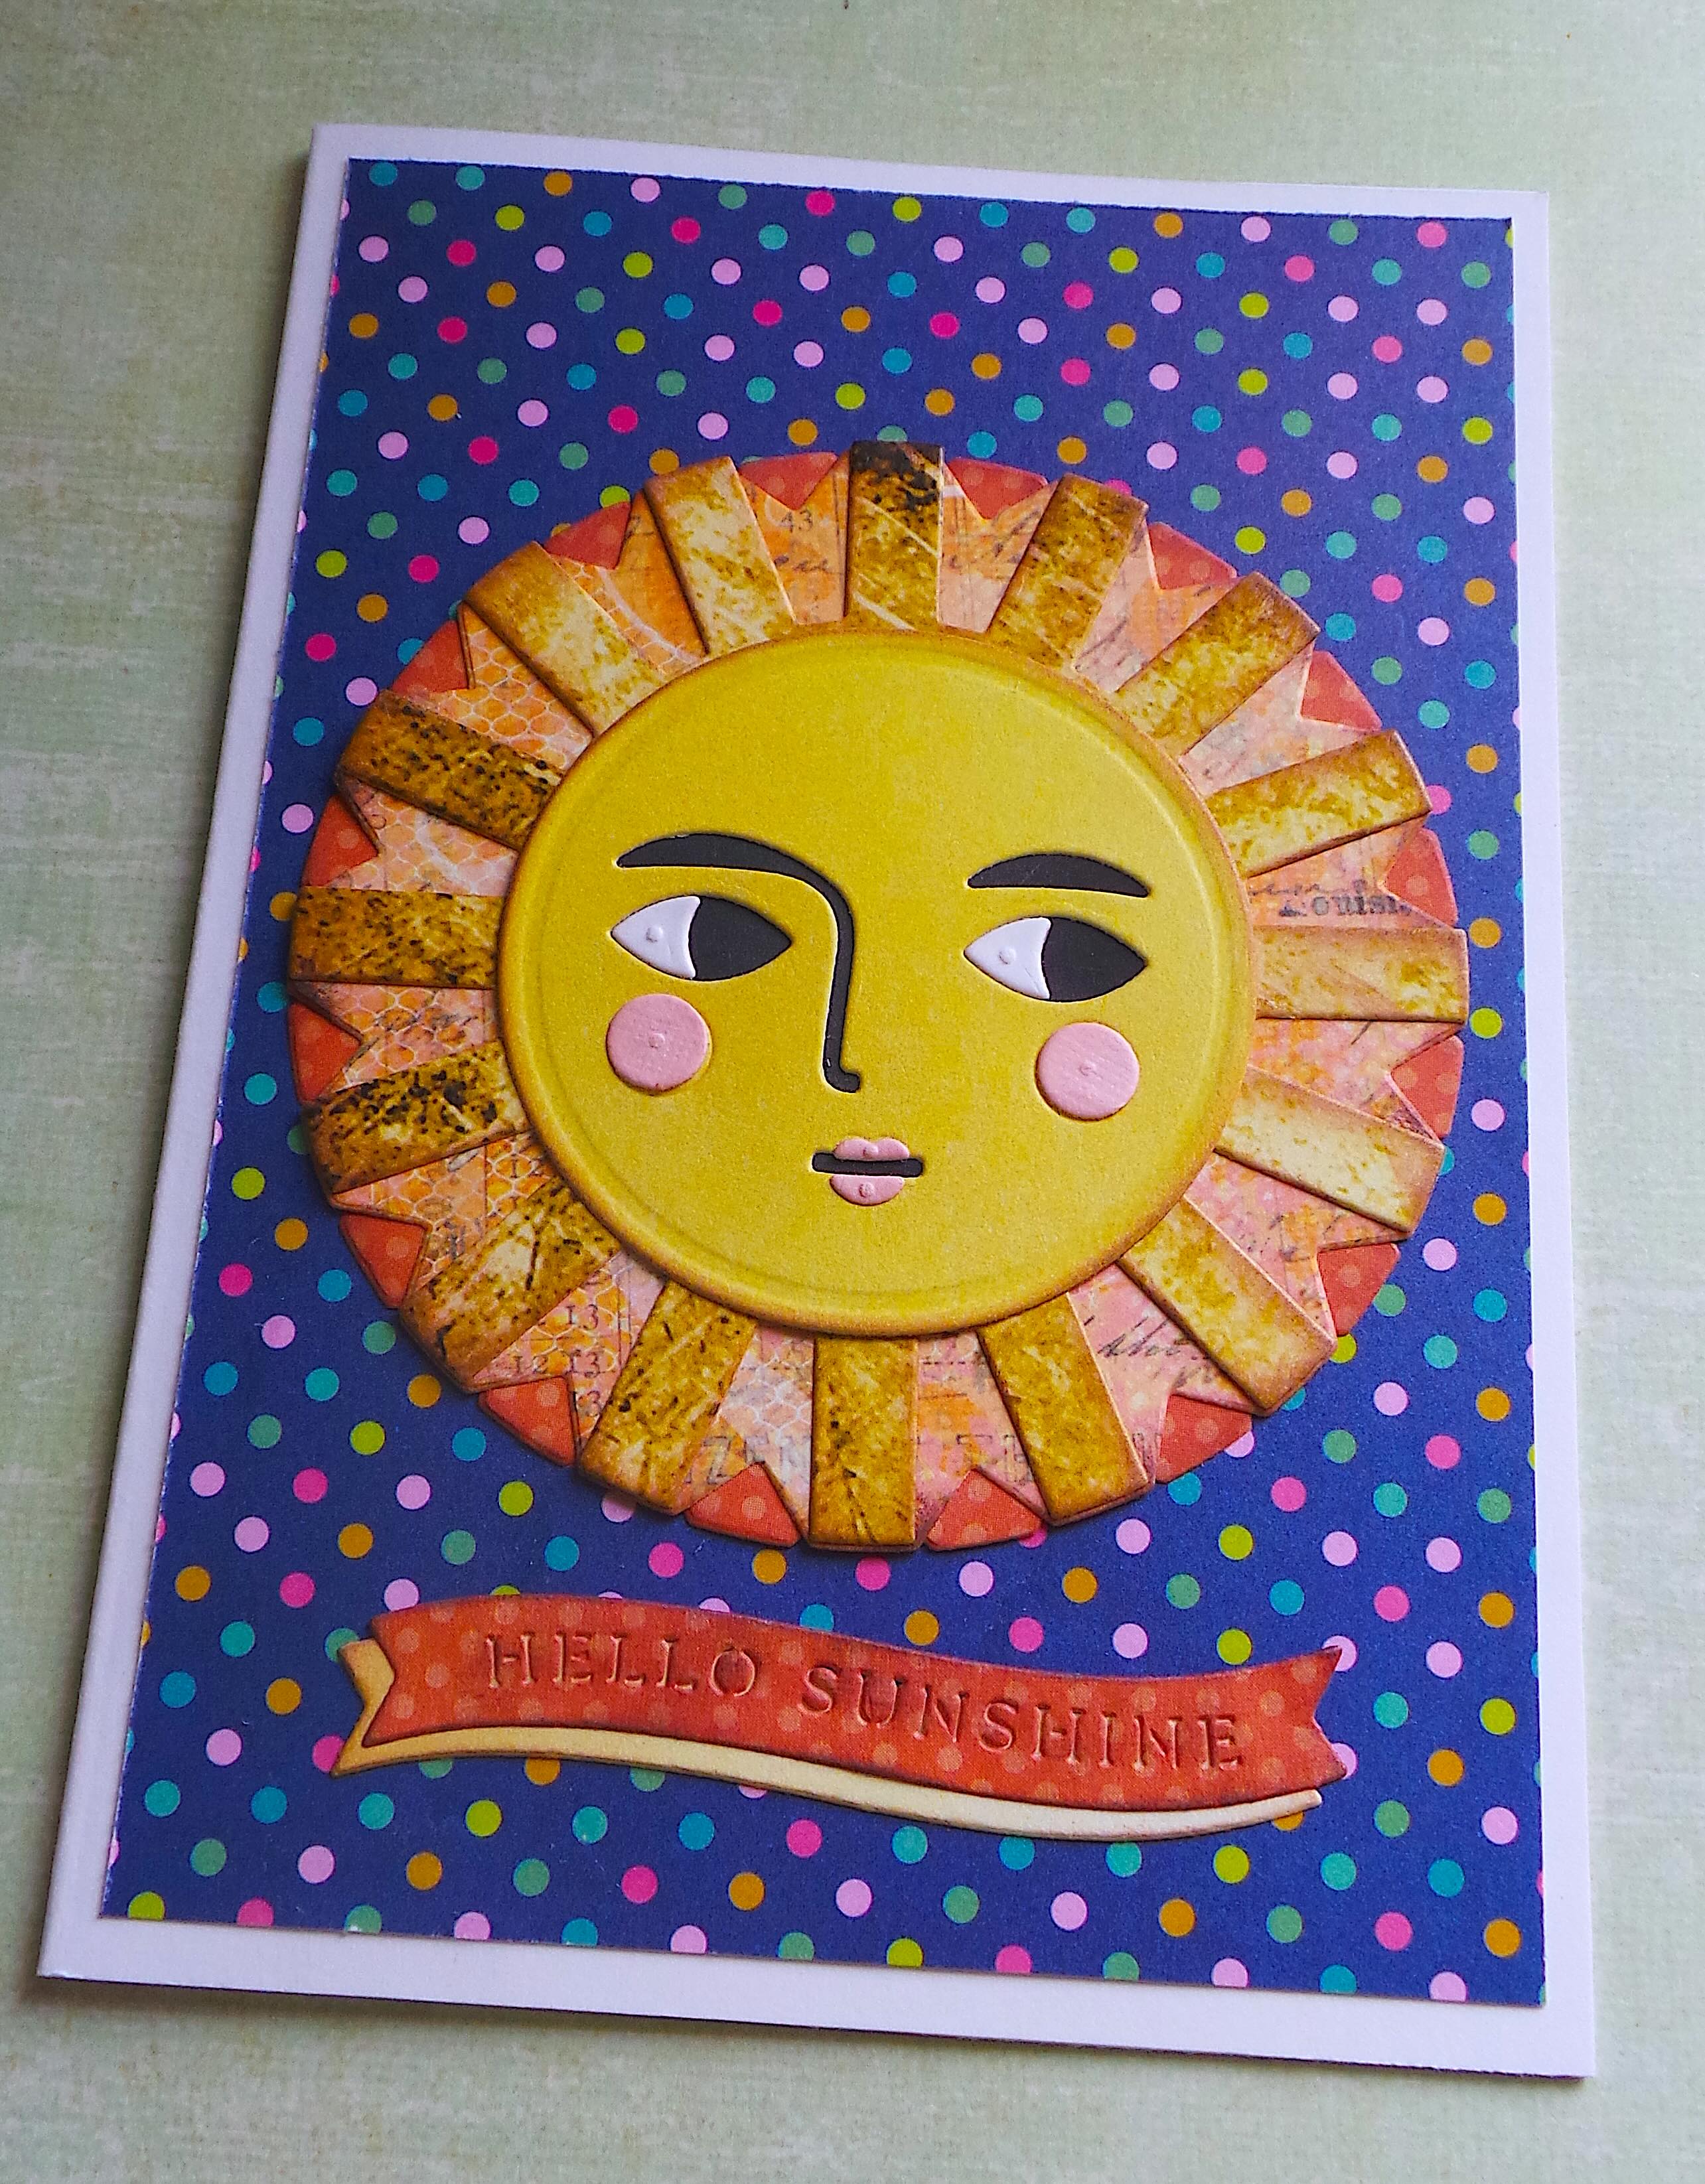
I also would like to share a quick card I made using the Mini Slimline and Tickets Thinlits Set and a few other of Eileen’s dies. So let’s get started!

First, I folded and placed a piece of Blue Cardstock slightly below the cut line of the Journal Diecut and run through the Diecut Machine. I used a 6″x6″ piece of patterned cardstock from my friend Pam Bray’s Cyan Consortium Paper Pack. Since the cardstock wouldn’t cover the card base I had the bright idea to piece together what had been cut and covered with the tickets that I had cut from the Mini Slimline and Tickets Thinlits. I also embossed some of the tickets with the Crochet Mandala 3D Embossing Folder.

I also dug into my stash and pulled out vintage tickets by 49 and Market (discontinued) and a sheet of cut a parts by Maggie Holmes. I fussy cut the little bunny from one of the cards in the cut a part, placed a wreath that I had cut from the Wreath and Snowflake Thinlits around it and adhered all the bits and pieces onto the card base.

I placed the “think happy” and “be happy” stickers (Maggie Holmes Garden Party) above and below the bunny and wreath.

I cut flowers and leaf sprigs from the Folio Page Pocket and Flowers Thinlits. I shaped with a Stylus, layered, added gems and a bow made out of cording to complete the card.

Be sure to watch Eileen Hull’s YouTube channel, you can find the link HERE, to see die assembly and project ideas! Eileen also does two livestreams each week on Facebook and YouTube-sharing more ideas on how to to use these dies in lots of different ways. You are invited to join our creative community Facebook group, the Eileen Hull Fan Club, you can find the link HERE, where we have special events and exclusive content. Follow Eileen on Instagram at @eileenhull!

Supplies

Sizzix/Eileen Hull: Chapter 2 Diecut Bundle

Sizzix/Eileen Hull: Mini Slimline and Tickets Thinlits

Sizzix/Eileen Hull: Card Case Diecut

Sizzix/Eileen Hull: Journaling Card Envelope and Window Thinlits

Sizzix/Eileen Hull: Journal Diecut

Sizzix/Eileen Hull: Crochet Mandala 3D Embossing Folder

Sizzix/Eileen Hull: Wreath and Snowflake Thinlits

Sizzix/Eileen Hull: Folio Page Pocket and Flowers Thinlits

Blue Cardstock

Diecut Machine

Pam Bray: Cyan Consortium Paper Pack

Stylus

Various Embellishments, Gems, Stickers, Cording

Scissors

Paper Cutter

Beacon Adhesives: Zip Dry Adhesive

(Products listed above are Affiliated Links for your convenience)

DISCLAIMERS

This blog is compensated to provide opinion on products, services, websites, and various other topics. Even though the owner(s) of this blog receives compensation for our posts or advertisements. I always give my honest opinions, findings, beliefs, or experiences on those topics or products. The views and opinions expressed on this blog are purely my own. Any product claim, statistic, quote or other representation about a product or service should be verified with each manufacturer, provider, or party in question.This blog contains affiliate links, clicking and shopping through these links helps to support and run Tonya Trantham Designs – Creative Paper Addiction at no additional cost to you. Today’s features are Sizzix, Eileen Hull, Scrapbook.com and A Cherry on Top Crafts Products. 

Thanks for stopping by, hope your Monday is great and enjoy creating!

Tea Time with Alice and the Queen of Hearts Tag

Hi everyone! I’m back this month with a whimsical tag I created for Blank Page Muse using the Tea Time Alice and Peek into Wonderland Stamp Set, Bedazzled Diamonds Stencil and Cyan Consortium Paper Pack. Let’s get started!

First, I placed both stamps from the Tea Time Alice and Peek into Wonderland Stamp Set onto the MISTI Stamping Tool, inked with Waterproof Black Ink and stamped onto a piece of Watercolor Paper. I used an assortment of watercolors and inks to paint Alice, the Queen of Hearts and rabbit and once dry I fussy cut the image out.

I cut a 8″x3 3/4″ tag from watercolor paper. I added a combination of black and light blue ink to the tag and once dry I used a Mini Polka Dot Embossing Folder to emboss. I lightly inked over the raised areas with a blue chalk ink.

I used the largest tag thinlit from the Tag Collection Thinlits and cut a tag from one of the cardstocks from the Cyan Consortium Paper Pack. I placed the Bedazzled Diamonds Stencil over the tag and applied Crackle Distressed Texture Paste, removed the stencil and once dry I applied a black ink over the stenciled area.

Next I placed and adhered the smaller tag slightly off the larger tag. From my stash I glued an ornate frame diecut onto the tag and placed patterned strips of cardstock on top of that. I placed Foam Pop Dots to the back of the stamped image before placing onto the tag.

I placed playing cards under one side of the stamped image. I used an assortment of flowers and leaves from the following thinlits: Folio Page Pocket and Flowers and Shadow Box Elements Thinlits. I shaped the flowers and leaves with a Stylus, glued together, added either sequin and gems to the center of each before placing onto the tag.

I added loops of thread, pearl sprays and Stickles to the stamped image to finish.

If you aren’t following Blank Page Muse on their social medias you can find them here:

Blank Page Muse Blog, Instagram, Pinterest, Facebook Business Page, Facebook Fan Page

Supplies

Blank Page Muse: Tea Time Alice and Peek into Wonderland Stamp Set

Blank Page Muse/Pam Bray: Bedazzled Diamonds Stencil

Blank Page Muse/Pam Bray: and Cyan Consortium Paper Pack

MISTI Stamping Tool

Waterproof Black Ink

Watercolor Paper

Crackle Distressed Texture Paste

Sizzix/Tim Holtz: Tag Collection Thinlits

Foam Pop Dots

Stylus

Sizzix/Eileen Hull: Folio Page Pocket and Flowers Thinlits

Sizzix/Eileen Hull: Shadow Box Elements Thinlits

Stickles

Paper Cutter

Scissors

Watercolors and Inks

Watercolor Brush

Various Patterned Cardstocks

Thread, Sequins, Gems, Pearl Sprays

Frame Diecut, Playing Cards

Beacon Adhesives: Zip Dry Adhesive

(Products listed above are Affiliated Links for your convenience)

DISCLAIMERS

This blog is compensated to provide opinion on products, services, websites, and various other topics. Even though the owner(s) of this blog receives compensation for our posts or advertisements. I always give my honest opinions, findings, beliefs, or experiences on those topics or products. The views and opinions expressed on this blog are purely my own. Any product claim, statistic, quote or other representation about a product or service should be verified with each manufacturer, provider, or party in question.This blog contains affiliate links, clicking and shopping through these links helps to support and run Tonya Trantham Designs – Creative Paper Addiction at no additional cost to you. Today’s features are Blank Page Muse, Scrapbook.com and A Cherry on Top Crafts Products. 

Thanks for stopping bye hope your Thursday is great and enjoy creating!

Happy Holidays Poinsettia Cards

Hi everyone and Happy first day of December! I want to share a couple of cards I created using leftover scraps and cardstock from Blank Page Muse by Pam Bray’s Tattered and Worn 6″x6″ Paper Pad. Let’s get started!

For the first card I folded the black and white dotted cardstock from the Tattered and Worn Paper Pad in half to create a 3″x6″ card base. I cut a 7/8″x6″(scrap of green cardstock from the Cyan Consortium 6″x6″ Paper Pad) and a 3/4″x6″ patterned cardstock and adhered to the card base.

Next, I punched out a circle from patterned cardstock, inked around the circle and placed glue in the center of the circle before placing onto the card base.

I cut out four poinsettias from Watercolor Paper and holly from Green Cardstock from a Christmas set of thinlits by Momenta. I lightly inked over the edges of all the flowers and holly, three of those flowers and the rest of the holly will be used on the next card. I glued the holly to the back of the poinsettia before placing in the center of the circle.

I placed three gold gems in the center of the flower, added Foam Pop Dots to the back of a Happy Holidays sentiment before placing onto the card base. Lastly I added loops of gold thread under the circle to finish this card.

The second card I did the same steps with the same cardstock from the Worn and Tattered Paper Pad to create a card base. I cut a patterned piece of cardstock 1/2″x6″ and adhered to the card base.

I glued the holly to the back of each poinsettia, added gold gems to the center of each along with loops of gold thread before placing onto the card base. I finished off by adding foam pop dots to the back of the sentiment before placing underneath the poinsettias.

My plan is to share a project everyday for the next 24 or 25 days…fingers crossed. That being said please stop back by the blog tomorrow for another Christmas inspired project!

Supplies

Blank Page Muse/Pam Bray: Tattered and Worn 6″x6″ Paper Pad

Blank Page Muse/Pam Bray: Cyan Consortium 6″x6″ Paper Pad

Watercolor Paper

Green Cardstock

Various Patterned Cardstocks

Diecut Machine

Momenta: Christmas Thinlits

Foam Pop Dots

Gold Gems

Gold Thread

Scissors

Paper Cutter

Red Ink

Green Ink

Beacon Adhesives: Zip Dry Adhesive

(Products listed above are Affiliated Links for your convenience)

DISCLAIMERS

This blog is compensated to provide opinion on products, services, websites, and various other topics. Even though the owner(s) of this blog receives compensation for our posts or advertisements. I always give my honest opinions, findings, beliefs, or experiences on those topics or products. The views and opinions expressed on this blog are purely my own. Any product claim, statistic, quote or other representation about a product or service should be verified with each manufacturer, provider, or party in question.This blog contains affiliate links, clicking and shopping through these links helps to support and run Tonya Trantham Designs – Creative Paper Addiction at no additional cost to you. Today’s features are Blank Page Muse, Pam Bray, Scrapbook.com and A Cherry on Top Crafts Products. 

Thanks for stopping by, hope your Thursday is wonderful and enjoy creating!

Everything is Coming Up Daffodils Tag

Hi everyone! It’s been awhile but I’m back with a project for Blank Page Muse! I want to share a tag I created using the daffodil stamp from the Flower and Bird Stitches Art Rubber Stamp Sheet. Let’s get started!

I placed a tag into the Crochet Mandala 3D Embossing Folder and run through the Diecut Machine. Side note…lightly spritz the tag with water before placing in the folder and running through the machine and it will hold the embossed image better and not tear the cardstock.

I placed the daffodil stamp onto the MISTI Stamping Tool, inked with Black Ink and stamped onto a piece of Watercolor Paper. I watercolored the image and once dry added a little Stickles to the center of each flower. Next I fussy cut the flower image out and lightly inked over the raised images of the tag with gold ink.

I punched a circle from a green sheet of cardstock from the Cyan Consortium Paper Pack using a 3″ Circle Punch.

From my pile of cardstock scraps I picked out patterned scraps and adhered to the base of the tag. I added Foam Pop Dots to the back of the circle punch and placing onto the tag. I glued two strips of patterned cardstock to the circle before adding the stamped image.

I added sequins, gems and loops of thread to finish off the tag.

If you aren’t following Blank Page Muse on their other social Medias you can find them on: Facebook, Instagram, Pinterest, Twitter, Blog

If you would like to purchase this stamp set or any other stamps and supplies you can find Blank Page Muse’s website HERE.

Supplies

Blank Page Muse: Flower and Bird Stitches Art Rubber Stamp

Blank Page Muse/Pam Bray: Cyan Consortium Paper Pack

Sizzix/Eileen Hull: Crochet Mandala 3D Embossing Folder

Diecut Machine

MISTI Stamping Tool

Black Ink

Watercolor Paper

Stickles

Gold Ink

3″ Circle Punch

Foam Pop Dots

Tag

Various Scraps of Patterned Cardstock

Sequins, Gems and Thread

Paper Cutter

Scissors

Beacon Adhesives: Zip Dry Adhesive

(Products listed above are Affiliated Links for your convenience)

DISCLAIMERS

This blog is compensated to provide opinion on products, services, websites, and various other topics. Even though the owner(s) of this blog receives compensation for our posts or advertisements. I always give my honest opinions, findings, beliefs, or experiences on those topics or products. The views and opinions expressed on this blog are purely my own. Any product claim, statistic, quote or other representation about a product or service should be verified with each manufacturer, provider, or party in question.This blog contains affiliate links, clicking and shopping through these links helps to support and run Tonya Trantham Designs – Creative Paper Addiction at no additional cost to you. Today’s features are Blank Page Muse, Sizzix, Eileen Hull and Scrapbook.com Products. 

Thanks for stopping by, hope your Monday is wonderful and enjoy creating!

Happy Father’s Day Cactus Card

Hi everyone! Since Father’s Day is only a couple weeks away I created a southwestern themed Father’s Day card for my project for Blank Page Muse! For the details and the how to’s you can find the blog post HERE.

Supplies

BPM: Small Wild Desert Cactus Skull Scene Stamp 

BPM:  Southwestern Desert Cactus Flower and Skull Stamp 

MISTI Stamping Tool

Black Waterproof Ink

Watercolor Paper

Paint Brush

Stylus

Paper Cutter

Scissors

Thread

Various Watercolors and Inks

Various Scraps of Patterned Cardstock

Kraft Cardstock

Beacon Adhesive: Zip Dry Adhesive

Printer for Sentiment

Foam Pop Dots

(Products listed above are Affiliated Links for your convenience)

DISCLAIMERS

This blog is compensated to provide opinion on products, services, websites, and various other topics. Even though the owner(s) of this blog receives compensation for our posts or advertisements. I always give my honest opinions, findings, beliefs, or experiences on those topics or products. The views and opinions expressed on this blog are purely my own. Any product claim, statistic, quote or other representation about a product or service should be verified with each manufacturer, provider, or party in question.This blog contains affiliate links, clicking and shopping through these links helps to support and run Tonya Trantham Designs – Creative Paper Addiction at no additional cost to you. Today’s features are Blank Page Muse and Scrapbook.com Products. 

Thanks for stopping by, hope your day is great and enjoy creating!

BPM: Floral Bouquet Tag

Hi everyone! Today over on Blank Page Muse’s blog I share how I created this floral dimensional tag using Pam Bray’s Floral Spray Sunflowers Chrysanthemum Stamp. You can find the blog post HERE.

Also if you aren’t following Blank Page Muse on their social medias you can find them on:

Facebook, Instagram, Pinterest, Twitter and Blank Page Muse Website

Supplies

Blank Page Muse/Pam Bray: Floral Spray Sunflowers Chrysanthemum Stamp

Tag

Damask Embossing Folder

Pink Ink

Watercolors

Watercolor Brush

Watercolor Paper

Diecut Machine

Thread and Seam Binding

Scraps of Patterned Cardstock

Scissors

Foam Pop Dots

Gems and Flatback Pearls

Paper Cutter

Beacon Adhesive: Zip Dry Adhesive

(Products listed above are Affiliated Links for your convenience)

DISCLAIMERS

This blog is compensated to provide opinion on products, services, websites, and various other topics. Even though the owner(s) of this blog receives compensation for our posts or advertisements. I always give my honest opinions, findings, beliefs, or experiences on those topics or products. The views and opinions expressed on this blog are purely my own. Any product claim, statistic, quote or other representation about a product or service should be verified with each manufacturer, provider, or party in question.This blog contains affiliate links, clicking and shopping through these links helps to support and run Tonya Trantham Designs – Creative Paper Addiction at no additional cost to you. Today’s features are Blank Page Muse and Scrapbook.com Products. 

Thanks for stopping by hope your day is wonderful and enjoy creating!