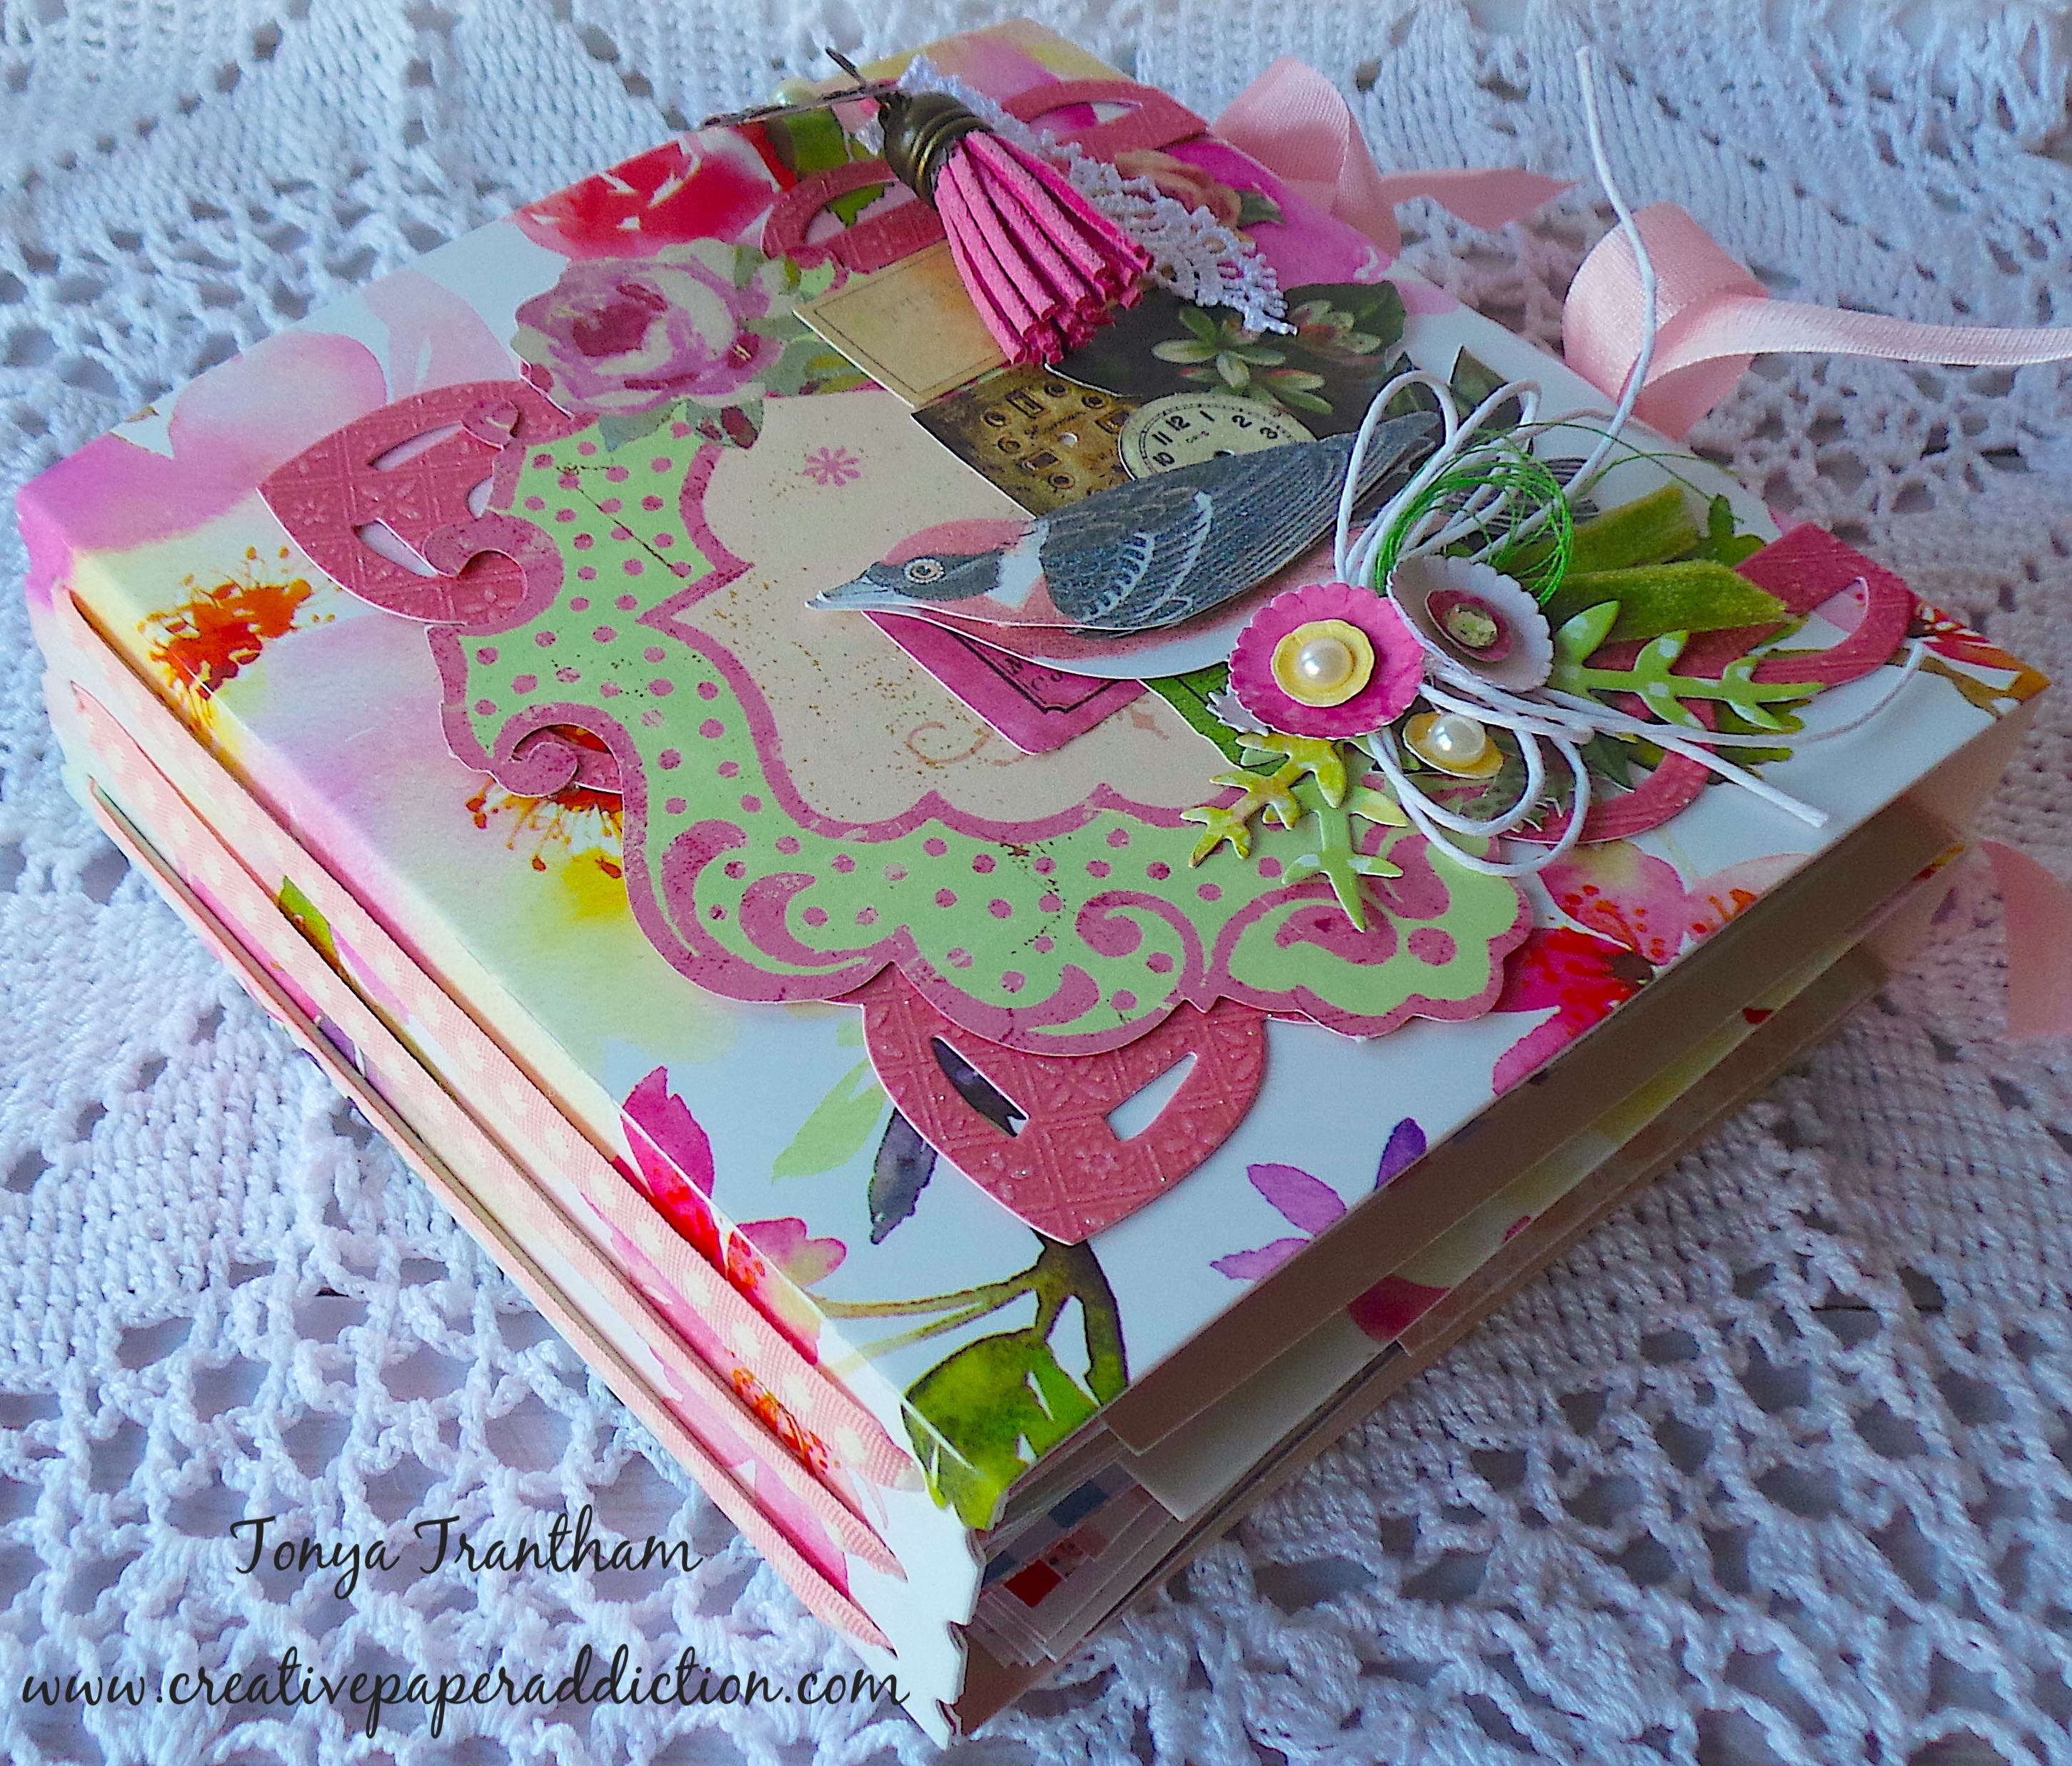
December 25th Caddy Box

Hi everyone! I’m back today with a box I created as a companion piece for the Jolly Old St. Nicholas Notepad I shared yesterday. You can find that post HERE. I used Eileen Hull’s Card Caddy Diecut along with a couple of other dies/thinlits. So let’s get started!

First, I applied Adhesive Sheets to both sides of a piece of Mat Board and placed patterned cardstock to both sides before cutting out one box and two sides.

To make the sides lay flush on the inside of the box I “peeled” the mat board from the tabs.

I adhered the bottom tab on the side panels to each side of the box.

Next I added adhesive to each of the longer tabs and glued each side of the box into place.

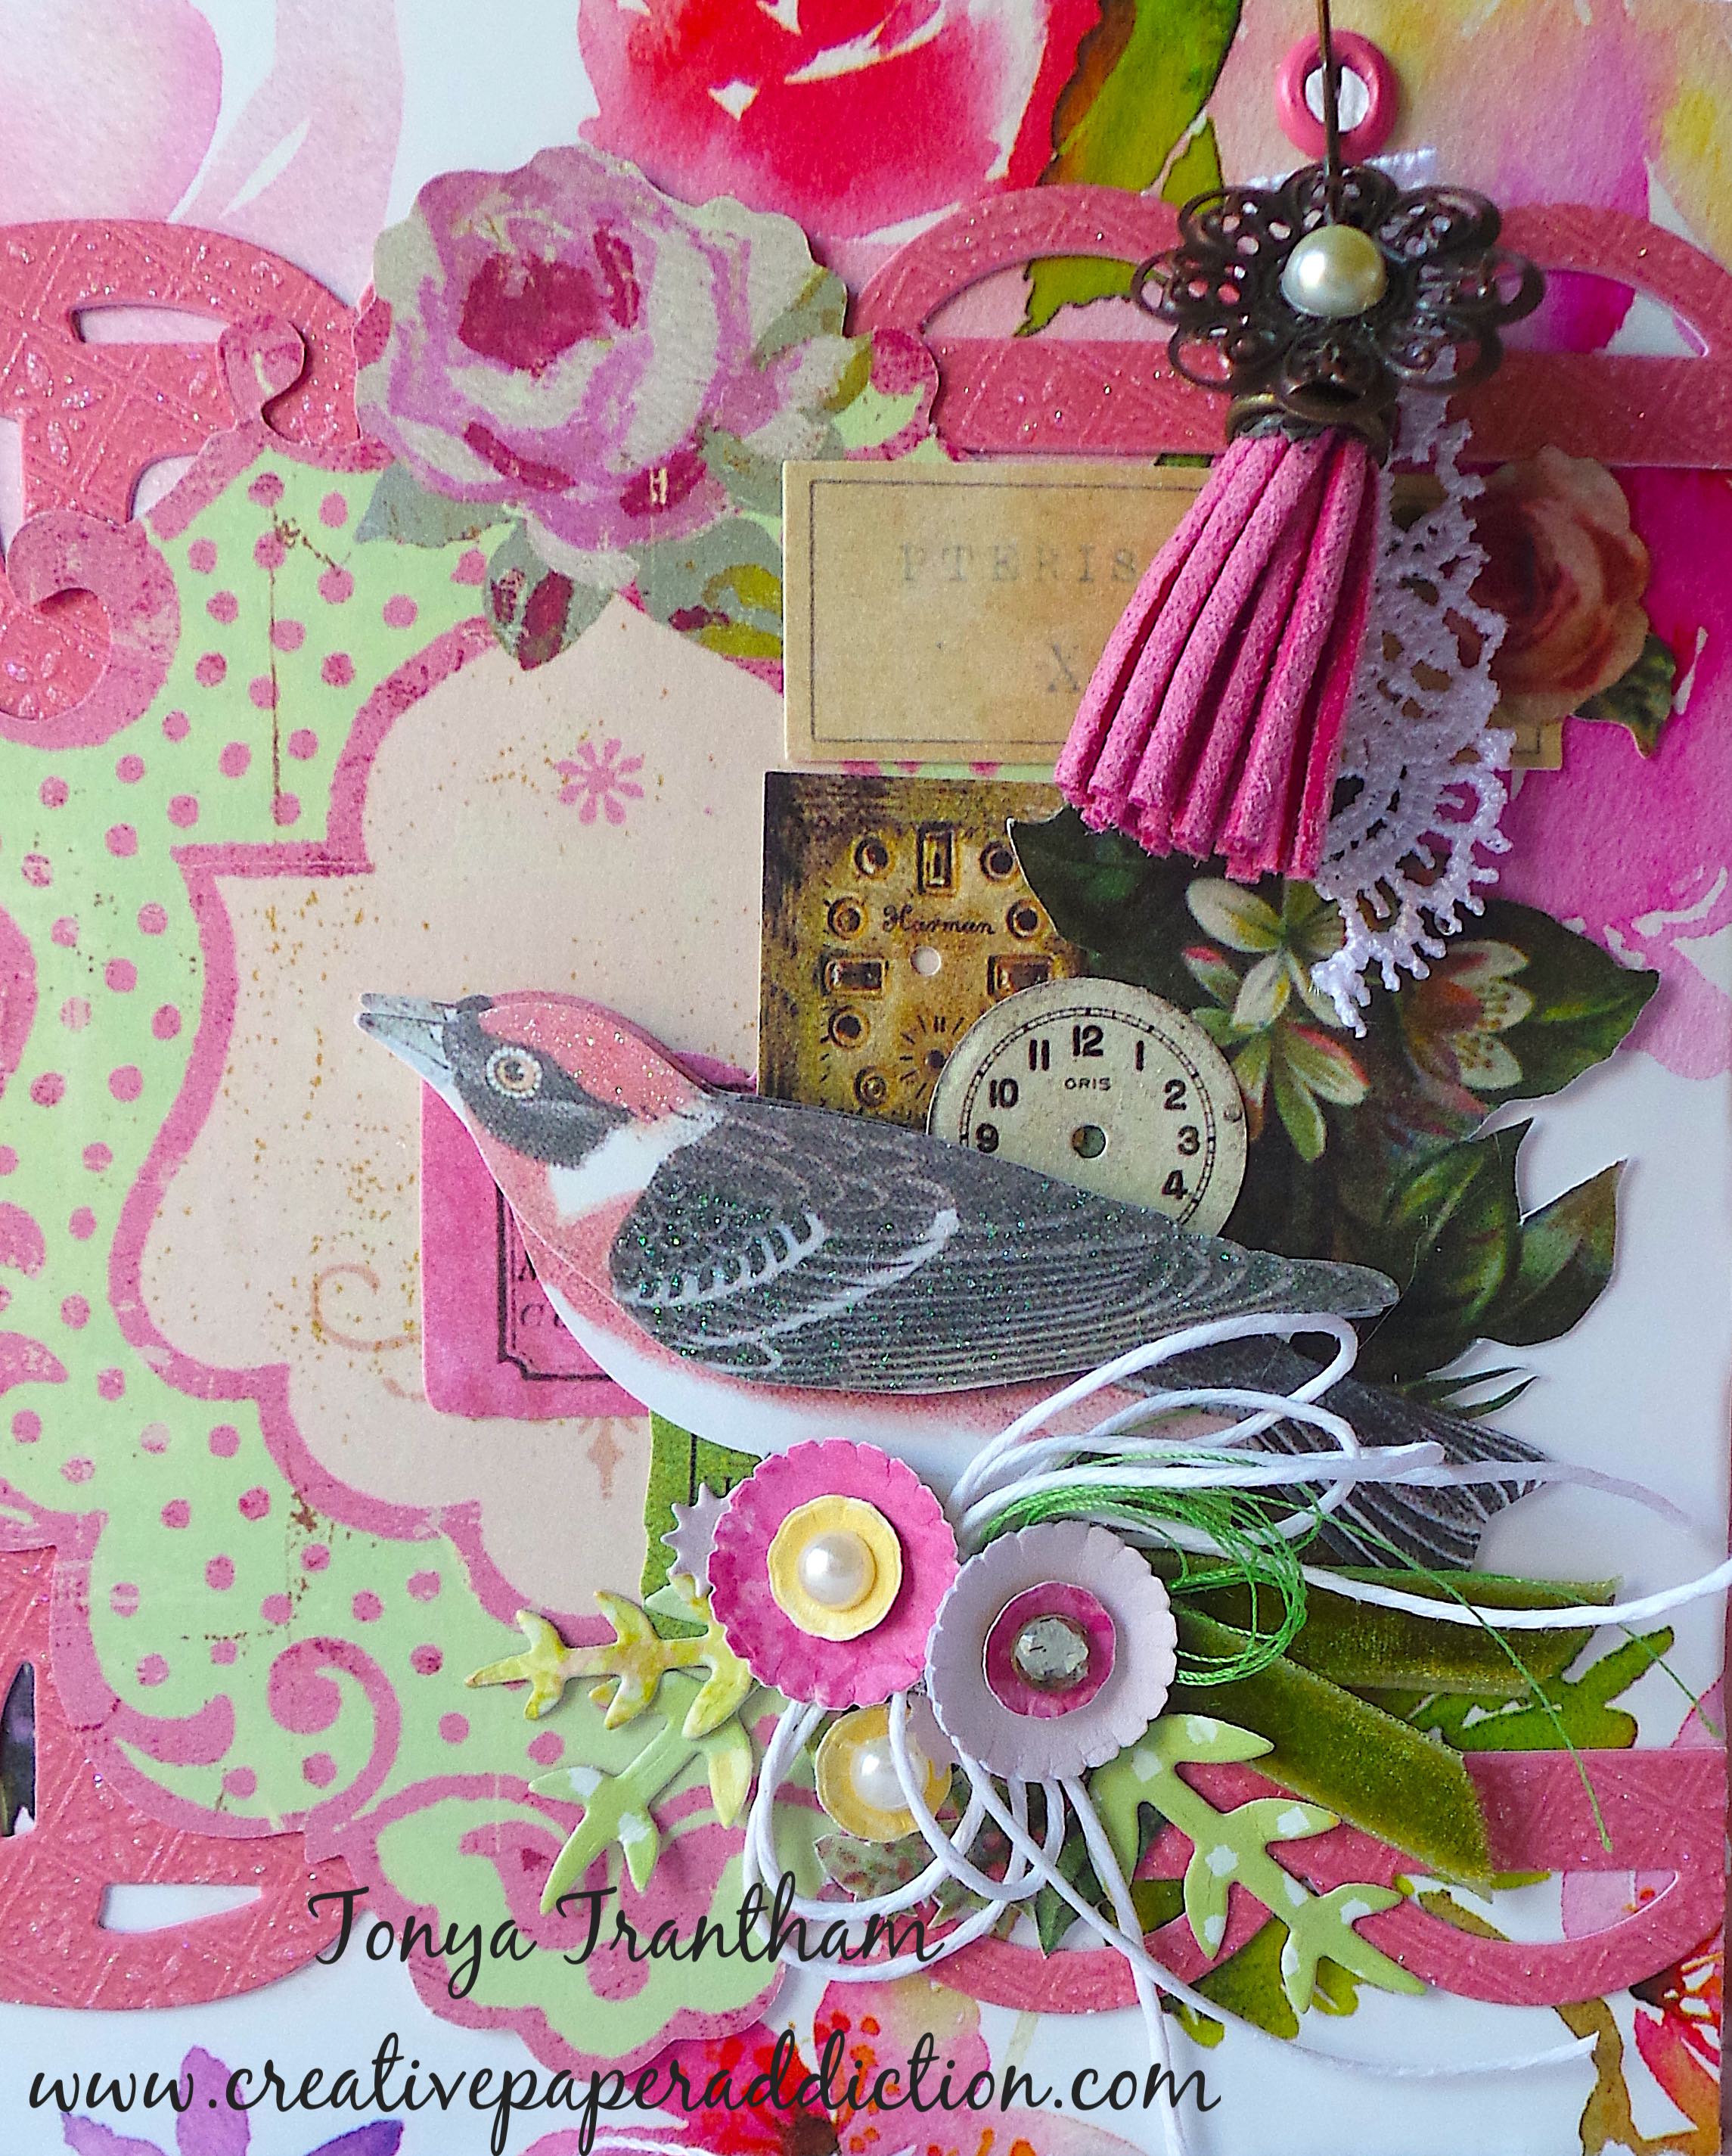
Now for the fun part…adding embellishments! I cut and intertwined two wreaths from the Wreath and Snowflake Thinlits along with raiding my stash of Christmas ephemera and embellishments and decorated one side of the caddy.

I also added a Santa that I had fussy cut from scrapbook paper (I did the same for the notepad) and glued the word “Christmas” to the label that’s included with the Caddy Card Diecut and a poinsettia to finish.

The notepad fits perfectly inside the box! Also as a side note you can create a journal from the Caddy Card Box. Maybe one day I will get around to making one?

Supplies

Sizzix/Eileen Hull: Card Caddy Diecut

Sizzix/Eileen Hull: Wreath and Snowflake Thinlits

Diecut Machine

Adhesive Sheets

Mat Board

Paper Cutter

Various Patterned Cardstocks

Christmas Embellishments

Scissors

Beacon Adhesives: Zip Dry Adhesive

(Products listed above are Affiliated Links for your convenience)

DISCLAIMERS

This blog is compensated to provide opinion on products, services, websites, and various other topics. Even though the owner(s) of this blog receives compensation for our posts or advertisements. I always give my honest opinions, findings, beliefs, or experiences on those topics or products. The views and opinions expressed on this blog are purely my own. Any product claim, statistic, quote or other representation about a product or service should be verified with each manufacturer, provider, or party in question.This blog contains affiliate links, clicking and shopping through these links helps to support and run Tonya Trantham Designs – Creative Paper Addiction at no additional cost to you. Today’s features are Sizzix, Eileen Hull, Scrapbook.com and A Cherry on a Top Crafts Products. 

Thanks for stopping by, hope your Saturday is wonderful and enjoy creating!

Love Postage Stamp Junk Journal Page

Hi everyone and Happy Valentine’s Day! I wanted to hop on and share a quick little junk journal page I created using leftover scraps, bits and pieces of ephemera and a printable girl that is from itKuPiLLiimaginarium. You can find the printable HERE.

I find this is a great way to use up what is laying on my desk and pushes me to get creating in the process. I love how I was able to incorporate a used postage stamp in the layout too. The “Be Mine” tag was from a swap several years ago and is a perfect place for the little girl to “sit”.

I’m slowly adding pages as I can to my junk journal. I shared pages last year on the blog and I had hoped to have the journal filled by now, but…you know…life happens. So maybe this year I’ll get it filled?

Supplies

Various Patterned Cardstocks

Paper Cutter

itKuPiLLiimaginarium: Bunny Fairy Paper Dolls Printable

Scissors

Ephemera

Lace and Thread

Sequins and Flat Back Pearls

Beacon Adhesives: Zip Dry Adhesive

(Products listed above are Affiliated Links for your convenience)

DISCLAIMERS

This blog is compensated to provide opinion on products, services, websites, and various other topics. Even though the owner(s) of this blog receives compensation for our posts or advertisements. I always give my honest opinions, findings, beliefs, or experiences on those topics or products. The views and opinions expressed on this blog are purely my own. Any product claim, statistic, quote or other representation about a product or service should be verified with each manufacturer, provider, or party in question.This blog contains affiliate links, clicking and shopping through these links helps to support and run Tonya Trantham Designs – Creative Paper Addiction at no additional cost to you. Today’s features are Scrapbook.com Products. 

Thanks for stopping by, hope your Monday is great and enjoy creating!

Wonderland Tea Party Folio Part 2

Hi everyone! I’m back and I want to share a couple pages from my Wonderland Tea Party Folio (part three I will try and share tomorrow). If by chance you missed part one of my folio reveal you can find that post HERE.

I used the Pocket Thinlit from the Folio Page Pocket and Flowers Thinlits to create a place to add tags and printables. I only glued it on two sides to create another pocket behind the pocket. I added a scalloped diecut from the Gift Box with Scallop Edges and Label Diecut that I had leftover from a previous project to the fold over on the pocket.

I adhered a couple of leaf sprigs that I had cut from the Folio Page Pocket and Flowers Thinlits to a crocheted flower that I had in my stash to dress it up a bit.

I adhered an empty tea bag ( I carefully cut the top of the tea bag to create a pocket) on two sides to create another pocket. I cut out two of the smallest size tags from the Waterfall Card and Tags Thinlits and added re-enforcers to the top of both tags. On one tag I glued the fussy cut image of the Mad Hatter to the top and on the other tag I added an Alice in Wonderland postage stamp from my stash. With this being a tea party theme I had to cut out a few of the teacups from the Teacup and Spoon Diecut and add as tag through out the journal.

The next page I matted with patterned cardstock and adhered a multi teacup printable (fussy cut) to create a pocket to hold the largest tag and teacup diecuts. I also added a teapot with tea time stickers to the bottom corner of the page.

I left the top of this page open so I could add an insert. I cut out two Photo Box Folders Diecuts (retired) (one to be used on an upcoming page) and glued a patterned cardstock, Alice image and oval diecut to one side of the insert. I adhered a fussy cut image to the tag too.

I used another printable that I fussy cut and adhered to create a pocket.

I embossed the tag with Queen of Heart Embossing Folder (retired), lightly inked over the embossed area with chalk ink and added a decorative brad to the top.

The next page I added another printable as a pocket.

I used the King of Spades Embossing Folder (retired) on this tag, lightly inked over the embossed area with a chalk ink and added the crown brad to the top of the tag.

This page has another set of double pockets with lots of tags and journaling cards.

Of course I had to add another teacup diecut to one of the pockets.

I’m going to stop here and will pick up (I hope) tomorrow with the final reveal of my journal. Eileen also has a new blog post today that shares more creativity from her team and you can find that post HERE. As always if you have any questions about this project please let me know.

Supplies

Sizzix/EIleen Hull: Folio Page Pocket and Flowers Thinlits

Sizzix/Eileen Hull: Gift Box with Scallop Edges and Label Diecut

Sizzix/Eileen Hull: Waterfall Card and Tags Thinlits

Sizzix/Eileen Hull: Teacup and Spoon Diecut

Sizzix/Eileen Hull: Folio Journal Diecut

Sizzix/Eileen Hull: Bookbinding and Label Thinlits

Sizzix/Eileen Hull: Mandala Thinlit

Sizzix/Tim Holtz: Queen of Hearts and King of Spades Embossing Folders (retired)

Sizzix/Where Women Create: Photo Box Folders Diecut (retired)

Diecut Machine

Paper Cutter

Scissors

Various Patterned and Plain Cardstocks

Alice in Wonderland Printables

Buttons, Pre-made Flowers, Stickers and Various Ephemera

Beacon Adhesives: Zip Dry Adhesive

(Products listed above are Affiliated Links for your convenience)

DISCLAIMERS

This blog is compensated to provide opinion on products, services, websites, and various other topics. Even though the owner(s) of this blog receives compensation for our posts or advertisements. I always give my honest opinions, findings, beliefs, or experiences on those topics or products. The views and opinions expressed on this blog are purely my own. Any product claim, statistic, quote or other representation about a product or service should be verified with each manufacturer, provider, or party in question.This blog contains affiliate links, clicking and shopping through these links helps to support and run Tonya Trantham Designs – Creative Paper Addiction at no additional cost to you. Today’s features are Sizzix, Eileen Hull and Scrapbook.com Products. 

Thanks for stopping by, hope your Thursday is great and enjoy creating!

Chapter 1 Eileen Hull Release Party and Sneak Peek!

Hi there and welcome to the Chapter 1 Eileen Hull/Sizzix Release Party Blog Hop! Just wait till you see all of the fun options the new ScoreBoards Folio Journal die has in store for you! You will also love the Mandala and Folio Page, Pockets and Flower Thinlits dies that coordinate. 
Please hop through the blogs and be inspired by the work of the talented Inspiration and Educator teams! Leave a comment for each designer and you could win a Folio Journal die (as soon as it arrives!) Join me and specials guests for a Facebook Live on Wednesday, Feb. 3 at noon Eastern. Comment on our Facebook Live and be eligible to win either the Mandela die or the Folio Pages, Pockets and Flowers die- two winners! Winners will be announced on the Facebook Live show on February 9 at 6:00 EST. We appreciate your love and support, friends!

I’m so excited about all of the new diecuts from this release and I can’t wait to share a sneak peek of my journal with you. For this project I used the Folio Journal Diecut and the flowers from the Folio Page Pocket and Flower Thinlits to create the cover.

I cut the journal from an extra thick file folder (love the floral design on the folder).

I cut two covers from the diecut and adhered the spine together.

I used an assortment of ephemera, craft supplies from my craft room (it’s a no spend month until my husband goes back to work) and the flowers thinlits from the Folio Page Pocket and Flower Thinlits to decorate the cover of the journal. Later this month I will share the inside of the journal so be sure to stop back by!

Be sure to stop by the other team members blogs to see what they have created and comment on each blog for a changes to win the newest Chapter One Diecuts by Eileen Hull!

Eileen Hull

Julia Aston

Madeline Arendt

Jennie Atkinson

Karen Bearse

Susie Madden Benz

Sarah Lizzie Dodd

Sue Eldred

Maggi Harding

Lisa Hoel

Jenny Marples

Elizabeth Robinson

Tonya Trantham—You Are HERE

Supplies

Sizzix/Eileen Hull: Folio Journal Diecut

Sizzix/Eileen Hull: Folio Page Pocket and Flower Thinlits

Diecut Machine

Beacon Adhesive: Zip Dry Adhesive

Scissors

Paper Cutter

File Folder

Ephemera, Ribbon, Seam Binding, Thread, Charms and Etc.

(Products listed above are Affiliated Links for your convenience)

DISCLAIMERS

This blog is compensated to provide opinion on products, services, websites, and various other topics. Even though the owner(s) of this blog receives compensation for our posts or advertisements. I always give my honest opinions, findings, beliefs, or experiences on those topics or products. The views and opinions expressed on this blog are purely my own. Any product claim, statistic, quote or other representation about a product or service should be verified with each manufacturer, provider, or party in question.This blog contains affiliate links, clicking and shopping through these links helps to support and run Tonya Trantham Designs – Creative Paper Addiction at no additional cost to you. Today’s features are (Sizzix, Eileen Hull and Scrapbook.com Products. 

Thanks for stopping by, hope your Wednesday is wonderful and enjoy creating!

Chunky Mini Vintage Junk Journal

Hi everyone! I had started this project almost two years ago…do you have  several of those types of projects laying around? 😬 I had started this for another design team that I was on but the company was bought out and all the design team members were let go. Soooo I just laid it aside with the intent of finishing it for one of Eileen Hull’s projects. When I did pick it back up to work on it I found out the Needle Book diecut had been retired. Soooo I put it up again until now. One of my goals for this year is to work on my mountain of unfinished projects…along with new projects, of course! 😁  
I started by applying Adhesive Sheets to the front and the back of a piece of Mat Board, placing on top of the diecut and running through the Diecut Machine. I then cut the diecut down the middle of the spine.
I cut another needle book from mat board and I cut it down the middle diecut. I measured 1″ on each side of the fold and cut.
Then I cut another piece of matboard 2″ wide by 3 5/8″ high and adhered each 1″ sides to the matboard. This re-enforces the spine of the needle book.
I adhered each of the covers to each of the flaps of the spine.
I measured on the inside of the spine and marked where I would sew in the signatures and punched small holes on both ends of the spine.
Each signature has 8 pieces of patterned cardstock. I used an abundance of leftover scraps from my stash.
I punched holes in the signatures and sewed each one into the spine and tied off.
Before decorating the inside pages I decorated the cover with a frozen Charlotte that I made with a mold and paper clay. I inked it and added butterfly wings to the back. I added an oval diecut, a flower with leaves before adhering the frozen Charlotte to the cover. 
I added bits of ephemera, scraps of cardstock, diecuts, etc. to the pages of this mini. 

As always if you have any questions about this project please let me know.
Also I would like to submit this project for the following challenge: 
Mini Album Makers Challenge: February


Supplies

Eileen Hull/Sizzix: Needle Book Diecut (retired)
Beacon Adhesive: Zip Dry Adhesive
Ephemera
Paper Flowers
Twine
Needle
Frozen Charlotte Figurine 
Various Patterned Cardstocks Scraps

(Products listed above are Affiliated Links for your convenience)

DISCLAIMERS

This blog is compensated to provide opinion on products, services, websites, and various other topics. Even though the owner(s) of this blog receives compensation for our posts or advertisements. I always give my honest opinions, findings, beliefs, or experiences on those topics or products. The views and opinions expressed on this blog are purely my own. Any product claim, statistic, quote or other representation about a product or service should be verified with each manufacturer, provider, or party in question.This blog contains affiliate links, clicking and shopping through these links helps to support and run Tonya Trantham Designs – Creative Addiction to Paper Blog at no additional cost to you. Today’s features are Eileen Hull, Sizzix and Scrapbook.com Products. 
Thanks for stopping by, hope your Wednesday is awesome and enjoy creating!

Collect Beautiful Moments Box with Eileen Hull

Hi everyone! I am super excited to share Eileen Hull’s newest  Gift Box with Scalloped Edges and Label Diecut from her Chapter One Collection! There is so much you can do with this diecut. The obvious is a box that you can add a gift inside if you like, a book or just decorate and use as a home decor piece.
For my project I used cardstock and cut a parts from an old Recollections paper pad I had. After I put the box together according to the directions I adhered corner protectors to each corner of the box and gems. 
  I raided my stash of paper flowers and other paper ephemera and added to the box.
I also used chipboard embellishments and stickers from Crate Paper/Maggie Holmes. I tried to add as much dimension as I could to each side. I accomplished this adding Foam Pop Dots to the back of the embellishments.
The top of the box I adhered a doily, decorative diecut, buttons, paper flower and a bow made from cording. 
For more inspiration hop on over to Eileen’s blog for more creativity from her team. You can find this month’s post HERE and HERE. Also if you have any questions about this project please let me know.
Supplies
Patterned Cardstock
Chipboard Embellishments
Stickers
Corner Protectors 
Cording
Buttons
Paper Flowers
(Products listed above are Affiliated Links for your convenience)
DISCLAIMERS

This blog is compensated to provide opinion on products, services, websites, and various other topics. Even though the owner(s) of this blog receives compensation for our posts or advertisements. I always give my honest opinions, findings, beliefs, or experiences on those topics or products. The views and opinions expressed on this blog are purely my own. Any product claim, statistic, quote or other representation about a product or service should be verified with each manufacturer, provider, or party in question.This blog contains affiliate links, clicking and shopping through these links helps to support and run Tonya Trantham Designs – Creative Addiction to Paper Blog at no additional cost to you. Today’s features are Eileen Hull, Sizzix and Scrapbook.com Products. 
Thanks for stopping by, hope your Sunday is wonderful and enjoy creating!

Pastel December Daily Glue Book Journal

Hi everyone! I’m back today with my Inspiration Team project I created for Eileen Hull. Truth be told I started this December Daily in 2017. 😮 Let’s face it no matter how hard I try I have never finished a December Daily. NEVER! I love looking at other peoples dailies and long to have one that has all the photos and documenting of my everyday life BUT in all honesty I don’t do anything exciting. I decorate the tree, wrap presents and then I get with my family and open the presents…see nothing really exciting. So I turned this into a glue book that I have been working on for the last three years. What is a glue book? It is a journal/book that you glue whatever you want to into it…pretty simple huh? 😊
I started this December Daily by cutting the covers from a file folder using the Journal Diecut.
I extended and reinforced the spine with an extra piece of the file folder once I glued the covers together.
I decorated the cover with and assortment of Christmas cardstock, trims and embellishments. The snowman and snow woman is a printable that I sized up before printing, fussy cutting and adhering to the cover. I also glued the clasp to the inside of the cover and tied a piece of cording with a tassel on the end to use as a closure.
I covered the spine with lace, then punched holes through the lace and run the elastic cording through the holes and tied off inside. I also sewed a button to the spine to wrap the cording with tassel to.
For the inside of the journal/glue book I used blank journals that I had purchased in a package of six from Target. They are the perfect size other than I had to cut off the ends so they would fit. 
I used a deer printable that I had received in a swap to decorate the cover of the journal along with pom pom trim. On the inside cover I created a double belly band to hold scraps that will eventually make its way into this book.
This is the perfect way to use scraps of cardstock and printables.
I covered these pages with my collection of Christmas washi tape. 
I have so much Christmas Washi Tape that I had to make a flap to hold the extras.
The Happy Holidays sentiment is an envelope I cut down to create a side pocket to hold tags and printables. I added pieces of patterned cardstock and an embellishment underneath the postage stamp. 
On the other side of the page is the envelope flap that I decorated. 
On the inside of the flap I added more cardstock and a little sentiment I had cut from a piece of cardstock. On the page I created a diagonal pocket to hold Christmas tags I had pulled off of the presents I had received that were to cute to throw away. 
I also added bits of wrapping paper from past presents to the pages as a collage. There you have it a peek of some of the inside pages of my not so December Daily/Glue Book. As always if you have questions please let me know.
If you need more inspiration from Eileen’s team you can find her blog posts HERE and HERE.
Supplies

Sizzix/Eileen Hull: Journal Diecut
Beacon Adhesive: Zip Dry Adhesive 
Sizzix/Brenda Walton: Merry and Bright Cardstock Pad
Christmas Ephemera
Printables
Elastic Cording
Lace, Pom Pom Trim and Trims
Embellishments
Various Christmas Cardstock
Washi Tape
Journals
File Folder
(Products listed above are Affiliated Links for your convenience)
DISCLAIMERS

This blog is compensated to provide opinion on products, services, websites, and various other topics. Even though the owner(s) of this blog receives compensation for our posts or advertisements. I always give my honest opinions, findings, beliefs, or experiences on those topics or products. The views and opinions expressed on this blog are purely my own. Any product claim, statistic, quote or other representation about a product or service should be verified with each manufacturer, provider, or party in question.This blog contains affiliate links, clicking and shopping through these links helps to support and run Tonya Trantham Designs – Creative Addiction to Paper Blog at no additional cost to you. Today’s features are Sizzix, Eileen Hull and Scrapbook.com Products. 

Thanks for stopping by, hope your Tuesday is great and enjoy creating!

Beach Disc Junk Journal

Hi everyone! I am here to share my Inspiration Team project I created this month for Eileen Hull. The weather has been so cold in my neck of the woods that my project has a warm weather beach theme to it.


I decided to gather up all of my beach theme cardstock, stickers, embellishments and things I had put back from my trips to the beach along with the Book Binding Movers and Shapers Magnetic Diecut, Base Tray, burlap covered matboard, Book and Pages, Trinket Box and Frame Diecut and Medium Discs to create this journal.


I got so carried away that I didn’t photograph a before photo of the cover which I cut from burlap covered matboard using the Book and Pages, Trinket Box and Frame Diecut. I backed the cover with a patterned cardstock and inked the edges.  I fussy cut sand dollars from scrapbook paper and adhered to the bottom corner of the opening of the cover along with a button and added a pearl and gem to the center of each sand dollar.  I adhered gems around the oval of the opening. A side note use a heavy duty adhesive to hold the gems in place. I used Zip Dry Adhesive at first but wasn’t holding so I reapplied Fabri-Tac and that seems to be holding them in place.


I love the Book Binding Movers and Shapers Magnetic Diecut! There is so many possible uses for it! My journal has a total of 35 pages, plus the front and back covers. So this is one packed journal and the best part I can take it with me on my vacation already assembled. No, taking a load of cardstock, embellishments, etc. which nine times out of ten I won’t fool with that much because…well…you know..I’m on vacation. 😎


I added a business card (Chick A Fil is a favorite place to eat at) and sacks/bags to the journal too.


I love the fact that you can move pages around or add or even take out completely.


I also made pages from a pamphlet I had picked up.


I used a hotel note pad for some pages in my journal too.


I threw in some paint chips in a beach theme.


The map I wanted to include was too large so I cut it down and folded and used a paper clip to keep it from flopping around.


Coffee sleeves work well as pockets to hold tags or receipts.


I added a drink coaster from my favorite restaurant to the journal.


I saved this bag from an order I received. I folded it over to create a flap, added some ric rac and a clip to keep ephemera safe.


Since the discs have a small heart in the center of each one I added an assortment  of fiber, seam binding, ribbon and charms to the top disc on the journal.


There you have it! One junk journal ready to go to the beach with me…hopefully this year…all I’ll need is an ink pen, Insta Printer and a small stash of embellishments and I am ready!
Be sure to check out these posts from Eileen’s team: HERE, HERE and HERE. As always if you have any questions about this project please let me know.


Also I would like to submit this project for the following challenges:
Word Art Wednesday Anything Goes: Challenge #318-#319
Mini Album Makers Challenge: January Challenge


Thanks for stopping by, hope your Monday is awesome and enjoy creating!

Mini Bird Junk Journal

Hi everyone! Has the weather started warming up where you live? Here for the most part we have had days in the 70’s to upper 80’s with everything in full bloom. I think we have skipped Spring and jump right on into Summer. 😎
I wanted to share my finished junk journal with you all. Do you remember I did a how to on how to stitch this journal? If not you can find that post HERE. Well, here is the finished project!


I used a variety of scraps of cardstock, stickers and bits and pieces I had laying around to create this little journal.


I even used a paperbag that held silverware in it from Chili’s to add tags to.


The blurbs I cut from packaging and added Stickles for some interest and of course I have to always add a paper doily to any journal I create. 😊


I forgot to add that I sewed in a total of six papers and that is including the paperbag. 


I love how chunky this little journal turned out! 


I also did a short flip through video of the inside of the journal which I hope you enjoy! As always if you have any questions about this project please let me know.


Also I would like to submit this project for the following challenge:


Thanks for stopping by, hope your Wednesday is awesome and enjoy creating!

Tsunami Rose Designs: A Rose by any Other Name Junk Journal

Hi everyone! I am back with a little junk journal I created for my design team project for Tsunami Rose Designs. I used the Pass Port Book diecut to cut the covers, spine and pages bases which are coffee dyed paper. 


I used a variety of printables from the shop and are as listed: Ephemera Set 2 30 PagesBig Elements 11 English Cards 3 PagesDecoupage Flowers Set 1 4 PagesVintage Shipping Tag Collection 1 5 PagesVintage Shipping Tag Collection 5 3 Page and Big Elements 13 B&W 2 4 Page. Along with some freebie printables that can be found on the Tsunami Rose Design blog. 🙂 Also for more photos of my project you can see it HERE.


Also you still have a week left to get printables at $2.50 each on the Tsunami Rose Designs etsy shop and that does include kits too!!! This sale ends September 1st so be sure to hop over there!
If you aren’t a part of the TsunamiRose FB Group be sure to join. There are so many talented folks in this group that are sure to inspire along with the awesome group of ladies that are part of TsunamiRose Blog design team.
If you have any questions about this little junk journal please let me know.


Thanks for stopping by, hope your Friday is awesome and enjoy creating!