The Robin’s Nest: If the Shoe Fits Wear it

Hi everyone! It’s me and I’m back to share another couple of projects using the Wedding {in love} Collection which is also featured this month over at the Robin’s Nest.
I have these little shoes  I created using Brenda Walton’s: Sizzix Ballroom Slippers Diecut and an Anniversary card.

For more details on how to create these little shoes and card hop on over to the Chattering Robin’s blog and check it out! Also if you have any questions please let me know.
Thanks for stopping by, hope your Thursday is wonderful and enjoy creating!!!

Birthday Cake!

Hi everyone! I’m here to share two 3″x5 1/2″ birthday cards I created. I cut them from one sheet of 8 1/2″x11″ piece of hot pink cardstock. I misted a doily with Tattered Angels Mantis Chalkboard mist and what didn’t fit on one card I used on the other card. I used scraps of cardstock and digi cake images from Cassi’s Creations which I used Stickles to give them a little glitter. I finished off with a birthday sentiment I printed from the computer and sequins.

The hardest thing about the cards was fussy cutting the cakes out. 🙂 

If you have any questions please let me know. Thanks for stopping by, hope your Thursday is awesome and enjoy creating!!!


Time Captured


Hi everyone! I’m back to share a project using the Lodge Collection from the Robin’s Nest. It is new and I simply love this collection!!! I can definitely see it being used for outdoor or Christmas themed projects in my future. 🙂
For this project I used two empty snus tins that my son (I dislike that my son uses this stuff…insert motherly frowning face) was going to throw away and crafty person that I am knew I could alter them and turn them into something fun and this is what I came up with.

First off you will need the bottoms from both of the tins.

I used a fine tip black Sharpie to mark the holes on the tin by using the hinge as a pattern. Next I used the bottle cap hole punch to punch holes in the tin.

I made sure the hinge worked and brads would fit through the holes of the tin.

I gessoed both tins, let dry and then painted with Folk Art Tapioca acrylic paint and once that dried I used Vintage Photo Distress Crackle Paint over the top of that.

Next I cut two 7 inch pieces of Natural Twine and adhered middle way on each side of the tin.

Next I cut a small piece of Forest Tree Specialty paper and a strip of Mens Plaid/Compass Cardstock which I folded to give it a pleated look. Also both of these paper/cardstock are double side which means you get more bang for your buck. 🙂

From the Lodge CutOuts Cardstock I cut one of the cards that has a clock on it. I roughed it up and inked the edges. I had this old watch that the paint was coming off around the edges  and didn’t work any more so I wound up adding just a little copper stain to it to add a vintage feel to it. I punched a circle from the Mens Plaid/Compass Cardstock and added beads and Beaches Dew/Tear Drops inside the watch face and adhered to the corner of the cutout.

I adhered the circle over the back of the watch and once dry I adhered the whole thing to the top of the tin.

To finish out the front I used a dew drop, sequin, buttons, ribbon, verbiage from Cassi’s Creations. I also punched two leaves from the Wrap Glitter Cardstock and inked and crumpled before adhering to the corner of the watch face.

Side view of tin with hinge.

Side view with Natural Twine used as a closure.

I cut two pieces of Mens Plaid/Compass Cardstock to fit the inside of the tin which I inked and the adhered to the inside. I didn’t like the way it looked and I decided to add Natural Twine around the edges. To finish it off and cover the ends of the twine I punched out more leaves from the Wrap Glitter Cardstock and adhered to the corners and then topped off with an acorn button and a mini pine cone that I had received from a swap.

This could either be used as a tiny trinket holder or you could add some mini photos inside.
Since I have two lids leftover from these snus tins I wonder what I create with them??? Be sure to check back in the future and see what I create with these. 😉

Supplies Used:

Robin’s NestNatural TwineForest Tree Specialty paperMens Plaid/Compass Cardstock Lodge CutOuts CardstockBeaches Dew/Tear Drops, Wrap Glitter Cardstock
Sequins
Beads
Buttons
Leaf Punch
Ribbon
Vintage Photo Distress Crackle Paint 
Folk Art Tapioca acrylic paint
Gesso
Chalk Ink
Bottle Cap Hole Punch
Old Watch Face
Tim Holtz Hinge
Cassi’s Creations: Verbiage Printable 

Be sure to stop by the Robin’s Nest and check out the new Lodge Collection. There is sooooo many different crafty projects you can use it for…just remember that you are only limited by your imagination 🙂
Thanks for stopping by, hope your Monday is awesome and enjoy creating!!!

She Wished for Beauty

Hi everyone and Happy Memorial Day!!! I’m here to share my May Flowers project I created for the Art with Heart Challenge which is over at Eileen Hull’s blog. I had just finished an altered Altoid tin for my design team project and after looking at the suitcase die I decided I could definitely create my own “Altoid tin” with this diecut. 🙂
For this challenge I used Eileen Hull’s Sizzix Scoreboards XL Die Bag Suitcase to cut out two “bottoms” each from mat board and cardstock for a total of four “bottoms”. I inked all the edges with chalk ink, adhered together.
Now for the fun part…adding all the fun embellishments!!!

I fussy cut the girl images out from the Easter Children Hang Tags and added stickles for a bit of shimmer.

I’ve had these hinges for several years and I’m now finally using them…yes, can we say I am a craft horder 😉

I used some leftover dies that I had cut out from the Sizzix Scoreboards XL Die Box Square to use to frame the side of the box. The buttons, Dew Drops and sequins I built up so I could wrap twine around to keep the box close. The beads I added as weighs to keep the twine from unwinding around the button.

The inside I used the Tim Holtz: Lace Die along with dew drops, stickers, punches, sizzlets and buttons which I think turned out adorable.

I fussy cut a butterfly from the Vintage Spring Printable. I added antenna and flowers to  top off the upper corner of the box.

Supplies Used:

Eileen Hull: Sizzix Scoreboards XL Die Bag Suitcase,Sizzix Scoreboards XL Die Box Square
Other Sizzix Dies: Tim Holtz: Lace Die,Sizzlits Retired Dies: Flower #3, Stampin’ Up! 
Robin’s Nest: Dew Drops
Little Leaves
Basic Grey’s Lemonade Collection
Making Memories: Hinges and Brads
Sticker Sayings
Stick Pin
Flower Punches
Buttons
Sequins
Broken Ear ring
Crystal Stickles
Ribbon
Lace
Twine
Beads
Brads
Chalk Ink
Recollection Flowers
Ephemera’s Vintage Garden: Easter Children Hang Tags
Graphic Fairy: Vintage Spring Printable
Cassi’s Creations: (Words)

If you have any questions about this project let me know. Thanks for stopping by, hope your Monday is awesome and enjoy creating!!!


The Amazing Flying Boy

Hi everyone! I’m here to share a quick project I created using the Eileen Hull’s Sizzix-Scoreboards Food Jar 3D Spoon Diecut. I know it is a little bit quirky but I had a lot of fun creating this little Flying Boy. 🙂
I cut the jar twice from matt board and cardstock, inked all edges and then adhered together. Then I lightly inked over the cardstock with Sahara Sands chalk ink to give it that “old vintage look”. Next I stuffed tissue paper in the bottom of the jar, cut out rosettes, put together, adhered to the jar and then added gears, sprockets and dew drops to top it off. 

The fly boy I fussy cut and chalked his outfit and then outlined him with a black fine tip pen. I then fussy cut bug wings out and adhered to the boy’s back, added two dress pins as antennas to his head and glued him inside the jar.

I printed the verbiage from the computer, cut, inked and adhered to the banner along with an airplane that I fussy cut. I adhered the banner to the stick pin and glued to jar.

Supplies Used:

Sizzix:Eileen Hull: Scoreboards Food Jar 3D Spoon Diecut
Matt Board
Other Sizzix Dies: Brenda Walton’s Medallion and Ampersands & Banner
Tim Holtz: Gears and Sprockets
Robin’s Nest: Airplane Cardstock, Belgian Chocolate Cardstock, Mens Plaid/Compass Cardstock, Beaches Dew Drops/Tear Drops, Natural Twine, Special Delivery Boy Cardstock
Stick Pin from Art.i.cakes
Lace
Ocean Depth and Sahara Sand Chalk Ink
Airplane from K & Company  
Bugs Wings are from Graphic Fairy Web site
Crystal Stickles
Two Dress Pins

Cassi’s Creations: Digital Collage Sheet Vintage Children 2 Fairies 

I hope you enjoyed this little project as much as I enjoyed creating it.
Thanks for stopping by, hope your Wednesday is wonderful and enjoy creating!!!


"Cat-titude"

Hi everyone! I’m here to share a mini album I created out of coffee filters using the Special Delivery Collection from the Robin’s Nest which is 20% off this month and we are cross promoting with EC crafts


The mini I created isn’t the typical baby mini album. I made this with my cat, Omega in mind…thus, the title “Cat-titude” meaning cat with attitude. 🙂
I started with four coffee filters as the base for my mini album.

I traced the filters onto the Special Delivery Cardstock and the Pink Rose on Green Cardstock and then cut out and inked the edges. Here is a tip…line up your words and stripes before you trace and cut out or you might have your words upside down or your stripes going in a weird way. 🙂

Next I used my Bind it All to punch holes in the pages and then cinch the 3/4″ O-wire.

This is what the mini will look like once the O-wires are added.

Next I “speckled” the cover and pages with a marker spritzer (I got this several years ago from Stampin Up) and Frayed Burlap Distress Marker to give the pages a bit of “well loved” look.

These two pages I kept pretty simple. I used a chipboard baby bottle from Gina’s Design which I painted. The other page I used the backside of the Forest Trees Specialty Paper to matt the photo of Momma cat and kittens.
I actually got to see these kittens be born. I really wished I had taken photos when this happened but at the time I had not planned on keeping any of them. The momma cat, Miss Bonkers had followed me  around all day and wouldn’t let me out of her sight. Well,when she finally went into labor and had all of them it was 2:00 in the morning. Omega was the last kitten to be born and was half of the size of the other three kittens. Omega meaning last is how she got her name since she was the last to be born. 🙂

I used from the new Lodge Collection the Birch Tree Paper Straws which I inked with and brown chalk ink and then I punched leaves from Wrap Glitter Cardstock, shaped and adhered to the side of the paper straw. I topped it off with a button and dew drop.
The other page I cut from the Lodge Cut Outs Cardstock the trees and inked the edges and adhered to the page…letting some of it hang off the side of the page. I added to the top of the photo The View sticker which is from the Outdoors Stickers set. I punched two leaves and shaped and topped off with a button, sequin and dew drop.

This is one of my favorite photos of Omega way up in a tree just laying there. She always got chased up a tree by my other cat, Cotton.

I cut from the Pink Glitter Cardstock four scalloped ovals from the Spellbinders Grand Scalloped Ovals diecuts and embossed all with the Flowers and Leaves embossing folder from EC crafts. I plan on adding more photos and finishing my journaling to these pullouts later on.

 I cut a matt from the Forest Trees Specialty Paper and adhered a photo of my husband and Omega to it. My hubby was already asleep when Omega got in his lap and went to sleep never waking my hubby. 🙂 Next I printed and cut out from the Collage and Charm Words Mix Media Altered Art digital sheet “sweet dream” and adhered above. 
The “loved” photo is one from my Instagram account. I used a wooden photo frame that I had received in a swap and added three pearl dew drops from Crimson Mini Dew Drops to top it off. I had a leftover Valentine Hearts cardstock that I cut a scallop diecut from and a scrap leftover from a heart cutout that I adhered to the page.

The back cover of the mini along with ribbon, fiber and charms that I added to the O-wire.

The front was major fun to do. Since I had scraps from past DT projects I used those and a script cutout from the Lodge Cut Outs Cardstock, Forest Trees Specialty Paper, dew drops, bling, decorative frame and doily from Gina’s Designs and a sticker of a vintage cat  that I had bought years ago that I thought would look perfect on the front.


Supplies Used:

4 Coffee Filters
Bind it All, 3/4″ O-wire
Ribbon
Buttons
Sequin
Punches: Leaf and Small Flower
Sizzix: Scalloped Circle, Little Leaves
Spellbinders: Grand Scalloped Oval Diecuts
Charms
Chocolate Chalk Ink
Robin’s Nest: Special Delivery Cardstock, Pink Rose on Green CardstockForest Trees Specialty PaperBirch Tree Paper Straws, Wrap Glitter Cardstock
Lodge Cut Outs CardstockOutdoors StickersCrimson Mini Dew DropsValentine Hearts cardstock, Crimson Mini Dew Drops, Dew DropsPink Glitter Cardstock 
EC Crafts: Flowers and Leaves embossing folder
Gina’s Designs: Doily, Baby Bottle, Decorative Frame (front of mini)
Cassi’s Creations:  Collage and Charm Words Mix Media Altered Art digital sheet

Well, I hope you enjoyed the mini I shared with you today. Please remember to stop by the Robin’s Nest and check out the Special Delivery Collection that is 20% off this month and while you are at it but sure to look at the new Lodge Collection too…super fun collection that you can do a lot of crafty things with. 🙂 Also be sure to stop by EC crafts and check out the embossing folders, stickers and other fun crafty stuff they have.

Thanks for stopping by, hope your Sunday is wonderful and enjoy creating!!!


This and That

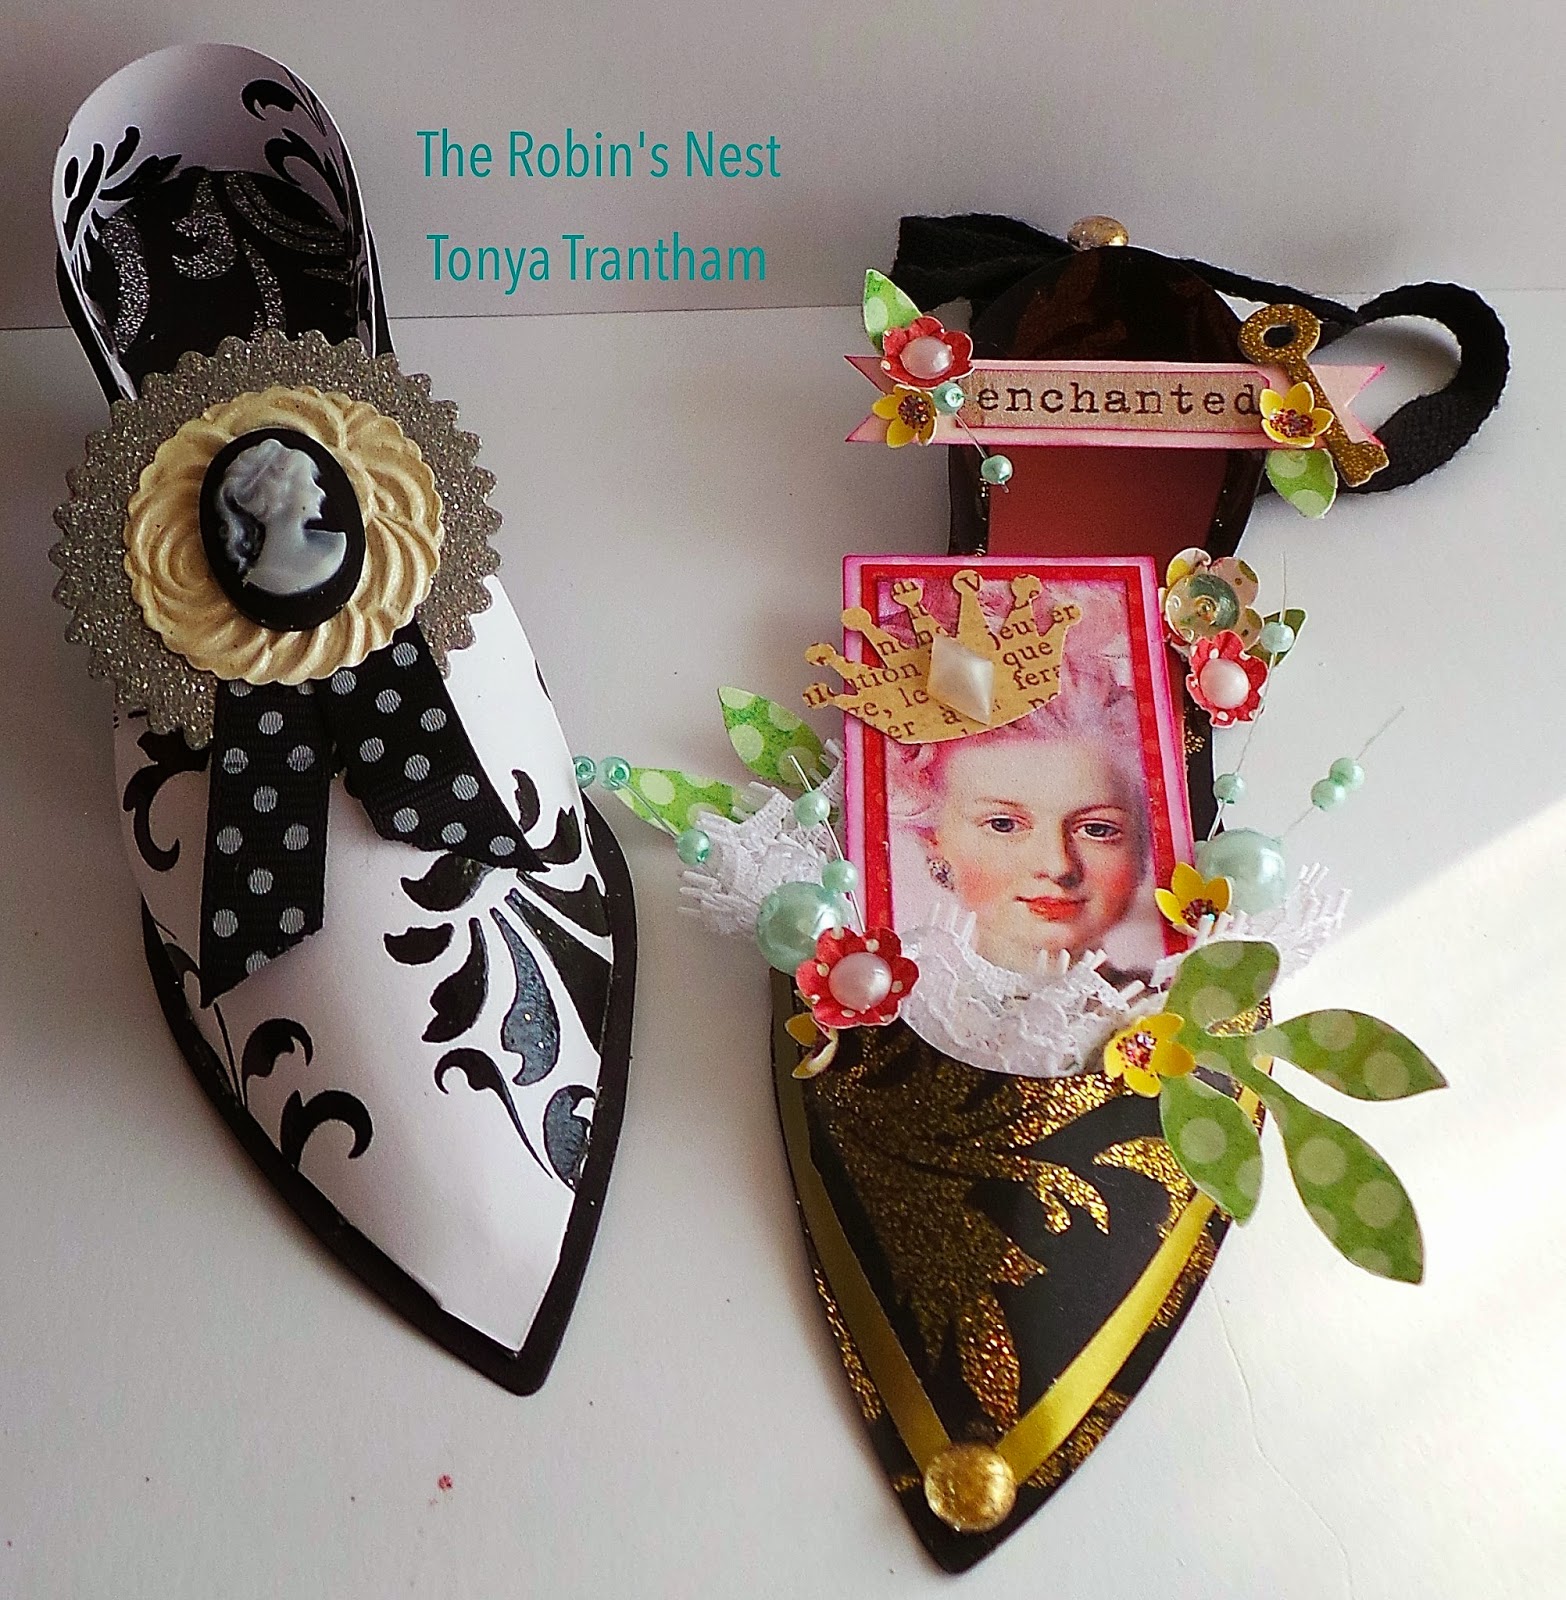
Hi everyone! It’s me Tonya and I’m back this month to share what I created using the Regency Collections that is 20% off this month over at the Robin’s Nest and  Heartfelt Creations which we are crossing promoting.
I kinda went crazy this month with projects. Instead of just one I have the box I altered into a ATC holder, eight ATC cards and one card using all these wonderful products.
If you are ready lets get started. 🙂

For the ATC holder first I found a box that was 3 1/2″x5″. Find the center of the box on the 3 1/2″ side, mark and drew a line down to the other 3 1/2″ side. Cut and then folded down on either side to make holder more sturdy.  

Make small holes for the “feet” that will hold up the box. Next gesso the sides and bottom of box. 

Once the gesso is dry paint the sides and bottom of the box with black acrylic paint. Let dry. Cut five pieces of cardstock to cover the sides from the Gold Glitter Paisley Cardstock. I cut these a little bit smaller so a little of the black paint would show on the box. Also measure the inside bottom of the box and cut from the black glitter chipboard a piece to fit inside. I embossed it with the Flourish embossing folder and used Sahara Sand Chalk Ink to ink the edges of all the cardstock to give it an “aged” look. Adhere the  Gold Glitter Paisley Cardstock to the sides and bottom of the holder. Next attach the “feet” to each corner of the holder with the brads that are included. Now adhere the black glitter chipboard to the inside of the holder. 

 I used Gold Glitter Chipboard to cut out the book plate that is on the front of my ATC holder. This diecut is from the Heartfelt Creations Burnished Key Custom Design Die Template. I printed the “This & That” sentiment from the computer and inked it to give it a vintage feel. I added an old ear ring that I had received in a swap several years. At the time I didn’t know what I would even use it for??? Now it is the perfect addition to the bookplate and to top it off I added a purple Dew Drop

Don’t you think the holder has an elegant and vintage feel???

The next project I created was some ATCs for my little holder. If you don’t know what an ATC is here is the definition I pulled from the Internet.

artist trading card
Web definition
  1. Artist trading cards are miniature works of art about the same size as modern trading cards baseball cards, or 2 1⁄2 by 3 1⁄2 inches, small enough to fit inside standard card-collector pockets, sleeves or sheets.


I’m a firm believer in using up scraps of cardstock and scrapbook paper that I have laying around. Yes, I have hoarder tendencies…lol
I started with base of the ATC using the Vanilla Fluer Glitter Cardstock. It is double sided  The children are from a digital sheet I got from Cassi’s Creations. I fussie cut, chalked and added scraps of cardstock, dew drops, button, stickers and sentiments…printed from the computer and stamped. Also I found this mini playing card that I thought was perfect for the little “king of hearts”.

The base of these two ATCs are cut from Gold Classic Swirl Glitter Cardstock. I inked both bases with chalk ink which turned nice. The butterflies I cut from scraps of Robin’s Nest cardstock using the Bigz Beautiful Butterflies die. Adhered to the card along with a zipper pull, sequin, gold dew drops and dress pins for antennas.
The other ATC I cut from scraps a heart from the Hearts and Brackets die which I embossed with Gear Box embossing folder and added sprockets gears, game spinner also. I used the Burnished Key Custom Design Die Template to cut out a lock and key from the gold glitter Chipboard. Inked and then attached it with a ring fastener.

For the base of the lion ATC I used Calmity Jane Rose Glitter Cardstock, fussie cut the lion from the Red Lion Cardstock, used scraps and a sticker from the Regency Sticker Set.
The friend is ATC base is cut from Gold Classic Swirl Glitter Cardstock and inked in chalk ink. The sentiment is from the Clearly the Right Words stamp set and to top everything off I used a dolie and bird chipboard pieces, scraps of scrapbook paper, button and twine.

Both of these bases are cut from Gold Glitter Paisley Cardstock and the Cathedral Speciality Paper was used as an accent. Scraps were used on both along with a dress form and butterfly chipboard pieces, dew drops, flower punches, sentiments printed from the computer. The “grumpy fairy” is an image I cut from a Crafty Secrets sheet. The only problem was I had clipped off of the back side of the sheet another image and my fairy was missing an arm so I created the sign to cover up the fact she is a one armed fairy.

I hope you liked the ATCs I created for my holder. The plan is to use up scraps on ATCs and fill this little holder up. 🙂

Also I had to come up with a card for my secret sister and since I had leftovers I decided to create a card. So I’m going to share. 🙂
I cut a 5″x6 1/2″ (approximate) card base from Gold Glitter Paisley Cardstock. I cut from the Vanilla Fluer Glitter Cardstock a piece a little bit smaller than the card base and stamped with the Summer Seasons Pre-cut Set from Heartfelt Creations in Timber Brown StazOn Ink.

Next I cut a piece of Cathedral Speciality Paper  and adhered to the stamped piece. I embossed one end with the Fleur De Lis embossing folder and then inked all the edges. 

I used some of the stickers from the Regency Sticker Set. 

I started with the black Fleur De Lis tag sticker and used Robin’s Nest scraps to make two banners to add to the tag.

The little girl digital image is from Cassi’s Creations. I wanted to add a little bit more color to her so I dragged out my chalk pastels (I’ve had these since elementary school…lol) and used a swab to add color to hair, cheeks and dress.

I also added a tab sticker which I stamped with Hello and I cut a Fleur De Les from the back side of the Gold Glitter Paisley Cardstock using the Fleur De Lis and Eiffel Tower diecut and added to the corner of the card. I topped it off with a Black Diamond Dew Drop.


Supplies Used:
Robin’s Nest: Gold Glitter Paisley CardstockVanilla Fluer Glitter Cardstock, Red Lion CardstockCalmity Jane Rose Glitter CardstockGold Classic Swirl Glitter Cardstock, Dew DropCathedral Speciality Paper,  Regency Sticker SetBlack Diamond Dew Drop, Gold Glitter Chipboard, Very Black Glitter Chipboard
Digital Images: Cassi’s Creations
Heartfelt CreationsBurnished Key Custom Design Die TemplateSummer Seasons Pre-cut Set 
Spare Parts Antique Silver, Box Feet
Apple Barrel Black Acrylic Paint
Sahara Sand Chalk Ink
Martha Stewarts Chalk Inks
Pastels
Gesso
Mod Podge
Tim Holtz: Ring Fastener, Sprocket Gears, Game Spinners 
Sizzix: Flourish and Postcard Embossing Set, Bigz Beautiful Butterflies die, Hearts and Brackets, Fleur De Lis and Eiffel Tower die
Cuttlebug: Gear Box and Fleur De List Embossing Folders
Prima Cling Mounted Stamps
StazOn Timber Brown Ink
Gina’s Designs

Well, that is a wrap! I hope this has inspired to hop on over to the Robin’s Nest  to check out the sale this month and while you are at it stop by Heartfelt Creations to see all of their die cuts and rubber stamps they have.
If you have any questions about any of the projects I created please give me a holler and I will do my best to answer. 
Thanks for stopping by, hope your Sunday is wonderful and enjoy creating!!!


Love Paper Sack Mini Album

Hi everyone!!! I have been sooooo busy creating cards, swaps and design team projects and I just haven’t got around to blogging but I’m now back to share one of my projects I created for a swap I was in on Facebook. We had to altered a 300 count matchbox into a Valentine’s Day theme and add handmade goodies inside of it. Well, I’m going to share the mini album I created using five 4″x6″ paper sacks. I did cut the tops down a little so the mini would fit into the matchbox. I used Baker’s twine to bind it together.

I used bits and pieces of leftover cardstock, scrapbook paper, lace, stickers and images to put this adorable mini together.

I also put together a package of die cuts, stickers, ribbon and dew drops so my swap partner, Norma, could add more to the pages if she wanted to.

Also I shared this mini and matchbox on Maya Roads Facebook page for a challenge they had going on…there is a chance to win a prize package. I have my fingers and toes crossed that I win something. 🙂
Come back Tuesday (treat holder) and Wednesday (matchbox)  to see what I created.
Thanks for stopping by, hope your Monday is awesome and enjoy creating!!!


Christmas Junk Journal Part Two

Hi there! I hope everyone had a wonderful Thanksgiving and didn’t eat too much. 🙂  I’m back to share the other half of my Christmas junk journal using the Christmas Collection (North Pole) which is 20% off this month over at the Robin’s Nest site. As you remember the photo below is the cover of my journal I created and if you missed that post you can check it out here.

I used Christmas Glitter Words, Black and White Glitter Pine Tree and Red Snowflakes cardstock to create these two page layouts below with a folded pullout too. I found the Santa image online when I was doing a search and just printed it out.

I used Flame Glitter Swirl cardstock on these two page spread. One side I added the rub on “believe” to the cardstock. The paperbag I added a glimmer misted paper doilie and a Santa cut out to the paperbag and a pullout tag too.

These layouts below I used bits and pieces and found objects I had laying around…Christmas name tags, stamps, images clipped from Christmas cards and ornaments.

A simply tag using Red Glitter Stripe cardstock  cut with Spellbinder’s Grand Calibur Creative Book Pages die and a used postage stamp as a tab on the opposite “page” make this glassine bag look adorable.

I used some candy cane dies cuts for one page and the olive green paperbag I made a “pocket” and added a printable image and White Glitter Swirl cardstock on White that I cut from Spellbinders Classic Triple Scallop Insert B die. Also I adhered sequins and dew drops too.

Next I matted both printables, one with Red Snowflakes  and the other with Black and White Glitter Pine Tree cardstock. These both double as pockets for the tag, Christmas name tag and old Bingo card.

I cut from the Black and White Glitter Pine Tree cardstock from the Spellbinders Oval and added a cute felt reindeer to it.

I used the backside of the Christmas Glitter Words for the background of the next page. The stocking die is cutting from Red Distressed cardstock and I added a cute printable image from Cassi’s Creations.

The back page is the opening of the envelope which can be used to add receipts or special tidy bits from Christmas. I covered that page with Red Snowflakes cardstock. 
There you have it 34 pages, 11 pockets/holders and 15 tags/pullouts to document everything that happens at Christmas.

Supplies Used:

Red Snowflakes 
Flame Glitter Swirl
Red Glitter Stripe
Red Distressed cardstock
Ephemera’s Vintage Garden printable 
Cassi’s Creations printable
Spellbinder’s Grand Calibur Creative Book Pages die
Spellbinders Classic Triple Scallop Insert B die
Sizzix Christmas Ornament, Light and Stocking

Be sure to stop by the Robin’s Nest site to check out the Christmas Collection (North Pole) since it is 20% off and pick some cardstock and embellishments to make your own junk journal!!! 
If you have any questions let me know. Thanks for stopping by, hope your Saturday is wonderful and enjoy creating!!!