Garden Gate Journal Cover Part One

Hi everyone! Did you catch Eileen Hull‘s release party Monday? She showed off her newest collection and the team’s projects from the show floor at Creativation. If you missed the live and would like to see what you missed you can find that video HERE.

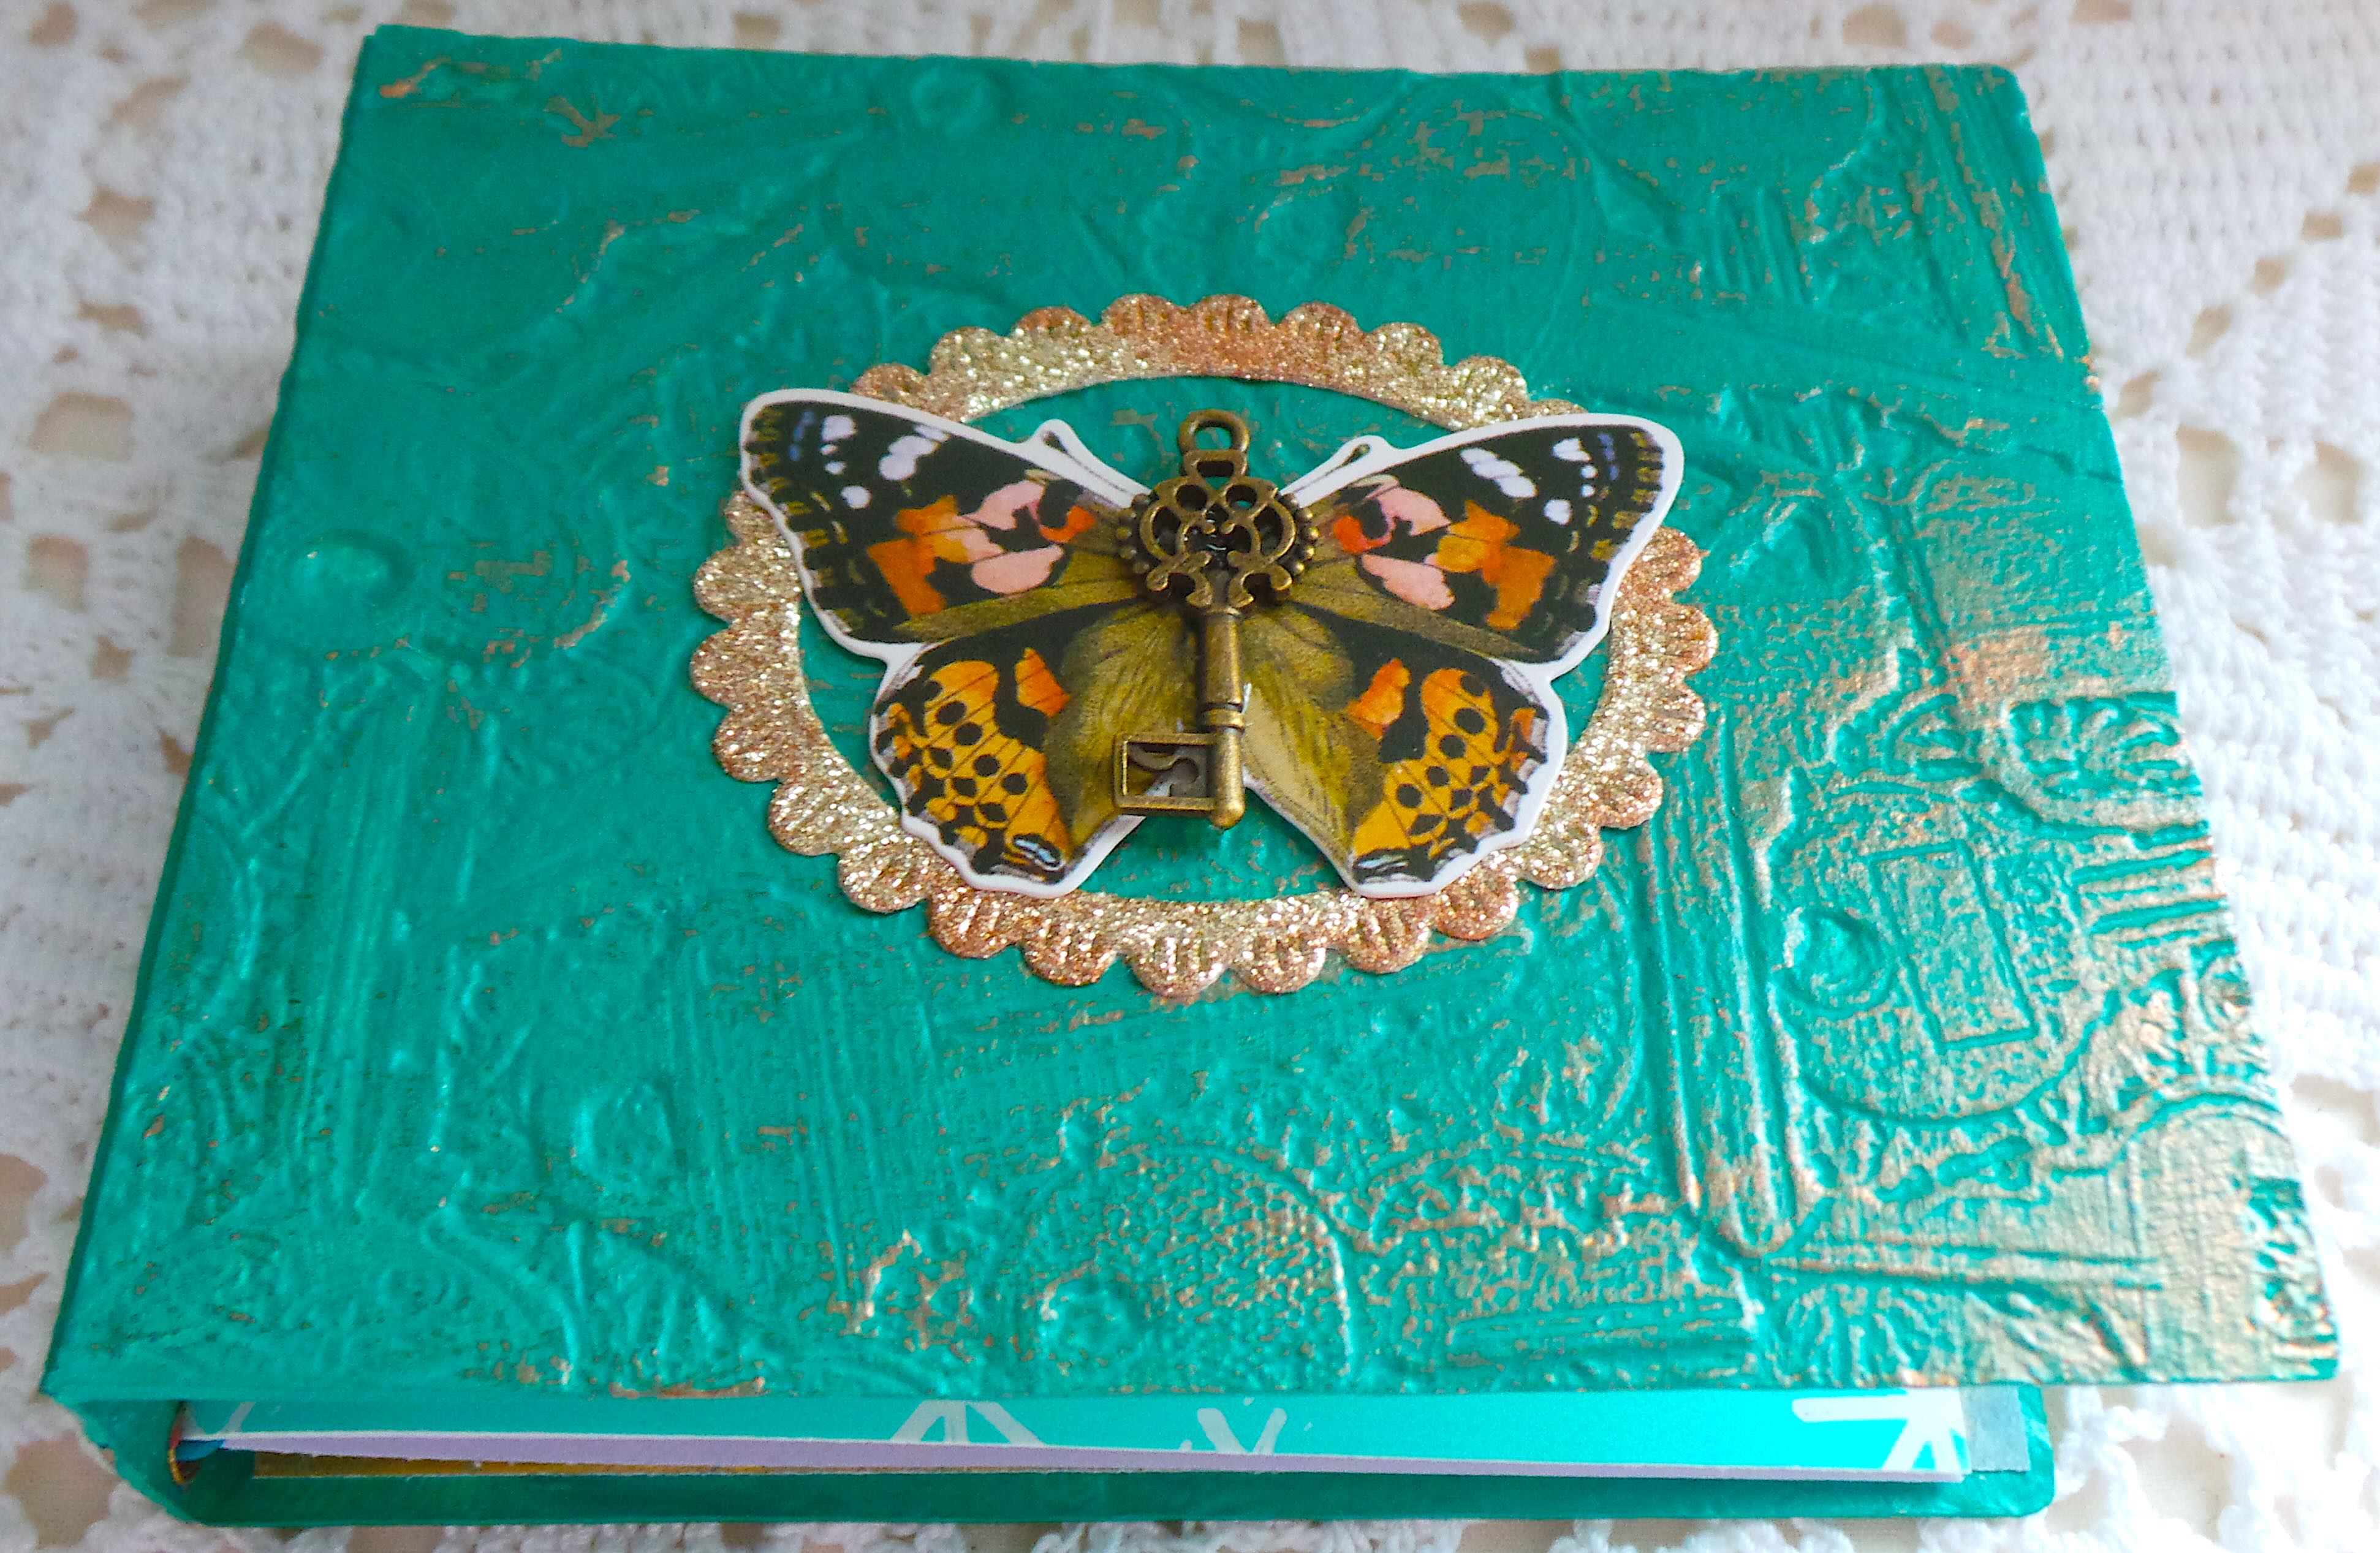
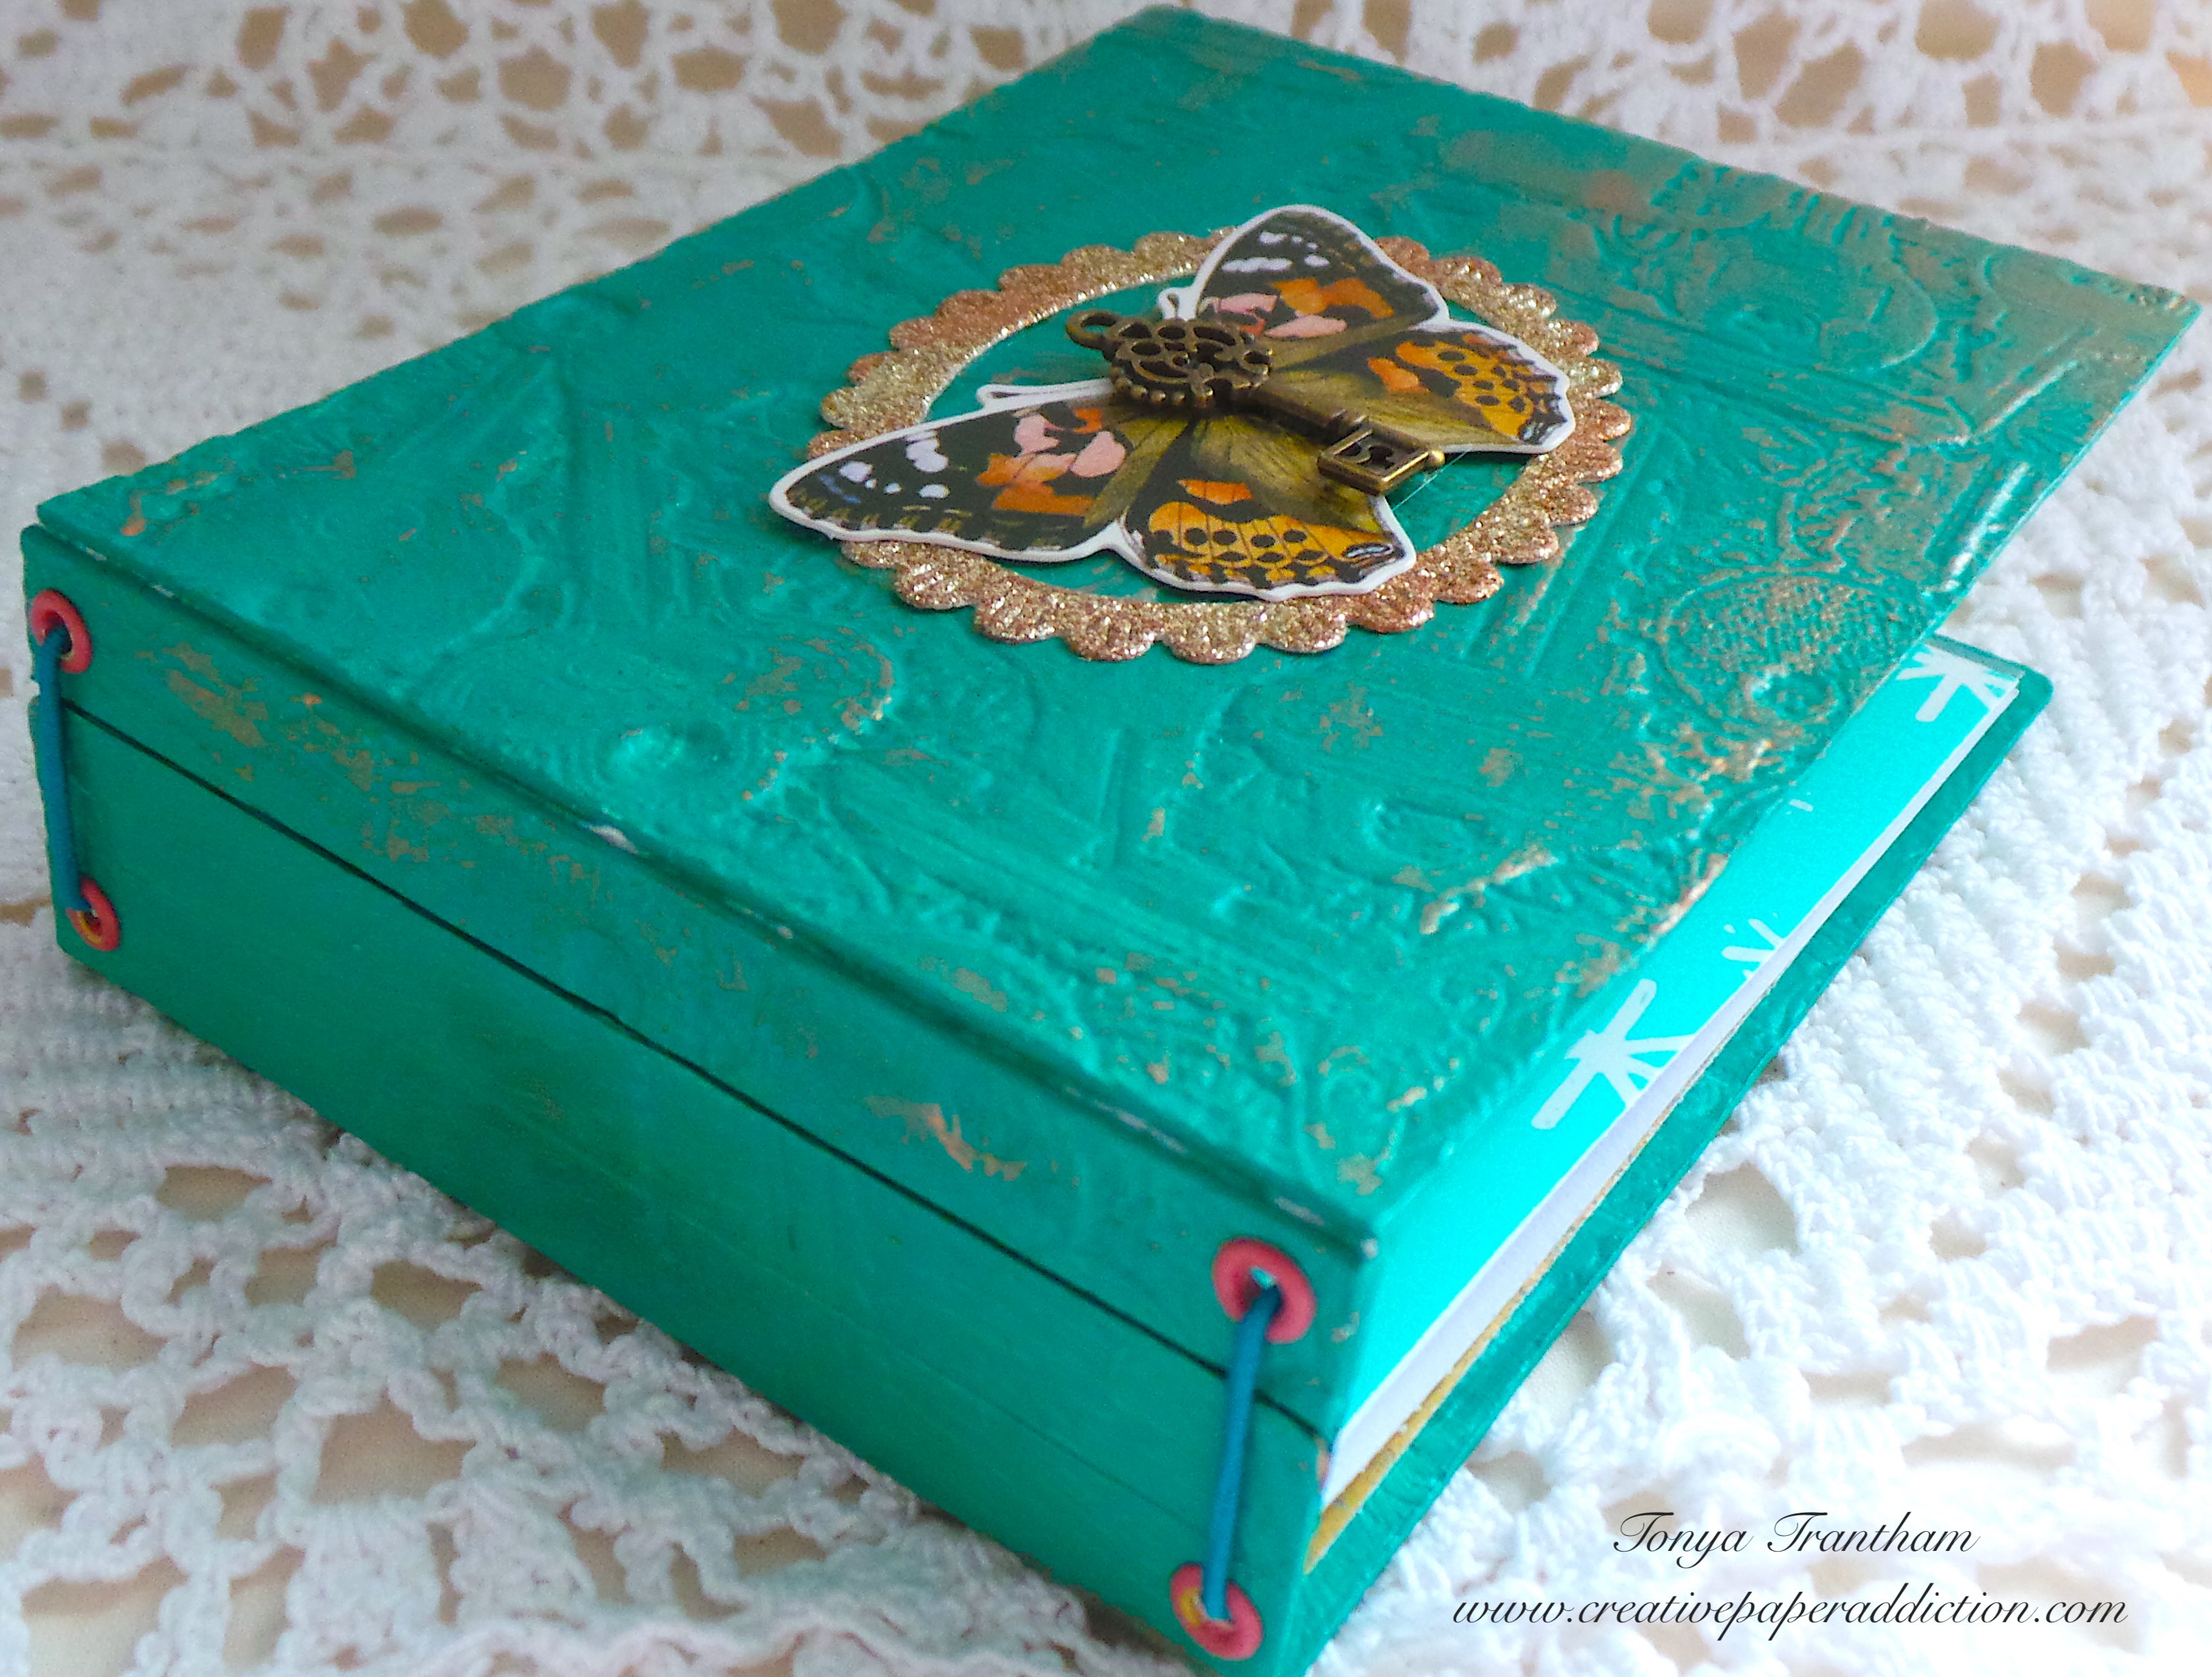
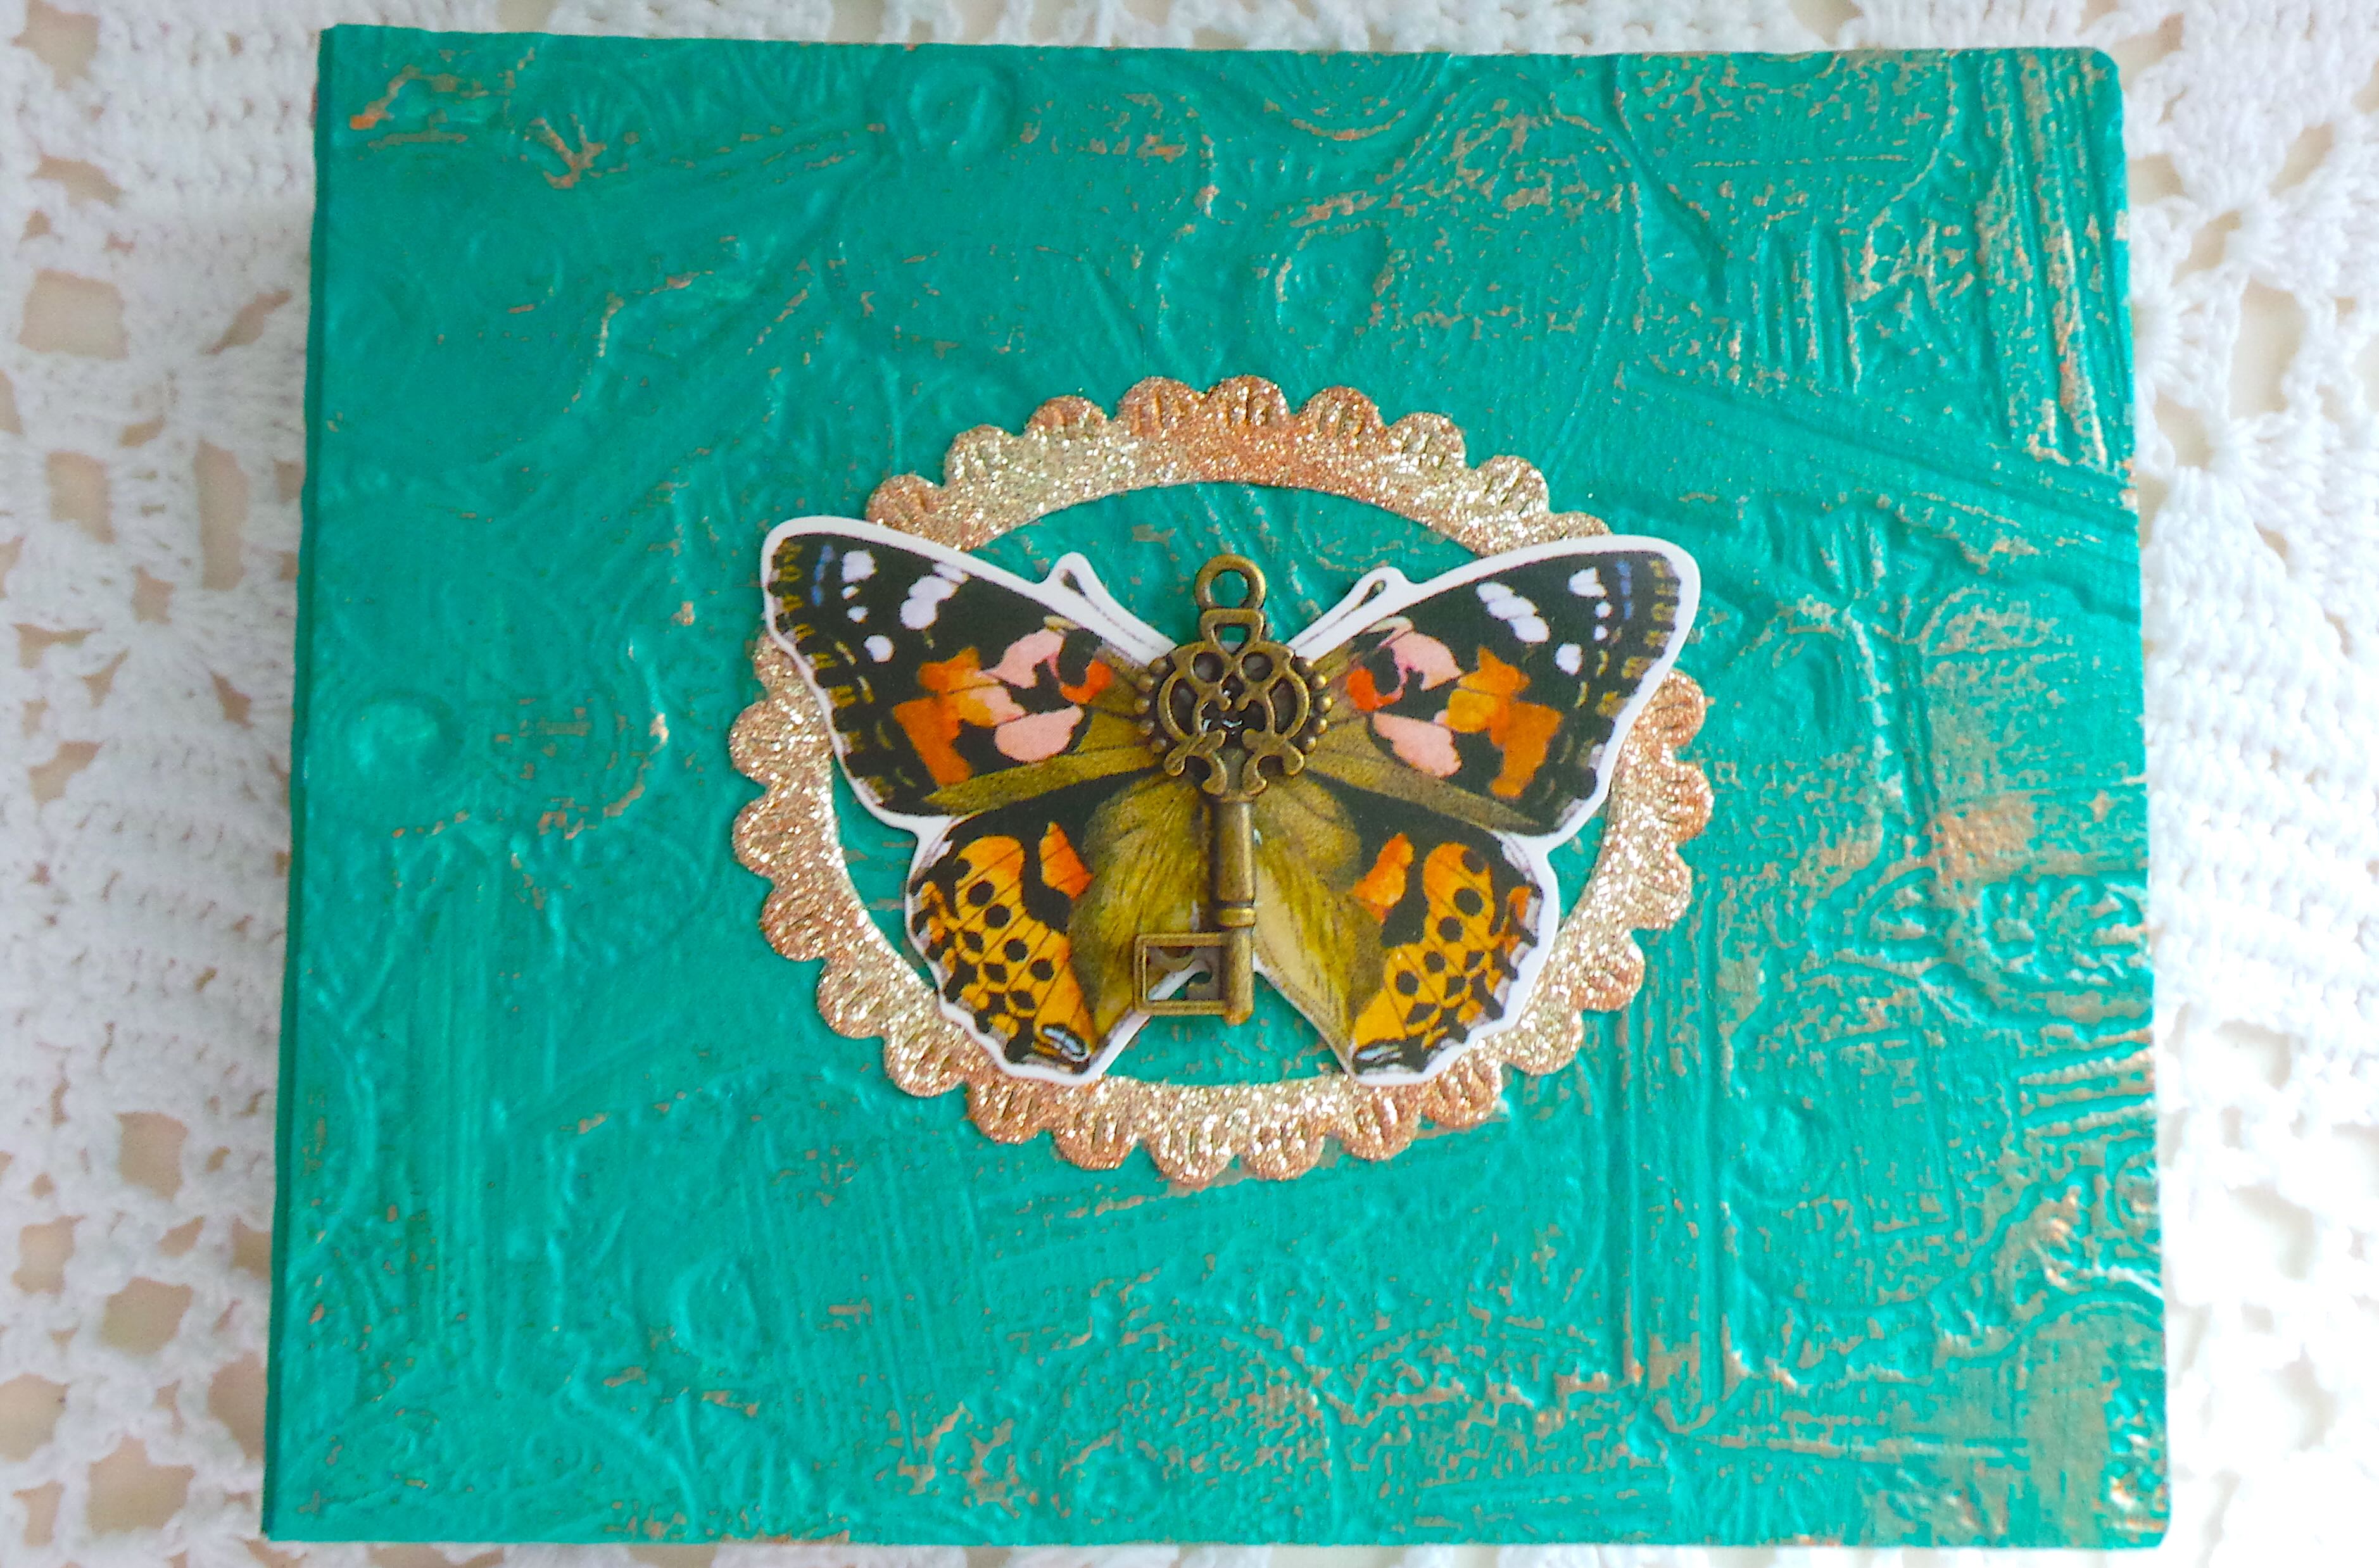
This was one of the projects that Eileen shared Monday. I created the journal cover featuring the Garden Gate Journal Diecut, along with a couple other diecuts from the same collection. Anyways, let’s get started!

A decorative paper craft featuring a fence design with colorful flower embellishments in a pastel color scheme.

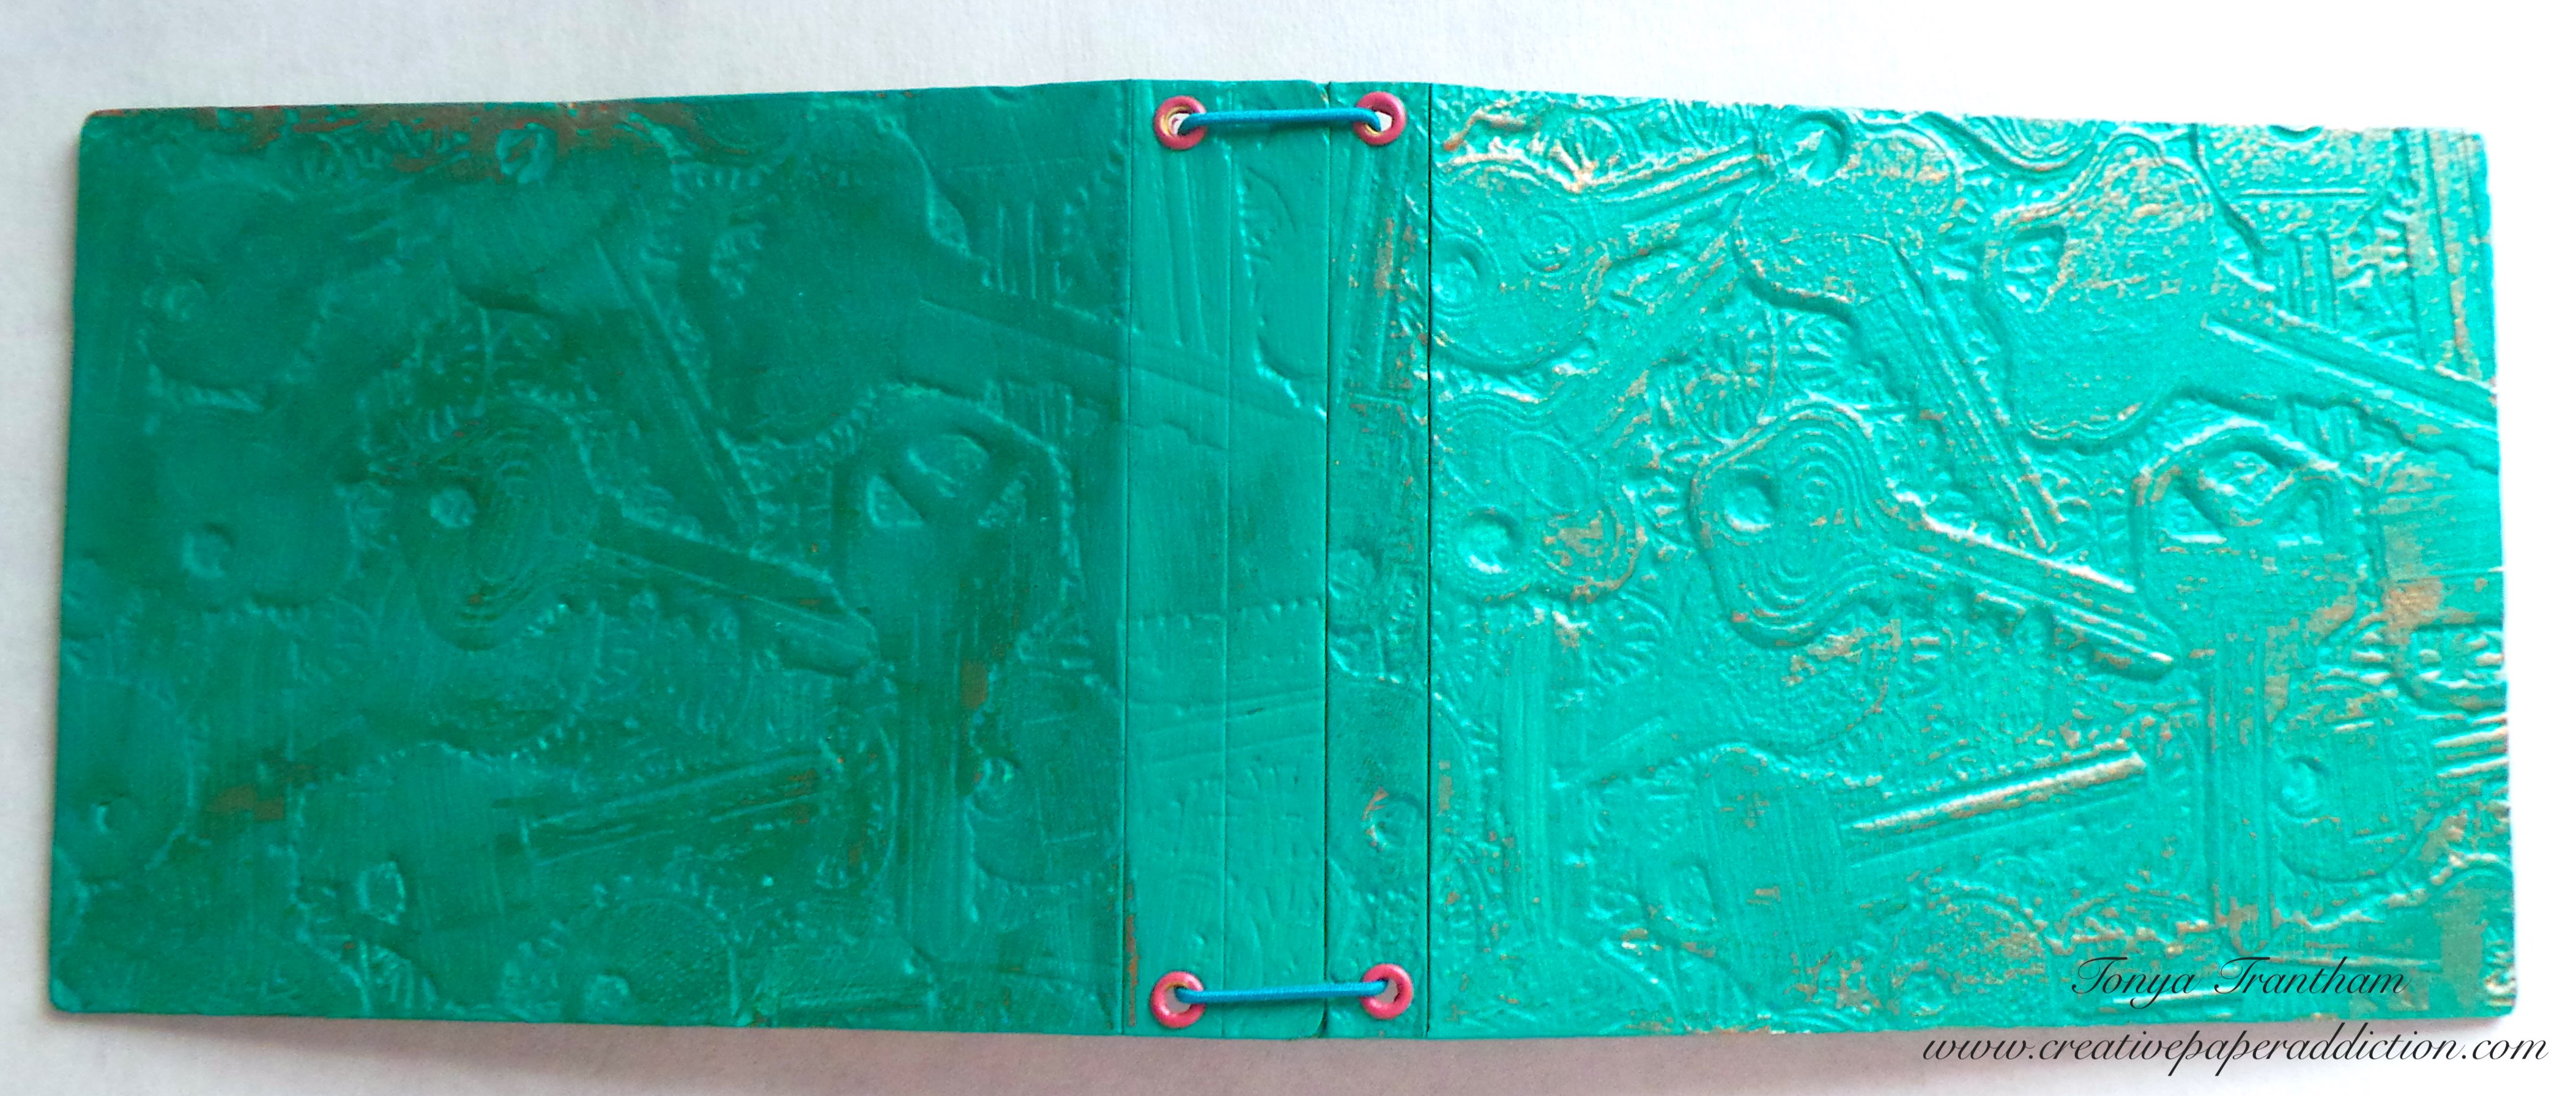
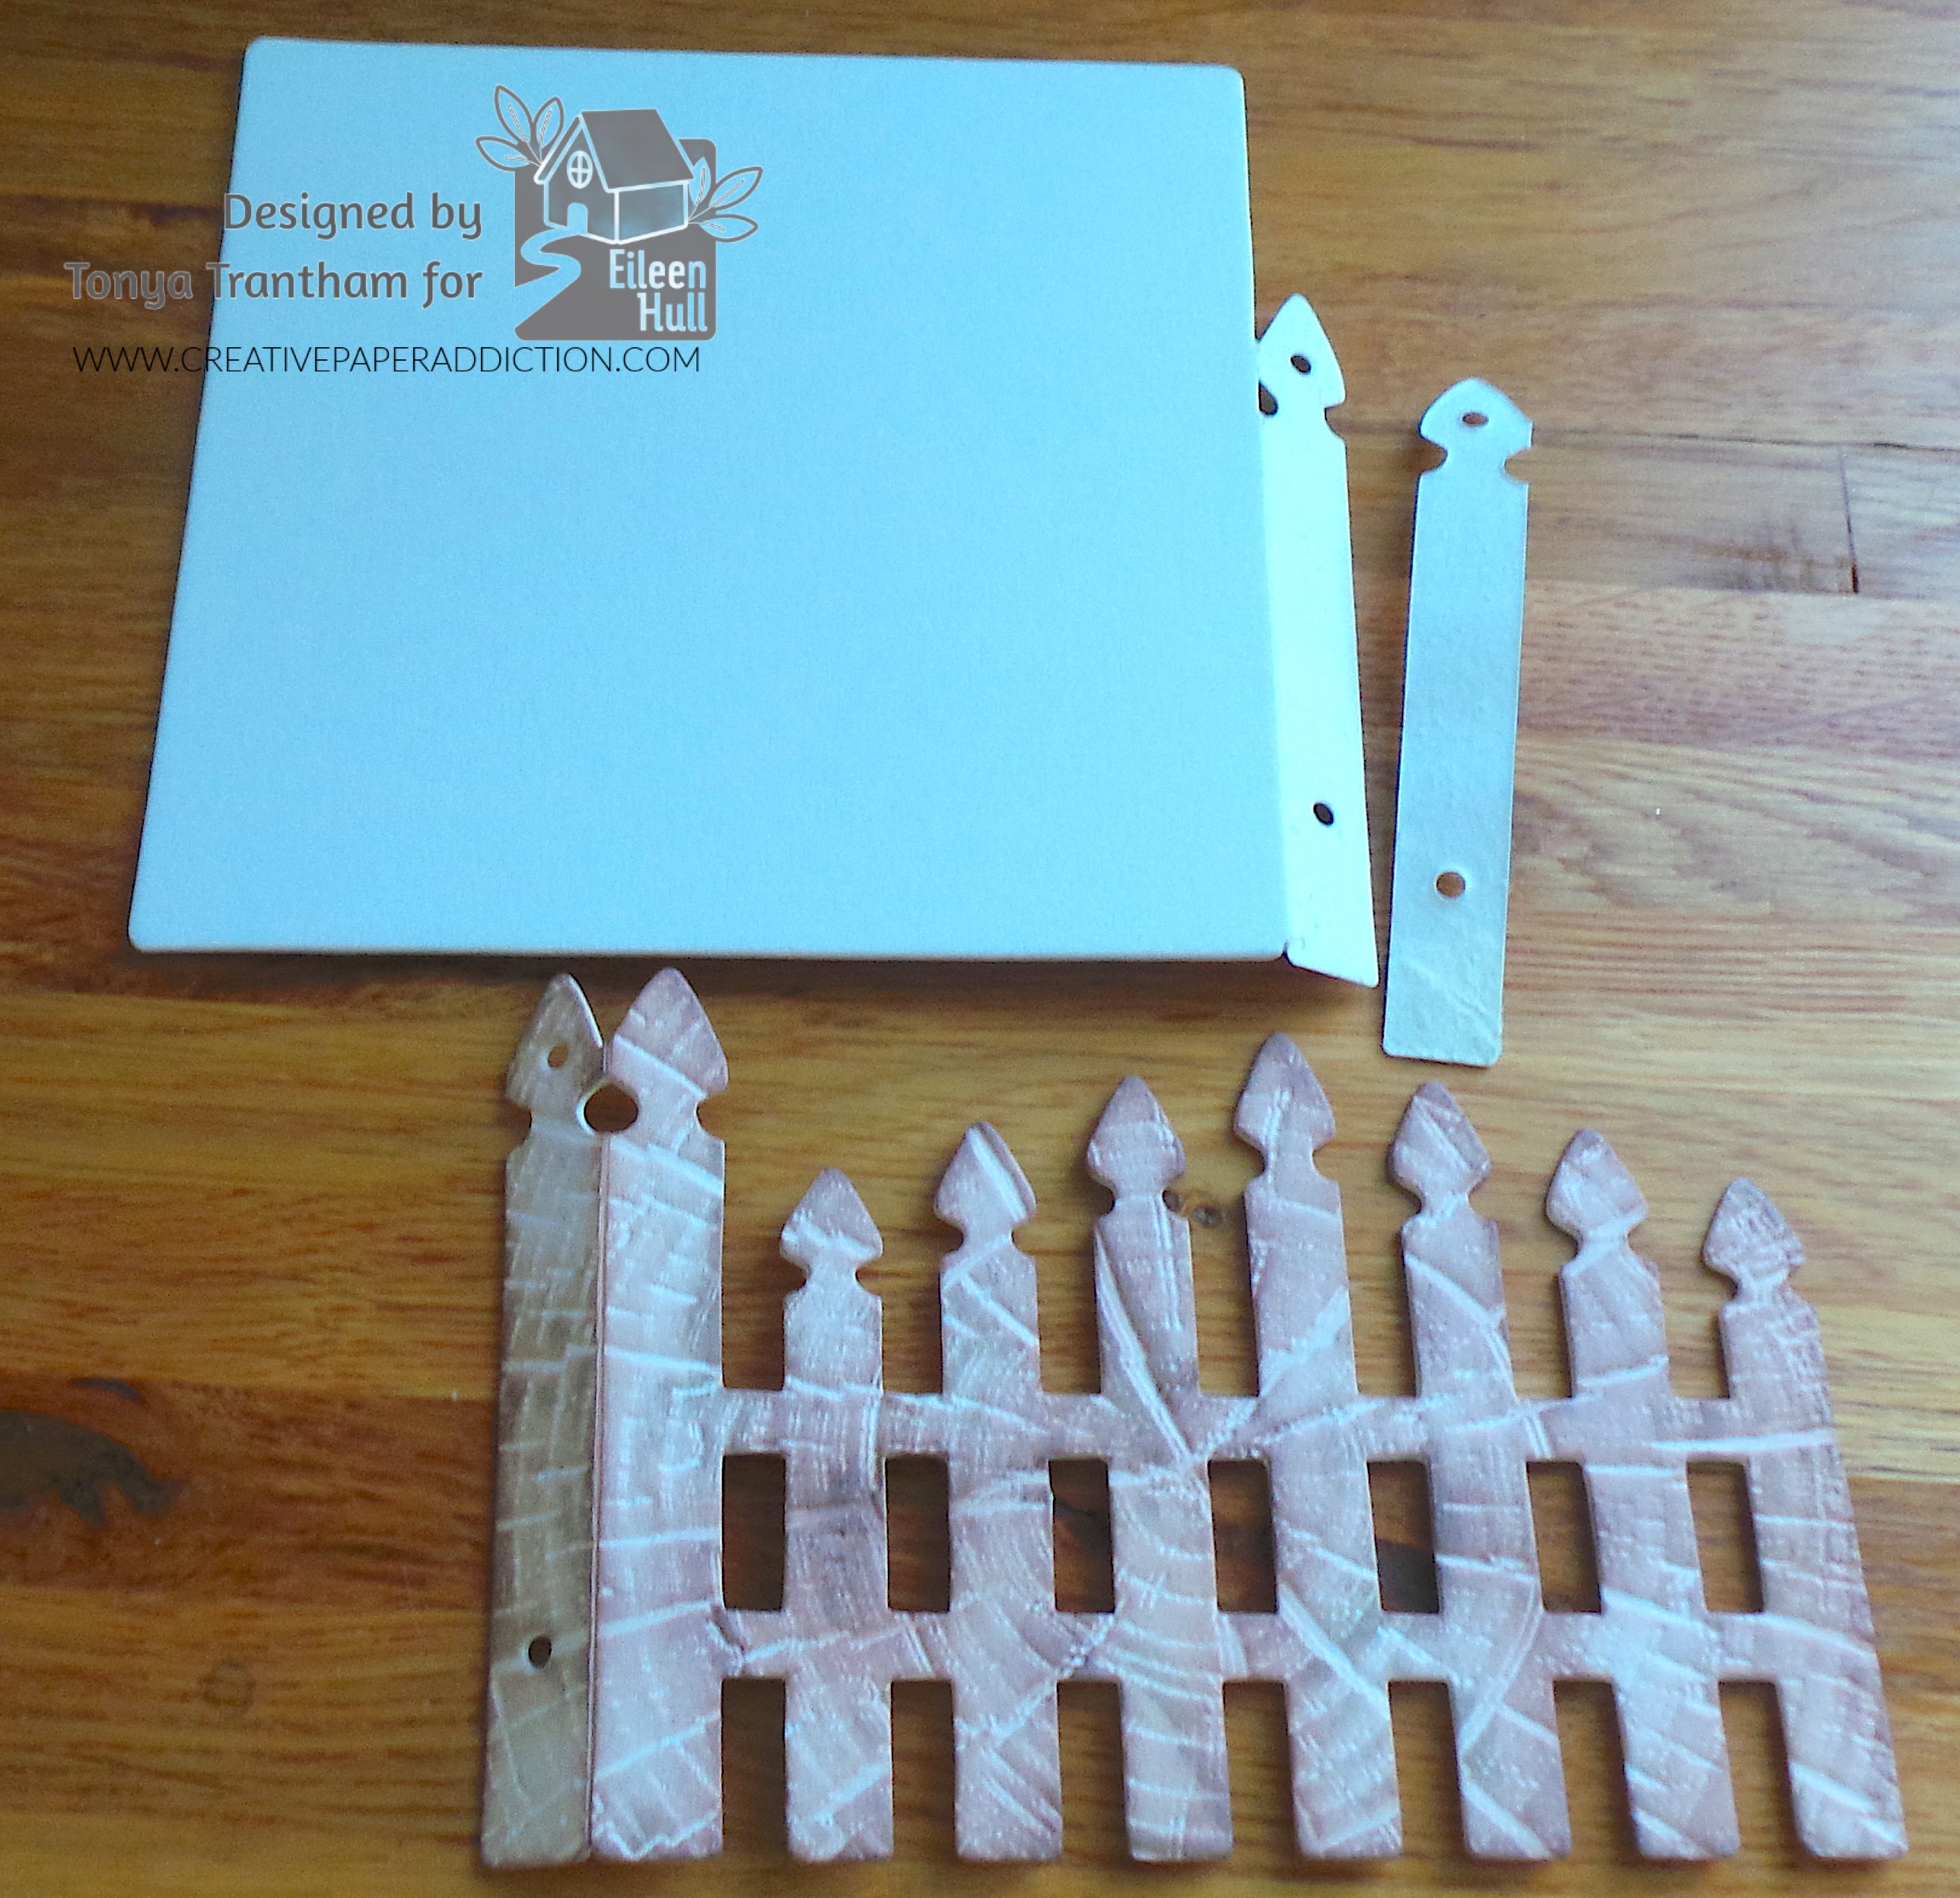
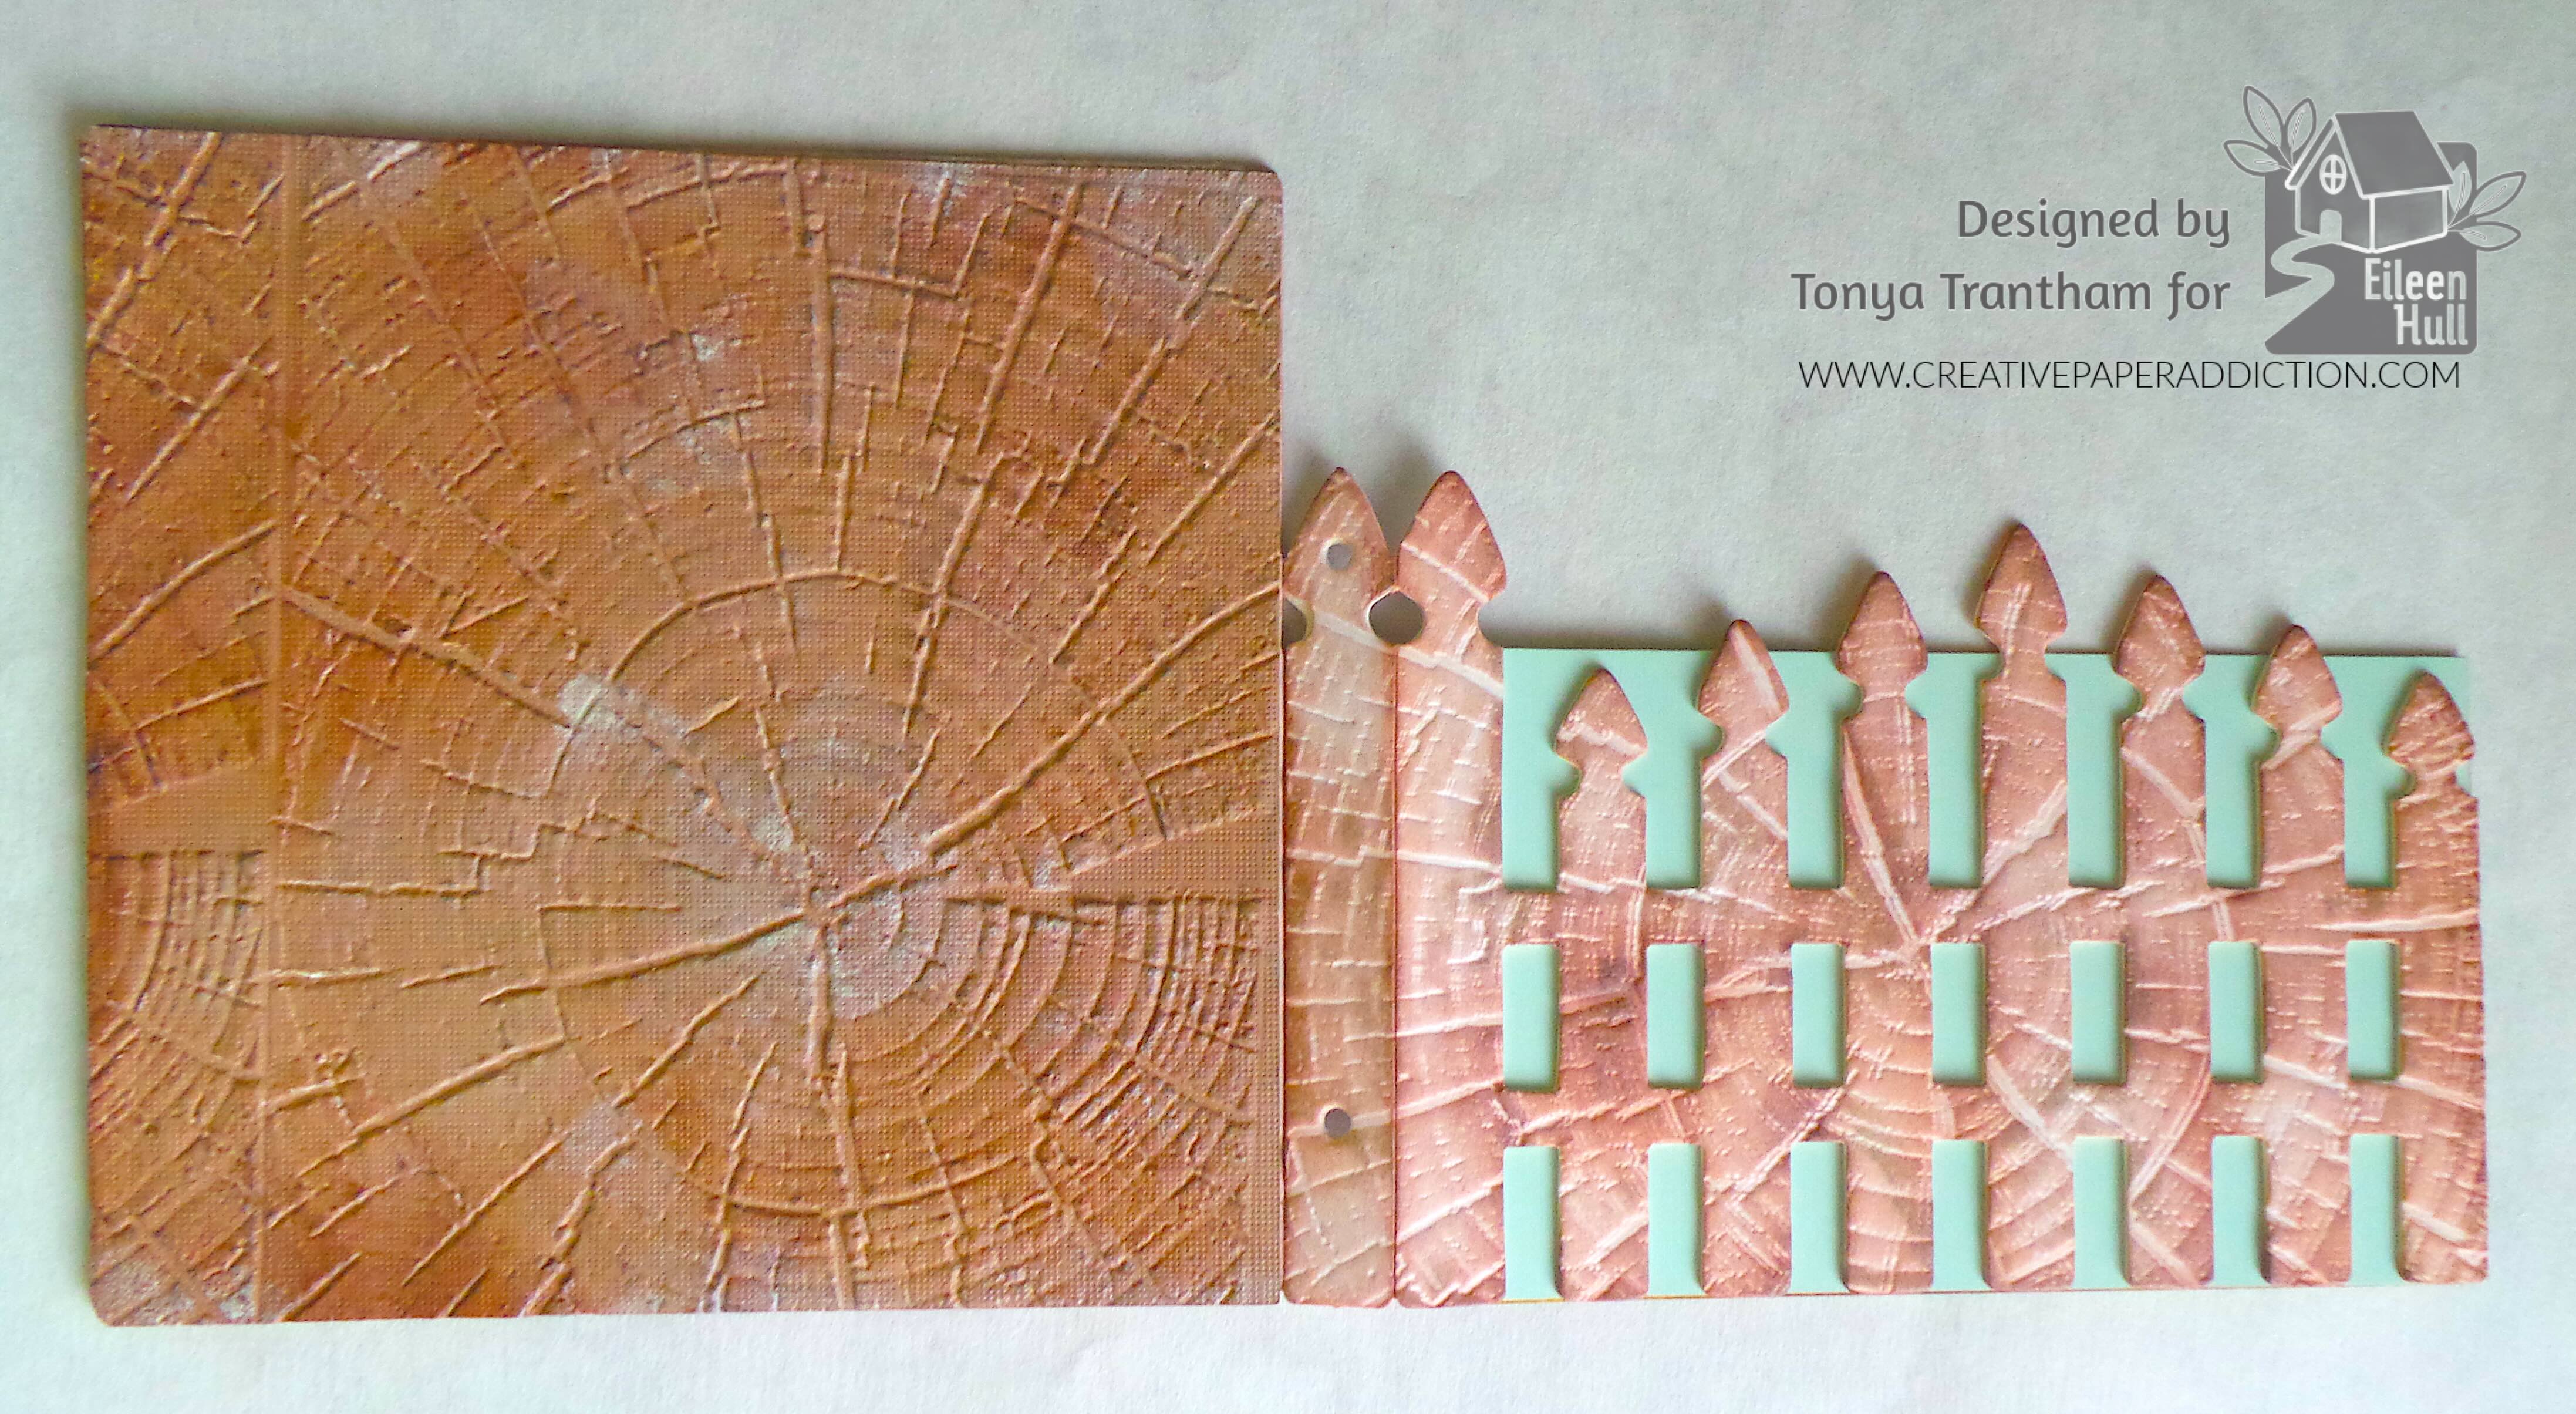
I cut a front and a back of the journal from Matboard using the Garden Gate Journal Diecut. I embossing the covers with the with a retired embossing folder by Tim Holtz. Side note, I did adhere a brown cardstock to the back outside of the cover before embossing. The embossing folder has a wood texture like the inside of a tree. The packaging didn’t have the name but had the item number 666049 if you are interested.

A white square crafting board with two white fence pieces and a pink decorative wooden fence segment on a wooden surface.

I inked over the embossed areas with an assortment of different shades of brown and black chalk inks. That is my preference of inks to use. I’m a firm believer in using what you have on hand and if you have something different use it.

Craft project featuring two rectangular panels with decorative edges, one larger and one smaller, set on a wooden surface.

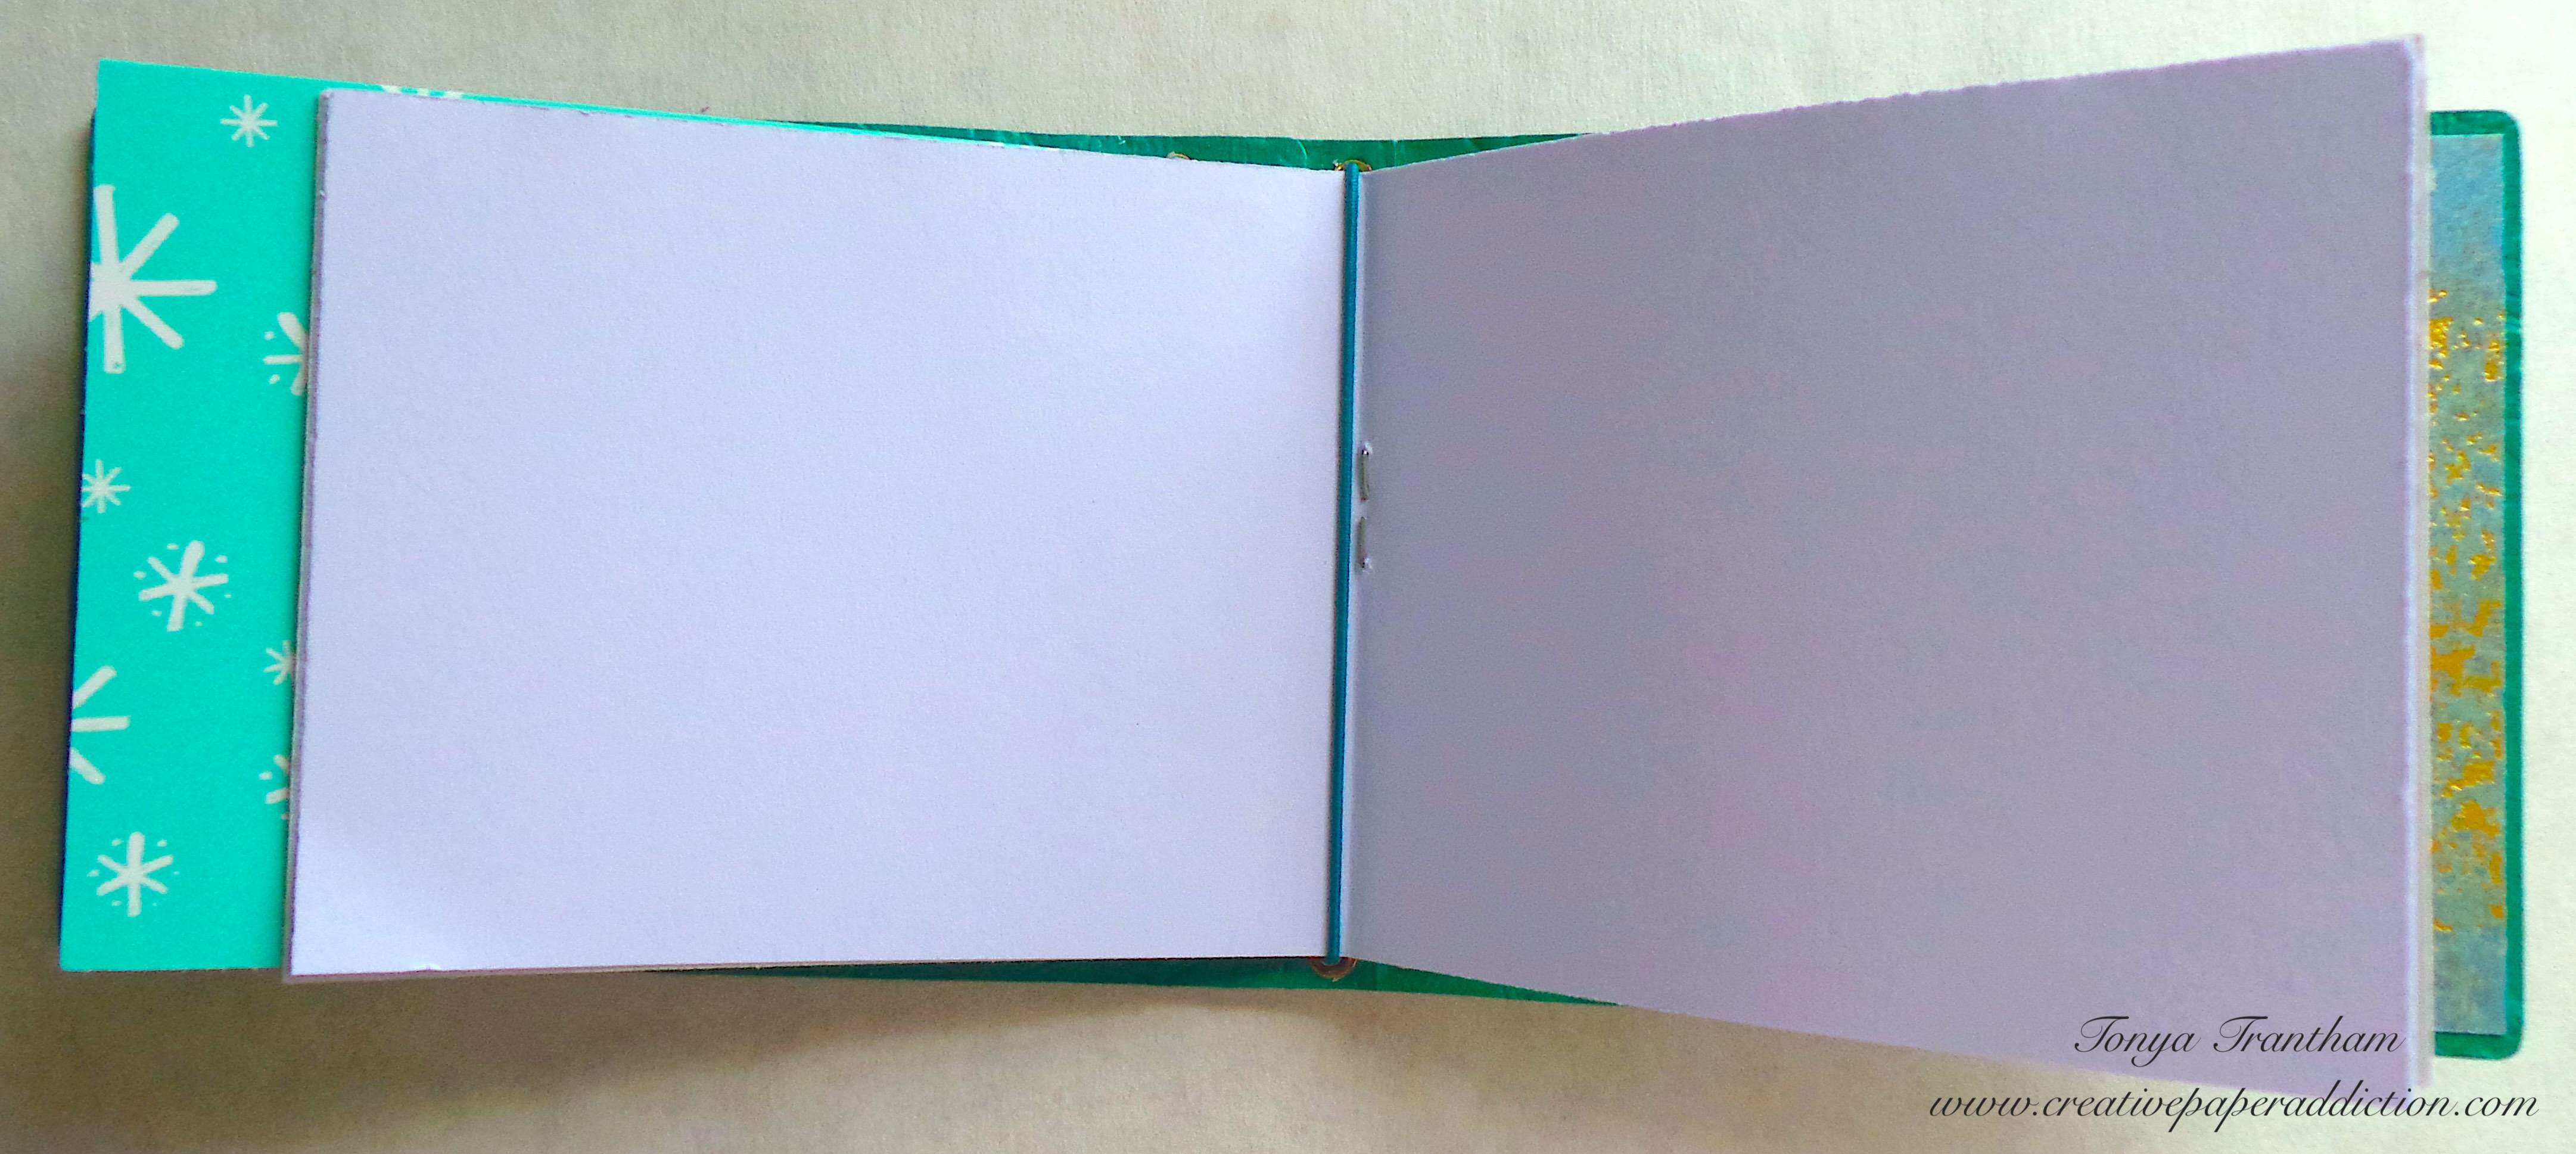
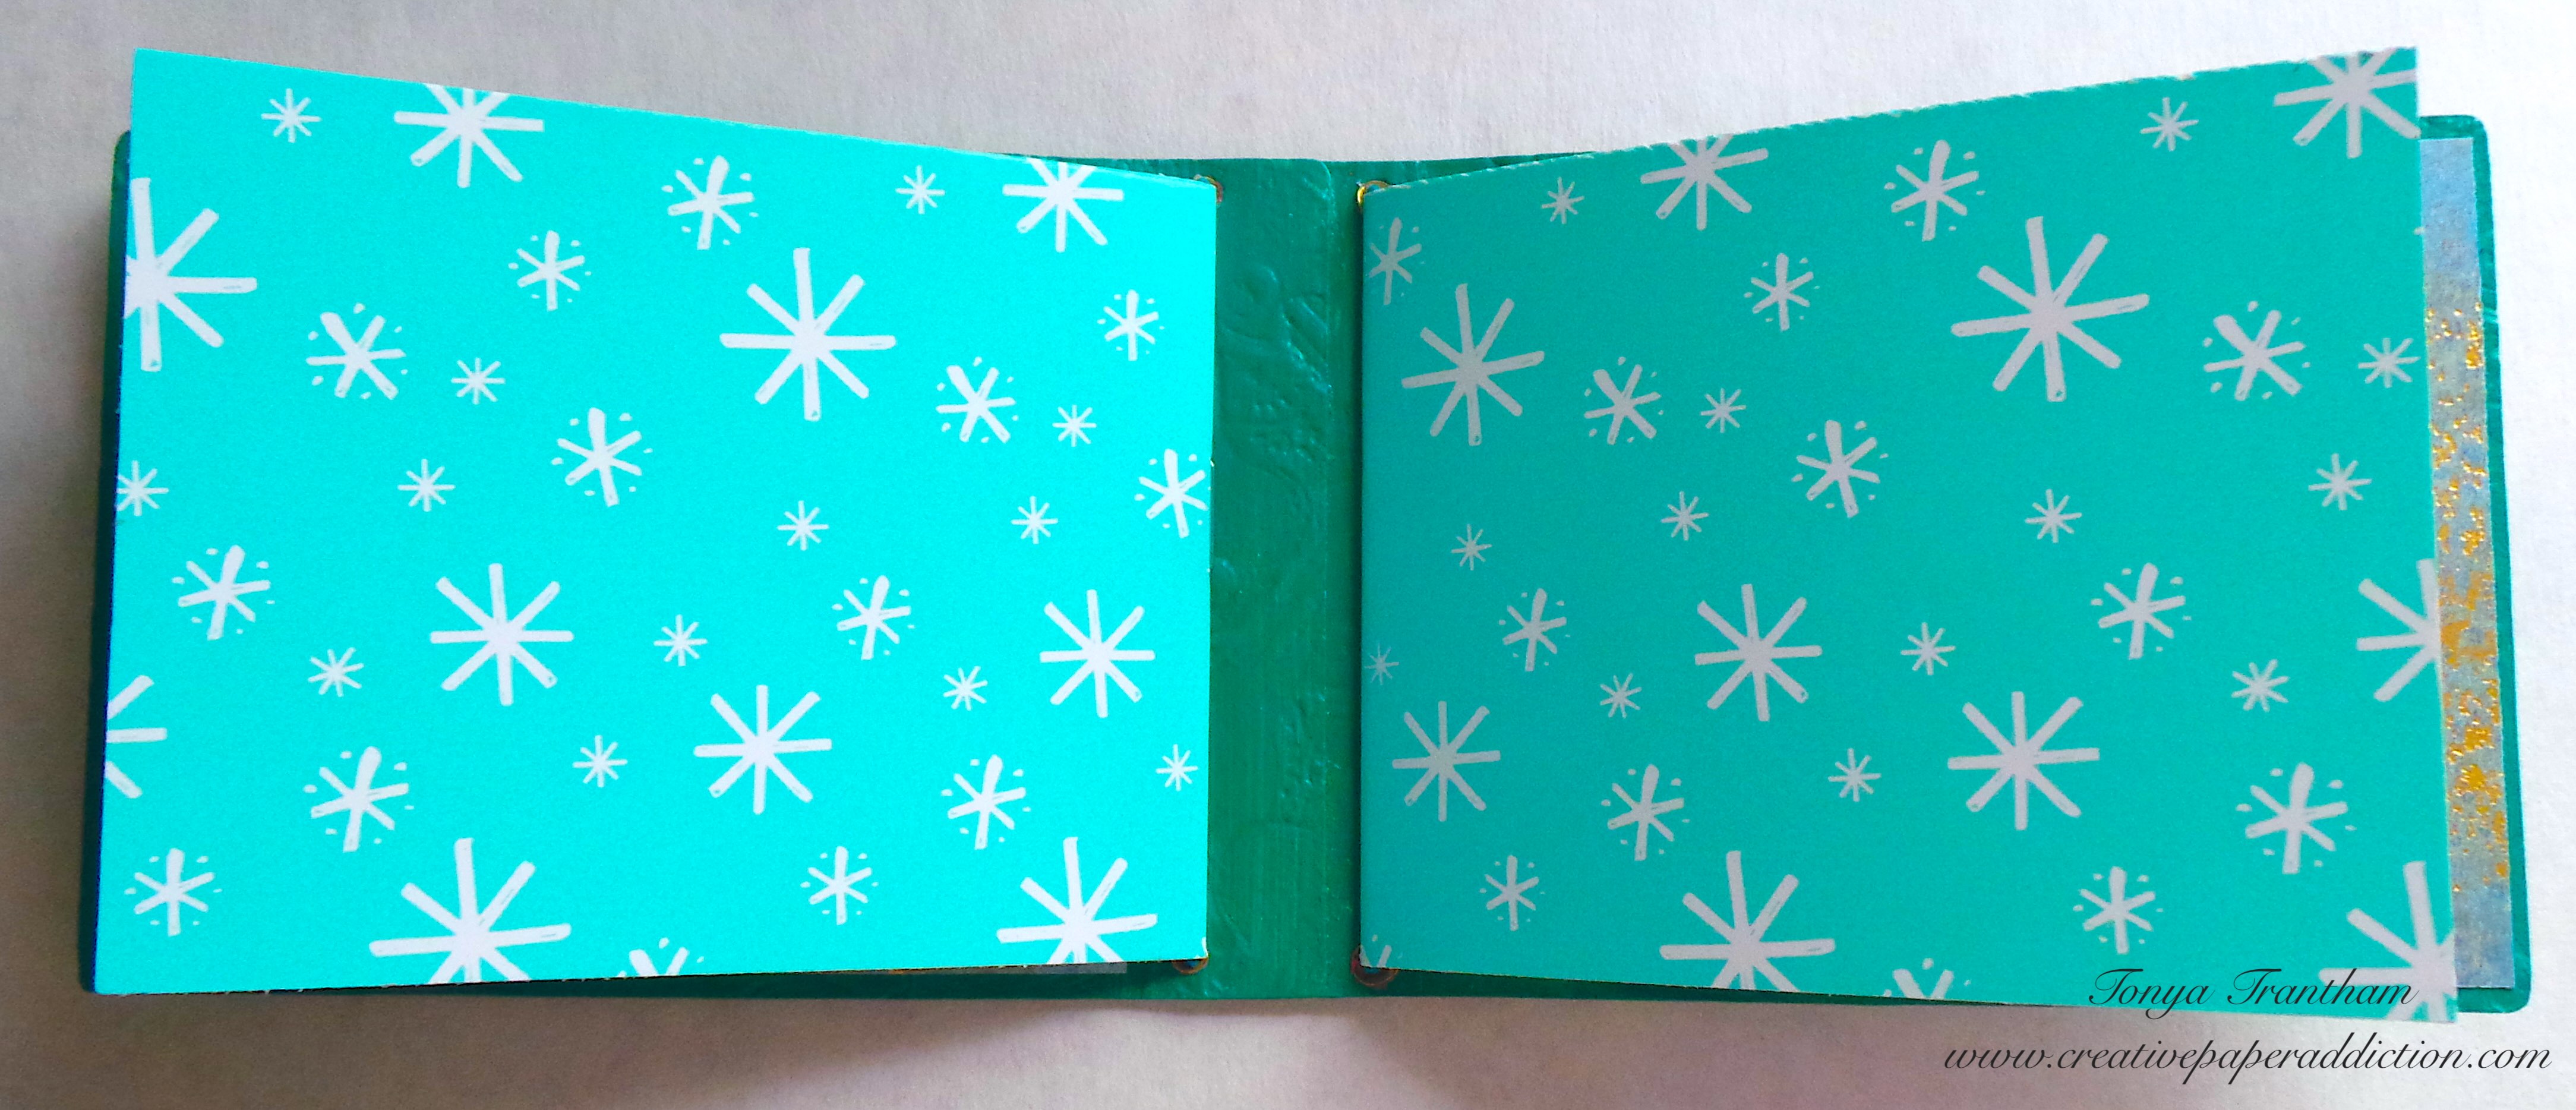
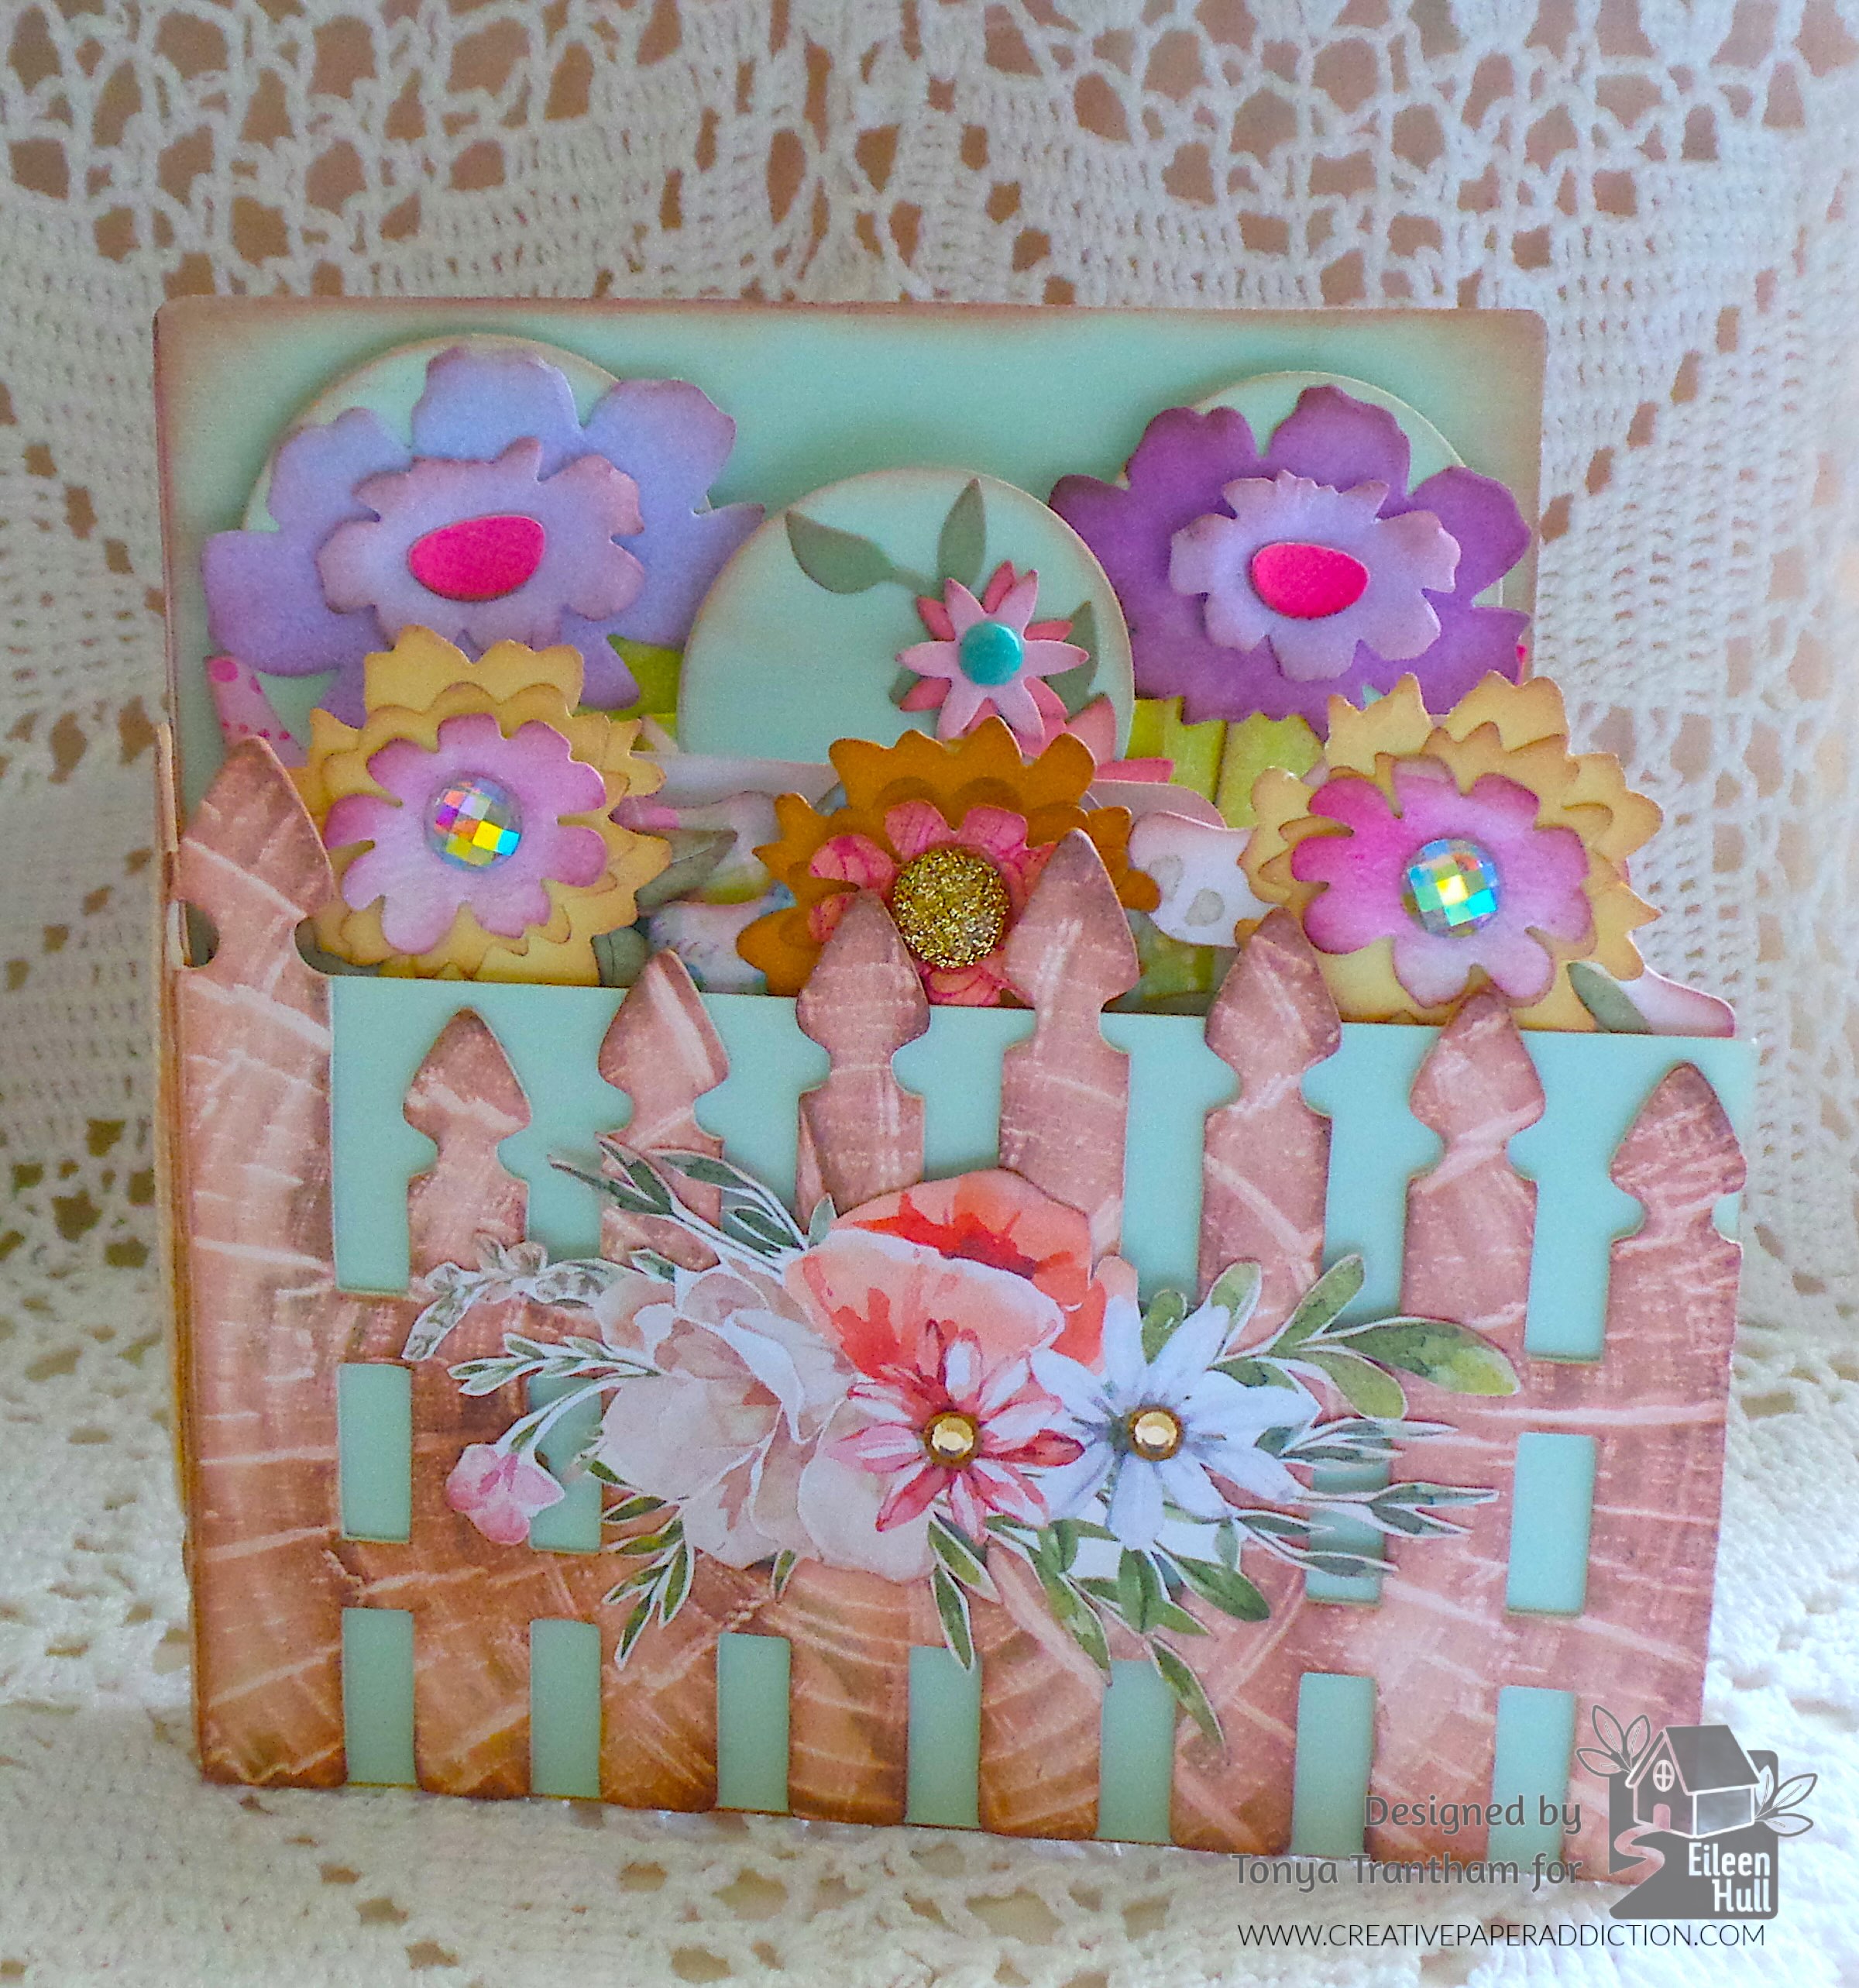
I also cut cardstock for the back inside cover of the journal. I inked the edges with a brown chalk ink and glued to the journal. For the front I cut cardstock slightly shorter than the tallest picket of the garden gate. I inked the edges of the cardstock. Then I added adhesive and placed onto the gate.

A textured brown cardstock resembling tree rings on the left, and a decorative fence cutout in a light color on the right, designed by Tonya Trantham for Eileen Hull.

The spine I “peeled” off some of the Matboard to make it thinner. I applied glue and adhered together. The “peeling” of some of the Matboard flattens out the spine.

Three bottles of Craft Smart acrylic paint in blue, green, and mint colors, alongside a paintbrush, placed on a wooden surface. Below, there's a painted cardstock with a blue and green watercolor design and decorative cut-out patterns.

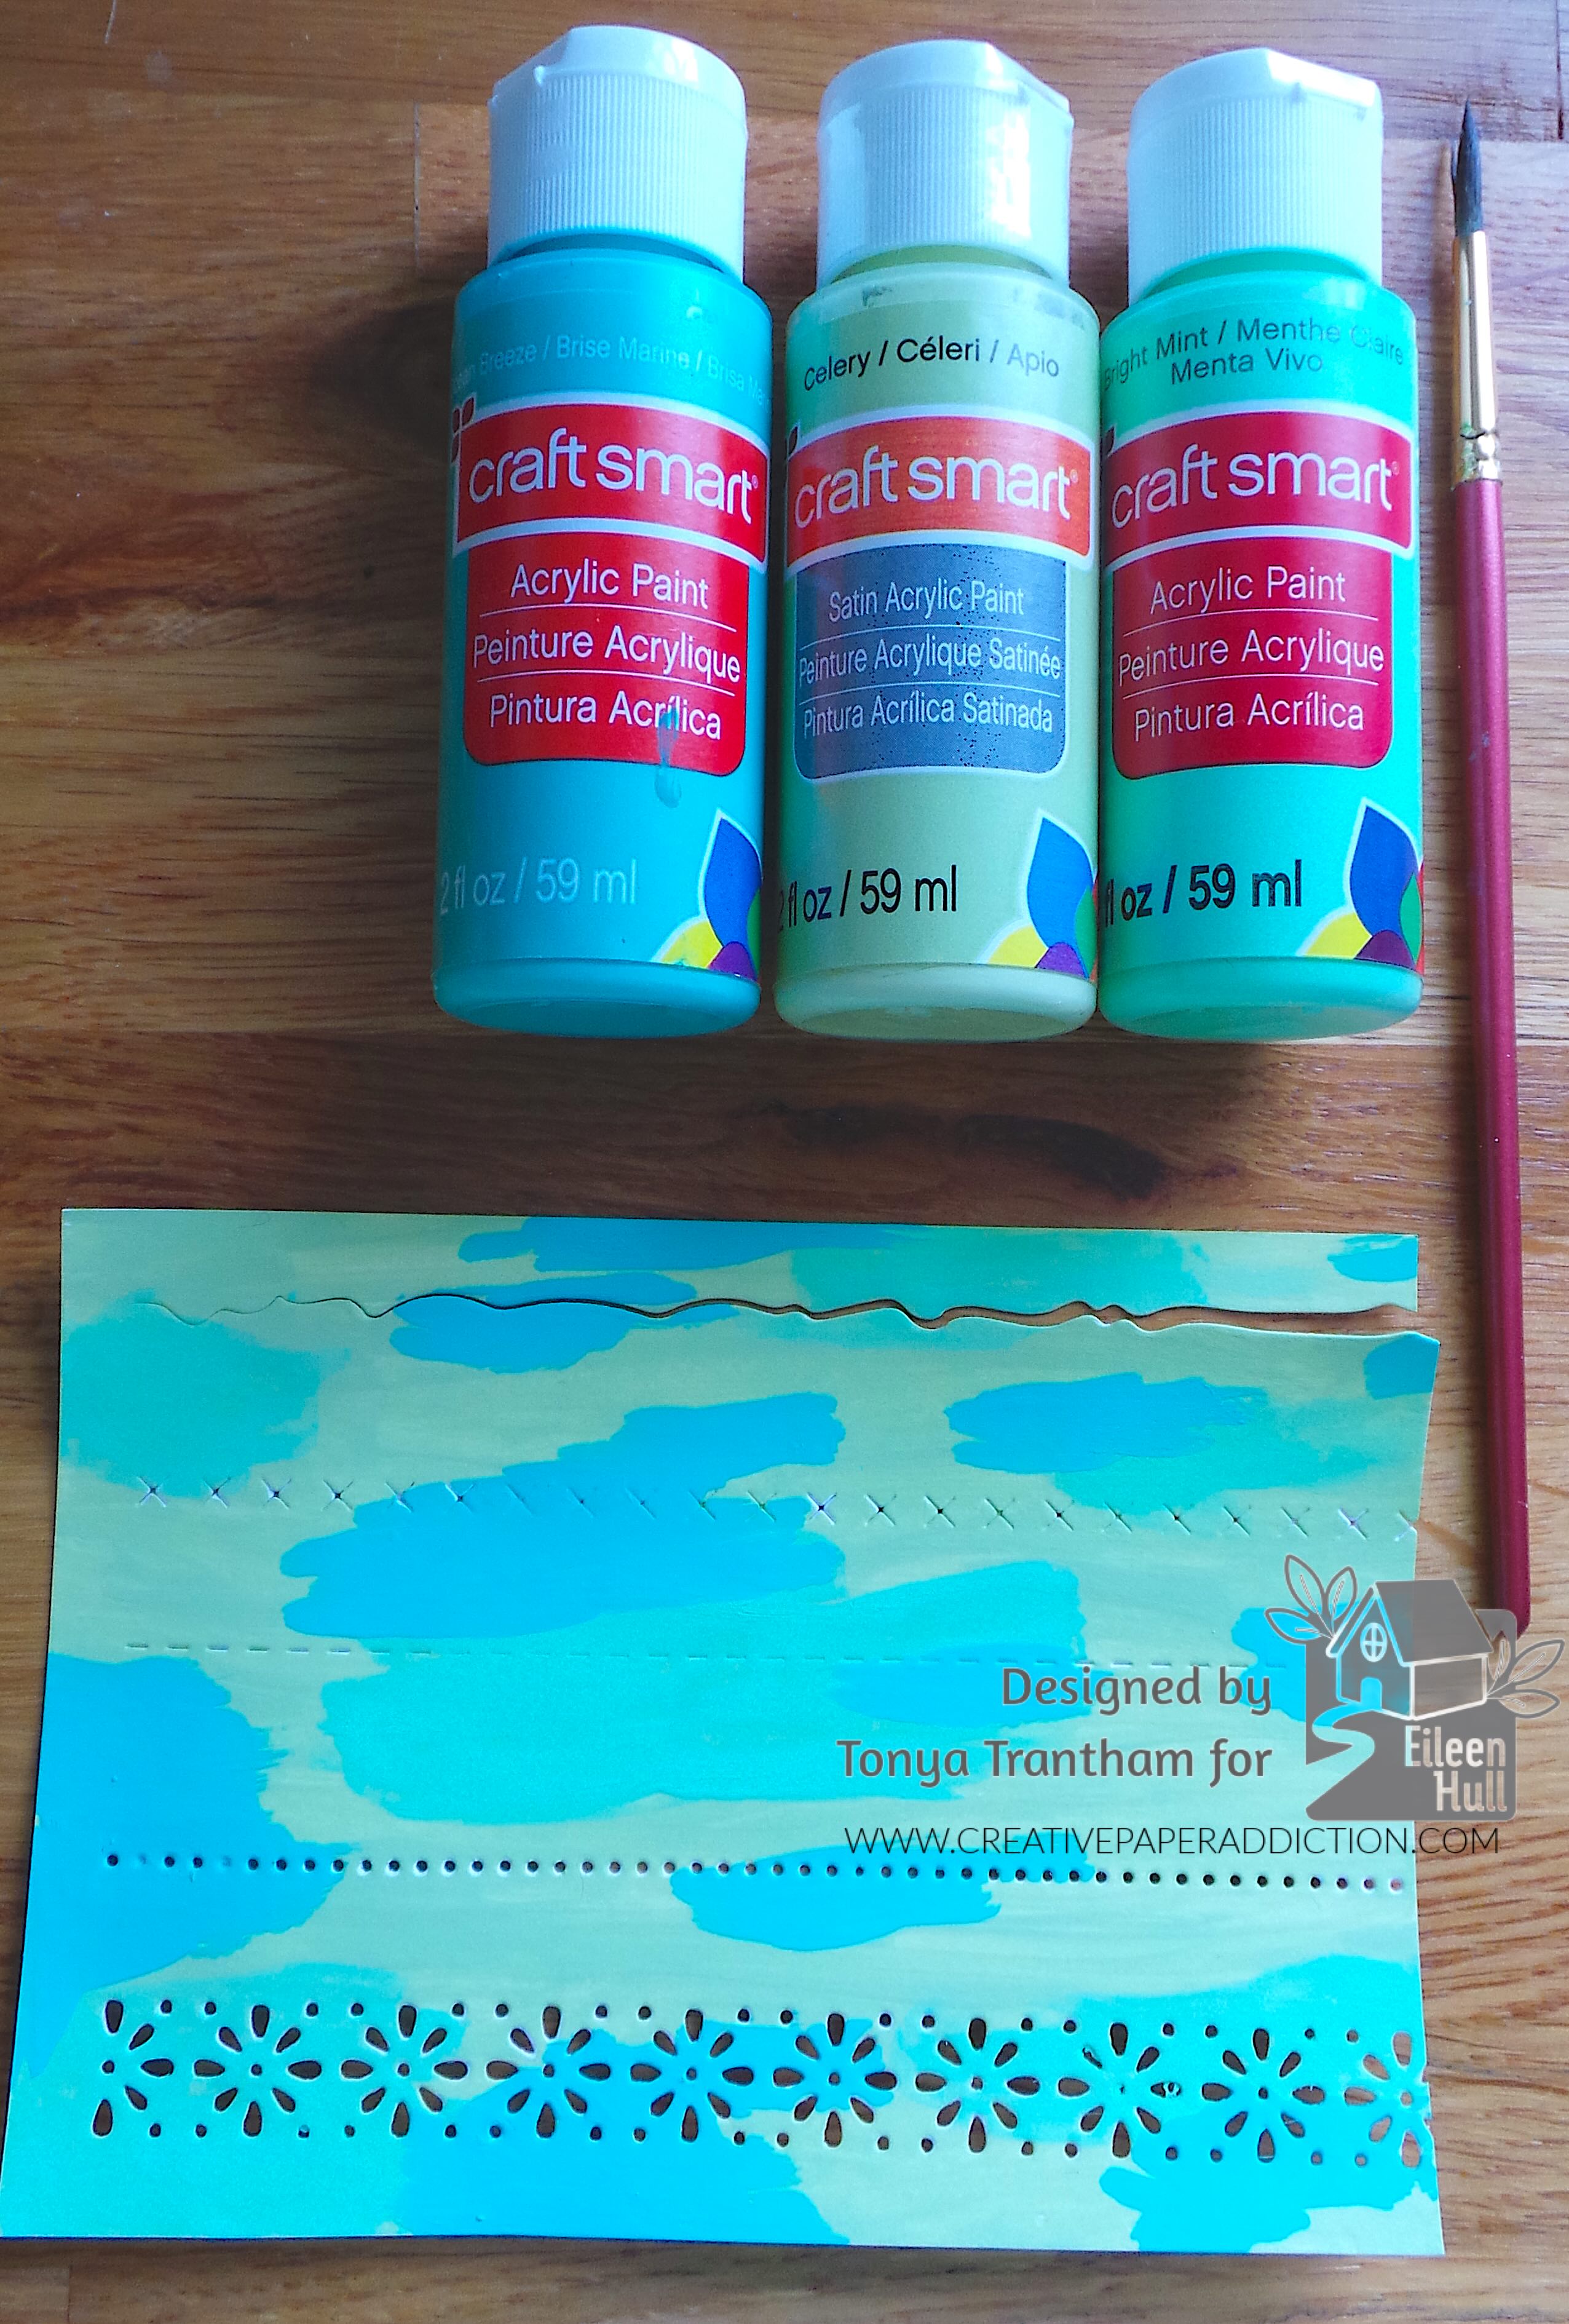
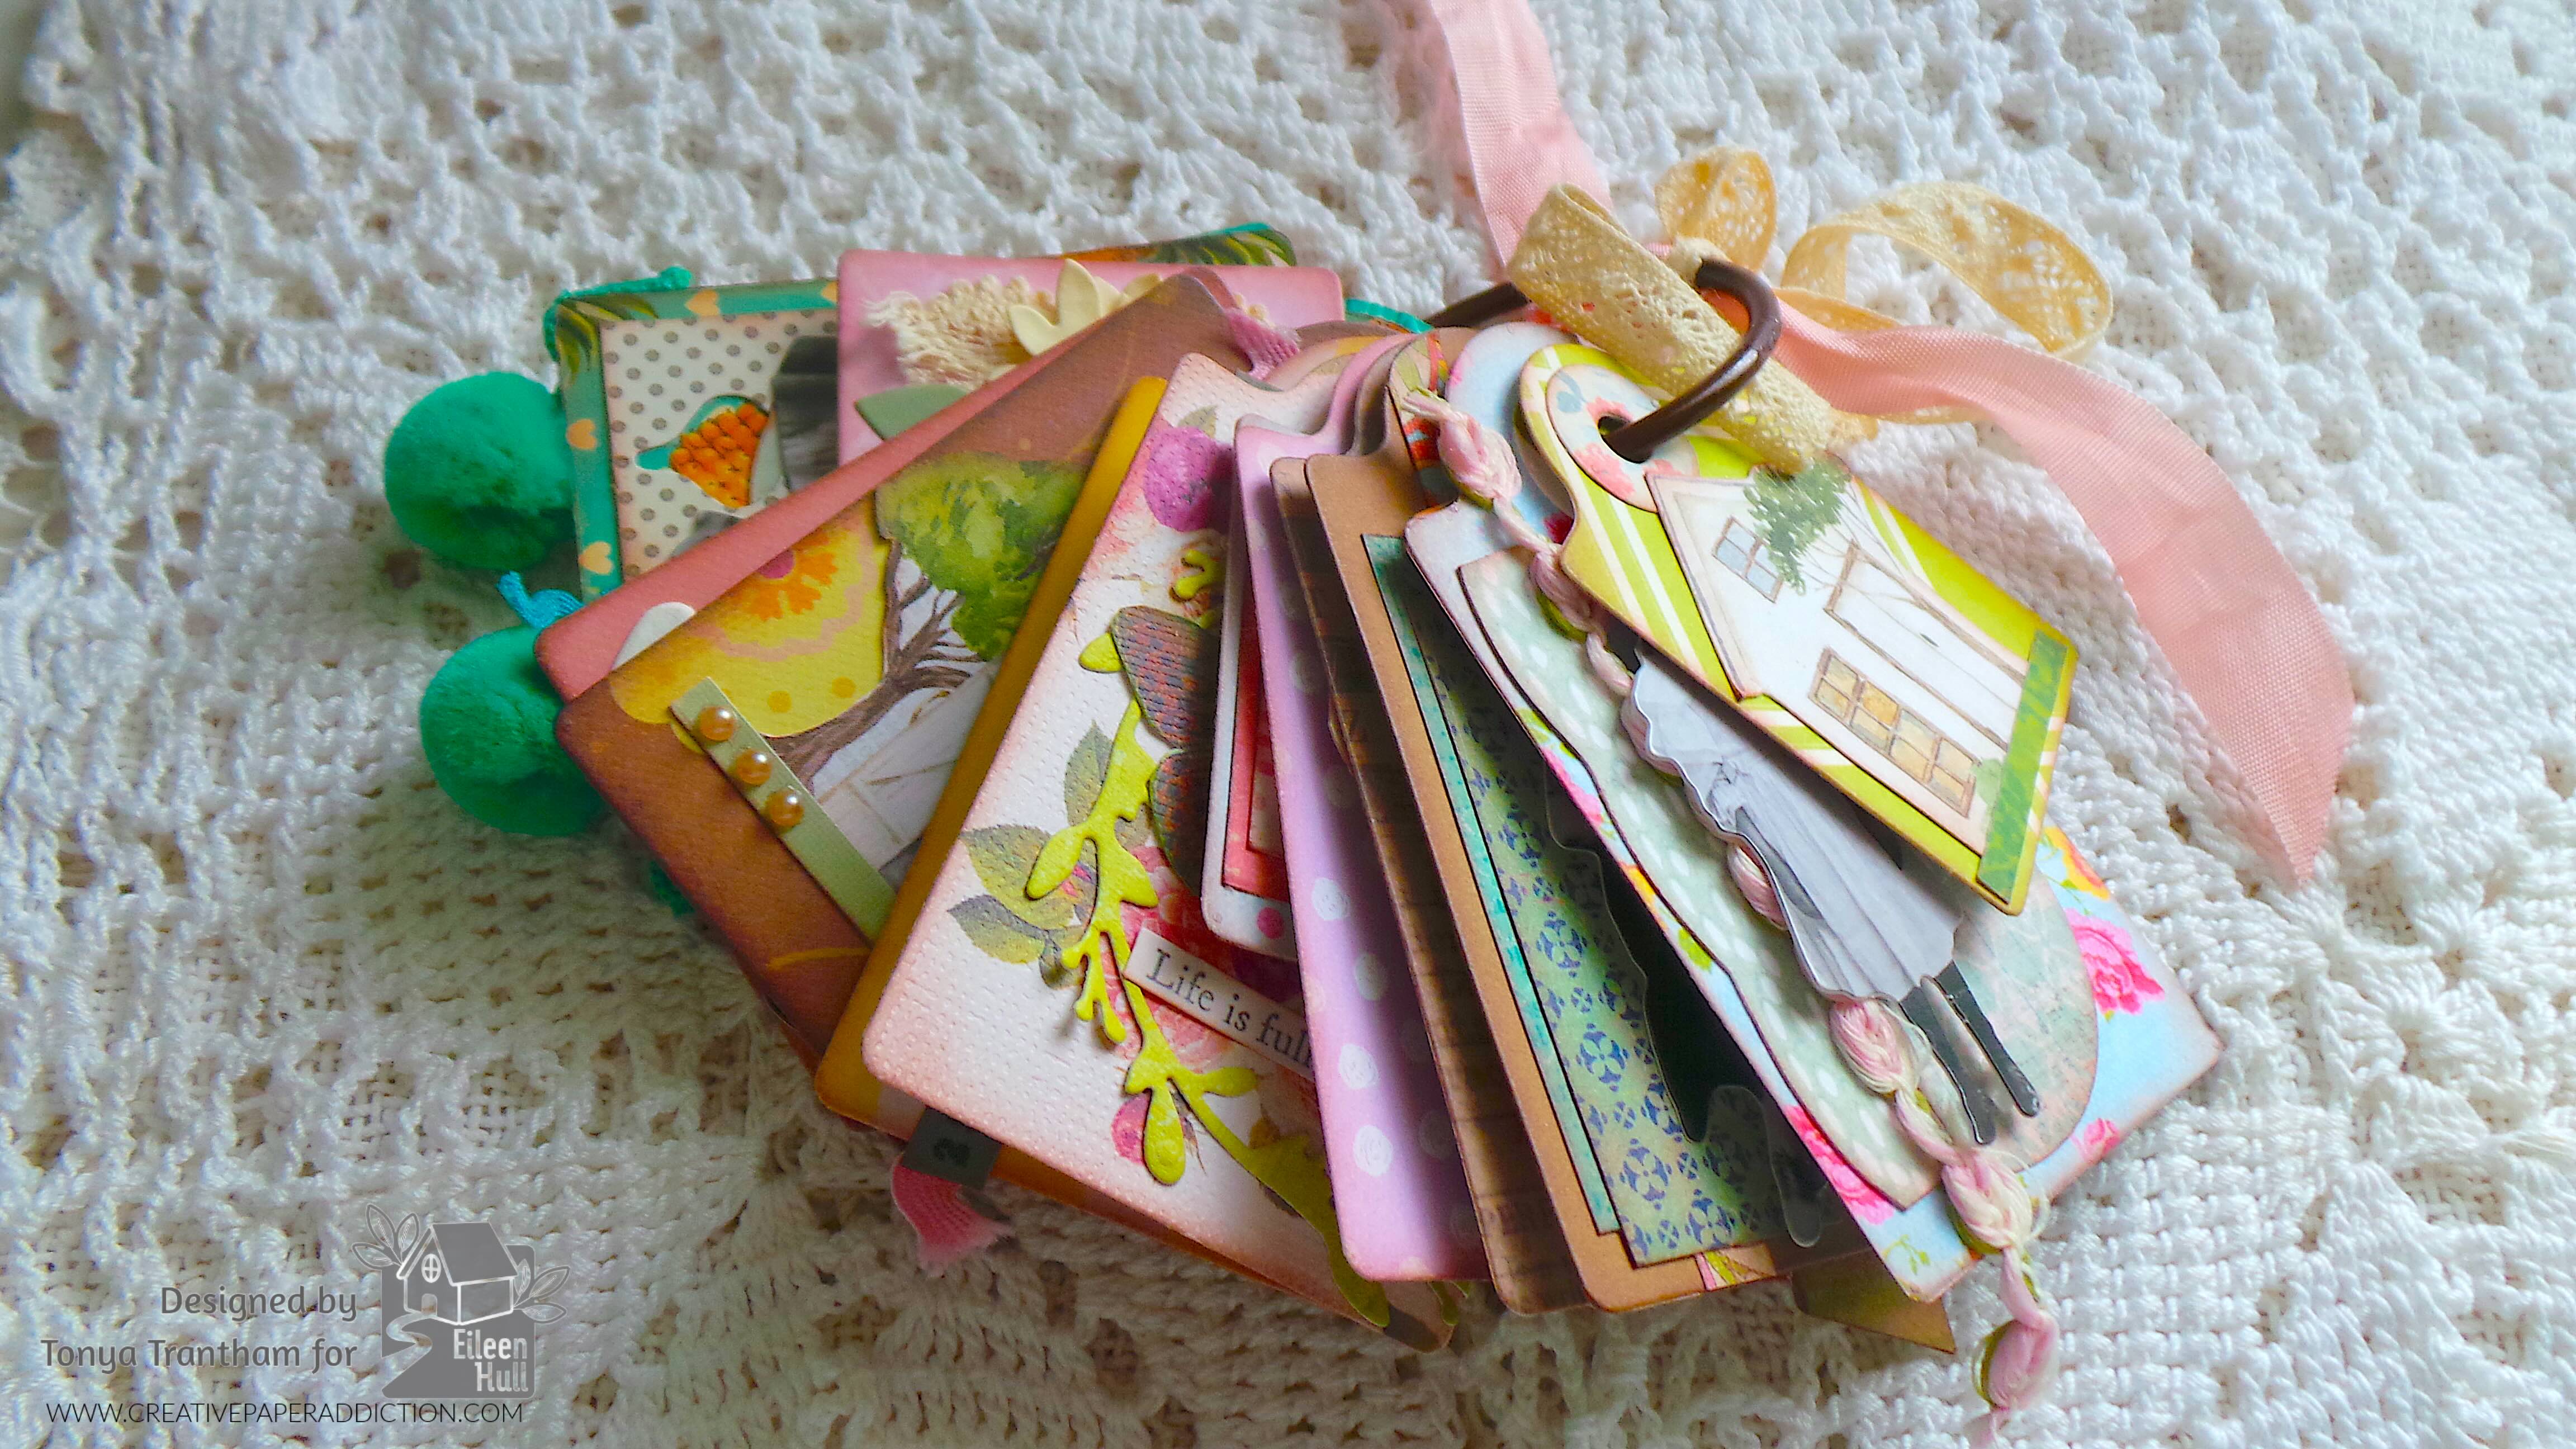
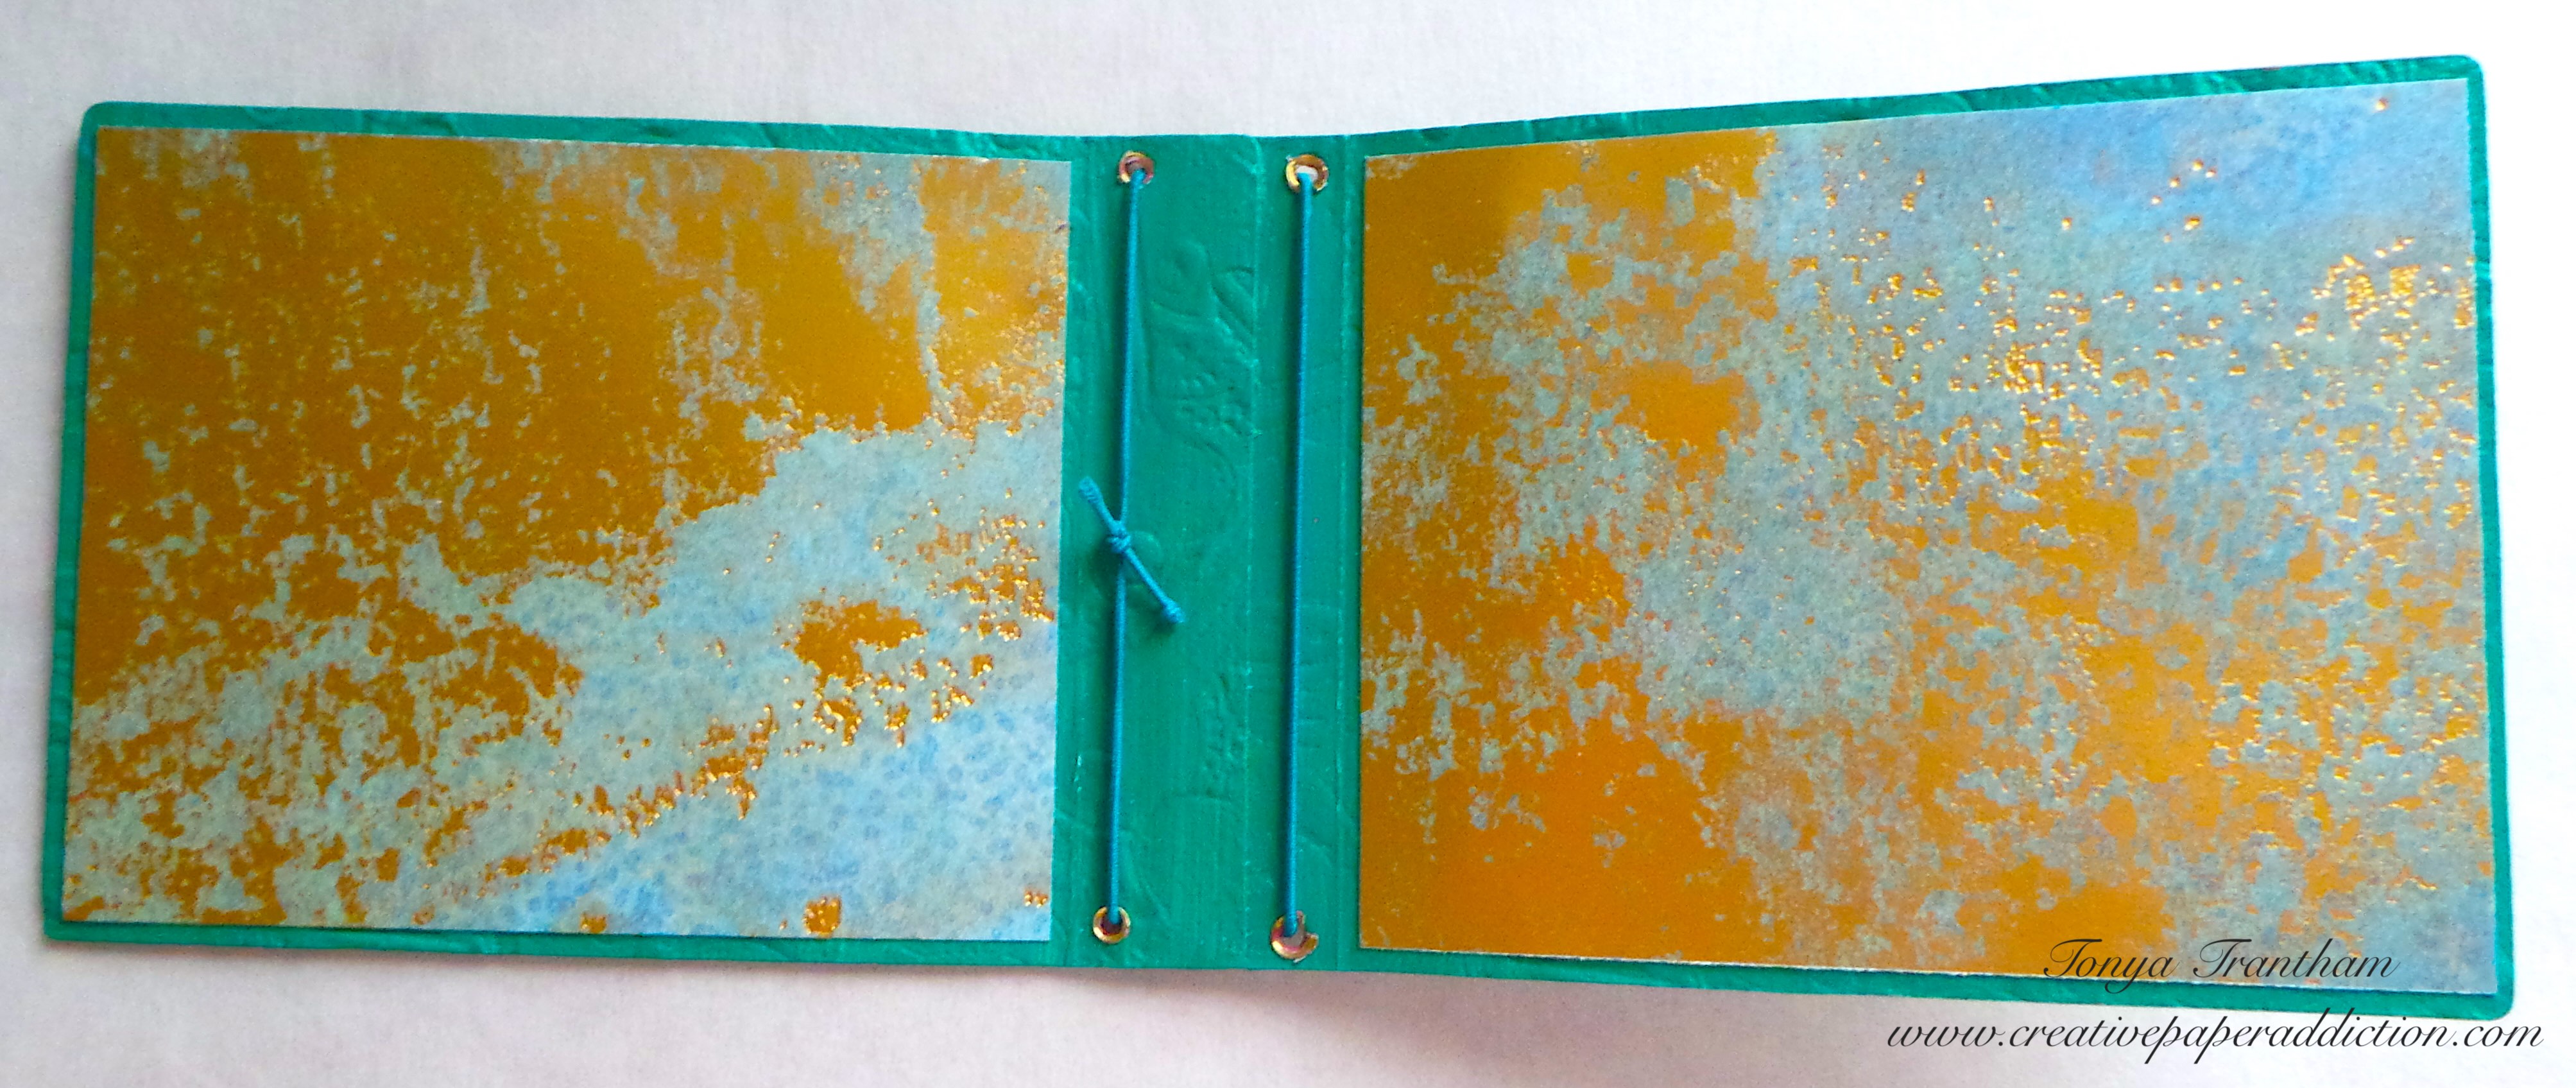
I had received cuts of the Page Edges Thinlits on white cardstock so I painted it with some of my favorite paint colors and let dry.

A colorful scrapbook page featuring layered patterned paper with floral designs, decorative borders, and a light blue background area ready for writing or additional embellishments.

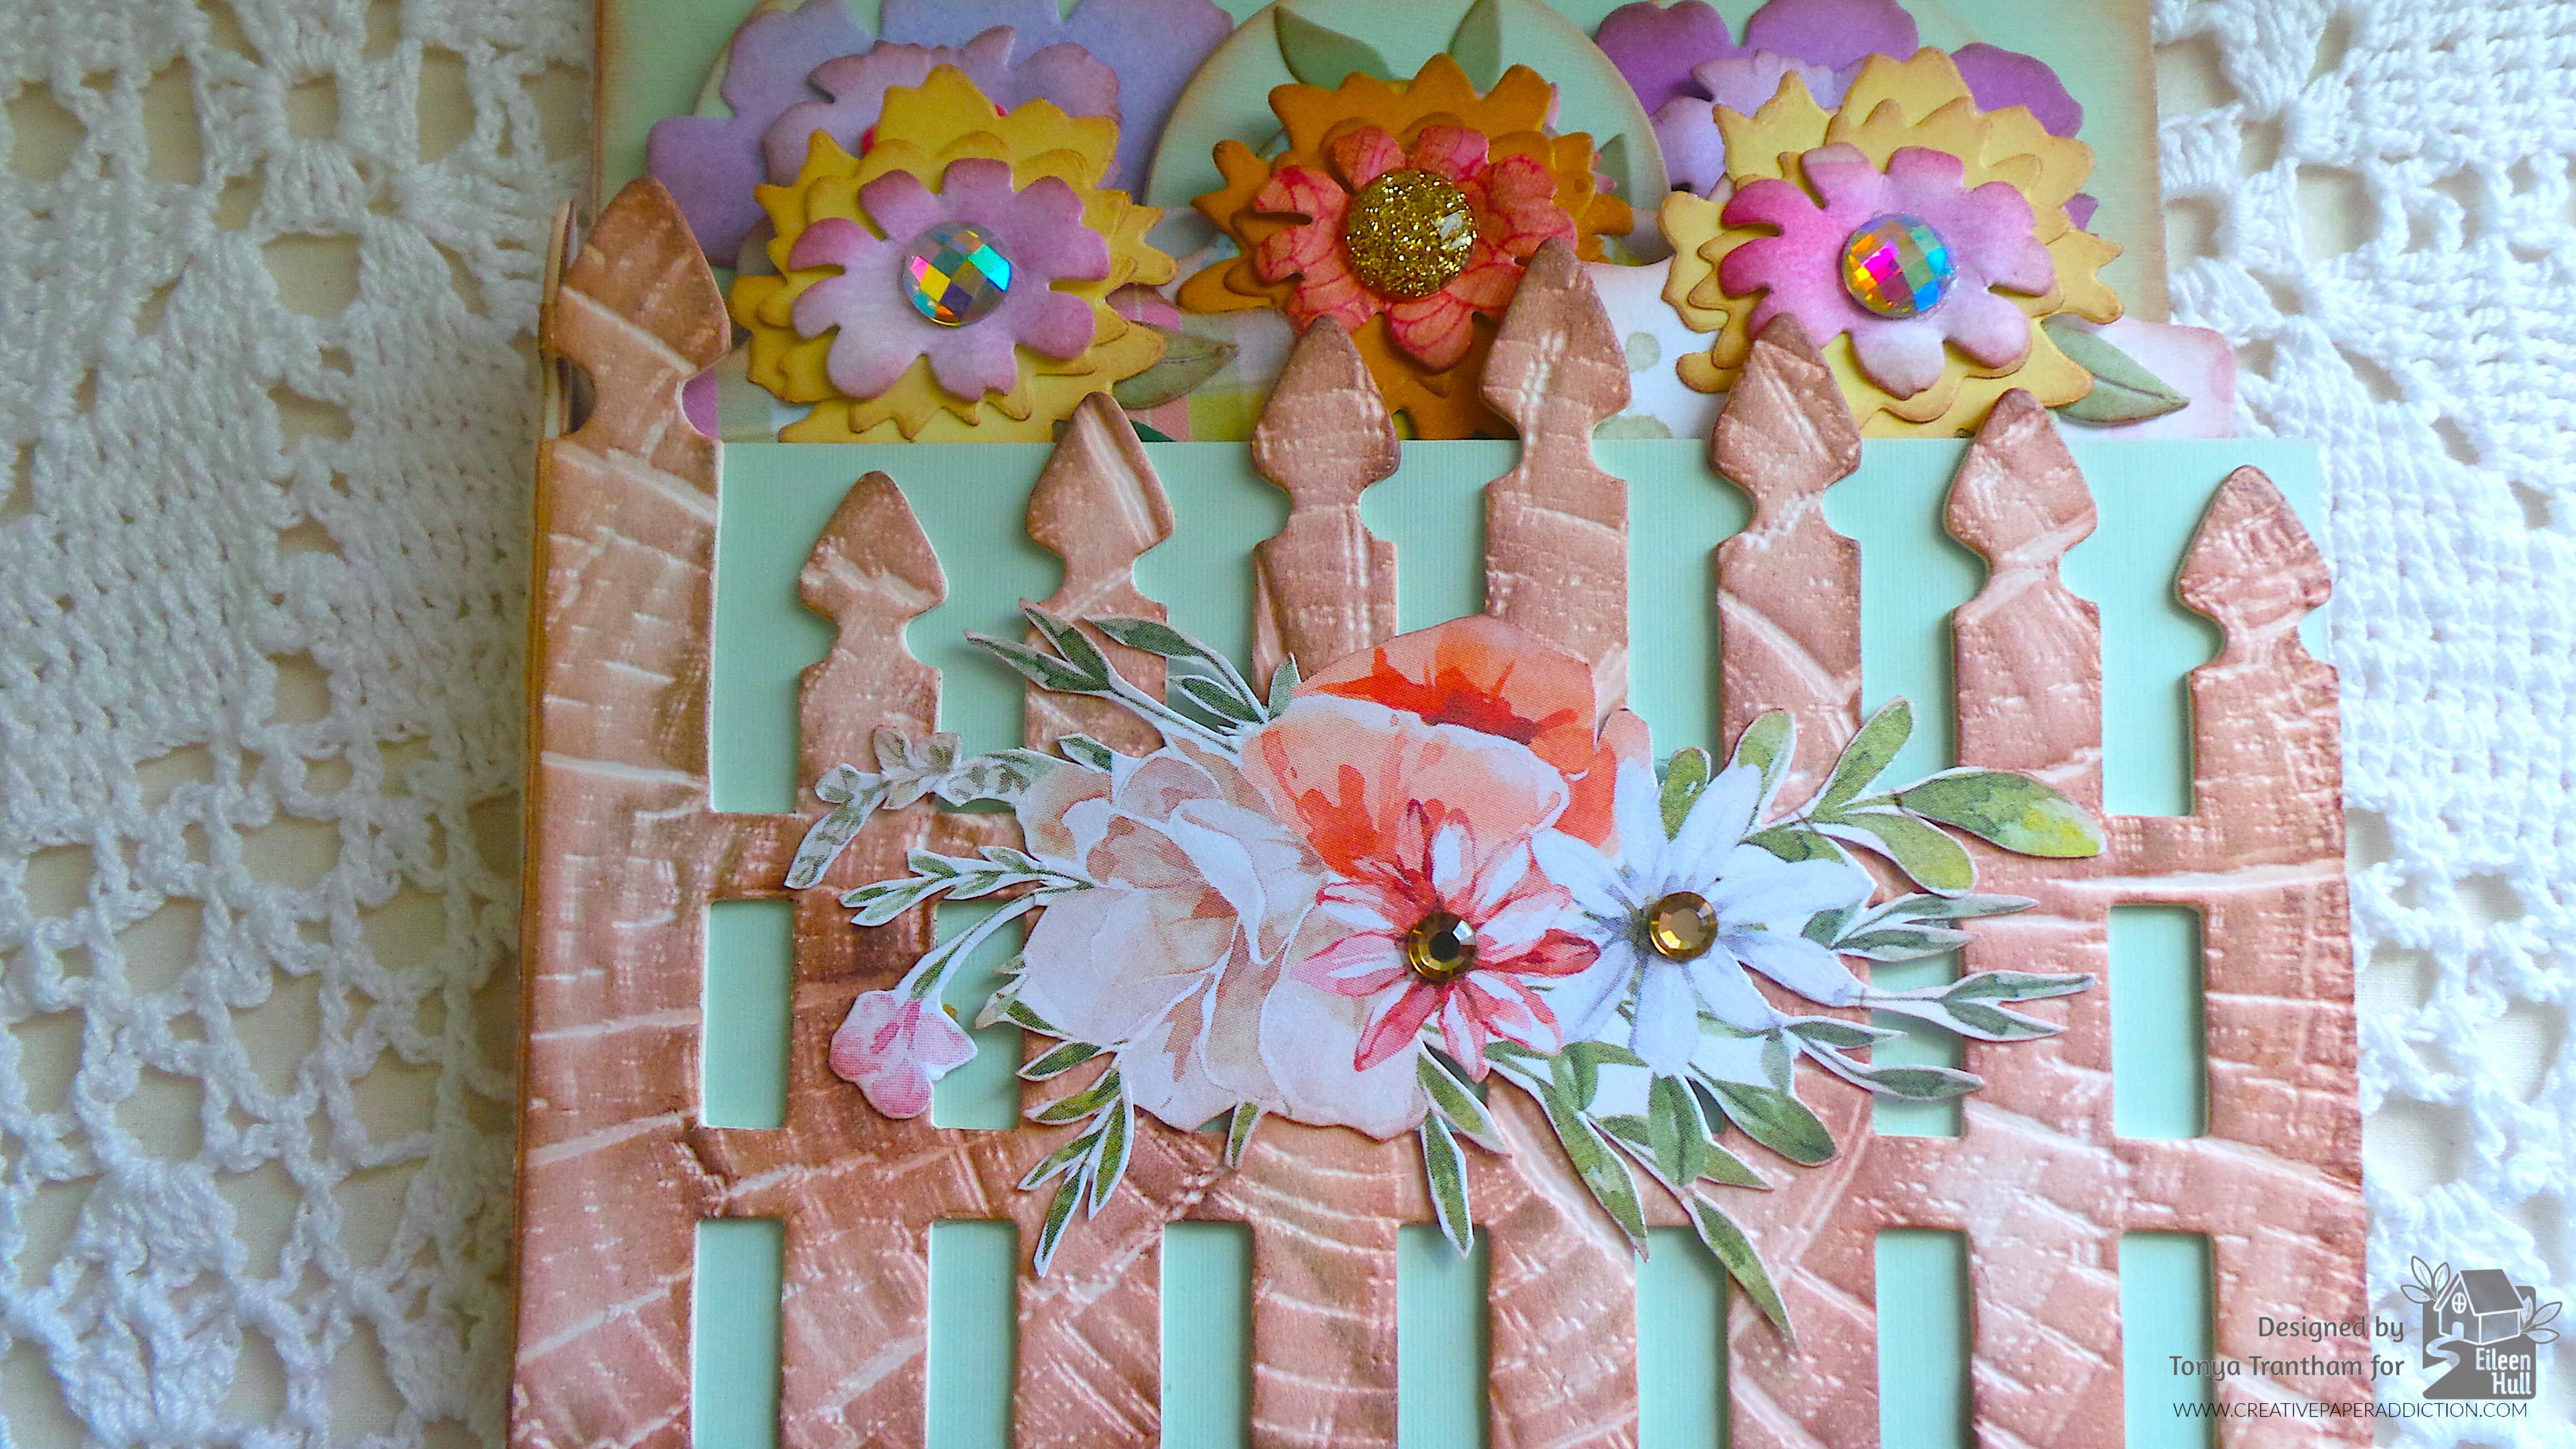
I cut two pieces of patterned cardstock an inch high (I think…I forgot to measure) and 5 inches wide. I applied glue to both sides and the bottom of each piece of cardstock and placed on the inside of the front and back cover to create pockets. I selected two of the page edge dies and adhered to the top of each pocket. I added light blue gems to the center of each flower on the page edge die.

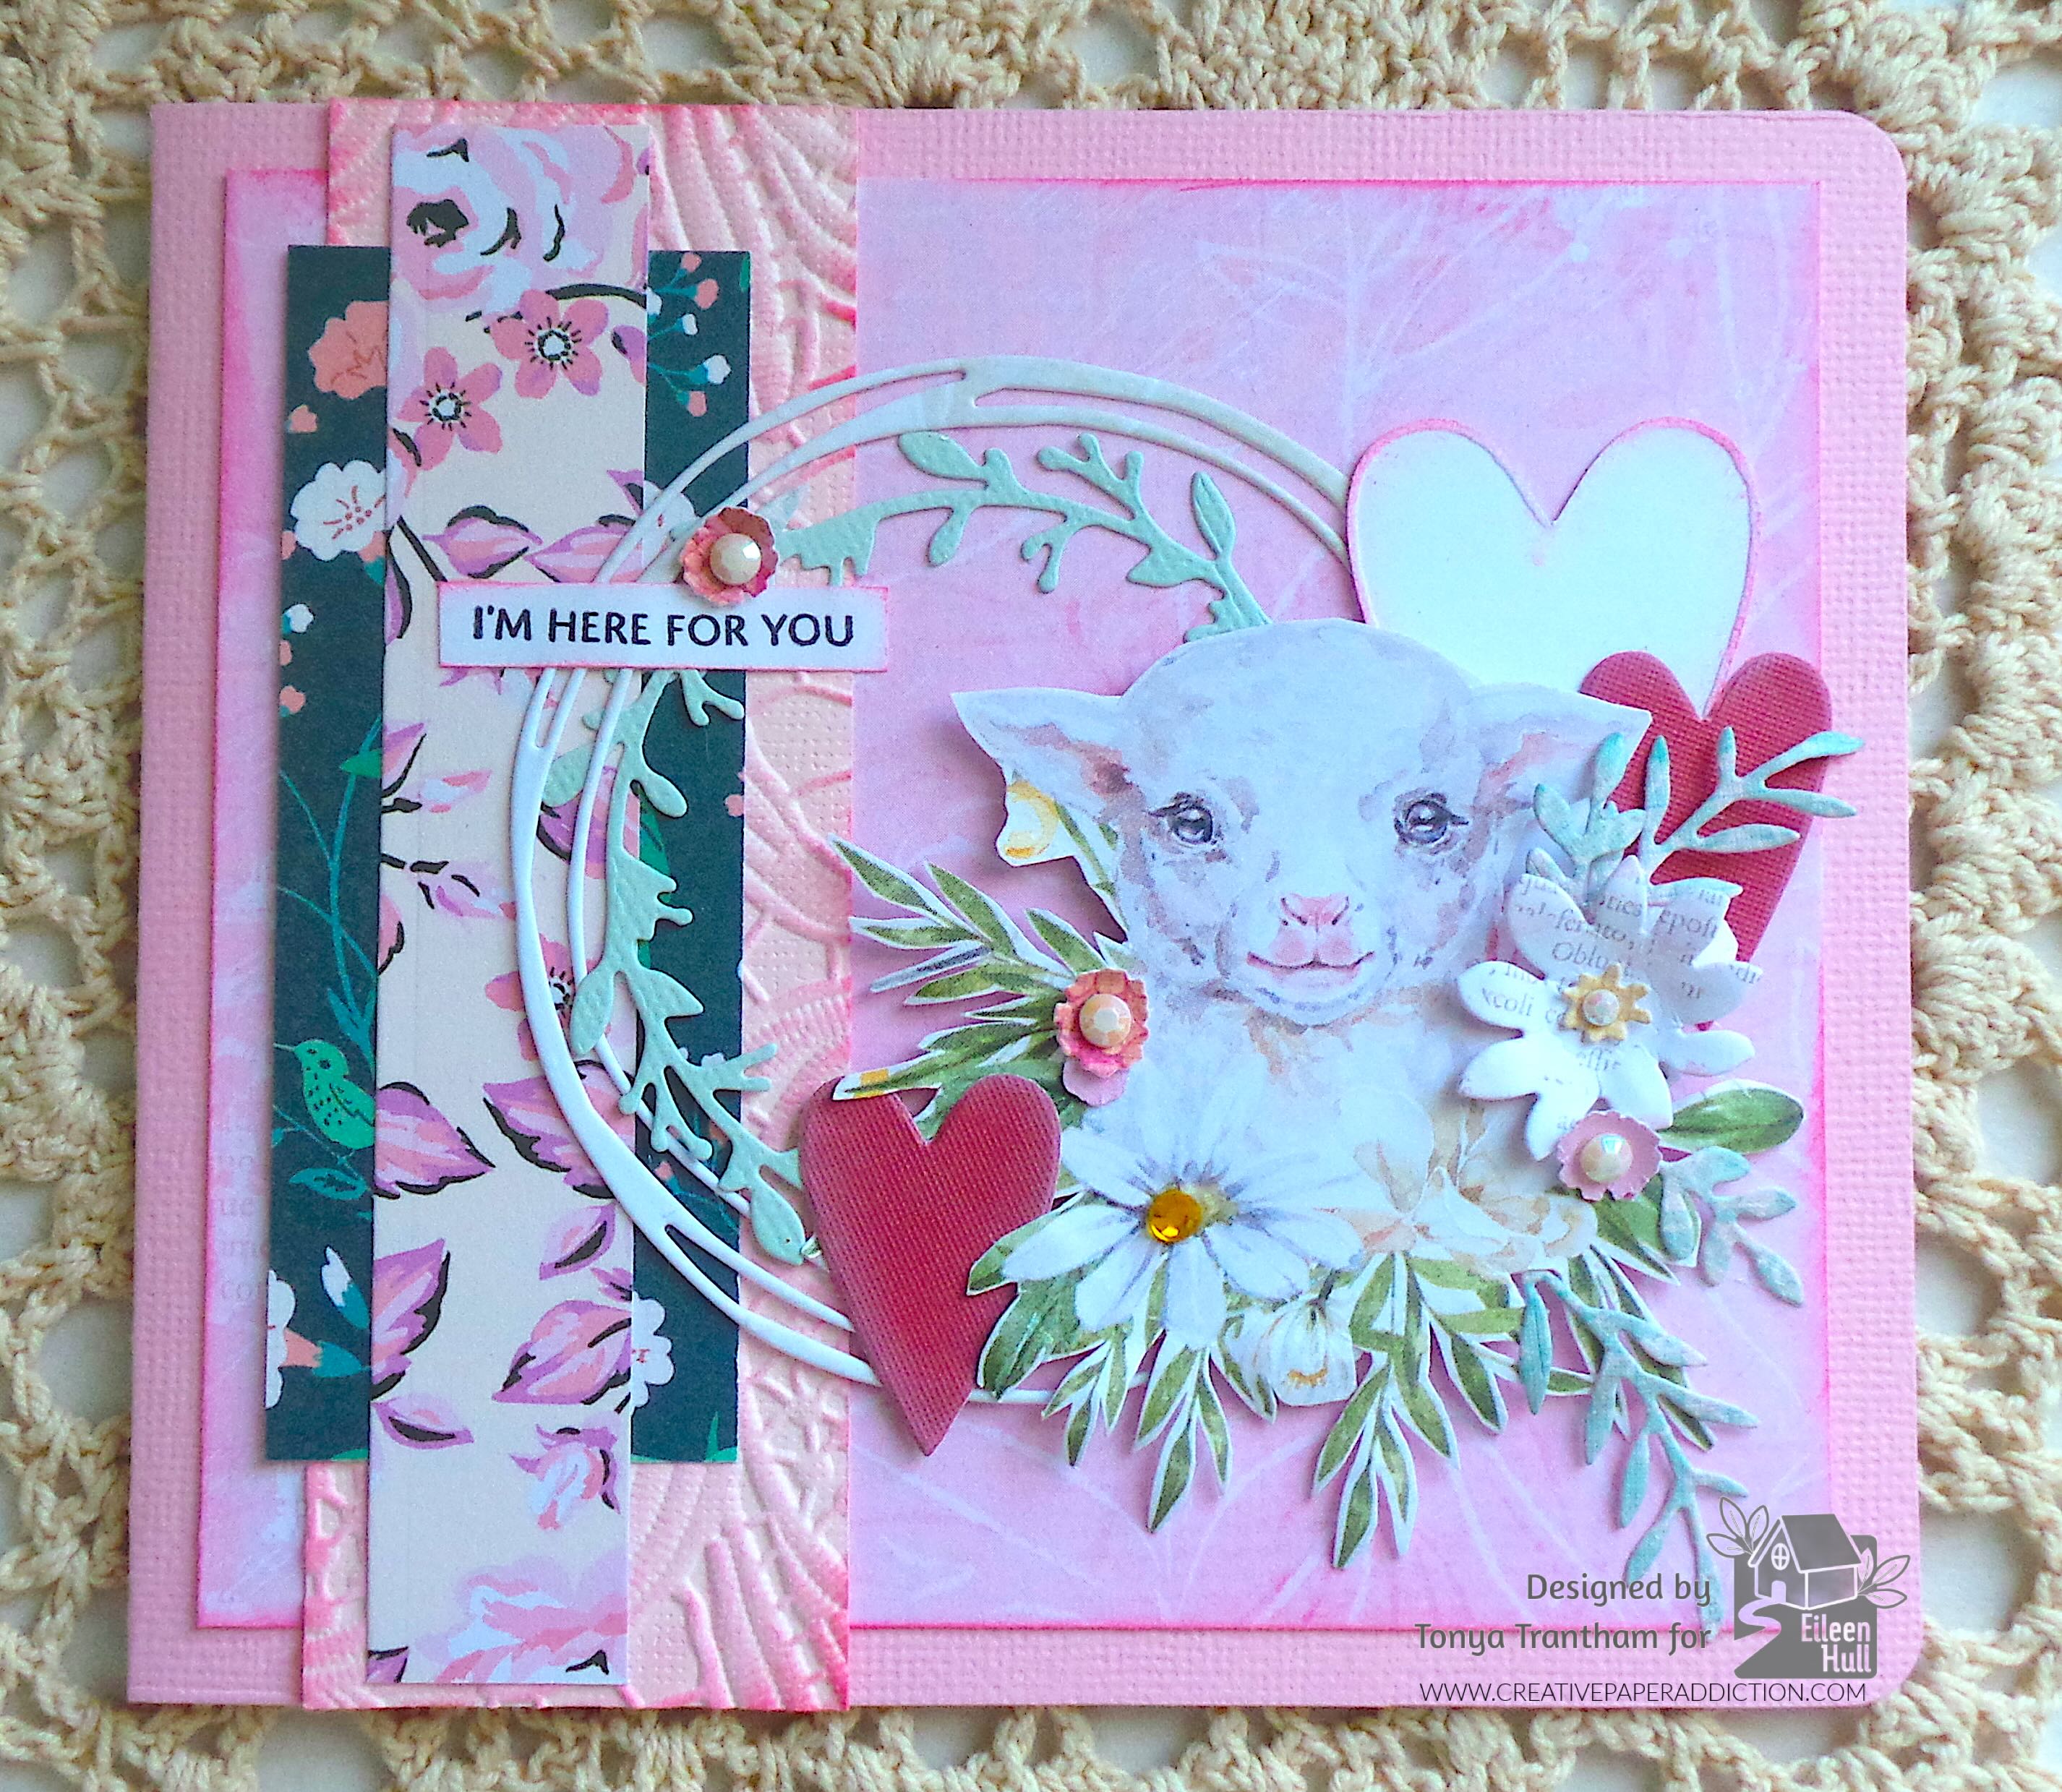
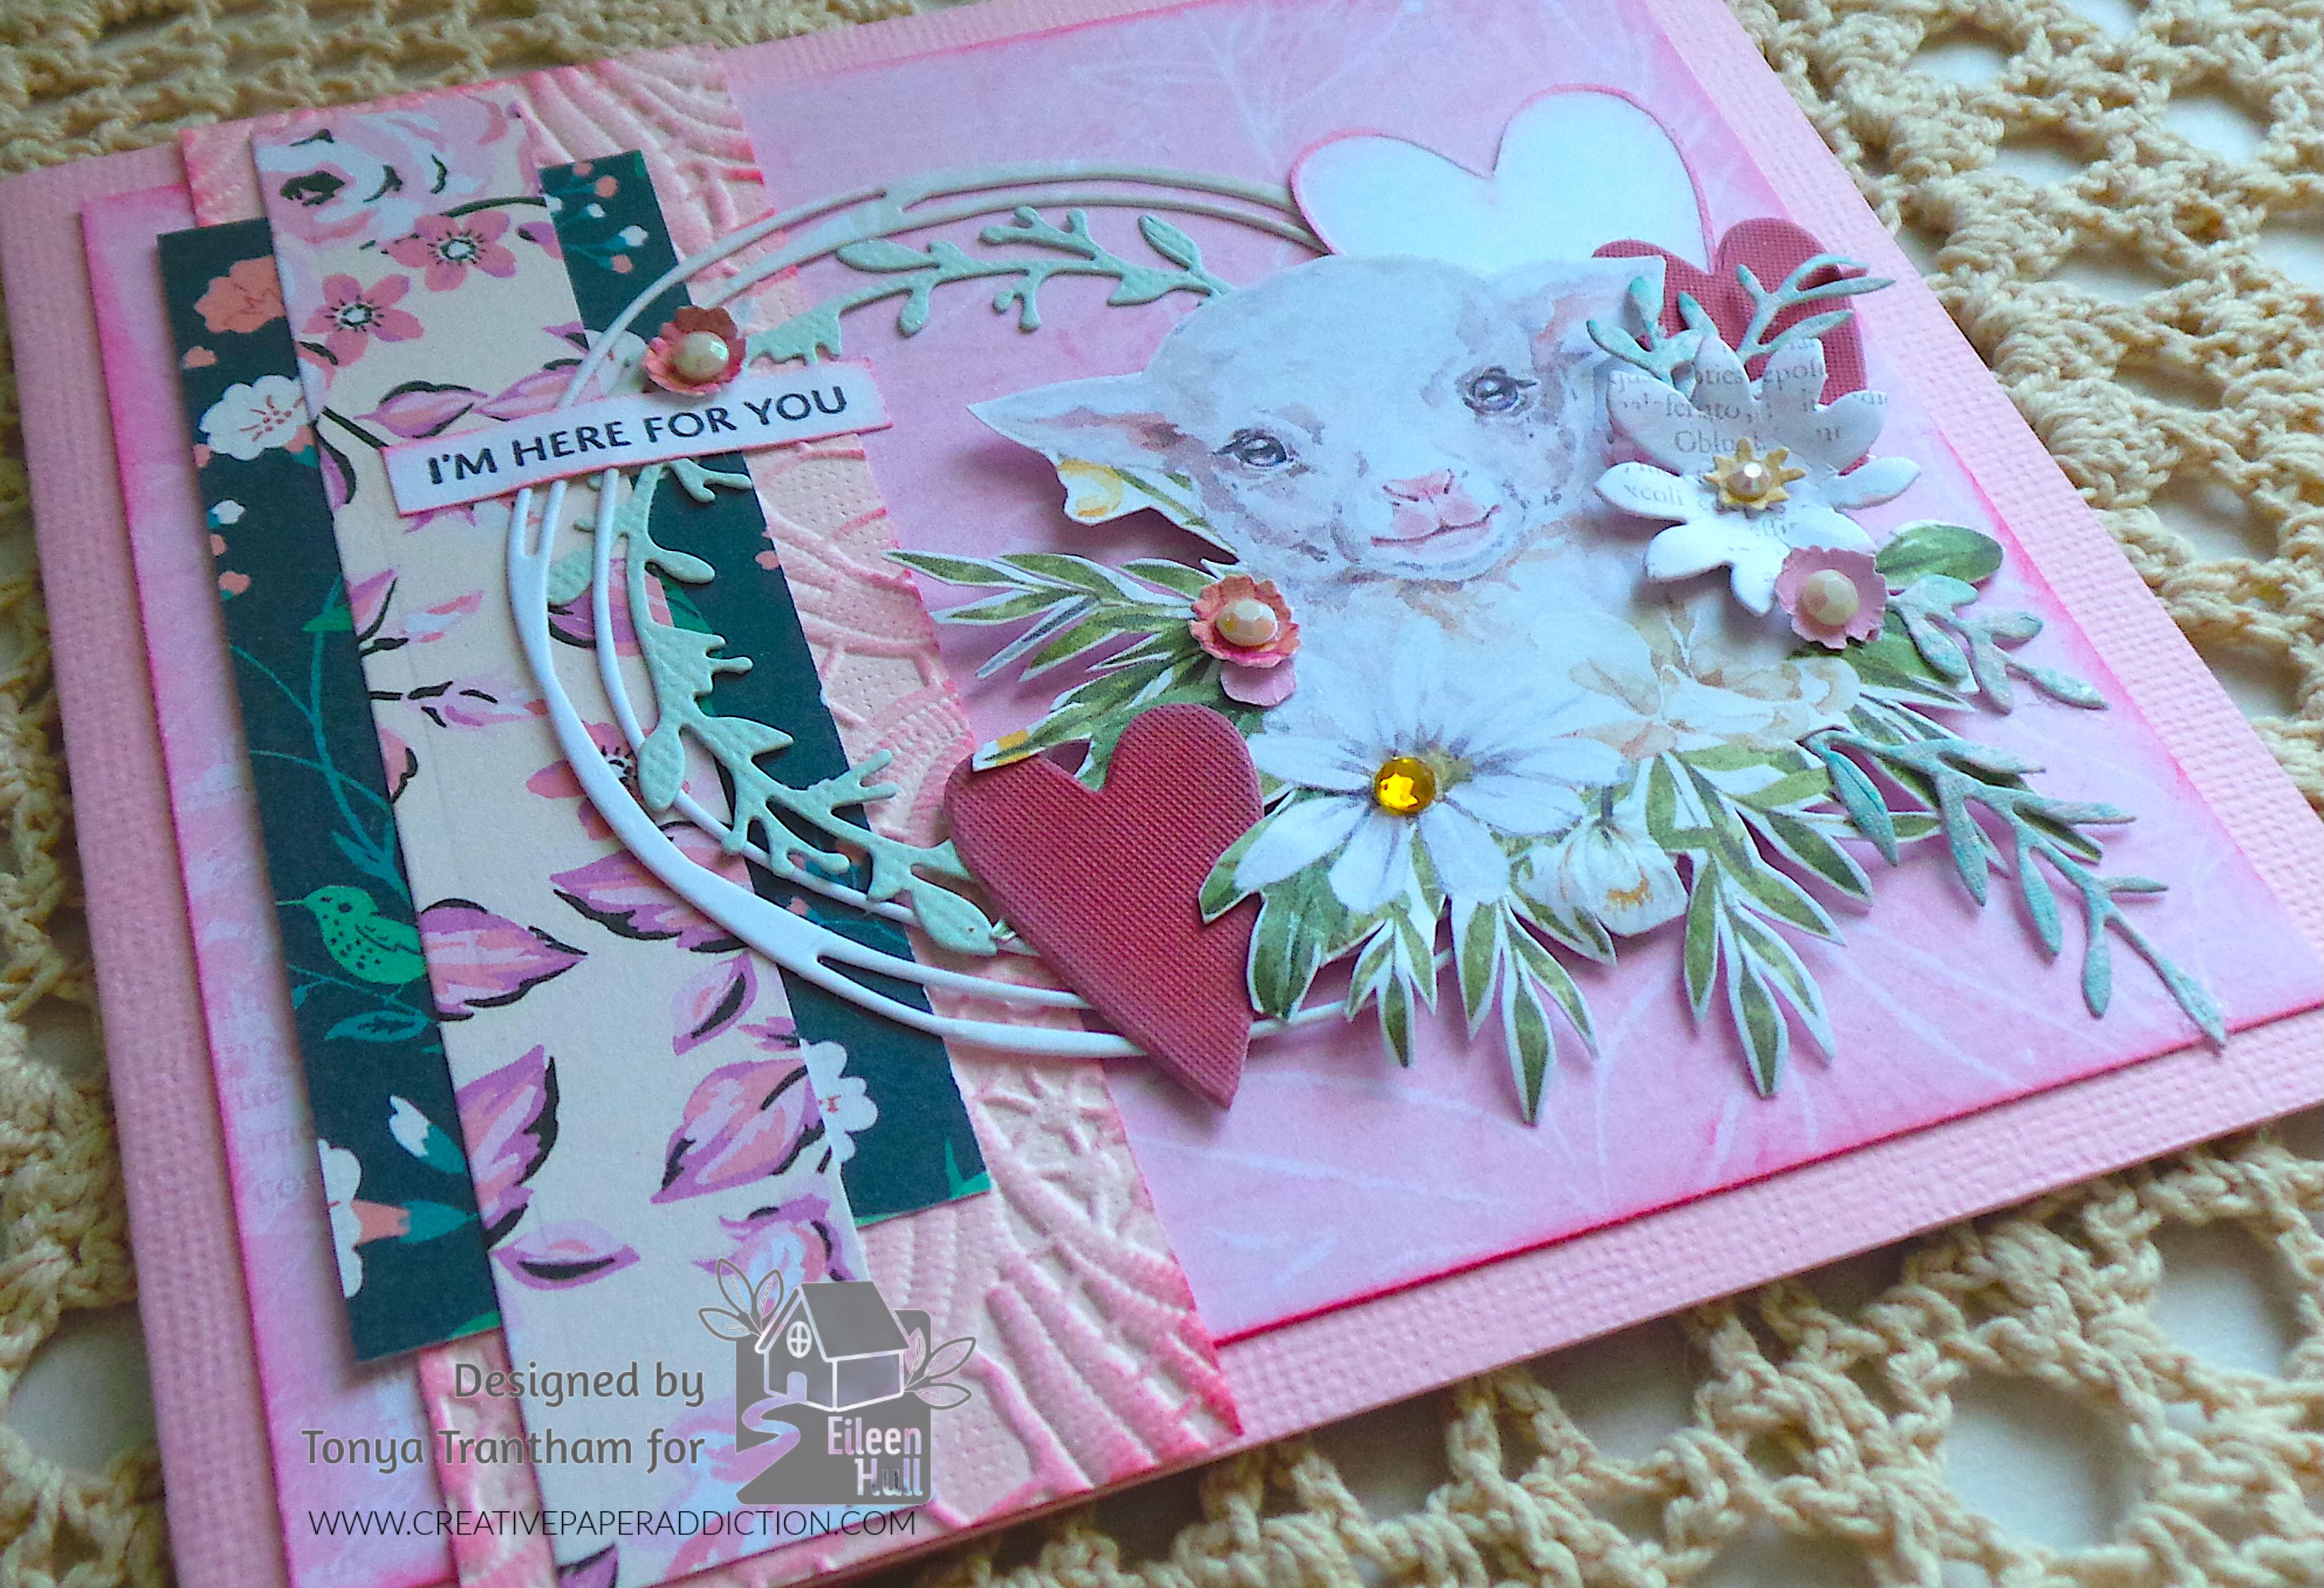
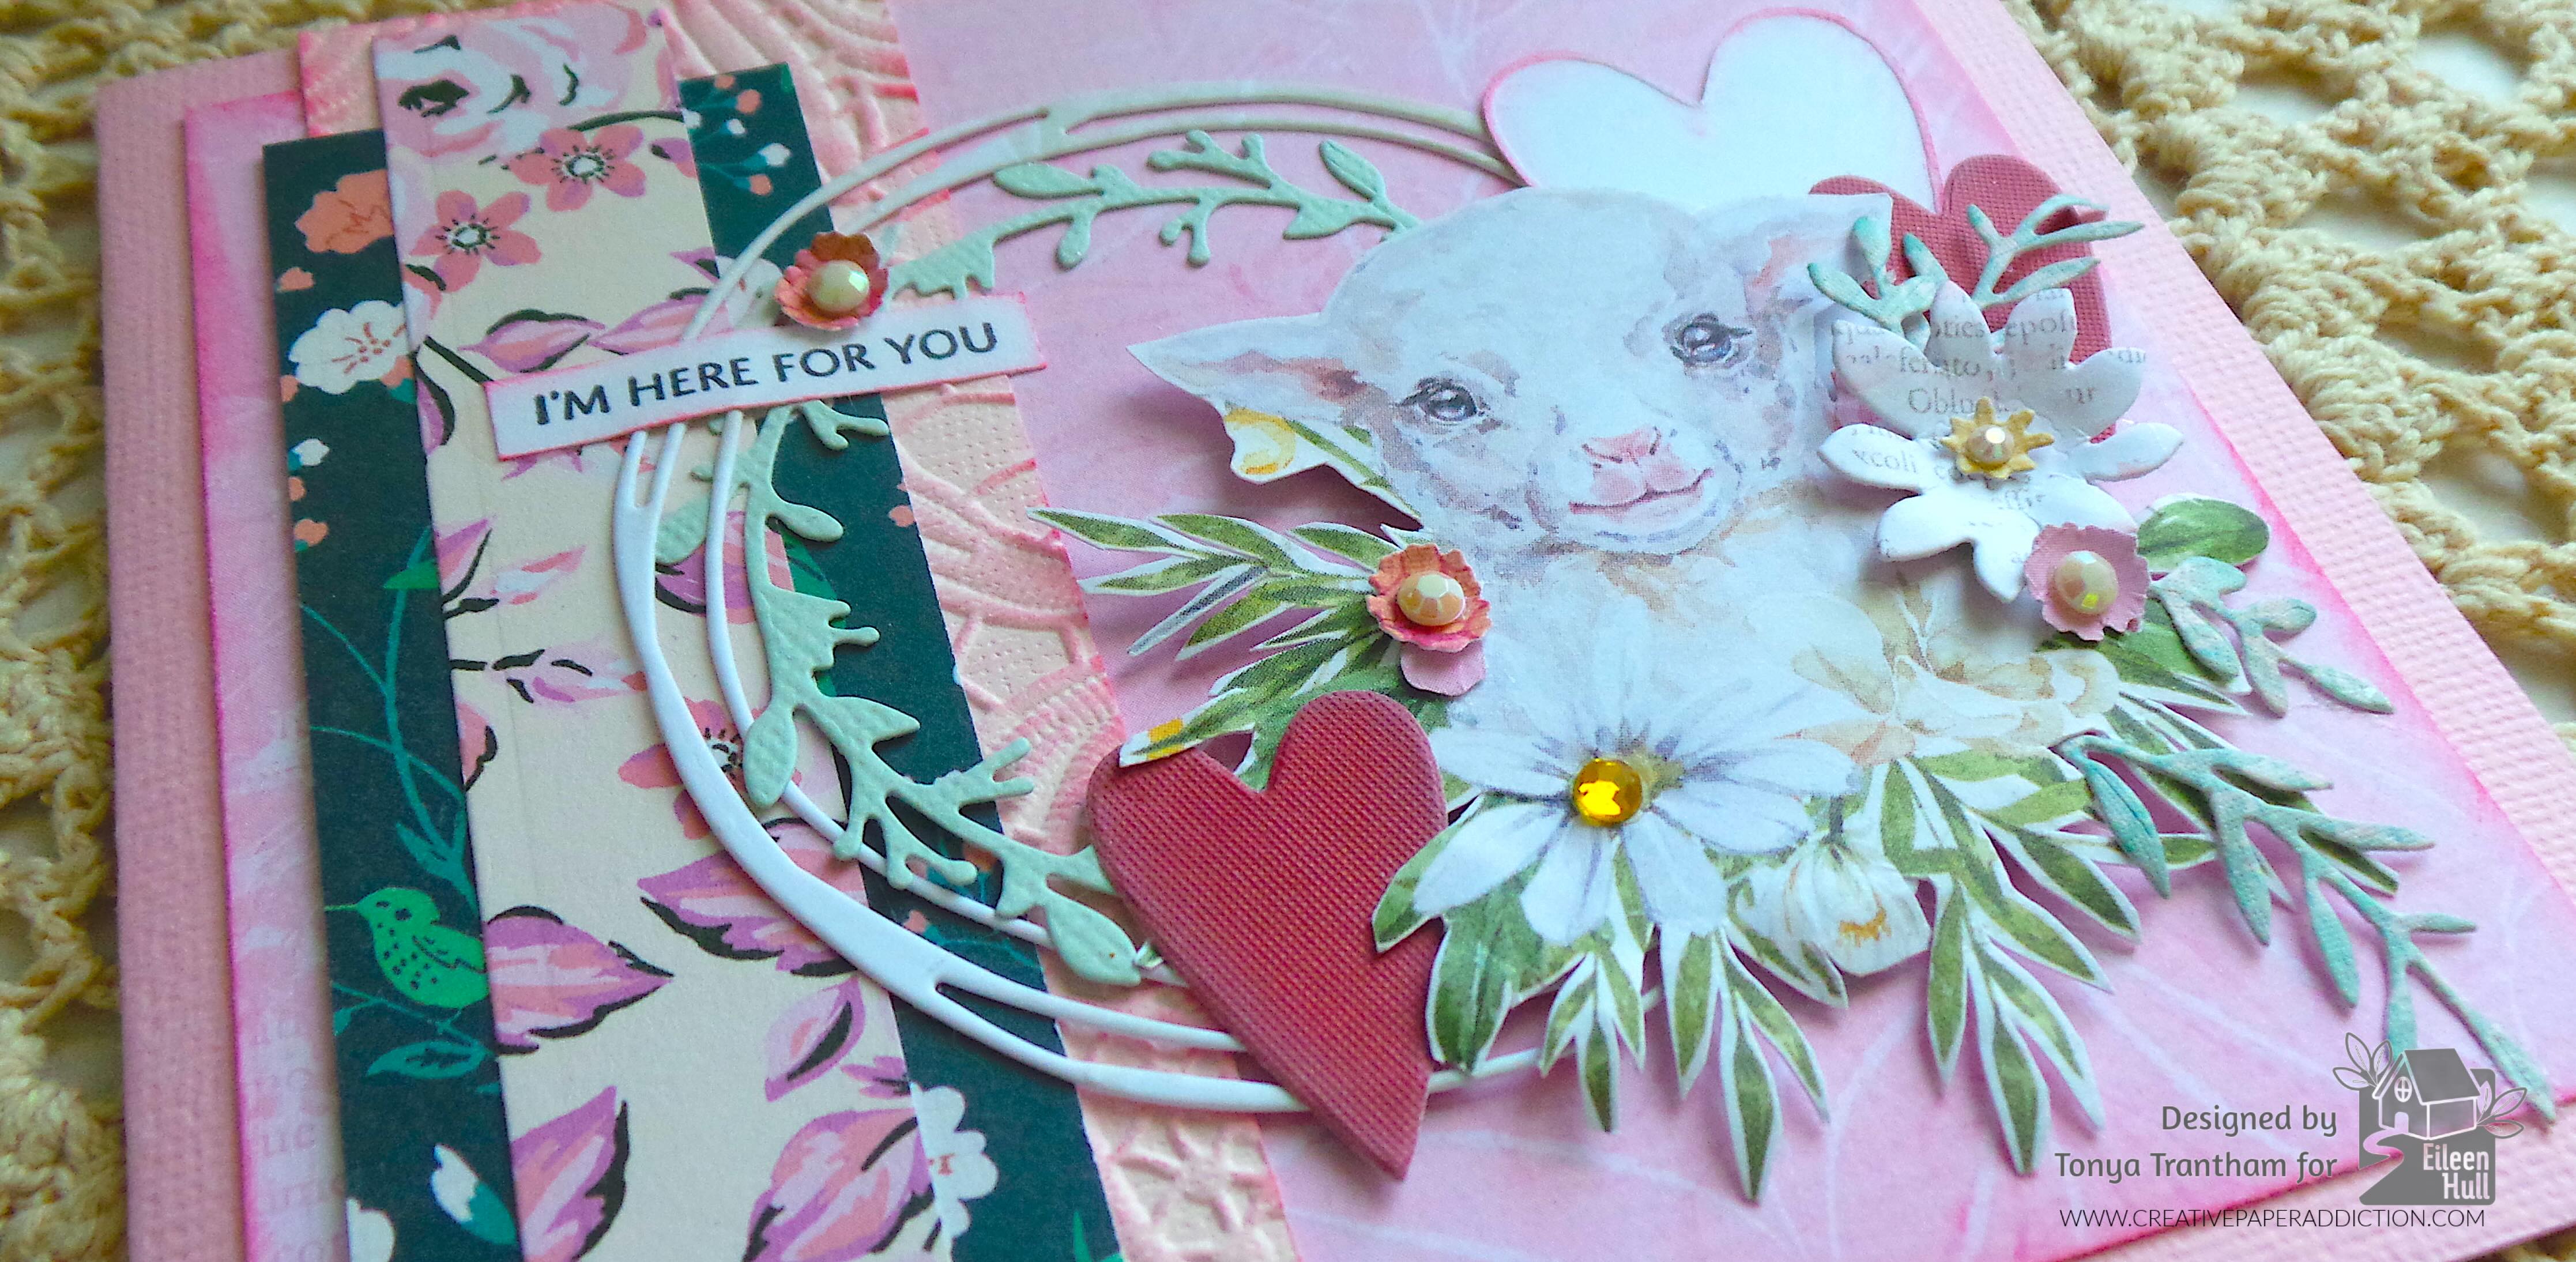
For the outside of the cover I dug into my stash and found this bouquet of flowers that I had fussy cut from some patterned cardstock. I added that to the garden gate and glued two gold gems to the center of the flowers to finish the cover.

If you have any questions or comments please leave them below. If you haven’t been by Eileen’s blog lately you can find the latest post HERE. Also be sure to come back Friday for part two of how I add the pocket to the inside of the spine and create tags.

A decorative paper craft featuring a peach-colored picket fence adorned with floral decorations, including pink, purple, and yellow flowers, along with a cluster of roses and greenery, set against a pastel background.

Supplies

Sizzix/Eileen Hull: Garden Gate Journal Diecut

Sizzix/Eileen Hull: Page Edges Thinlits

Diecut Machine

Paper Cutter

Matboard

Scissors

Sizzix/Tim Holtz: Wood Embossing Folder (item number 666049)

Light Blue and Gold Gems

Various Plain and Patterned Cardstocks

Brown and Black Chalk Inks

Acrylic Paint: Celery, Bright Mint, Ocean Breeze

Paint Brush

Thread and Needle

Beacon Adhesives: Zip Dry Adhesive

(Products listed above are Affiliated Links for your convenience)

DISCLAIMERS

This blog is compensated to provide opinion on products, services, websites, and various other topics. Even though the owner(s) of this blog receives compensation for our posts or advertisements. I always give my honest opinions, findings, beliefs, or experiences on those topics or products. The views and opinions expressed on this blog are purely my own. Any product claim, statistic, or quote should be checked with each manufacturer. Verify other representations about a product or service with the provider or party in question.This blog contains affiliate linksClicking these links helps to support Tonya Trantham Designs – Creative Paper Addiction. It’s at no additional cost to you. Today’s features are Sizzix, Eileen Hull and Scrapbook.com Products. 

A decorative box featuring a lattice design on the front, embellished with colorful paper flowers and gems, resting on a lace background.

Thanks for stopping by, I hope your Wednesday is great and enjoy creating!

A decorative design featuring a colorful bird perched among vibrant flowers, with the name 'Tonya' elegantly displayed in a stylized font against a soft blue background.

Join Eileen Hull’s Release Party for Exciting New Craft Products

Hi everyone! Are you ready? Today is the day! The new Eileen Hull Sizzix Collection is here, and Eileen celebrating LIVE from the show floor at Creativation (the live will be streamed on Facebook and YouTube)!

You are invited to join Eileen and Susie as they broadcast the Sizzix Release Party straight from Eileen’s tiny vintage trailer, Daisy, bringing together her amazing creative team from all around the world. You’ll get an up-close look at the fabulous project samples created by the team, sneak peeks of the new products, and maybe even a glimpse of the excitement happening on the show floor!

Promotional image announcing a new collection from Sizzix, with details about a launch party on May 18th at 12:00 Central Time, taking place live from Creativation by NAMTA, featuring Eileen Hull.

The May 2026 release includes seven exciting new products:
• The fan-favorite Garden Gate Album die — brought back by popular request
• Five brand-new Thinlits sets
• A beautiful new embossing folder – inspired by watercolor florals

Designed for journaling, card making, mixed media, and dimensional projects, the collection blends Eileen’s signature style of storytelling, texture, and interactive design with endless opportunities for customization and creativity.

Nora Alphabet Thinlits Die Set featuring colorful alphabet letters.

We can’t wait to see what YOU create with the new collection! Be sure to share your projects in the Eileen Hull Fan Club so we can continue inspiring each other and celebrating creativity together.

I have a couple of sneak peeks with full reveals for later. Also thank you for being part of this amazing journey with Eileen and the team!

A decorative paper craft featuring a pastel-colored fence embellished with flowers and beads, showcasing intricate details.

Supplies

Sizzix/Eileen Hull: May Die and Embossing Folder Bundle

(Products listed above are Affiliated Links for your convenience)

DISCLAIMERS

This blog is compensated to provide opinion on products, services, websites, and various other topics. Even though the owner(s) of this blog receives compensation for our posts or advertisements. I always give my honest opinions, findings, beliefs, or experiences on those topics or products. The views and opinions expressed on this blog are purely my own. Any product claim, statistic, or quote should be checked with each manufacturer. Verify other representations about a product or service with the provider or party in question.This blog contains affiliate linksClicking these links helps to support Tonya Trantham Designs – Creative Paper Addiction. It’s at no additional cost to you. Today’s features are Sizzix and Eileen Hull Products. 

A collection of colorful, decorative cards bound together with a ring and ribbon, resting on a textured white crochet background.

Thanks for stopping by, I hope your Monday is wonderful and enjoy creating!

A colorful illustration featuring a bird perched among vibrant flowers, with the name 'Tonya' elegantly styled in cursive font.

March in Miniature: Spring Altered Spool Project

Hi everyone! I’m back with my first project of the month for Eileen Hull. The theme for the month is March in Miniature. I used the Home Sweet Home Thinlits, Windowsill Flowers and Vase Thinlits and the Bookmark, Pocket and Toppers Thinlits to altered a mini ribbon spool. Anyways, let’s get started!

A decorative paper spool featuring a cute rabbit and colorful flowers, designed by Tonya Trantham for Eileen Hull.

After I had used up the ribbon that was on this spool I saved it. I thought there has to be a way to alter it into something useful.

A decorative black and white spool for ribbon designed in a flower shape, featuring the text 'ribbon' and 'the Paper Studio'.

I traced the top and bottom onto a scrap piece of patterned cardstock.

A black flower-shaped ribbon holder with 'Ribbon' text and a pen placed on a wooden surface next to a label featuring cloud shapes and a barcode.

I cut out the cardstock and glued to the top and bottom of the spool. I also inked the edges with a brown chalk ink. I cut a strip of cardstock to go around the center piece of the spool, inked and adhered around the center piece.

A decorative paper spool with a light blue and white scalloped top, placed next to a patterned strip of paper featuring pastel colors, on a wooden surface.

I cut the rabbit out of brown cardstock. Before cutting out the nose and the inside parts of the ears I applied an Adhesive Sheet to the back of a scrap of pink cardstock before cutting. I used Detail Tweezers to place the noses and the inside parts of the ears onto the rabbit. I inked the back and the belly of the rabbit with white chalk ink. I added an eye with a black marker.

A brown paper bunny cutout next to a silver metal die cut bunny, on a wooden surface with a pair of tweezers.

The first thing I did was apply glue along the bottom edge of the rabbit. I placed on top of the spool. I propped in-between a pair of Scissors and Detail Tweezers. This helped keep the rabbit upright while the glue dried.

Next I cut an assortment of leaf sprigs and flowers from the following diecuts: Home Sweet Home Thinlits, Windowsill Flowers and Vase Thinlits and the Bookmark, Pocket and Toppers Thinlits.

A handmade card featuring a brown rabbit sitting next to a pink flower and green leaves, placed on a decorative base.

I shaped all the flowers and leaf sprigs with a Stylus before adhering onto the spool. I added Gold and White Gems and Pearls Dots to the center of each flower. To finish I cut the top of a Q-Tip off and glued to the tail of the rabbit.

A small, decorative paper craft featuring a bunny surrounded by colorful flowers and green leaves, held in a person's hand.

I think this little rabbit will be the prefect shelf sitter and I can’t wait to create more. Also if you haven’t been by Eileen’s blog lately to see what her team has been up to you can find the latest post HERE.

If you have any questions or comments please leave them below.

A decorative paper craft featuring a small rabbit surrounded by colorful flowers and leaves, placed on a floral patterned spool. Designed by Tonya Trantham for Eileen Hull.

Supplies

Sizzix/Eileen Hull: Home Sweet Home Thinlits

Sizzix/Eileen Hull: Windowsill Flowers and Vase Thinlits

Sizzix/Eileen Hull: Bookmark, Pocket and Toppers Thinlits

Diecut Machine

Scissors

Paper Cutter

Adhesive Sheet

Stylus

Detail Tweezers

Gold and White Gems and Pearls Dots

Brown and White Chalk Inks

Black Marker

Plain and Patterned Cardstocks

Empty Ribbon Spool

Q -Tip

Beacon Adhesives: Zip Dry Adhesive

(Products listed above are Affiliated Links for your convenience)

DISCLAIMERS

This blog is compensated to provide opinion on products, services, websites, and various other topics. Even though the owner(s) of this blog receives compensation for our posts or advertisements. I always give my honest opinions, findings, beliefs, or experiences on those topics or products. The views and opinions expressed on this blog are purely my own. Any product claim, statistic, or quote should be checked with each manufacturer. Verify other representations about a product or service with the provider or party in question.This blog contains affiliate linksClicking these links helps to support Tonya Trantham Designs – Creative Paper Addiction. It’s at no additional cost to you. Today’s features are Sizzix, Eileen Hull and Scrapbook.com Products. 

A decorative paper spool featuring a cute brown bunny surrounded by colorful paper flowers and green leaves, set against a textured background.

Thanks for stopping by, I hope your Tuesday is wonderful and enjoy creating!

A decorative illustration featuring a bird perched among colorful flowers with the name 'Tonya' artistically displayed in a stylish font.

Join the Eileen Hull Dies Card Bonanza Fun

Hi everyone! I hope everyone had a great holiday. I took time to enjoy family and I wound up with a nasty cold that took awhile to get over. But I’m back with my first Eileen Hull project of the month and the theme is Card Bonanza. I used an assortment of dies, stamp set and an embossing folder to come up with this uplifting card. Let’s get started!

A handmade card featuring a charming illustration of a lamb surrounded by floral and leafy embellishments. The card has a soft pink background and includes hearts and the text 'I'M HERE FOR YOU.'

I used a piece of cardstock and the Mini Album Diecut to create the base for my card. All I had to do was fold the diecut in half. Next I cut a piece of patterned cardstock slightly smaller than the base. I inked the edges with a hot pink chalk ink before gluing to the card.

A handmade greeting card featuring a painted lamb surrounded by floral embellishments, with the text 'I'M HERE FOR YOU' at the top.

I used an assortment of patterned cardstocks along with a plain piece of cardstock which I embossed with the Lacy Leaves A5 Embossing Folder. I lightly inked the embossed cardstock with a mix of hot pink and regular pink chalk inks before adhering all strips of cardstock to the base of the card.

A handmade card featuring a watercolor lamb surrounded by floral embellishments and hearts, with the text 'I'M HERE FOR YOU' on a decorative banner.

I found in my stash a wreath from the Wreath and Snowflake Thinlits and a garland from the Winter Garland Thinlits (retired) already cut out. I glued both to the center of the card. The lamb is a leftover piece I had fussy cut from cardstock. I shaped the leaves and made an indention in the center of the largest flower with a Stylus before adding Foam Pop Dots to the back of the lamb. I placed that off center of the wreath and garland.

A handcrafted greeting card featuring a cute lamb illustration surrounded by flowers and hearts, with a pink and floral-patterned background and the text 'I'M HERE FOR YOU.'

Next I cut one large and two of the medium size hearts from the Envelope, Folder and Flowers Thinlits. I inked the edges of all the hearts with a pink chalk ink before adhering all to the card.

I cut three small flowers and a large flower with center flower from the Windowsill Flowers and Vase Thinlits. I cut four leaf sprigs from the Home Sweet Home Thinlits. I shaped with a Stylus and glued all to the lamb. I placed Yellow and White Gems to the center of each flower.

A decorative card featuring a cute illustration of a lamb, surrounded by floral elements, hearts, and a sentimental message that says 'I'M HERE FOR YOU'.

I placed the “I’m Here for You” sentiment from the Swatch Cards Stamp Set onto the MISTI Stamping Tool and inked with Black Ink. I stamped onto a piece of cardstock, cut to size and inked with pink chalk ink. I adhered to the upper edge of the wreath and garland along with a mini flower to finish.

If you haven’t been by Eileen Hull’s blog lately to see what the team has been up to you can find the latest blog post HERE. Also if you have any questions or comments please leave them below.

A handcrafted card featuring a watercolor illustration of a lamb surrounded by floral embellishments, hearts, and the text 'I'M HERE FOR YOU' on a pink background.

Supplies

Sizzix/Eileen Hull: Mini Album Diecut

Sizzix/Eileen Hull: Lacy Leaves A5 Embossing Folder

Sizzix/Eileen Hull: Home Sweet Home Thinlits

Sizzix/Eileen Hull: Windowsill Flowers and Vase Thinlits

Sizzix/Eileen Hull: Swatch Cards Stamp Set

Sizzix/Eileen Hull: Wreath and Snowflake Thinlits

Sizzix/Eileen Hull: Envelope, Folder and Flowers Thinlits

Sizzix: Winter Garland Thinlits (retired)

Diecut Machine

Paper Cutter

Black Ink

Scissors

Yellow Gems and White Gems

Foam Pop Dots

MISTI Stamping Tool

Various Plain and Patterned Cardstocks

Hot Pink and Pink Chalk Inks

Stylus

Beacon Adhesives: Zip Dry Adhesive

(Products listed above are Affiliated Links for your convenience)

DISCLAIMERS

This blog is compensated to provide opinion on products, services, websites, and various other topics. Even though the owner(s) of this blog receives compensation for our posts or advertisements. I always give my honest opinions, findings, beliefs, or experiences on those topics or products. The views and opinions expressed on this blog are purely my own. Any product claim, statistic, or quote should be checked with each manufacturer. Verify other representations about a product or service with the provider or party in question.This blog contains affiliate linksClicking these links helps to support Tonya Trantham Designs – Creative Paper Addiction. It’s at no additional cost to you. Today’s features are Sizzix, Eileen Hull and Scrapbook.com Products. 

A handcrafted card featuring a watercolor lamb surrounded by flowers and leaves, with the text 'I'M HERE FOR YOU' prominently displayed. The card has a pink background with decorative patterned paper in pastel colors.

Thanks for stopping by, I hope your Monday is awesome and enjoy creating!

A decorative graphic featuring a bird and colorful flowers with the name 'Tonya' elegantly displayed in cursive font.

Step-by-Step Guide to an Embossed Glue Book Using Keys Folder

Hi everyone! I’m back with my first project of the month for Eileen Hull. The theme this month is anything embossed. I’ve had this book in my stash of unfinished projects which I started over two years ago. I’ve been plugging along on the inside pages and hopefully be finished soon. But I thought I could at least show how I completed the cover. I used the Notepad Diecut which is retired. The Keys 3D Embossing Folder I used to emboss the cover. This embossing folder can be found in Eileen Hull’s Etsy Shop. Anyways, let’s get started!

A decorated journal cover featuring an embossed teal background, with a butterfly embellishment and a key in the center, surrounded by a glittery frame.

First I cut two covers of the Notepad Diecut (retired) from Mat Board.

Two covers made from mat board for a notepad, one white and one a cream color, with visible score lines for folding.

I embossed both covers with the Keys 3D Embossing Folder.

Three embossed covers featuring intricate key designs, with a Sizzix packaging in the background.

I painted both sides of each cover with an acrylic paint. I have no idea of the color of the paint I used.

Two green book covers embossed with a key pattern, showcasing different angles of the embossed design.

I glued the covers together at the spine. I cut and adhered cardstock to the inside covers. I punched a total of four hole in each of the spine with a Crop-A-Dile.

Opened journal cover with metallic gold and teal pages showcasing an artistic embossed design.

I set eyelets in each of the holes. I also cut elastic and strung through the holes and tied off on the inside of the spine. I applied Rose Gold Luster Wax over the embossed areas of the cover.

A completed book cover featuring a teal embossed design of keys, secured with pink eyelets.

I have blank journals that I had bought at Target several years ago. I cut two down to fit the inside.

Open blank journal with patterned cover and white pages.

I opened the journals up to the center where it is stapled and slide under the elastic cording.

Side note, I know I have shared about making glue books in the past but would like revisit that thought. A glue book is similar to a junk journal. Anything can be added to them. You can include mail, book pages, clothing tags, etc to the pages. In my case, I like using up the scraps of cardstock I have laying around after finishing up a project. Like the title suggests you use glue to adhere everything to the pages. I hope this explanation helps.

Open journal page featuring a bright turquoise background adorned with white snowflake-like designs.

Now back to the project, I pulled from my stash a butterfly chipboard piece, frame and key. I lightly applied Rose Gold Luster Wax to the frame.

A butterfly chipboard piece, a vintage key, and a jar of Sizzix Rose Gold Luster Wax displayed on a white paper towel with a decorative gold frame.

I adhered the frame and butterfly to the cover. I glued the key to the center of the butterfly to finish. I hope to share the inside of the glue book later with a blog post and a flip through.

A decorated journal cover featuring a turquoise embossed design, with a butterfly embellishment and a key positioned at the center of a glittery frame.

If you haven’t been by Eileen Hull’s blog lately you can find the latest posts HERE and HERE. Also if you have any questions or comments please leave them below.

A decorative journal with a turquoise embossed cover, featuring a butterfly embellishment in the center and colorful eyelets on the spine.

Supplies

Sizzix/Eileen Hull: Keys 3D Embossing Folder

Sizzix/Eileen Hull: Notepad Diecut (retired)

Rose Gold Luster Wax

Diecut Machine

Mat Board

Acrylic Paint

Various Plain and Patterned Cardstocks

Butterfly, Key and Frame Embellishments

Eyelets

Crop-A-Dile

Elastic Cording

Blank Journals

Paper Cutter

Scissors

Beacon Adhesives: Zip Dry Adhesive

(Products listed above are Affiliated Links for your convenience)

DISCLAIMERS

This blog is compensated to provide opinion on products, services, websites, and various other topics. Even though the owner(s) of this blog receives compensation for our posts or advertisements. I always give my honest opinions, findings, beliefs, or experiences on those topics or products. The views and opinions expressed on this blog are purely my own. Any product claim, statistic, or quote should be checked with each manufacturer. Verify other representations about a product or service with the provider or party in question.This blog contains affiliate linksClicking these links helps to support Tonya Trantham Designs – Creative Paper Addiction. It’s at no additional cost to you. Today’s features are Sizzix, Eileen Hull and Scrapbook.com Products. 

A brightly colored teal journal cover featuring a butterfly embellishment with intricate details and a vintage key accent, surrounded by a golden decorative frame.

Thanks for stopping by, I hope your Friday is wonderful and enjoy creating!

A vintage-style graphic featuring a bird amidst colorful flowers with the name 'Tonya' displayed in an elegant font.

March Release Party with Eileen Hull!

Hi everyone! It’s that time again for another wonderful release from Eileen Hull! I’m so excited to introduce this brand new collection by Eileen from Sizzix! As always, these designs may be used together but also stand alone. There are four pieces in this set. Also I will be sharing a sneak peek of each project I created and will do a complete blog post of each later.

The Storage Box is an XL ScoreBoard die measuring 4” square, the largest square box yet!

This box is constructed with a removable top and may be used in many ways, such as organizing desk and office supplies, as a gift box, storing craft supplies and packaging for baked treats.

The Mini Book is a great way to create a book in just one an evening, and using up all those scraps you have lying around in the process.

This book measures 3 3/4” x 2 1/4” and comes with a strap/handle and tiny label for the book cover. It also makes a great bag topper if you fold it in the middle and also will hold a business card. Die cut it from felt and stitch up a tiny wallet!

There is a new Thinlits called Faux Postage– the full panel is designed to fit on a 5” x 7” card and creates a fun postage stamp effect. You can also cut (or tear) each stamp apart and use the individual pieces as a miniature work of art! These dies coordinate with similar dies: Snail Mail (A-2 card size) and Mini Slimline (6” x 3”).

The Lace 3D Embossing Folder is so amazing! It’s a new LARGE size measuring 8 1/2” x 5 3/4”. It works great on bigger journal covers, card backgrounds and on home decor pieces. This is created from vintage lace that Eileen has collected. I used the embossing folder and faux postage thinlit together to create this!

Check out this collection and see lots of ideas from Eileen’s fantastic team! The Release Party will be held on Friday, March 1 at noon Eastern on Eileen’s YouTube, Facebook and Instagram channels.

There’s a giveaway too- join us on the live and hear how you can win…

You can find these dies in your local scrapbook stores- if they don’t carry them, ask them to order. Eileen also carry them in her Etsy Shop and would love your support!

Supplies

Sizzix/Eileen Hull: Storage Box Diecut

Sizzix/Eileen Hull: Mini Box Diecut

Sizzix/Eileen Hull: Faux Postage Thinlits

Sizzix/Eileen Hull: Lace 3D Embossing Folder

Diecut Machine

(Products listed above are Affiliated Links for your convenience)

DISCLAIMERS

This blog is compensated to provide opinion on products, services, websites, and various other topics. Even though the owner(s) of this blog receives compensation for our posts or advertisements. I always give my honest opinions, findings, beliefs, or experiences on those topics or products. The views and opinions expressed on this blog are purely my own. Any product claim, statistic, quote or other representation about a product or service should be verified with each manufacturer, provider, or party in question.This blog contains affiliate links, clicking and shopping through these links helps to support and run Tonya Trantham Designs – Creative Paper Addiction at no additional cost to you. Today’s features are Sizzix, Eileen Hull and Scrapbook.com Products. 

Thanks for stopping by, hope your Friday is wonderful and enjoy creating!

You and Me Tag

Hi everyone! I’m back this week with a quick little tag I created using an assortment of scraps and tags from the Waterfall Card and Tags Thinlits by Eileen Hull. So let’s get started!

First, I cut two of the largest tags, one medium tag and a small tag using the Waterfall Card and Tags Thinlits. I glued the two large tags back to back because there wasn’t a design/patterned on the back side of the patterned green tag. Plus I generally decorate the other side of the tag.

Second, I adhered one of the medium tags slightly off one side of the large tag and the other medium tag I added Foam Pop Dots to the back before placing onto the tag. I also lightly inked all the tags with a chalk ink in either tan or brown.

Third, I selected an image of a couple from the Mini Paper Dolls Pack and glued onto the raised tag. I also added the You and Me chipboard piece behind the image and adhered bits of patterned cardstock onto and behind the raised tag.

Fourth, I cut two medium, one small flower and one leaf sprig from the Everyday Tags and Labels Thinlits (only at Scrapbook.com and on clearance), shaped with a Stylus and adhered all three flowers on top of each other along with the leaf sprig which I added to the back of the flower. I made a bow from thread which I placed under the flower and added an Enamel Dot to the center of the flower to finish the front of the tag.

Fifth, I kept the back side of the tag fairly simple. I placed the medium size tag from the Waterfall Card and Tags Thinlits over the tag which is on the front to cover the exposed back of the tag. I glued a small banner at the top of the tag and the “love” chipboard sentiment over that.

Sixth, the flowers, I think, are strawberry blossoms that I had received in a swap. So no idea the name of the printables or where they came from…sorry. I fussy cut the flowers and adhered them to the tag along with the “life is grand” sentiment. I finished by adding Liquid Gloss on random areas of the blossoms and leaves and two gold dots that was leftover from a package of thickers. I would like to mention I added ring protecter to each hole on each tag.

There you have it! Tags are a great way to challenge yourself in using what’s on your desk and supplies you haven’t touched in forever. Besides the obvious reason of just making to be making these can be made to add to presents or mini albums. Can you think of other ways to use these besides what I suggested? Leave a comment below.

Also if you haven’t been by Eileen Hull’s blog lately to see what her teams have been up to you can find her latest post HERE.

Supplies

Sizzix/Eileen Hull: Waterfall Card and Tags Thinlits

Sizzix/Eileen Hull: Everyday Tags and Labels Thinlits (only at Scrapbook.com)

Diecut Machine

Foam Pop Dots

Tim Holtz: Mini Paper Dolls Pack

Enamel Dot

Various Plain and Patterned Cardstocks

Stylus

Paper Cutter

Chipboard Embellishments and Printables

Thread

Tan and Brown Chalk Inks

Liquid Gloss

Adhesive Sheets

Scissors

Beacon Adhesives: Zip Dry Adhesive

(Products listed above are Affiliated Links for your convenience)

DISCLAIMERS

This blog is compensated to provide opinion on products, services, websites, and various other topics. Even though the owner(s) of this blog receives compensation for our posts or advertisements. I always give my honest opinions, findings, beliefs, or experiences on those topics or products. The views and opinions expressed on this blog are purely my own. Any product claim, statistic, quote or other representation about a product or service should be verified with each manufacturer, provider, or party in question.This blog contains affiliate links, clicking and shopping through these links helps to support and run Tonya Trantham Designs – Creative Paper Addiction at no additional cost to you. Today’s features are Sizzix, Eileen Hull, Scrapbook.com and A Cherry on Top Store Products. 

Thanks for stopping by, hope your Tuesday is great and enjoy creating!

Bountiful Harvest Tag

Hi everyone! I’m back with a quick tag I created. I had found this cardstock in my stash and since November is almost over I figured I ought to knock out a tag with the two 8″x8″ pieces of Graphic 45 cardstock I had. I enjoyed the crafting process so there’s no step out photos.

I used the largest tag from the Tag Collection Thinlits and cut a tag from the Graphic 45 cardstock. The other sheet of cardstock was cut a parts. I used an assortment of those and layered and glued to the tag base. The illustration of the children I added Foam Pop Dots to the back and placed onto the tag.

I cut leaves and pine needle sprig from the Funky Festive Thinlits. I know this set of diecuts are Christmas themed but I figured I could pull off an autumn vibe. I added a bow and loops of cording, sequins and a button to the leaves to finish the front of the tag.

The back side of the tag I kept it simple. I layered several of the cut a parts other than the “ohhhh Autumn” sentiment which I added foam pop dots to the back before placing onto the tag base. I finished this side off with sequins and a bow make from cording.

I would like to wish everyone a Happy Thanksgiving (if you celebrate this holiday) and if you have any questions or comments please leave those below.

Supplies

Graphic 45: Calendar Collection (retired)

Sizzix/Tim Holtz: Tag Collection Thinlits

Sizzix/Tim Holtz: Funky Festive Thinlits

Foam Pop Dots

Paper Cutter

Scissors

Cording and Sequins

Beacon Adhesives: Zip Dry Adhesive

(Products listed above are Affiliated Links for your convenience)

DISCLAIMERS

This blog is compensated to provide opinion on products, services, websites, and various other topics. Even though the owner(s) of this blog receives compensation for our posts or advertisements. I always give my honest opinions, findings, beliefs, or experiences on those topics or products. The views and opinions expressed on this blog are purely my own. Any product claim, statistic, quote or other representation about a product or service should be verified with each manufacturer, provider, or party in question.This blog contains affiliate links, clicking and shopping through these links helps to support and run Tonya Trantham Designs – Creative Paper Addiction at no additional cost to you. Today’s features are Sizzix, Scrapbook.com and A Cherry on Top Store Products. 

Thanks for stopping by, hope your Wednesday is great and enjoy creating!

Happy Day Swan Card

Hi everyone! I’m back with a mini slimline card that I created using Eileen Hull’s new Mini Slimline and Tickets Thinlits and a few other of her other products. So let’s get started!

First, I folded a piece of 6″x6″ White Cardstock in half to create a card base. Next I cut a piece of white cardstock slightly smaller than the base of the card, placed into the Tablecloth 3D Embossing Folder and run through the Diecut Machine. I lightly inked the raised embossed areas, placed Foam Pop Dots to the back before placing onto the card base.

I cut one strip of tickets and one background from the Mini Slimline and Tickets Thinlits and adhered the tickets on top of the background.

Next, I glued the tickets onto the card base.

I had received this swan medallion in a swap I had participated a couple of years ago and instead of hoarding it I decided I would use it on the card. I did change the sentiment that was on it by placing a “happy day” sticker over the other sentiment. I glued the medallion off center of the card.

I dug into my stash of flowers and leaves, I had cut these from the Folio Page Pocket and Flowers Thinlits, I shaped and glued two of the flowers on top of each other along with a sequin and a gem and added leaf sprigs before adhering to the corner of the medallion. Side note…why does it seem like when you photograph something you never see if there is a piece of fussy or in this case a hair attached until after all photos are taken and you are editing and you can’t do anything about it? Why?

But anyways, there you have it! A finished card! If you haven’t been by Eileen’s blog lately to see what her teams have been up to you can find the latest post HERE.

Supplies

Sizzix/Eileen Hull: Mini Slimline and Tickets Thinlits

Sizzix/Eileen Hull: Tablecloth 3D Embossing Folder

Sizzix/Eileen Hull: olio Page Pocket and Flowers Thinlits

White Cardstock

Diecut Machine

Foam Pop Dots

Stylus

Paper Cutter

Various Cardstocks, Sequin, Gems, Chalk Ink

Beacon Adhesives: Zip Dry Adhesives

(Products listed above are Affiliated Links for your convenience)

DISCLAIMERS

This blog is compensated to provide opinion on products, services, websites, and various other topics. Even though the owner(s) of this blog receives compensation for our posts or advertisements. I always give my honest opinions, findings, beliefs, or experiences on those topics or products. The views and opinions expressed on this blog are purely my own. Any product claim, statistic, quote or other representation about a product or service should be verified with each manufacturer, provider, or party in question.This blog contains affiliate links, clicking and shopping through these links helps to support and run Tonya Trantham Designs – Creative Paper Addiction at no additional cost to you. Today’s features are Sizzix, Eileen Hull, Scrapbook.com and A Cherry on Top Crafts Products. 

Thanks for stopping by, hope your Thursday is great and enjoy creating!

Mum Gift Box

Hi everyone! I can’t believe next week will be Thanksgiving?! Then we hop right into all things Christmas! Yikes! Have you started decorated your homes for Christmas? I want to but haven’t dug out all my Christmas decorations…even though I really want to. Anyways, I want to share a Fall project I created for Eileen Hull (before I jump all in on Christmas) using the Geometric Box Diecut and the Sunflower Diecut. Let’s get started!

First, I cut three of each of the medium and small flowers from the Sunflower Diecut. I crinkled the flowers with my hand and then shaped the petals with tweezers and a Stylus. I adhered each one on top of each other, starting with all the medium flowers followed by the smaller flowers.

I applied Adhesive Sheets on both sides of the Mat Board along with patterned cardstock ( you will need to cut out two geometric panels and one bottom piece). I adhered the panels together and placed and glued the bottom in place.

I adhered lace around the top of the box and placed the flower with added gem to the center, leaves, cording and glittered berry sprigs to finish this project.

This project came together quickly and if you didn’t want to use it as a gift box you could place a battery operated candle inside and it would make a beautiful home decor piece.

Also if you need ideas for the upcoming holidays be sure to stop by Eileen Hull’s blog to be blown away by the creativity of her teams! You can find those posts HERE and HERE.

Supplies

Sizzix/Eileen Hull: Geometric Box Diecut

Sizzix/Eileen Hull: Sunflower Diecut

Stylus

Adhesive Sheets

Mat Board

Patterned Cardstock

Gem, Lace, Cording, Glittered Berry Sprigs

Diecut Machine

Paper Cutter

Scissors

Beacon Adhesives: Zip Dry Adhesive

(Products listed above are Affiliated Links for your convenience)

DISCLAIMERS

This blog is compensated to provide opinion on products, services, websites, and various other topics. Even though the owner(s) of this blog receives compensation for our posts or advertisements. I always give my honest opinions, findings, beliefs, or experiences on those topics or products. The views and opinions expressed on this blog are purely my own. Any product claim, statistic, quote or other representation about a product or service should be verified with each manufacturer, provider, or party in question.This blog contains affiliate links, clicking and shopping through these links helps to support and run Tonya Trantham Designs – Creative Paper Addiction at no additional cost to you. Today’s features areSizzix, Eileen Hull, Scrapbook.com and A Cherry on Top Crafts Products. 

Thanks for stopping by, hope your Friday is great and enjoy creating!